What is DIN rail
DIN rail is an imported invention, and that is why it is often called DIN rail. The abbreviation DIN stands for the German standard, DIN 43880-1988 “Built-in electrical appliances. Overall and corresponding installation dimensions”, where this rail was first standardized. In Russia, this product is standardized in GOST R IEC 60715-2003 and is often called a mounting rail. Expanded name: mounting rail for installation (fastening) of electrical devices in low-voltage distribution and control devices for electrical networks (electrical circuits).
Definition
Din rail (according to the Russian GOST mounting rail) is a metal strip for fastening attachments in electrical cabinets. This device simplifies the assembly of the ShchR, makes it dense, and facilitates the fixation of the modules. The electrician does not need to drill, use screws, bolts. The speed of circuit assembly increases significantly. Products differ in size, material, and other characteristics. They are selected in relation to the parameters of the devices installed on them.
A terminal block in the form of a strip with sockets and screws is the simplest device. The mounting accessory for DIN rails is a complex design. The electrical device is a dismountable block with a body made of non-flammable material and a clamping mechanism.
Types of terminal blocks for DIN rails
- Walkthroughs. They differ in the type of clamps: screw, spring.
- With breaker.
- Grounding.
Types of din rails
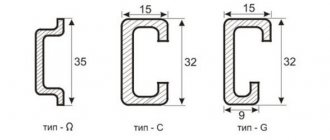
According to GOST 60715, mounting rails are available in three types:
- TN type (TN 15, TN 35, TN 75);
- C type (C 20, C30, C40, C50);
- G type (G 32).
You can read in detail about the types of slats in GOST, it doesn’t matter. For practice, it is important that you will be dealing with TN type slats, the profile of which is visible in the pictures. For electrical circuits of apartments and houses, a DIN rail with a width of 35 mm (TN 35) is used, with a shelf height of 7.5 mm. The types of slats differ in profile thickness (from 1 to 1.5 mm) and the diameters of the installation holes (4 mm, 5 mm), which are clearly visible in the figures.
Kinds
And before moving on to the types, it is worth describing the differences that they may have. Mainly changed:
- weight;
- strength;
- the strength of the current carried through the terminals;
- material: steel and aluminum;
- perforation: continuous and regular;
- notch: either there or not.
And if we are talking about standards, then you need to understand that it is impossible to unify the fasteners of electrical devices and rails. Therefore, there are three varieties used depending on the situation:
- Omega type. The most popular type and enshrined in Russian GOST, which is often referred to as TH35. Its width is 35 mm, although there is also a version on the market with a smaller format in thickness and width. Basically, such smaller versions are used for terminals, not devices. In addition to the material, there is also its processing, the most popular of which are anodizing, galvanizing and galvanizing.
- C-type. It has dimensions similar to Omega - 32 mm. The ends in this form are bent inward, which visually resembles the letter C. Mainly used for clamps and terminal blocks, however, there are a number of devices for which the C-type is also the most suitable.
- G-type. The model is identical to the C-type, with the exception of one difference - one of the ends is smaller and narrower than the other. Visual association with the letter G. Also used for clamps, but the difference in shape is necessary for flexibility in installation in inaccessible places and specific equipment.
If you need to install a terminal, then the omega type is often useful. All the rest are mostly used by builders. If you make repairs, you will have to either choose the slats responsibly from the beginning, or get advice from experienced builders.
Material for making DIN rails
Depending on the purpose of the slats, namely the planned load, slats are made of steel or aluminum. You can see the aluminum slats above.
Steel slats are more durable and can withstand maximum loads with a minimum thickness of 1 mm. While aluminum slats can be loaded to the maximum (installation of frequency converters, soft start devices, powerful contactors, three-phase power circuit breakers) only with a thickness of 1.5 mm.
Auxiliary elements and accessories
The accessories for the new System pro M compact range are universal: they fit all modular switches of the S200 and F200 series, as well as
RCBO series DS200, which allows you to effectively manage existing material resources.
The range is quite wide and includes auxiliary and signal contacts, remote releases and automatic reclosers, allowing the creation of various hardware configurations.
In all these configurations, auxiliary elements are connected without the use of any adapters. This increase in the efficiency of circuit breakers and RCCBs allows the use of innovative and integrated solutions in all cases.
Accessories for electrical installation (busbars, bus terminals and feeder terminals) allow connections to be made according to any scheme). The range of standard accessories (marking sets, terminal covers) allows us to satisfy all the requirements of electrical installation customers.
For circuit breakers S200 series, RCBO series F200, RCBO series DS200, DS201/DS202C
For RCBO series DSH941R
For circuit breakers of the S280 UC and S800 series
Load characteristics of DIN rails
As you can see in the photo above, a DIN rail is a profile product and is a priori designed for high weight loads compared to a simple plate. However, there are load characteristics of DIN rails that you need to know.
- Aluminum slats 1 mm thick, designed for the installation of individual modular devices, such as circuit breakers, ouzo, power supplies. Before use, cut into short pieces.
- Aluminum slats with a thickness of 1.1 mm are designed for the installation of single modular equipment in rows.
- Aluminum slats with a thickness of 1.4 mm are designed for the installation of modular equipment of any weight.
Steel slats with a thickness of 1.0 mm, a load analogue of an aluminum slatted 1.5 mm, can withstand maximum loads and have no restrictions on installation.
I note that manufacturers of electrical panels can equip the panels with rails with other profiles. Let's look at the photo:
DIN rail limiter - easy installation
I welcome all visitors to the “Electrician in the House” website. After the hectic holidays I decided to do a little work. Today I want to share one trick that will help make assembling electrical panels a little easier. The chip is called a metal limiter for DIN rail yxd10. Its essence lies in the rigid fixation of equipment installed on a DIN rail. That is, it fixes machine guns, ouzo, diffs and any other equipment exactly in the place it should be. This article presents a din rail limiter from iek.
What is the advantage of this device? Why is it even needed? In truth, I must say that these questions are asked not only by beginners, but even by some professionals I know who have been doing electrical installation for decades. The limiters do not affect the operation of the equipment; the shield will work correctly without them (if, of course, everything is connected correctly)
But with the help of limiters you can give the shield a certain aesthetic appearance, which in my opinion is very important during operation
When you assemble a shield, you want everything to look beautiful and neat. Modular equipment mounted on a rail must be positioned clearly in line. But it happens that I installed a dozen machines on a DIN rail, connected them, everything seems to be fine. But you look from the outside - everyone is skewed.
One went to the left, another to the right, the third down, in general, some went into the forest, some for firewood. And if there is not enough space in the shield, and the wires touch the equipment installed on the rail, then it’s generally tough, everything will look like after an explosion.
To be honest, it is very difficult to find a limiter for a DIN rail; I ran around all the stores in my city, but they are not there anywhere. Most likely this is due to their low demand. Store owners simply do not want to purchase goods that are not in demand. I had to order online. Luckily there are plenty of them there. You may have better luck finding them in stock.
I have not used yxd10 limiters before. I also found them out on one of the electrical forums - mastercity.ru. I decided to try it and did not regret it.
They are also very convenient to use when you install a small number of protective devices (two, three). For example, in floor panels, when you are replacing old Soviet machine guns with modern ones. I had one case when in a floor panel it was necessary to replace an old bag and two machines that went to the apartment.
Instead of a packet package, it was necessary to install one two-pole 25 A (input) circuit breaker, and instead of the old circuit breakers, two single-pole 16 A circuit breakers. All of them needed to be placed and fixed somewhere. How to fix them? Of course, you need to take a piece of DIN rail, attach it to the shield body, and then attach the machine guns to it. So I did. I come back half a year later, open the shield and am surprised. On the piece of DIN rail that I attached (it is about 10 cm long), someone thought of putting their machine guns, moving mine at the same time. Moreover, one of my machine guns jumped off and was practically hanging in the air.
I had to remove all this beauty, install a longer rail and fix my machines using limiters on the yxd10 DIN rail. After this, the machines don’t move, and no one will be able to move them.
How to secure machines with a limiter
How to fix machines on a DIN rail using a limiter. Everything is very simple. The limiter itself is made of galvanized steel and is shaped like a bracket.
It is fixed on the rail using a pressure plate, which rests against the rail when the screw is tightened. In order to fix the machines or any other equipment, we take the limiter, install it in the desired place on the panel and tighten the screw located on top. We have one reference point.
Then we install circuit breakers, ouzo, terminal blocks (everything that is needed for the panel design) on the DIN rail, and press them tightly against the limiter. Then we take the second limiter on the yxd10 DIN rail, press it to the outermost machine and tighten the screw. The module, which is located between these two stops, is securely fixed, does not move left or right, and certainly will not jump off.
Similar materials on the site:
- Shield for apartment hager cosmos
- Horror in the floor board
How to choose
- In practice, the most popular, sold and in demand are steel DIN rails with a thickness of 1 mm and a length of 1000 meters. They are universal and slightly cheaper than aluminum rivers.
- Often they are cut into plates suitable for the size of electrical boxes (panelboards) being sold. Actually, you need to choose a rail according to its installation method. If a DIN rail is needed to assemble a new panel, you need to measure from the mounting points of the rail plus a margin.
- If a DIN rail is needed to install one (two) modules, say in a floor panel, then it is enough to buy a 10-15 mm rail, with a margin.
- The assembled panels come with ready-made slats cut to size.
Dimensional characteristics
The reliability and safety of using electrical equipment depends on the correct selection of the housing for the DIN rail. Rails may vary in color and length. The standard size is 2 m in length, but to simplify use, devices are sold cut into 200 mm long plates.
Cast slats are also available with holes. The presence of holes simplifies the installation process, since you only need to attach the strip through these slots. The optimal distance between individual holes is 10-20 mm.
Solid DIN rails are highly reliable. Their bending under high loads is excluded; several machines can be mounted on them.
How to install slats in an apartment (country) electrical panel
The slats are installed on the mounting bolts at the installation site. The rail is attached in two places along the edges. It is not recommended to allow the edges of the slats to droop, so the slats must be cut to size before installation.
In difficult places where direct installation of modular equipment will be difficult, special holders for DIN rails are used, which allow you to rotate it at a certain angle.
What are they?
Types of din rails are determined by different installation conditions and profile capabilities, represented by the following classification:
According to the section configuration
The G-type is a “G” shaped rail where one curved end is shorter and lower than the opposite edge. It is rare to find such a profile on the domestic market, since it is designed for installation of equipment of European standards.
The C-type is symmetrical and more common. The edges of the rail are equally curved, which provides reliable fixation for terminal blocks and clamps of other devices.
Omega-type has a completely different cross-section, similar to the Greek letter “omega”: the ends of the bar are sharply bent in both directions from the rail, forming peculiar “ears”. This design is adapted to almost all electrical elements and devices.
According to the presence of holes for fastenings
Cast, without factory holes and consisting of a single plate. It is considered more reliable and durable, and for some electricians even more reliable, since the mounting holes are made independently at the required distance.
Perforated ones have holes approximately every centimeter, which greatly simplifies the process of installing the slats.
- according to the material of manufacture:
- made of aluminum;
- made of stainless steel (more common).
Sealing of terminals
When you have assembled the entire terminal block and connected the wires, the energy supply organization may require that all live parts be sealed so that later it will not be possible to make changes to the metering circuit.
For this purpose, plastic transparent boxes are used. In the fastening places where the “lambs” or nuts are tightened, there are slots for fishing line or wire from the seal.
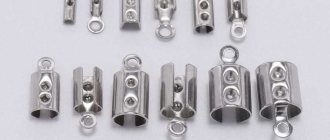
Terminal retainer or stopper
After installing the terminal on the rail, it must be fixed in place. Otherwise, when tightening the screws, the terminals will move apart in all directions.
In this case, you will need an end stop, holder or clamp, depending on what you call it. At least 2 pieces of such end clamps are needed for one assembly.
If there are many terminal blocks in a panel on one line, such stoppers can be used as separators. The more difficult it is to snap into place such a latch, the more reliably it performs its function.
In order to remove the end stop or the terminal itself without damaging it, carefully insert a screwdriver into the upper part, lift the product and pull it out without breaking the individual plastic parts.
End clamps, even from the same company, can be produced in various types:
- self-latching
- for screwdriver (BAM from ABB)
Terminal color
Typically the color of the feed-through terminal is neutral – grey.
However, you can also find models in blue and yellow-green colors. Blue ones are used to connect neutral working wires. Yellow-green - for protective grounding conductors.
The yellow-green terminal has a separate catalog number and a special device.
It's not just a matter of color. Its clamp automatically connects the circuit that you place under the screws to the DIN rail.
To do this, after installation, you need to tighten the central bolt. Thus, from below, the fastening mechanism expands and engages with its metal parts on the rims of the rail. This provides fairly reliable contact.
Therefore, be careful, you cannot connect phase wires with such terminals, otherwise your entire DIN rail will be energized.
There are, of course, other multi-colored models - yellow, orange, beige, etc.
But they do not carry any functional feature, but are produced for ease of assembly and configuration of the electrical panel.
You get a clear breakdown of phases, certain power circuits or control circuits.
Installation of the machine
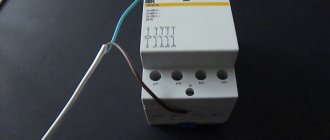
As an example, we can consider installing a circuit breaker to a mounting rail in an electrical panel.
There is a special clip on the instrument body for mounting on the rail
The rail is fastened to the panel body using screws. Electrical panels can be supplied disassembled, and are often equipped with an already installed strip.
Next, you should install the circuit breaker on the rail, for which one edge of the device is attached to the top of the bar and press the body of the circuit breaker until it clicks lightly. In principle, this completes the installation of the device.
Each modular device on a mounting rail can be freely moved in all directions horizontally. This allows you, if necessary, to change the location of the machine by simply moving it.
The wires to the circuit breaker located inside the panel are connected through a power cable and a wire coming from the electricity consumer.
First, the power wire is connected, for which you need to:
- Unscrew the fastening latch located on top;
- connect the power wire to the terminal;
- tighten the fastening.
To connect a consumer, the same steps are performed.
Installation on old panels
Installation of rails in old-type electrical panels is often carried out on surfaces that are not suitable for such work. There is nothing to be surprised here - Soviet-made shields were manufactured at a time when DIN rails did not yet exist.
The need for installation in an old electrical panel is due to the installation of new equipment in it - replacement or installation of additional circuit breakers or other devices:
- RCD;
- automatic machines;
- relay for phase control;
- voltage rise limiters;
- modular devices;
- small-sized electricity meters;
- packagers and other devices.
Unlike modern electrical panels or boxes, in which the DIN rail is placed in already prepared places and secured with self-tapping screws or bolts, you will have to tinker a little with old panels.
Installation of the rail in the old panel is carried out in the following sequence:
- two holes are made in the shield platform made of metal;
- threads are cut in the holes;
- the rack is secured using two bolts;
As a rule, there are enough holes in the platforms of old panels, so you can do without drilling.
History of design.
DIN rails are approaching their first centenary since their original invention by a German electrical engineer in 1928. Nowadays, almost every large electrical installation will be assembled using a DIN rail. They are one of the few components that are standard throughout the world. The name itself is an acronym for the German "Deutsches Institut für Normung", which is simply the name of the German Standards Institute that published the original specifications for this product. These specifications were standardized in the 1950s and later adopted by the standards institutes of Europe and North America.
Installation
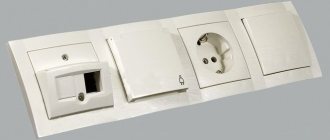
Before you begin installing an electrical socket, you need to make sure that the parameters of the socket correspond to the power of the equipment that is intended to be connected.
If the socket is installed on a small electrical panel of a house or apartment, then the rated current is quite acceptable 6A, 10A. If a modular device is installed to power powerful electrical appliances required when performing construction or repair work, then its rated current must be at least 16A.
As an example, let's take a Bemis 1/16A grounded electrical socket with a degree of protection IP44. The durable plastic case corresponds to a high level of protection, which makes it possible to use Bemis 1/16A in production.
Sequence of installation of a modular electrical socket:
- Using a screwdriver, pry up the movable part of the plastic clip.
- Place the socket on the rail profile and release the clamp. A click indicates that the latch is secured, which means the socket is locked.
- Start connecting three wires to it: phase, neutral and ground.