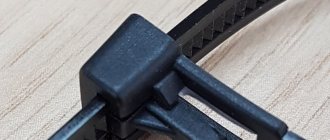
Clamping wires of different sections into a common terminal
The most difficult task during installation (especially for novice craftsmen) is combining conductors of different cross-sections in one connector. To avoid problems, you should adhere to the following rules:
- Wires of larger and smaller cross-sections are diverted from each other. This can be done thanks to different insulation of the conductors, as well as a reserve in diameter at the tip skirt. The thinner product is stripped a greater distance, after which it is moved forward so that it ends up in the end first.
- At the second stage, the main wire is inserted into the tip all the way and crimping is performed.
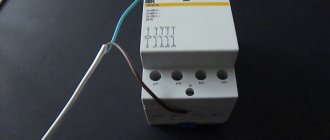
A similar principle should be followed in the case of double NSHVIs - first the thin conductor is inserted, and then the main wires are inserted. For crimping, it is recommended to use STK-03 pliers. While working, make sure that the tool does not snap into place. To do this, hold the ratchet lever while crimping.
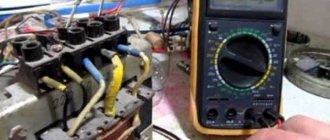
Choosing the right tip
To carry out high-quality crimping work, it is important not only to prepare the tool for wire lugs in advance, but also to select the appropriate lug according to the parameters. These products have sleeves that differ in thickness, and the inlet hole differs in diameter. The best connection is ensured when the size of the stripped cable matches the shank of the lug.
When using an aluminum lug, it must have a cross-section that matches the same parameter of the wire. Working with copper tips can cause certain difficulties, and therefore you will have to go one of these ways:
- the size is selected according to GOST tables, taking into account the flexibility classes of the cores;
- the choice is made on the basis of the actual diameter with a simultaneous comparison of the internal section.
For cores and wires, lugs with sleeves made of matching material are selected. This will minimize the risk of subsequent corrosion.
Types of tips
For equipment to operate efficiently, simply connecting to an electrical outlet is not enough. Another important condition is to ensure a reliable contract between the equipment and the wire. A bad connection can cause:
- overloads;
- power surges.
These situations in most cases lead to devices breaking down and requiring expensive repairs or replacement. The use of special connectors will help to avoid such problems.
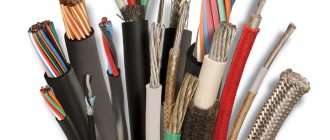
The material used for their production may vary. The most common:
- Aluminum. Suitable for wires with aluminum conductors with a cross section of 16−240 mm2. For their manufacture, an AD1M aluminum pipe is used.
- Aluminum-copper. Used to connect aluminum cables to copper terminals of electrical devices. The cylindrical part of such products is made from AD1M aluminum rod, the contact part, on which the mounting hole is located, is made from M1 copper rod. Both parts are connected by frictional diffusion.
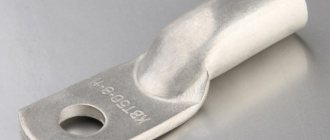
- Copper. Used for wires with copper conductors with a diameter of 2.5−240 mm2. The starting material for them is solid drawn copper pipes of grade M2 and sheets of copper grades M1 and M2.
Selection of lugs for crimping wires
When choosing an electrical installation part, you need to focus on the material of manufacture, the cross-section and flexibility of the cable used, as well as the method of connection to household appliances and other electrical appliances.
- One of the most important aspects is the cable cross-section. If it is larger than the diameter of the tip hole, the cable simply will not fit into the sleeve; if less, the connection will not be tight.
- Connection methods to the equipment may also differ. The electrical installation part must be used if switching with a direct connection is not possible.
To ensure a high-quality connection, the flexibility of the tips should be taken into account.
Popular crimping tool
To install KVT tips, use the following tool:
- WS-04A is the optimal pliers for beginners. With their help, it is possible to solve the main set of problems in the process of installing various electrical circuits and assembling panels. Its functions include the ability to bite off and strip wires (cables) with a cross-section of up to 10-16 square meters. mm. In addition, it provides recesses for NShVI tips up to 6 sq. mm. (if desired, a cable up to 10 “square” is included) or up to 10 sq. mm. (includes up to 16 “square”). On sale you can find WS-04A pliers, which are equipped with dies for crimping NShVI. Their disadvantage is that the matrices can only cope with products of standard sizes up to 6 square. If you use wires with a reduced cross-section (fake), the quality of the connection will be poor.
- PKVk-10 is a universal tool that is used for crimping conductors of 0.5-10 sq. mm. But this is in theory, because in practice the situation is different. For example, to crimp a cable from 6 "square" and above, a lot of force will be required, and if you reduce the crimping force, the quality of contact when crimping connectors with a small cross-section deteriorates. The advantage of PKVk-10 is its compactness and the ability to get into even hard-to-reach places for installation (if necessary). The tool is best used for crimping conductors up to 4 square.
- STK-03 - powerful pliers that are suitable for large sections (from 10 to 25 “square”).
- PC-16. These pliers are useful for crimping TML from 6 to 10 sq. mm. The manufacturer sets the upper limit at 16 sq. mm., but in practice, crimping such a cable requires a strong hand and a lot of effort. Overall, the tool is not very good, but it has an affordable price. The PK-16u version is available for sale - a reinforced version that is more durable. The tool is suitable for cases where crimping is rarely carried out.
- PGRs-70 is a hydraulic press that is used for TML and sleeves. Many consider the tool as an alternative to PC-16. A special feature of the press is the availability of interchangeable dies with different cross-sections in the range of 4-70 sq. mm. With the help of such equipment it is convenient to crimp classic cables - six, ten or sixteen square millimeters. It does not require a lot of load or excessive effort.
- PKVsh-6 - used for crimping NShVI and NShV from 0.25 to 6 sq. mm., as well as a double tip NSHVI-2 with a cross-section from 0.5 to 4.0 sq. mm.
As for Wiedmuller or Knipex pliers, their disadvantage is the large divergence of the handles. As a result, it is difficult to crimp the NShVI with one hand (the fingers are not long enough).
To avoid discomfort when performing work, you should select a tool based on ease of use, and not focus on the brand.
Features of working with insulated pin and other lugs
A special feature of working with NShVI lugs is that they are not intended for crimping rigid single-core electrical wires. These will not hold up after crimping with a relatively soft shell. In this case, the flexible multi-core cable, after crimping with pliers, is held tightly, and the contact is tight.
NShVI can be crimped even with these pliers, without a ratchet
It is interesting that you should not immediately take the stripped wire and crimp the NShVI. A sleeve made of soft metal is required, with which the core is first crimped. Of course, you can ignore it, which is what most even professional electricians do, but reliability in this case decreases. We will return to the sleeves later, but now we will look at the tool that is needed to perform such work.
Tool required for work
It is extremely important to choose the right press pliers for crimping tips, the size of which is suitable for the selected products. They come in five types:
- manual (PK2, PK2M) are intended for conductors with a cross section of up to 10 mm². These are used for household needs;
- manual reinforced ones (PK1, PK2M) are suitable for cables with a diameter of up to 50 mm²;
- hydraulic manual ones - an analogue of PK2, but with these it is much easier to crimp the electrical wire;
- for industrial needs, more powerful equipment is used, such as a manual press, which helps terminate cables up to 240 mm²;
- a hydraulic press with a pedal or electric drive capable of compressing a core of 300 mm².
The crimping process is simple. The image shows all its stages
Wire sleeves for crimping: when are they used?
Sometimes there is no need to use a ferrule, but crimping the wires with sleeves is required. They can be of two types - GML (tinned copper sleeve) or GAO (copper-plated aluminum sleeve). The choice depends on the cable material.
Good to know! When connecting aluminum wires, it is advisable to use quartz vaseline paste. It prevents the oxidation process from occurring.
Twisted pair cables are crimped in a similar way. The only difference is in the matrices
Steps to prepare for crimping
As with any job, there are some steps you need to take before crimping. First, the core needs to be stripped to the required distance. This can be done either with a regular knife or with a stripper (the second option is preferable).
Next, the wires are twisted tightly and inserted into the tip or sleeve
Please note that tightly twisted electrical wire has a slightly smaller diameter. This must be taken into account when choosing products for crimping.
Press jaws are equipped with different dies for different sizes and shapes
Each pliers has a set of dies corresponding to different wire sizes and crimping methods.
How to crimp a wire: some rules
It is worth mentioning some of the nuances of producing such work. The cable in the ferrule or sleeve should be held tightly so that it does not move during crimping. Be sure to make sure that the matrix on the press jaws fits the diameter of the product. If everything is in order, you can start crimping. A ratchet mechanism will help you do this easily. It prevents the ticks from weakening. If the crimping did not go as planned, the mechanism must be unlocked. As the reader has already guessed, this does not present any particular difficulties.
Consequences of an inattentive and careless attitude to cable crimping
Crimping cables with a double lug: how to do it
This work is practically no different from the previous one. The exception is that instead of one wire, two are inserted into the crimping product. In this case, the crimping itself is performed by a matrix one size larger than required. For example, if it is necessary to crimp 2 cores with a cross-section of 4 mm², a 6 mm² matrix is used.
Double NShVI - when you need to crimp 2 wires
Marking of wire lugs
Explanation of tip markings
Product markings differ depending on the manufacturer who specializes in the production of tips. Some of them prefer full alphanumeric markings, while others use only numeric values.
Markings and design features depend on the standard to which it was manufactured. The most popular and widespread are domestic and European standards such as GOST 23981-80, TU and din.
Letter designations:
- Types of tips: sleeve - G, ring - K, tubular - T, pin - W.
- Design: split - R, male - P, female - M.
- Additional equipment with vinyl insulation: combination VI or V.
Marking
The main criteria for classifying cable lugs are designs and materials of manufacture. Regardless of this, Russian-speaking countries have adopted a unified product labeling system, thanks to which a knowledgeable person can easily understand what material the item is made from and where it should be used.
The main letter designations include:
- A – material of manufacture – aluminum;
- L – brass;
- M – copper;
- T – metal with a tubular cross-section;
- U – angular.
You can often see the letter “O” on the elements. Its presence indicates that the product is equipped with a special viewing window, which allows you to visually verify the quality of the connection at any time.
Let's look at more advanced abbreviations:
- TML (O) – tubular tinned copper lug for wires for crimping with an inspection window (or without it, if the letter “O” is missing);
- NSHVI – pin bushing;
- NIK – ring.
Numerical values are added to the letter designations, which indicate the cross-sectional area or diameter of the product.
Decoding and purpose of NSHVI
NSHVI is a type of tip, which is deciphered as follows:
- "N" - tip.
- "Ш" - pin.
- "B" - bushing.
- "I" - isolated.
This type of tip is used when crimping copper wires with a large number of cores for subsequent connection to devices and assembly of electrical circuits.
Crimping is carried out using a special tool - NSHVI crimping pliers. In other words, the task of the product is to ensure high-quality contact and integrity of the cores when connected using a screw clamp.
Sleeve NShVI are used for copper wires with a cross-section in the range of 0.5-35 sq. mm. After installation of the product, solid pins are formed at the ends of multi-core cables, simplifying connection to the terminal or equipment.
Termination and crimping
Another important point when using this device is the protection of cleaned copper contacts, which will oxidize quite quickly, due to which they will lose their current conductivity, because of this the resistance will rise, which means that they will begin to heat up in this place, and a fire will occur.
Tinned copper lugs TML are used for terminating bare copper contacts. Most often, to install such a device on conductors made of copper material, ordinary crimping pliers are used. It is worth noting that copper pipes with different diameters are used as the material for the production of these devices. They are cut and then flattened on one side. After this, a small hole is made in the flattened end of the pipe, which is necessary for tightening the bolt that will hold the tip.
Crimping of TML tips is used for the following purposes:
- establish a connection between the building’s electrical network and the required electrical appliance;
- establish contact within one device between several parts or establish communication between several devices;
- A very common operation is “splicing”, which is used when it is necessary to extend an existing wire by attaching another to it.
How to crimp NShVI bushings?
Before crimping, the wire is stripped using an insulation stripper, a special knife or a stripper. The first option is the most convenient and allows you to quickly get rid of the top insulation without damaging the cores. Stripping is carried out precisely along the length of the sleeve into which the conductor is installed.
As soon as the preparatory work is completed, a sleeve is put on the insulated part. Pre-select the pin sleeve tip (NSHVI) of the required length.
When crimping, special pliers are used, which were mentioned above.
While doing the job, it is important to know how to use press jaws. If you violate the technology, the quality of fixation leaves much to be desired
To avoid errors, the sequence should be like this:
Inserting the stripped edge into the sleeve; Installing the tip into the tool groove
It is important to ensure that the insulated part is pressed tightly against the body of the pliers; Clamping the handle with sufficient force to ensure reliable fixation of the connector.
If you do everything correctly, you get a reliable connection, and the structure itself is monolithic and strong. The principle of crimping using NSHVI-2 is similar. The main thing is to accurately select the cable cross-section. This is not difficult to do. The first numbers show the cross-section, and the subsequent ones (indicated by a hyphen) show the length of the working part.
The optimal tool for crimping in terms of price-quality ratio is considered to be the WS-04A, which was mentioned earlier. Its peculiarity is the presence of lower teeth, which ensure reliable crimping of the product. Thanks to the groove, the connector is tightly compressed and cannot be removed.
When installing the NShVI, keep one nuance in mind - use the section one step lower. What does it mean?
For example, if for a cross-module the permissible cross-section of a stranded wire is specified as 16 sq. mm., after crimping a 16mm analog using NShVI, the structure will not fit into the connector. Here you should use a 10 kV cable. mm.
The PKVK-10 tool is considered no less convenient, but it is used for smaller sections. After crimping, the connector has a rectangular, rather than trapezoidal (as in the previous case) shape.
The advantages of the tool are reliability and ease of use, but even with it there are “punctures” in the form of poor-quality crimping (this nuance should be monitored when performing work).
Errors when crimping tips
People without special training sometimes make mistakes when crimping tips. The most common:
- Crimping with unsuitable tools. An attempt to crimp the terminal with pliers or a hammer will damage the cable.
- Selecting a sleeve or tip of the wrong diameter. This reduces the reliability of the connection. To avoid mistakes, measure the cross-sectional diameter of the cable.
- Using a tip or sleeve made of the wrong material. Follow the rule: copper to copper, aluminum to aluminum. For connecting aluminum and copper conductors there are aluminum-copper lugs.
- Insufficient or excessive number of crimps. To avoid mistakes, use the tables in the press operating instructions.
- Pressure testing from insulation to the blade. This compromises the reliability of the connection, so crimp the tip from the blade to the insulation.
- Using a press die of the wrong diameter. Because of this, the tip or sleeve is deformed.
- The tip must be inserted into the press so that the die cross-section markings (35-50-70, etc.) are imprinted on the front side of the tip, and not on the side or bottom.
To avoid mistakes, use professional tools for crimping tips and sleeves. In the operating instructions for the press that comes with the tool, there is a sign indicating the required number of crimps. Please note that this table is intended for tips and sleeves made in accordance with GOST.
The same rules apply for connecting sleeves.
The nuances of working with NSHVI
If a multi-core cable is used, it is recommended to buy an NShVI tip. This type is not used for terminating wires with one core.
Crimping of a multi-core cable is performed as follows:
- you need to select the wire cross-section and tip brand. The veins should enter freely from the skirt side;
- The type of tip should be selected with some margin. A wire with a cross-section of 1.25 mm is crimped with a tip of 1.5 sq. mm, and the section of the skirt is up to 2.5 square meters. mm.
Required Tools
Crimping is carried out with a special tool that allows you to create the necessary force. The following tools are popular:
- Press pliers for crimping PK2 and PK2M lugs are used for terminating cores with a cross-section of up to 10 sq. mm;
- PK1 and PK1M brand tools are a more powerful version of hand pliers;
- hydraulic pliers allow you to crimp wires up to 10 sq. mm;
- In industrial production, a hand press is used. It is suitable for wires up to 240 sq. mm;
- hydraulic press with electric drive is used for cables up to 300 sq. mm.
Press pliers with hinges increase the pressure of the tool, which makes the manual crimping process easier. Devices with a ratcheting mechanism are especially convenient. They prevent the instrument from unclenching until the procedure is completed.
You can watch how to crimp a wire without tools in this video:
Sleeves for wires for crimping
Not all devices or instruments use cable lugs - there is also a sleeve termination. For cables with copper conductors, sleeves marked GML are used, which means tinned copper sleeve. The GAO brand is suitable for aluminum wires. This is a closed type sleeve made of aluminum. If it is necessary to make a connection with the connection of copper and aluminum elements, then an alloy is used.
Sleeves for crimping
Preparation for crimping
Before putting the tip on the core, it is necessary to perform certain preparations:
- Clean the required length of the wire from the insulation. You can use a special tool for this;
- Twist the wires by hand and place them in the tip from the skirt side.
It is important to choose the correct cross-section of the core to ensure easy entry into the tip sleeve
How to crimp a wire
After selecting suitable tips and wires, you will need a special tool. Press pliers resemble pliers, at the end of which there is a special matrix into which lugs and an uninsulated section of the cable are installed. This device ensures that the tip pressure is applied evenly on all sides.
Particular attention should be paid to the type of cable, which can be stranded or with a monolithic core
Crimping of stranded wires
Single terminal crimp
To make a high-quality crimp, it is recommended to follow the following recommendations:
- to prevent the cores from falling out of the socket, the conductor should be fixed when placed in the tool matrix;
- crimping is carried out using pliers until the snoring mechanism is activated, which allows you to block the tool from opening;
- if fixation is carried out manually, then control is carried out by pulling the hand. If the crimp is of high quality, then the installation will be tight without movement;
- You can use a double-circuit crimping tool. Termination is performed by compressing the insulator and bushing in sockets with different diameters;
- Finally, you need to check the strength of the contact by slightly pulling the elements.
Single wire crimping
Double terminal crimp
The connection of two phase conductors is carried out on one contact. When installing modular machines, they are connected using special jumpers. There are a pair of cables per contact.
In this case, it is recommended to use NShVI for two wires. Here are some installation features:
- two wires are installed inside the cuff at once;
- It is better to perform crimping using press pliers. When crimping a double tip, it is better to use a matrix with a cross section of 6 square meters. mm.
Crimping power cable lugs
To crimp the power cable, it is recommended to use a tinned copper tip, which is protected from oxidation. When cutting the cable, the edge may fluff up and become larger than the rest of the core. In this case, the edge can be removed using a sharpener. The cable should be unfolded so that the circle removes excess along the veins, but does not bend them.
You should not use the soldering method for crimping, since contacts made only with pure tin cannot be used on wires.
Power cable crimping
How to crimp wire lugs: list of suitable tools
To install metal connectors on wires, do not use tools that are not designed for this purpose. There are special ferrule crimpers for wires. Each of them has unique capabilities and can therefore be used in certain conditions. Scope of use of various types of tools for crimping wires with lugs:
Most often, hydraulic or press pliers are used for crimping tips.
- Press pliers PK2M and PK2 are designed for crimping wires whose cross-sectional size does not exceed 10 mm².
- Press pliers PK1M and PK1 are manual pliers that are much more powerful than the previous version.
- Hydraulic pliers – designed for crimping cables with a cross-sectional size of up to 10 mm².
- Manual press – used in industrial production on wires up to 240 mm² in size.
- Electrically driven hydraulic press – designed for crimping wires with a cross-section of up to 300 mm².
A tool equipped with hinges has increased pressing force. In this case, a person does not have to make a lot of effort to install the tip. The most convenient to use devices are those with a ratchet mechanism.
Important! Before starting work, you need to make sure that the diameter of the hole (matrix) on the tool is set correctly. Otherwise, the tip may be damaged during the crimping process.
Popular products in Russia
There are many factories in Russia that produce NShVI tips. The leading position in this market segment is occupied by the KVT plant, which produces electrical installation tools and cable fittings of high quality and affordable prices.
Today, the plant’s product range includes more than four thousand items, which allows you to select the appropriate tools and components.
The plant produces the following products:
- Cable lugs and sleeves designed for crimping wires and cables.
- Bolted lugs and connectors - for convenient installation of cable cores. The peculiarity lies in the versatility and reliability of contact, which allows the product to be used as components for heat-shrinkable cable sleeves.
- Insulated tips, sleeves and connectors.
- Insulated clamps and terminals.
- Cable couplings KVT.
- Elements of cable couplings and other elements of equipment designed to work with wiring.
Power cable processing
For these purposes, you will need to use high-voltage wire lugs. They are made of copper with antioxidant protection. If the cable fluffs up after cutting, the edges are corrected with a sharpener. When unfolding the cable, you need to remove excess sections along the veins. It is important to avoid bending. Another caveat would be to avoid the soldering method, since contact on pure tin is not acceptable.
Read here! Copper wire - main types, classification, marking and rules of use (110 photos)
What are wire lugs for crimping used for and areas of application?
The use of cable lugs significantly increases the quality of the electrician’s work and also facilitates the procedure for connecting cables. Cables are terminated with the help of lugs and sleeves for their strong fixation. Using aluminum, copper and combined lugs, it is possible to combine power sources and different installations.
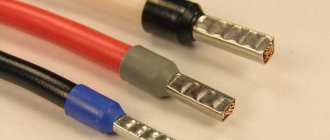
Tip and stripped wire
Tips are a universal tool. On the modern market there is a huge assortment of them, from which you can choose the necessary option for a certain type of installation work.
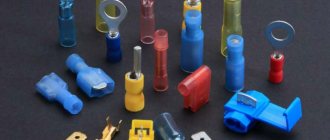
Different types of tips
In order to be able to select a tip for a specific cross-section, it is marked at production. If the dimensions are chosen correctly, the crimping of the cable lugs will be as reliable as possible.
Correct selection for crimping
Before any crimping work, a high-quality selection of tips is carried out. Here it is important to take into account both the thickness of the sleeve or the diameter of the input sleeve, and the material of manufacture.
Note! When choosing the diameter of the inlet hole, you should focus on the diameter of the wire that has already been stripped of insulation. It must coincide with the tail of the product.
If an aluminum lug was selected, its cross-section should be identical to the wire. In the case of using copper products, some difficulties may arise, so it is best to do this:
- Look for a suitable solution in the GOST tables, but you will need to understand the flexibility classes of the cores.
- Manually measure the diameter using a special tool - a caliper. Next, the obtained result is compared with the cross-section of the internal hole, which is measured by the same device.
It is important that the materials from which the tips and cores are made are identical, since when copper interacts with aluminum without the use of protective reactions, corrosive processes will occur. This will lead to oxidation and subsequent short circuiting of the wiring, which does not bode well.
Rules for crimping: how to do it efficiently?
To get the maximum effect from using lugs, you need to crimp them correctly and thoroughly prepare the wire.
First you need to expose the veins. Ideally, this is done with a special tool - a stripper. If it is not there, then you can use improvised tools, but try to make the line as even as possible, because the quality of the insulation depends on this. The protective coating is removed 5 mm longer than the length of the shank, since during the crimping process the latter will increase in size.
Stripped copper cable
To protect against corrosion and improve contact, the exposed wire is degreased with special contact pastes.
All wires on the cut must have the same length; if this rule is neglected, the connection will not be of high quality. Some wires can break and become damaged. For the same reason, you cannot twist the wires for termination with lugs, since during the crimping process they will be crushed and will not be able to perform their functions.
Pressure testing is performed in stages. Depending on the length of the tip, 1÷2 crimps with a press may be required. For sleeves – 2÷4 pcs. They are made at a distance of 1÷2 mm. The first crimp should be at the blade, then closer to the edge of the shank.
It is necessary to select a suitable press matrix. If it is less than necessary, then large “ears” of metal will form along the edge of the crimp. After cutting them off, through holes are obtained that violate the insulation.
The tip is installed in the device so that the marking is imprinted on the front side of the element, and not on the side.
Only a small flash is allowed; here, after removing the “ears”, the insulation will be compromised
Preparation for the process
Before putting the tip on the core, it is necessary to perform certain preparations:
- Clean the required length of the wire from the insulation. You can use a special tool for this;
- Twist the wires by hand and place them in the tip from the skirt side.
It is important to choose the correct cross-section of the core to ensure easy entry into the tip sleeve.
Procedure for crimping cable lugs and sleeves
For crimping thick-walled tips and sleeves, it is best to use a hydraulic press. The press set initially includes universal dies for any tips and wires.
Under no circumstances use a tool not intended for crimping (hammer, chisel, etc.). A contact pressed in this way will not last long, especially if it constantly experiences heavy loads.
The next question that arises for an ignorant user is: how many times should I press the tip with a press? Once, twice or three times?
This depends on 2 parameters - the length of the tip and the width of the matrix.
In the operating instructions for the press that comes with the tool, there is a sign indicating the required number of crimps. Please note that this table is intended for tips and sleeves made in accordance with GOST.
Insert the tip into the press so that the matrix cross-section markings (35-50-70, etc.) are imprinted on the front side of the tip, and not on the side or bottom.
- do the first crimp test closer to the blade (where the bolt is inserted);
- Perform the following crimps in order, moving from the blade to the tail of the tip.
The same rules apply for connecting sleeves.
This must be done in this sequence, because with each press the tip tends to lengthen (sometimes up to ten percent!).
And if you start pressing from the end (not from the blade), during the last crimp, there is a high probability that you will have a void at the end of the sleeve. And you will not achieve the contact that was necessary. First of all, this applies to all aluminum products. For copper this is not yet so critical.
When crimping from the side of the blade, the tip will seem to fit onto the core, tightening the connection more and more. The insulated tips even have special digital markings that indicate the pressing order.
The crimping ends at the moment when the matrices close together. If you need to perform two or three crimps, step back 2-3 mm from the previous crimping point and continue crimping.
When crimping, the formation of a small flash is acceptable. It can be removed or filed off. A very common mistake is the formation of large “ears” on the tip. This results from an incorrect choice of matrix.
If such “ears” do appear, you should not cut them down to the base of the sleeve. Otherwise, a gap may form in the ferrule and the crimp contact will weaken.
After the tip is crimped, it is advisable to insulate the area between where the shank ends and the remaining uninsulated part of the core. It is best to use heat-shrinkable tubing for this.
Five rules of crimping
To summarize the above, if you want to get high-quality and durable crimping, you need to adhere to five rules:
- Choose the right tip based on material and size.
- Properly clean the vein.
- Use a specialized tool. Crimping with a chisel is prohibited!
- Select the required matrix.
- Follow the crimping sequence.
Crimping of stranded wire
The next stage is preparing the wire. The insulation is cleaned exactly to the section of the wire that will be hidden by the end cap. Clamping parts of the insulation into the lugs, as well as the exit of bare wires, is generally not acceptable, of course, unless the technology requires it.
Next, the conductor is placed in a wire lug for crimping, and all this together is placed in a crimping tool onto a pad corresponding to the diameter of the lug. By squeezing the pliers to the required parameters and stops, direct crimping is carried out.
As a crimping tool, it is preferable to use a crimper (pliers) with a ratchet mechanism. This allows you to achieve better results with significantly less effort.
The final stage of work is quality control.
First, the wire must be held securely after crimping. The second stage of such control is checking the electrical quality of the connection, but, alas, it is not always accessible to the average person due to the lack of necessary equipment.
So the most you can do is test a section of wire with lugs by “ringing” it. Thus, make sure that the insulation has not been compressed instead of the cores - there is no contact.
Video: crimping/crimping wires with various lugs and electrical installation tools
Save time: selected articles delivered to your inbox every week
Choosing the right tip allows you to save money!
Choosing the right tip allows you to save money! The table below will help you choose the size of the tip based on the cross-section of the wire. For example, when terminating a copper wire PV-1 at 95 mm 2, you need to install a T 70-10-13 tip.
| type of copper tip according to GOST 7386-80 | wire cross section | core class | type of aluminum tip according to GOST 9581-80 | wire cross section | core class |
| 2,5-(3,4,5,6)-2,6 | 2,5 | 3;4;5;6 | 16-(6,8)-5,4 | 16 | 1;2 |
| 4 | 1;2;3;4 | 25-8-7,0 | 16 | 3 | |
| 4-(4,5,6)-3 | 4 | 5 | 25 | 1;2 | |
| 6 | 1 | 35-10-8 | 25 | 3 | |
| 6-(4,5,6)-4 | 4 | 6 | 35 | 1;2 | |
| 6 | 2;3;4;5 | 50-10-9 | 35 | 3 | |
| 10 | 1 | 50 | 1 | ||
| 10-(5,6,8)-5 | 10 | 2;3;4 | 70-10-11 | 50 | 2 |
| 16 | 1 | 70 | 1;2 | ||
| 16-(6,8)-6 | 10 | 5;6 | 70-10-12 | 50 | 3 |
| 16 | 2;3 | 95 | 1 | ||
| 25 | 1 | 95-12-13 | 70 | 3 | |
| 25-(6,8)-7 | 16 | 4;5;6 | 95 | 2 | |
| 25 | 2 | 120-(12,16)-14 | 120 | 1 | |
| 35 | 1 | 150-(12,16)-16 | 95 | 3 | |
| 25-(6,8,10)-8 | 25 | 3;4;5;6 | 120 | 2 | |
| 35 | 2 | 185 | 1 | ||
| 35-(8,10)-9 | 35 | 3;4 | 150-(12,16)-17 | 120 | 4 |
| 50 | 1 | 150 | 1;2 | ||
| 35-(8,10,12)-10 | 35 | 5;6 | 185-(16,20)-18 | 185 | 2 |
| 50 | 2 | 185-(16,20)-19 | 150 | 3 | |
| 50-(8,10,12)-11 | 50 | 3;4 | 240-20-20 | 240 | 1 |
| 70 | 1;2 | 240-20-22 | 240 | 2 | |
| 50-(8,10,12)-12 | 50 | 5;6 | 300-20-24 | 185 | 3 |
| 70-(10,12)-13 | 70 | 3;4;5;6 | 240 | 3 | |
| 95 | 1 | 300 | 1;2 | ||
| 95-(10,12)-15 | 70 | 5 |
Conductor classes: 1 - single-core conductor (PV1 wire, AVVG, VVG cable) for stationary installation. 2 - multi-core conductor (wire PV2, cable AVVG, VVG) for stationary installation. 3 - stranded conductor (wire PV3, cable KGL). 4 - flexible stranded conductor (wire PV4, cable KG). 5 - flexible thin-wire conductor (PVS wire, KG cable). 6 - especially flexible thin-wire conductor (KOG cable).
Crimping with screw and vice
If you do not have soldering accessories, and you consider point crimping using a center punch not reliable enough, then the third method remains.
Place this screw along the tip. Then you squeeze the entire structure in a vice. The end result should be approximately this form of pressing.
If one screw is not enough, a second one is placed on top of the depressed one and compressed again. You can initially use 2 screws, only installed on different sides of the sleeve. The main thing is not to overdo it and not break the sleeve.
To prevent the screw from moving, you can fix it with electrical tape.
In general, to summarize, we can say that these three methods have the right to life, and many people connect the power cable wires and lugs this way.
However, only a specialized factory tool can create a reliable and durable contact, which you will forget about immediately after crimping and it will not bother you during the entire period of work.
Design nuances and characteristics
The NShVI tip, as a rule, has the following features:
- During the manufacturing process, M1 type copper is used;
- The upper voltage threshold is 690 V;
- The surface of the connector is subjected to electrolytic tinning;
- The dimensions of the connectors are designed to connect one cable (installation is carried out taking into account the cross-section);
- Insulation is performed using polypropylene, which does not contain halogens;
- The insulating element is characterized by high thermal resistance - it can withstand temperatures up to 105 degrees Celsius;
- KBT bushing connectors are manufactured in one color and have a common DIN standard. This is done in order to eliminate difficulties during the installation process. In addition, the color is selected taking into account the marking DIN 462228, part 4.
- The conductor is crimped on top of the copper bushing;
- The NShVI cuff has a conical shape, which eliminates problems in the process of inserting a stranded wire into the inner part of the sleeve.
Product characteristics are presented below.
Application of single tips
When installing tips of this type, you need to focus on the following recommendations:
- For better penetration of the cores into the socket, it is necessary to firmly fasten the conductor in the matrix.
- The wire is crimped with a tip until the ratchet begins to operate, blocking the device from unclenching.
- When fixing manually, you need to control the process by pulling your hand. It is important to ensure a tight crimp to prevent movement.
- High-quality manipulations are carried out with a double-circuit crimping tool. Here the insulator and bushing are compressed in sockets that have different diameters.
- Checking the strength of the contact is carried out by slightly pulling the elements.
Main types of lugs for crimping
There are different types of lugs for use with wires of different modifications and cross-sections. Let's look at the most popular of them:
copper tips. Used to work with copper wires. They are made from seamless tubes. On one side there is a clamping part, and on the other side there is a tubular hole for the wire. Tips of this type are used for installing electrical appliances, connecting input distribution devices and for grounding;
Copper products
aluminum. For aluminum cores, tips made of the same material are used. At one end there is a contact blade with a hole, and at the other there is a tubular hole. The cores are connected to the tip by crimping with a special tool. The product is first lubricated with quartz vaseline lubricant, which protects against oxidation;
aluminum-copper. Switchgears can use copper busbars, for which aluminum-copper lugs are suitable. In them, the landing tube is made of aluminum, and the contact blade is made of copper. Products are made using the friction diffusion method or gas-dynamic spraying method. In this case, copper sputtering covers the product on top, which allows for stable contact;
bolted These lugs are secured using a clamping bolt. In this case, crimping is not necessary, since the bolt is part of the tip. Tightening is done with a wrench.
Basic rules for crimping
Rules for crimping
In order to perform high-quality crimping of wires using lugs, it is important to follow the following rules and recommendations:
- Select the correct electrical part.
- Thoroughly clean the wire cores.
- For high-quality crimping, use special equipment.
- Choose the right matrix.
An important factor on which the outcome depends is strict adherence to the sequence of actions during crimping.
In order not to damage the connecting elements, it is necessary to additionally set the diameter on the press jaws.
Installation methods
Cable lugs are attached to wires in different ways. Most often, their installation is carried out by welding, soldering or crimping. Special installation bolts can also be used for this purpose.
The pressing method requires a special tool (press), which can be operated manually, mechanically or hydraulically, or using a pump. For installation of household contacts, a manual mechanism—a stripper—or crimping pliers is suitable. It is easy to manually attach the tip to a copper or aluminum cable used to create grounding or wiring when connecting household electrical appliances.
Crimping a power cable requires a more powerful press and can be done in three ways. The metal core is inserted into the tubular tail of the tip and compressed into the die using a punch. In certain places where the teeth of the punch are pressed in the most, the best connection between the tip and the core is ensured.
With continuous compression, the same pressure is guaranteed along the entire length of the tip. In this case, complete electrical contact between the elements is achieved. To improve the connection of the tubular part with the cable, combined crimping is used, which, under continuous crimping conditions, provides additional compression at the point where the teeth enter.
Equipment for crimping tips can vary in type of adjustable wrench or hole diameter. The standard size is considered to be a hole ranging from 0.25 to 1 millimeter.
Creating a reliable contact using a soldering iron occurs in several stages. First, the cable, stripped to a shine and treated with neutral solder, is inserted into the connector all the way, then solder is poured through a special hole.
During the installation of cable lugs using set screws, the size of their heads is controlled automatically inside the crimping apparatus. The bolts are screwed into the connector hole all the way, then their head is torn off. This ensures reliable and irreversible contact.
The advantage of bolted connections is that they can also be made without the use of a press using a wrench. The size of the connected cable may be several times smaller than the maximum diameter provided by the manufacturer for the tubular part of the tip.
Features of different types of tips
We have looked at the main types of wire lugs, but there are also various subtypes. They depend on the design, additional attributes and some other aspects that manufacturers use for your convenience. Let's look at the most common of them.
Split ring tip
- First of all, this is the type of connection of the wire to the tip. It can be solid, or it can be split. What does it mean? The split type of tip means that the place where the wire is attached to the connector consists of two parts that can be properly crimped even with ordinary pliers. For a continuous connection it is better to use a crimper.
- The next possible differences are the presence of insulation. There are two possible options here. In the first case, for a wire, the tip has insulation only at the junction of the wire and the connector. In this situation, before crimping, the insulation should be removed and then pulled over the joint.
Fully insulated flat tip
- The second option is to completely insulate the tip. First of all, this method is used for connectors designed to connect two wires. This insulation can be removable or continuous. Here the choice depends on your preferences - the advantages and disadvantages are obvious.
- For cable lugs, there are even products with insulated crimp points. But such tips can only be used for networks with voltages up to 1000V. For cables of higher classes, it is unacceptable to use such insulation as the main one.
Ferrule crimping
And finally, let's devote a few words to the process of crimping wires
The matter is not so complicated - but there are nuances that are worth paying your attention to
Wire crimping pliers
So, we have a set of wire lugs, or just lugs of the required cross-section
Why is it so important that the cross-section matches exactly, since you can crimp a tip of a larger diameter? The fact is that in this case, voids are formed in the sleeve or tip. Of course, they can be filled with wire scraps, but the quality of such a connection decreases
It is extremely important to match the cross-section of the wire and the tip
- After this, using a special tool: crimping pliers or crimper, we perform crimping. Crimpers can be of several types. Some have non-removable heads with a clearly defined cross-section of crimped wires. Or they may have removable heads, which change depending on the cross-section of the wires being crimped. We think it is clear that the head must correspond to the cross-section of the wire being crimped.
- Crimping of the tips is usually performed on one side, the sleeves are crimped with two compressions from opposite ends. Moreover, the compressions should be performed in the opposite direction, as in the video, that is, we make one compression, then rotate the sleeve 180⁰ and make a second compression.
Stages of crimping sleeves
Copper wire lugs are used only for copper wires. If you work with aluminum wires, then it is better to use brass lugs for them, since the contact part of power machines, terminal blocks and other switching devices usually have copper terminals.
Design and types
The product consists of 2 elements:
- CURRENT CONDUCTING TUBE. In the process of its manufacture, electrolytic copper with mandatory tinning is used.
- POLYAMIDE FLANGE, INSULATED.
In simple terms, NSHVI cable lugs are copper tubes processed by galvanization and having one flared end (for inserting a stranded conductor). The second part of the product is a polyamide cuff, which provides reliable insulation and protection against voltage.
During the manufacturing process, a special type of copper is used, which ensures a reliable connection at the contact point and avoids damage to the conductor due to screw pressure. Today you can buy an NShVI tip with a cross section of 0.25-150 mm.
According to the design of the device, there are two types:
- Single.
- Double.
The first are intended for crimping one, and the second - two stranded wires at the same time. This is their main advantage. For example, when power is supplied to the AB (circuit breaker), it is possible to eliminate an additional wire jumper from the circuit. Based on the characteristics of each type, the size of the plastic flange varies.
In addition to the type of product already discussed, there are other types:
- TML TIPS - used for crimping copper and aluminum cables by crimping for subsequent connection to a bus or equipment. There are two types of TMLs - copper and aluminum. The former are used to connect cables made of copper, and the latter - made of aluminum. Tinned TML products are used simultaneously with copper and aluminum conductors for crimping and soldering.
- TIPS NVI AND NKI - suitable for terminating flexible (stranded) copper conductors. Used when assembling electrical circuits when screw fixation is used during the connection process. Ring lugs are typically used to provide permanent connections to electrical equipment. If in the future it is necessary to disassemble the circuit and re-cross the clamps, it is worth using NShVI. Thanks to its use, there is no need to dismantle the fastening - just loosen the clamping screw.
Types
Despite the common area of application for all cable lugs, they are all divided into several types. The most common gradation is based on material, end shape and installation method. Let's take a closer look at each of them.
According to the material of manufacture
Various metals can be used as a material for the manufacture of an entire electrical device or only part of its structure.
Rice. 1: types by material
Therefore, depending on the material from which the cable lugs are made, there are:
- aluminum - their design is completely made of aluminum and allows it to be connected only to aluminum conductors and the same conductor;
- copper - tips made of copper and intended for terminating copper wires and their further connection with the same conducting surfaces, can be additionally coated with a layer of tin;
- combined - consist of two materials (copper and aluminum) which are made of connected plates in various combinations; aluminum-copper lugs are used to connect copper and aluminum conductors and surfaces;
- brass - made from an alloy of zinc, tin and copper, used to connect copper and aluminum cables or an open connector type connection.
It should be noted that putting copper lugs on aluminum conductors, as well as aluminum lugs on copper ones, is strictly prohibited. This is due to the fact that at the point of such contact, diffusion of particles at the interface of two metals will occur, followed by the destruction of one of them. Over time, this will cause the connection to weaken, increasing contact resistance and causing heat. This can be avoided by using combined or brass models for terminating wires.
By installation method
Another criterion for dividing cable terminations by type is the method of their installation. In practice, types are distinguished for:
- crimping with an aluminum or copper tube is the fastest way to install a cable lug by crimping part of the cable sleeve with a special tool or at least with pliers. But, using a non-specialized tool, you can get a bad connection using the crimping method.
- tightening with screw clamps - divided into classic bolts or breakaway bolts. Conventional bolts are a classic version of a bolted connection implemented in a cable sleeve, where the conductor is clamped by one or more bolts. Breakaways are a disposable version of a bolt clamp - when a certain tightening torque is reached, the heads on the bolts come off and the core remains fixed in the cable lug.
- soldering or welding - soldering of the conductor threaded into the tip is carried out using tin solder. Welding is performed with the same metal as the current-carrying conductor using spot welding.
Rice. 2: cable lugs according to installation method
According to the shape of the cable lug
Depending on the shape of the edge of the cable lug, they can be used in various devices and perform certain functions. Based on this criterion, this type of product is divided into:
- Ring tips - are a product, one part of which is made of a tube or an open sleeve, and the second is a ring. The ring is designed to be clamped under a bolt and ensures good contact over the entire area.
- Horn, fork or hook - are a plate open on one side. Allows you to quickly disconnect and connect pins; they are widely used in laboratories when conducting tests.
- Connector - represent elements of the classic mother-father connection as a cable lug.
- Plate - used to connect power cables to electrical installation elements; they are distinguished by a sufficiently thick plate that can withstand the load of the connected cable.
- Plug or sleeve lugs are a design that is placed in a connector.
- Pin - made in the form of a flat strip or bent in the shape of a needle
- Tubular - are an element for splicing two or more cores according to the principle of a cable coupling.
Rice.
3: according to the shape of the cable lug Each of the above types should be selected in accordance with the tasks that you need to solve with a specific connection. But these criteria are not the only ones that should be followed when choosing a specific cable lug model.
Labeling: how is it useful?
Each tip is marked with an alphanumeric code - this is a marking. It can provide basic information for selecting the correct electrical installation component. It looks like this: TML 70-10-11.5. Each symbol carries information:
- T is a pipe, a semi-finished product for making a part;
- M – material, in this case copper;
- L – processing method, means that this element is made of tinned copper;
- 70 (first digit of the code) – section in mm;
- 10 (second digit of the marking) – diameter of the mounting hole for the bolt in mm;
- 11.5 (third digit) is the internal diameter of the shank in mm into which the wire is inserted.
Common markings and their interpretation are presented in the table.
| Letter code | Image | Explanation and description |
| TML | Made from tinned copper, universal in use, protected from environmental influences | |
| TA | Made of aluminum, suitable for aluminum wires only | |
| THERE | Aluminum-copper for connecting aluminum wires with copper contacts | |
| SIP | Tube insulated, aluminum with copper terminal | |
| NSHVI | Sleeve pin, insulated, most applicable in everyday life |
The production of parts for electrical installation is regulated by GOST, but you can find products manufactured according to specifications or European standards; their markings will have a different appearance.
Using a dual tip
If modular machines are installed, then a connection with a special jumper will be required, as a result of which 1 contact will be combined with a pair of wires. This requires the use of NShVI under two wires:
- two wires are placed in the cuff at the same time;
- Crimping is carried out using press pliers with a 6 square meter matrix. mm.
Why crimping?
Soldering a stranded wire is not the easiest operation, because you need to expose all the wires, make sure that they are clean in terms of contact, and only then start soldering. Any core in a stranded wire has insulation, and this often creates difficulties in establishing reliable contact.
Just crimping the cable lugs solves all these problems, because with the help of mechanical force (compression) not only the insulation of individual cores is destroyed, but also a strong connection of the entire cable is created for better contact.
This is where the moment arises of how to choose the correct sleeves for crimping wires, because they are made from different materials and have very precisely specified current characteristics.
The problem is that the size of these cartridges is small, and the markings are unclear to those who are not specialists. But before that, let's define the difference between a sleeve and a cable crimp lug.
Another point that is not even in the markings is the moment of tightening the sleeve or tip during crimping. And they are completely different for different types of tips, such as:
- ring (NKI).
- fork (NVI).
- pin round (NSHKI).
- flat (plug) connectors (RPI-P, RPI-M, RSHI-P, RSHI-M, etc.).
- piercing type couplers (OV).
Here it is necessary to return to the tool that is used to crimp the wires, because on each tool the dimensions are indicated for the standard shape of the jaws, and the force itself is accurately measured by diameters. So, unless you made a mistake with the diameter, you cannot apply excessive force.
And, despite the fact that the lugs for wires for crimping are different, with the same diameter both the force and the standard of the tool will be the same. It's a pity that this parameter is not reflected on the labeling. Apparently because such work is usually done by professionals, not home electricians.
But it is precisely the standards that allow home electricians to stock up on universal crimping pliers and crimp cable lugs for their own purposes without any problems. This procedure is quite simple to master, and technologically it is the same for crimping an RG-45 connector and a tip for a three-phase machine.
When crimping a multi-core cable, you cannot do without special lubricants. Therefore, use sleeves and tips that already have this lubricant inside. In any case, this is a one-time operation. It is not possible to remove a part to move it to another location.
As a result, having mastered the installation of sleeves and tips, you will be able to quickly restore the desired connection, carry out repairs without problems, as well as a connection that, in fact, will not need repair for many years.
general description
Cable lugs are special elements that are used for terminating single-core and stranded wires. The cores are placed freely in the cylindrical part of the product and fixed in the chosen way. Most often, the crimping method is used for these purposes, which does not require large energy costs (it is enough to purchase a special crimping machine). The wire is then easily attached to the connection point in the “blade” area using a bolt, screw or clamp. Thanks to the variety of configurations, you can choose an element that will allow you to connect thick wires to a connector of a smaller diameter.
Connectors are used in cases where permanent direct attachment is not possible or necessary. In modern conditions, electricians increasingly prefer to use these elements in their work, since they reduce the risk of overheating of wires in electrical systems, create a reliable connection and reduce the likelihood of oxidation of the wires at the point where they are terminated.
How to choose the right terminals for wires
When choosing the most suitable cable lug, you need to be guided by the fact that the electrical conductor and sleeve correspond to the specified automatic parameters. This principle is relevant for any fixation, since when using a shank with a large diameter, there is free space that impairs contact.
There is no need to fill and crimp it with debris using wire or solder, as this may solve the problem. The plate is selected according to the diameter of the hole and the cross-section of the bolt or terminal. They are also chosen based on the quality of the core. If the crimped terminal and dielectric have a bare area, it may cause oxidation, fracture and fire.
Correspondence of diameter to bolt cross-section