- First, choose the right connector or tip so that its size matches the cross-section of the wire being pressed.
- Secondly, use a professional tool. These are press pliers equipped with a ratcheting mechanism that will allow you to perform a full crimping cycle.
- And thirdly, select the desired matrix. Its geometry and shape must correspond to the crimp part of the tip.
Crimping or crimping wires with insulated or non-insulated lugs has become very accessible recently. This process even has a number of advantages over tinning wire cores:
- faster
- more reliable
- cheaper
When the wire is tinned and used for a long time, due to temperature changes, the contact may weaken. This causes the tinned connection to heat up.
And since the melting point of solder is low, it easily burns out or melts under load, weakening and significantly reducing the contact area. Next, sparking occurs with all the current negative consequences.
Why do you need crimping and crimping wires?
Is it even possible to do without sleeves and crimping? What's wrong with simply attaching wires to machines and other devices?
With a simple clamp, the bundle of wire fluffs up and is crushed to the sides. Some individual conductors may even be damaged. Such conductors, destroyed and separated from the main bundle, no longer take part in contact and the passage of current load through themselves.
All this leads to the fact that the remaining cores are not enough and the connection points heat up. In addition, the bare copper from which the wire strands are made remains accessible to moisture and oxygen. And this leads to its darkening and oxidation. By crimping the conductor once with a tip or sleeve, you will save yourself from all these problems in the future.
What is the essence of the method?
Crimping is a method of connecting wires using special sleeves. Outwardly, they look like ordinary tubes and serve as a connecting mechanism.
The wire strands that are to be connected are inserted into the tube from two opposite ends, crimped with press pliers, and as a result, a strong and reliable electrical unit is obtained. The tube is compressed in two or three places, depending on its length and the cross-section of the switched conductors. The connected cores and the sleeve are jointly subjected to deformation. At this moment, the tube compresses and squeezes the conductive surfaces of the conductors. Due to this, the wires interlock with each other, which provides reliable electrical contact.
The junction is then isolated.
Most often, this method is used in situations where it is not possible to use another type of connection. For example, welding requires the presence of electricity so that the welding machine can be connected. When working in a small junction box, it is inconvenient to position the bolt connection, nut clamp or terminal block. And reaching up to the distribution box from the ceiling with a soldering iron is also not very convenient. It is in such cases that crimping wires using sleeves helps out.
The crimping method is most in demand:
- if it is necessary to connect wires in power lines with a high current load;
- for switching multi-core conductors;
- if it is necessary to connect large cross-section wires.
How to choose the right wire and tip
First, you need to find out what cross-section of wire you will be crimping. This can be done by following the inscriptions on the core insulation, or using a caliper. Further, when choosing certain sleeve tips, you can be guided by the color marking of their insulated skirt. Each color must correspond to a specific section and size of the tip sleeve.
True, there are also manufacturers who don’t bother with this and produce single-color products of different sections.
After choosing, be sure to physically check how tightly the wire fits into the sleeve or tip.
In this case, there is absolutely no need to twist the wires before inserting them into the tip.
The tip at the entrance has a special skirt that will help you put it on even a slightly fluffy wire. In addition, this skirt acts as an insulation retainer. You can compare how many kinks in different directions the wire will withstand and without a skirt. As you understand, the result will not be in favor of the latter option.
Another important point that needs to be remembered: many wires are manufactured not according to GOST, but according to their own technical conditions.
And therefore, their actual cross-section may be less than that stated in the nomenclature. Accordingly, because of this, a slack is formed in the pressed part of the tip, although as it seemed to you, you selected everything according to the tables and seemed to have made no mistakes anywhere.
It often happens that a 2.5mm2 wire easily fits into a tip with a cross-section of 1.5mm2. Therefore, choosing from tables is, of course, good, but you can’t do without practical fitting of the sleeved part and wire.
Marking and decoding
The industry produces a large number of all kinds of tips, which differ in design and materials.
Color coding option
There is a special marking system that allows you to distinguish the material and use it for its intended purpose. Here is a breakdown of some of the symbols:
- A – the sleeve is made of aluminum;
- L – brass is used;
- M – the base of the product is copper;
- T – the element is made of tubular metal;
- U – the connector is made in the shape of an angle.
There is also a designation in the form of the letter O, which indicates the presence of an inspection window through which you can make sure that the cables are correctly located in the sleeve inside.
If the marking is TML (O), then it means tinned tubular copper with an inspection window. NSHVI - means a pin sleeve tip, and NKI - a ring one. In this case, the numbers indicate the cross-sectional area or diameters of the rod. To make it easier to find suitable connectors, for example, NShVI or KVT, you can use a special catalog or tables.
After the letter designations in the markings there are usually numbers that contain information about:
- nominal section;
- diameter of the contact rod;
- internal diameter of the shank.
For example, the product is marked TML (O). This means that this wire termination is made of copper tubing and is tinned. Its distinctive feature is the presence of a small hole - an inspection window, with which you can verify whether the wire is inserted correctly for crimping.
Such contacts are used mainly in production, so not all electricians are aware of their existence.
Crimping solid wires
Many people often wonder whether it is possible to crimp solid wires? Yes, of course, it is not prohibited to do this, you just need to use the appropriate tool for this. Ordinary crimpers are no longer suitable here, since they are designed for less force required when compressing a monocore. You will have to purchase specially designed press pliers PK-16u or PK-35u for this.
This is a universal tool and can also be used for crimping stranded wires.
In order for the compression on the monocore to be high-quality and there is no play inside the sleeve, the basic rule here is to choose a sleeve or tip one size smaller than the cross-section of the wire being pressed. These pliers are also convenient for pressing several conductors simultaneously in one sleeve. This is done, for example, when making connections in junction boxes.
Features of crimping pliers
Press jaws vary in size and shape of the matrix, but have a common purpose. They use a tool to secure several conductors to each other or prepare a bundle of current-carrying wires for subsequent switching with terminals on electrical devices.
Often the need for crimping arises when connecting cables consisting of several cores. They should not be placed in the terminals without proper preparation, since due to small vibrations during the movement of electric current, some cores will become compacted. This will lead to the appearance of free space and, accordingly, weakening of the contact.
This is what contributed to the fact that several decades ago, when there were no cable lugs, only single-core wires were used for installing power electrical wiring. With the advent of press jaws, everything has changed significantly.
Despite the recommendation for the use of single-core cables in power wiring, multi-core wires were used and crimped. Instead of pincers, then (and now) the operation was carried out using a powerful press that created the required force. The operating principle of the press resembles a car jack, and most equipment models are equipped with a hydraulic drive. Today, bulky devices are used for high-quality crimping of thick power cables.
The crimping process is trivially simple: a special sleeve is put on the end of the stripped cable, which is placed in crimping pliers and then fixed. Remember the network cable that is inserted into the rear socket of the system unit: it is crimped using press pliers, and a transparent RJ45 tip acts as a sleeve. This is not the only possible option: there are double-sided bushings, on both sides of which the ends of different cables are inserted. As a result, we have a better and more reliable alternative to conventional twisting or soldering of wires.
Why can't you twist the wires?
The wires inside the bushing are crimped under very high pressure, so that they can even change their original circular shape if they lie parallel to each other. From a circle they turn into a hexagon, and this increases the area of their contact surface with each other.
And when you twist them, during crimping, in those places where the veins intersect, they can be pressed against each other.
Methods of using press pliers for crimping tips
Wire crimping work can be permanent or occasional. In everyday life, the second option is more typical. In such cases, there is no need to purchase universal wire crimping pliers. It is worth choosing a tool with a narrow focus that will help solve specific problems.
The main functionality of this type of tool includes:
- Crimping sleeves. The pliers required for this type of crimping differ in the shape and size of the matrix. A flange may be present as an additional structural element. Its presence will allow you to make a better connection.
- Removing the insulating layer. Using pliers, you can remove the required area of the insulating coating without directly damaging the core. It is important to set the size correctly. If you don’t have enough experience, it’s better to purchase a tool where the size is set automatically. Such models are more expensive, but provide high-quality work.
- Crimping of tips. Presses for crimping wire lugs have a special rod, which during the operation is placed on the dividing seam. The device is designed to work with bare and brass wiring.
- Working with twisted pairs. In such a crimping device, the wire is inserted into a special connector.
Press tongs are often used when crimping sleeves
Only the right tool will allow you to make a quality connection.
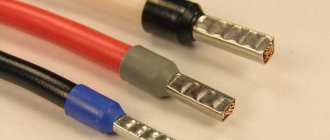
Tip material
Another relevant point in choosing a tip is the material of manufacture. When purchasing, make sure that they are selling you copper or tinned tips. To do this, it is enough to first purchase one tip and file it with something foreign.
With copper material, especially if high-quality copper is used, the cut will be reddish in color. If ordinary copper alloys are used, which is most often the case, then the cut will be a pale yellowish color.
When exposed to air, copper may darken and lose contact quality. Copper tinning is a long-known method that makes the contact durable and reliable.
Advantages of crimping wires with lugs
- the crimped end of the wire is considered airtight
- the ferrule sleeve prevents individual wires from being damaged or excluded from contact
- tinned tip surface – reliable protection from environmental influences
Required Tools
Crimping is carried out with a special tool that allows you to create the necessary force. The following tools are popular:
- Press pliers for crimping PK2 and PK2M lugs are used for terminating cores with a cross-section of up to 10 sq. mm;
- PK1 and PK1M brand tools are a more powerful version of hand pliers;
- hydraulic pliers allow you to crimp wires up to 10 sq. mm;
- In industrial production, a hand press is used. It is suitable for wires up to 240 sq. mm;
- hydraulic press with electric drive is used for cables up to 300 sq. mm.
Types of instruments
Press pliers with hinges increase the pressure of the tool, which makes the manual crimping process easier. Devices with a ratcheting mechanism are especially convenient. They prevent the instrument from unclenching until the procedure is completed.
You can watch how to crimp a wire without tools in this video:
Types of press jaws
The manual crimper is used for crimping non-insulated cable lugs, contact connectors, terminals and contact sleeves of various sizes. If a manual crimper has special blades (usually they are located where the handles are attached), then this tool can also be used for cutting cables and wires.
Electric pliers are a multifunctional tool for professional use. They can do almost any work with wires. Electric pliers are mainly used for cutting and stripping wires, but they can also be used to crimp uninsulated and insulated cable ends.
A crimper is a tool for crimping wire lugs, twisted pair cables, and connectors. It has two long handles (one or both can be movable) and a massive working part in the form of metal jaws, which have holes for cables.
When the handles are brought together, the jaws close and the cable connector is crimped using forceful pressing. Some models have a blade on the working part, which simplifies the work - no additional tools are required to cut the cable.
How to choose press jaws
The choice of crimping tool is determined by the cross-section of the wire. The larger it is, the more powerful the device should be. Human effort is not enough to create a tight and uniform pressure, even when using household tips.
Crimping of cable lugs is performed using one of the following tools:
- Press pliers of brands PK2 or PK2M - for manual use, suitable for wires with a cross-section of up to 10 sq. mm.
- Hydraulic pliers – designed for terminating cables up to 10 sq. mm.
- Press pliers for crimping terminals, brands PK1 or PK1M - similar to the first tool, but reinforced with long handles, due to this they are capable of crimping a wire up to 50 sq. mm.
More powerful devices, such as manual and hydraulic presses, are used in production. With their help, you can crimp wires with a cross-section of up to 30 sq. mm.
Hand press pliers for home use
Technical specifications
The main types and brands of thin-walled insulated lugs and terminals widely represented on our market are the following:
NKI ring tips - all their data and technical parameters are given at the beginning of the article above.
NVI insulated fork lugs:
Insulated flat pin lugs NSHPI:
Insulated round pin lugs NShKI:
Connectors—flat insulated “female” terminals RPI-M:
Connectors - flat insulated male terminals RPI-I:
You can view the current prices for tools for crimping such tips here.
Why crimping?
Soldering a stranded wire is not the easiest operation, because you need to expose all the wires, make sure that they are clean in terms of contact, and only then start soldering. Any core in a stranded wire has insulation, and this often creates difficulties in establishing reliable contact.
Just crimping the cable lugs solves all these problems, because with the help of mechanical force (compression) not only the insulation of individual cores is destroyed, but also a strong connection of the entire cable is created for better contact.
This is where the moment arises of how to choose the correct sleeves for crimping wires, because they are made from different materials and have very precisely specified current characteristics.
The problem is that the size of these cartridges is small, and the markings are unclear to those who are not specialists. But before that, let's define the difference between a sleeve and a cable crimp lug.
Another point that is not even in the markings is the moment of tightening the sleeve or tip during crimping. And they are completely different for different types of tips, such as:
- ring (NKI).
- fork (NVI).
- pin round (NSHKI).
- flat (plug) connectors (RPI-P, RPI-M, RSHI-P, RSHI-M, etc.).
- piercing type couplers (OV).
Here it is necessary to return to the tool that is used to crimp the wires, because on each tool the dimensions are indicated for the standard shape of the jaws, and the force itself is accurately measured by diameters. So, unless you made a mistake with the diameter, you cannot apply excessive force.
And, despite the fact that the lugs for wires for crimping are different, with the same diameter both the force and the standard of the tool will be the same. It's a pity that this parameter is not reflected on the labeling. Apparently because such work is usually done by professionals, not home electricians.
But it is precisely the standards that allow home electricians to stock up on universal crimping pliers and crimp cable lugs for their own purposes without any problems. This procedure is quite simple to master, and technologically it is the same for crimping an RG-45 connector and a tip for a three-phase machine.
When crimping a multi-core cable, you cannot do without special lubricants. Therefore, use sleeves and tips that already have this lubricant inside. In any case, this is a one-time operation. It is not possible to remove a part to move it to another location.
As a result, having mastered the installation of sleeves and tips, you will be able to quickly restore the desired connection, carry out repairs without problems, as well as a connection that, in fact, will not need repair for many years.