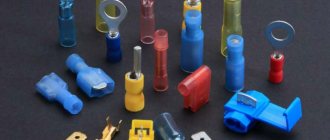
The insulated pin sleeve lug (abbreviation NShVI) is designed for crimping stranded copper wires, and allows them to be firmly and quickly attached to any devices or connectors. The end of the cable is crimped using a special tool. This connection does not require much effort and is very reliable. Pliers are often used to clamp the NShVI-tip with screw fixation. In this article we will look at the main types and sizes of NShVI tips, as well as the rules for crimping them.
Decoding and purpose of NSHVI
NSHVI is a type of tip, which is deciphered as follows:
- "N" - tip.
- "Ш" - pin.
- "B" - bushing.
- "I" - isolated.
This type of tip is used when crimping copper wires with a large number of cores for subsequent connection to devices and assembly of electrical circuits.
Crimping is carried out using a special tool - NSHVI crimping pliers. In other words, the task of the product is to ensure high-quality contact and integrity of the cores when connected using a screw clamp.
Sleeve NShVI are used for copper wires with a cross-section in the range of 0.5-35 sq. mm. After installation of the product, solid pins are formed at the ends of multi-core cables, simplifying connection to the terminal or equipment.
Crimping tool
The tip attached to the conductors using the crimping method is a non-removable connection, therefore, when connecting to other electrical equipment in a different way, it will have to be cut off. The crimping process is a kind of crimping of a bushing with conductors inside. For these purposes, a special tool is used - press pliers. They are equipped with a set of dies for different tip diameters.
Press pliers produce different modifications, and some models are designed to perform two types of work:
- The most common and convenient to use are universal press pliers. They are capable of performing a double function: stripping the insulation from the wire and crimping the bushing. Moreover, in addition to NSHVI, press pliers can cope with other types of tips;
- sometimes press pliers are equipped with an adjustment mechanism that controls the crimping force. This device allows you to avoid accidental pinching of the sleeve;
- press pliers with hinges increase the clamping force of the tool, which facilitates the process of manual crimping;
- Press pliers with a ratcheting mechanism are very convenient to use. It prevents the tool from unclenching until crimping is completed. It often happens that a tool accidentally released loosens the undercompressed bushing in the matrix, and it rotates. The next pressing with the die may not coincide with the grooves from the previous crimping, which will create a poor crimp.
In general, each specialist selects press pliers individually. After all, the quality and speed of work depends on the convenience of the tool.
Where are they used and what will happen if you don’t use sleeve tips?
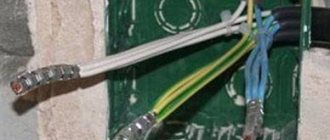
Connecting multi-core copper wires without the use of NShVI leads to damage to the wires, deterioration of the contact connection and subsequent burnout. In addition, damaged conductors are susceptible to oxidative processes and rust faster.
NShVI (KVT) tips have a wide range of applications. They are actively used when connecting sockets and switches, installing machines in an electrical panel, connecting RCDs and other equipment.
The popularity of a multi-core cable is easy to explain, because it has a number of advantages - flexibility and the ability to pass more current through itself (when compared with a single-core wire of the same cross-section). But it is not suitable for screw connections. It is precisely these clamps that are used today in the same circuit breakers, switches and sockets.
If you operate without clamping, the wires are displaced under the pressure of the screw and are damaged. As a result, the reliability of the connection deteriorates and the quality of contact decreases.
Previously, to solve the problem, soldering of stranded wires was used, thanks to which a large number of wires became one whole.
The disadvantage of this method is that it takes a lot of time. If you need to install a dozen sockets and switches, the work will take more than one day. The use of NShVI allows you to avoid such problems and speed up the completion of work.
During the installation process, it is worth remembering that the cross-section of the wire and sleeve must clearly correspond to each other and be selected taking into account the manufacturer. This is the only way to avoid installation difficulties and prevent cable damage. You can be sure that the connection will last for the entire period of operation.
Insulated pin sleeve lug for wires and its crimping
Single wire type cables are very well suited for distributing 220V power throughout the house. They are rigid, so you can bend them however you want, and because the wire inside is a single rod, without additional tools, using ordinary electrical connectors, it quickly connects to other wires and blocks (for example, in an electrical panel).
Power cords are a completely different story. They are flexible, and inside one wire consists of a dozen or even several dozen thin copper wires. The vast majority of power cords supplied with household appliances and all kinds of extension cords are made using wired multi-core cables.
Using such cables, you can connect two or more wires to one point without using external electrical connectors. For this purpose, cable end sleeves (pin lug) are used and today’s article will be about them. An important advantage of this solution is that the switch has a very good contact surface with the cable or wires.
In addition, the terminals of such a sleeve can be used wherever it is necessary to connect cables such as a network line. Connecting a cable to an electrical connector of a product (module) without a clamped bushing may result in the connector screw pressing only on part of the cable wires, which will weaken reliability and conductivity.
Design and types
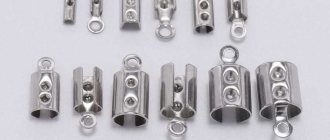
The product consists of 2 elements:
- CURRENT CONDUCTING TUBE. In the process of its manufacture, electrolytic copper with mandatory tinning is used.
- POLYAMIDE FLANGE, INSULATED.
In simple terms, NSHVI cable lugs are copper tubes processed by galvanization and having one flared end (for inserting a stranded conductor). The second part of the product is a polyamide cuff, which provides reliable insulation and protection against voltage.
What are NShVI and NShVI-2?
It is necessary to start by deciphering the abbreviation: NSHVI - pin, sleeve, insulated tip. If there is a designation without the letter “I” at the end, this means that there is no additional insulating material. NShVI-2 differs from the standard NShVI only in that it can be installed on 2 wires at the same time.
Also, at the end of each abbreviation, the cross-section of the conductor for which the tip is designed can be indicated. This information is also provided by the product labeling.
Figure 1: NSHVI
Each tip consists of a tinned copper tube and a special skirt, which acts as insulation in the product. Nowadays, the most popular products are those with insulation, which are an integral part of modern electrical wiring.
Figure 2: NShVI-2
Design nuances and characteristics
The NShVI tip, as a rule, has the following features:
- During the manufacturing process, M1 type copper is used;
- The upper voltage threshold is 690 V;
- The surface of the connector is subjected to electrolytic tinning;
- The dimensions of the connectors are designed to connect one cable (installation is carried out taking into account the cross-section);
- Insulation is performed using polypropylene, which does not contain halogens;
- The insulating element is characterized by high thermal resistance - it can withstand temperatures up to 105 degrees Celsius;
- KBT bushing connectors are manufactured in one color and have a common DIN standard. This is done in order to eliminate difficulties during the installation process. In addition, the color is selected taking into account the marking DIN 462228, part 4.
- The conductor is crimped on top of the copper bushing;
- The NShVI cuff has a conical shape, which eliminates problems in the process of inserting a stranded wire into the inner part of the sleeve.
Product characteristics are presented below.
Which tip to choose
Before you begin crimping, you must select the correct tip. It is worth remembering that such products come in different types - different sleeve thicknesses, different inlet diameters. Moreover, this happens with connecting parts of the same cross-section, but from different manufacturers. Therefore, it is not always possible to crimp 2 different lugs for wires of the same cross-section using the same matrix. In addition, the number of sleeve crimps may also differ.
If you want to achieve a high-quality connection that will reliably serve you for years, use the following recommendations.
- The core, stripped of insulation, must clearly correspond to the diameter of the tail part of the tip.
- There may be play, and it is acceptable, but it should be minimal.
- If the tip material is aluminum, then the choice is simpler. Select a tip of the same cross-section as the cross-section of the wire. You can navigate by the inscriptions on the blade of the contact part.
But if the material of the product is copper, then certain difficulties arise. But there are several solutions here too.
- There are GOST tables that can be used to select the desired type. But this is not entirely convenient, because... you need to clearly know and distinguish between core flexibility classes, and you don’t always have these tables at hand.
- measure the diameter of the cable core with an ordinary caliper. Then compare it with the diameter of the inner part of the tip shank, which can be determined using the same caliper, or by the inscription on the blade.
The third group of numbers in the marking TM-35-8-9 will be exactly the required diameter. That is, if the diameter of the core that you measured turned out to be 8.5 mm, then the most suitable option would be the tip marked TM-35-8-9.
Please note that the diameter of the core should be slightly smaller, but not larger than the diameter of the shank.
The material of manufacture of the tip and sleeves must be the same as the material of the wire or cable core. Connect aluminum wires with aluminum parts, copper with copper. Otherwise, corrosion processes cannot be avoided.
If you need to connect an aluminum terminal to a copper contact (on a switch or switch), use an aluminum-copper ferrule or use aluminum-copper washers.
There are special aluminum-copper sleeves for joining copper and aluminum cable cores.
Working methods
When using NShVI tips, it is worth considering the following:
"SKIRT" COLOR. The product shows the cross-section of the connector. As a rule, we use the KVT standard, which is characterized by the following:
- Black - 1.5 sq. mm;
- Blue - 2.5 sq. mm;
- Gray - 4 sq. mm;
- Yellow - 6 sq. mm;
- Red - 10 sq. mm.
It is worth noting that goods from stores deviate from the standard. At the same time, the size of the product and color do not correspond to KVT in any way. The downside is low quality and rapid destruction. That is why, when choosing, you should pay attention to the color of the “skirt” and its correspondence to the cross-section.
PACKAGE. As a rule, NShVIs for crimping come in packs of one hundred products, which are packed in groups of five in a larger package. It is not possible to purchase such a product individually.
If you need to connect two cables, there is no need to “reinvent the wheel.” NShVI-2 connectors of the same type of installation are available for sale. For example, if you buy a product for four square meters. mm, it easily accepts two wires per 4 sq. mm.
Ratio of wire cross-section to tip
NVSHI can only carry out crimping of flexible stranded wire. Such bushings cannot be used for single-core wires. Crimping of rigid cores is performed with non-insulated bushings.
The single or double tip used must be selected according to the cross-section of the wires. The wires should be inserted freely and sit well in the socket before crimping it. This will ensure the best contact after crimping.
If we talk about the cross-sectional ratio, then the bushings are not designed for a specific wire diameter, but have a small run-up. For example, a PV-3 1x2.5 mm2 wire can be crimped into a lug with a socket cross-section from 1.5 to 2.5 mm2.
Crimping tools and their disadvantages
There are two types of tools used for crimping:
- SPECIAL PLIERS - characterized by a fixed matrix. In the case of KVT connectors, STC is used. The disadvantage is the low reliability of the connection if the conductor has a non-standard cross-section. In addition, you should have two types of pliers on hand - for connecting single and double connectors. In some cases, larger pliers may be required.
- PLIERS WITH MULTIPLE DIES. This tool also has a disadvantage related to practical application. So, after processing wires with a large cross-section, for example, 10 sq. mm, for connecting a socket with a 2.5 sq.m. wire. mm. installation of a new matrix is required. Such changes take a lot of time.
Types of tips
There are several types of NSHVI, differing in the number of connected wires. One or two wires can be connected to the product, but the exiting metal part, intended for clamping with a screw terminal, remains one. The double tip in the designation has the number 2 after the letters NSHVI.
If we consider the design, the NShVI double-connection sleeve terminals have the same structure as their single counterparts. The same metal part for crimping and PVC cuffs. The double model differs only in the wider width of the PVC skirt, since it is designed for two wires.
The use of double lugs is necessary when connecting two wires to one terminal. This frequent need arises during the installation of sockets and circuit breakers in an electrical panel. Crimping of double models is identical to single ones, and the same tool is used - press pliers.
Popular crimping tool
To install KVT tips, use the following tool:
- WS-04A is the optimal pliers for beginners. With their help, it is possible to solve the main set of problems in the process of installing various electrical circuits and assembling panels. Its functions include the ability to bite off and strip wires (cables) with a cross-section of up to 10-16 square meters. mm. In addition, it provides recesses for NShVI tips up to 6 sq. mm. (if desired, a cable up to 10 “square” is included) or up to 10 sq. mm. (includes up to 16 “square”). On sale you can find WS-04A pliers, which are equipped with dies for crimping NShVI. Their disadvantage is that the matrices can only cope with products of standard sizes up to 6 square. If you use wires with a reduced cross-section (fake), the quality of the connection will be poor.
- PKVk-10 is a universal tool that is used for crimping conductors of 0.5-10 sq. mm. But this is in theory, because in practice the situation is different. For example, to crimp a cable from 6 "square" and above, a lot of force will be required, and if you reduce the crimping force, the quality of contact when crimping connectors with a small cross-section deteriorates. The advantage of PKVk-10 is its compactness and the ability to get into even hard-to-reach places for installation (if necessary). The tool is best used for crimping conductors up to 4 square.
- STK-03 - powerful pliers that are suitable for large sections (from 10 to 25 “square”).
- PC-16. These pliers are useful for crimping TML from 6 to 10 sq. mm. The manufacturer sets the upper limit at 16 sq. mm., but in practice, crimping such a cable requires a strong hand and a lot of effort. Overall, the tool is not very good, but it has an affordable price. The PK-16u version is available for sale - a reinforced version that is more durable. The tool is suitable for cases where crimping is rarely carried out.
- PGRs-70 is a hydraulic press that is used for TML and sleeves. Many consider the tool as an alternative to PC-16. A special feature of the press is the availability of interchangeable dies with different cross-sections in the range of 4-70 sq. mm. With the help of such equipment it is convenient to crimp classic cables - six, ten or sixteen square millimeters. It does not require a lot of load or excessive effort.
- PKVsh-6 - used for crimping NShVI and NShV from 0.25 to 6 sq. mm., as well as a double tip NSHVI-2 with a cross-section from 0.5 to 4.0 sq. mm.
As for Wiedmuller or Knipex pliers, their disadvantage is the large divergence of the handles. As a result, it is difficult to crimp the NShVI with one hand (the fingers are not long enough).
To avoid discomfort when performing work, you should select a tool based on ease of use, and not focus on the brand.
Types and varieties
Ferrules for stranded wires are available in cross-sections from 0.5 mm² to 250 mm². According to the shape of the contact part, they are:
- ring;
- fork;
- detachable;
- pin (with different shapes of pins);
- sleeves.
Cable lug blade shapes
For screw terminals, wires are terminated with ring or fork lugs. They can often be seen on cords that are connected to the terminal blocks of household appliances: washing machines and dishwashers, electric ovens, stoves, hobs. If you look inside the equipment, there may also be pin or connector lugs.
It is important here that the shape of the pin matches the socket, since they are very diverse. Only those shown in the photo above are more or less standard, and, in general, can be of different shapes and lengths
Based on materials
In addition to their shape, wire lugs can differ in the metal from which they are made. Exist:
- aluminum;
- copper;
- brass;
- combined - aluminum tube, copper blade.
Copper lugs can be made from standard electrical copper, but tin-plated products are most often used, as they practically do not oxidize, which ensures better contact.
A few more types
The tip material is selected depending on the material of the cores. For copper - copper, for aluminum - aluminum. If you need to connect an aluminum cable to a copper busbar, use combined cables. They solve the problem of the chemical interaction between copper and aluminum. For example, such lugs are useful if an aluminum cable is pulled from a pole, but it must be connected to a copper busbar.
By installation method
Wire lugs are distinguished according to the installation method. They are:
- For pressure testing. Their installation requires special crimping pliers or a hydraulic press (for large diameters or work volumes).
- For soldering. Only copper or tinned copper ferrules are used. The form is usually split.
- Under the bolts. They can be identified by their appearance - there is a hole for a bolt. During installation, the bolt is tightened, clamping the wires. Not a very convenient method, since the bolt may stick out, which often gets in the way.
- For welding. Rarely used in everyday life.
Crimp lugs are the most popular for electrical wiring in houses and apartments.
There is also a screw connection. It is used with cables of large diameters. The inside of the tip has the shape of a trimmed cone - it tapers at the top. There is a thread on the inner surface. The cable is simply screwed in, and due to the applied forces, the conductors are pressed against the walls, which ensures good contact.
Most often, crimp lugs are used. They provide a good connection and are easy to install. The only negative is that you need to have a special tool - crimping pliers. But they are not that expensive and last for years.
How to crimp NShVI bushings?
Before crimping, the wire is stripped using an insulation stripper, a special knife or a stripper. The first option is the most convenient and allows you to quickly get rid of the top insulation without damaging the cores. Stripping is carried out precisely along the length of the sleeve into which the conductor is installed.
As soon as the preparatory work is completed, a sleeve is put on the insulated part. Pre-select the pin sleeve tip (NSHVI) of the required length.
When crimping, special pliers are used, which were mentioned above. While doing the job, it is important to know how to use press jaws. If the technology is violated, the quality of fixation leaves much to be desired.
To avoid errors, the sequence should be like this:
- Inserting the stripped edge into the sleeve;
- Installing the tip into the tool groove. It is important to ensure that the insulated part is pressed tightly against the body of the pliers;
- Clamping the handle with sufficient force to ensure reliable fixation of the connector.
If you do everything correctly, you get a reliable connection, and the structure itself is monolithic and strong. The principle of crimping using NSHVI-2 is similar. The main thing is to accurately select the cable cross-section. This is not difficult to do. The first numbers show the cross-section, and the subsequent ones (indicated by a hyphen) show the length of the working part.
The optimal tool for crimping in terms of price-quality ratio is considered to be the WS-04A, which was mentioned earlier. Its peculiarity is the presence of lower teeth, which ensure reliable crimping of the product. Thanks to the groove, the connector is tightly compressed and cannot be removed.
When installing the NShVI, keep one nuance in mind - use the section one step lower. What does it mean?
For example, if for a cross-module the permissible cross-section of a stranded wire is specified as 16 sq. mm., after crimping a 16mm analog using NShVI, the structure will not fit into the connector. Here you should use a 10 kV cable. mm.
The PKVK-10 tool is considered no less convenient, but it is used for smaller sections. After crimping, the connector has a rectangular, rather than trapezoidal (as in the previous case) shape.
The advantages of the tool are reliability and ease of use, but even with it there are “punctures” in the form of poor-quality crimping (this nuance should be monitored when performing work).
How to crimp a pin lug
This is a simple operation. Just do it once and you can consider yourself an expert on this topic. It may take two or three tries, but let's start from the beginning. Let's look at two examples:
- We will compress a wire with a cross section of 2.5 mm2 using a 2.5 / 8 sleeve
- Let's fasten two conductors at one end: one 2.5 mm, the second section 1.5 mm2 using a 2 x 2.5 / 10 sleeve
Crimping a single bushing with a wire
First of all, we remove the insulation from the test 3-core cable with a cross section of 2.5 mm. It is better to use an insulation stripper, but you can do it the classic way - using a knife.
After removing the overall outer insulation, strip the insulation from the end of each wire separately. It is worth stripping the insulation to the same length as the length of the sleeve, which in this case is 8 mm.
Now all you need to do is put the sleeve (tube) on the end of the wire. Ideally, the sleeve insulation will match the wire insulation.
It is not acceptable to place the ferrule so that the copper wires between the wire insulation and the ferrule insulation are visible. Such a connection is both unreliable and unsafe!
Now you need to insert the sleeve into the hole of the tool of the required size and compress it. We find 2.5 on the crimping device and insert it to the end of the tube with the wire, then press the handle and everything is done.
You can check whether the lug is securely seated on the wire by holding the cord with one hand and pulling the cable with the other. You may have to apply more pressure if the tip moves.
Double Pin Lug Crimping
Clamping two wires at one end requires the use of a double terminal for the given cable cross-section.
The first step is identical. Remove the insulation from the ends of both wires. The double lug we'll be putting on has a sleeve length of 10mm, so will require a little more insulation than before. Holding both wires parallel to each other, insert them into the end of the sleeve. There is no need to pre-twist the cables together. Slowly (so as not to become disheveled) we put the tip on the wires.
Clamping wires of different sections into a common terminal
The most difficult task during installation (especially for novice craftsmen) is combining conductors of different cross-sections in one connector. To avoid problems, you should adhere to the following rules:
- Wires of larger and smaller cross-sections are diverted from each other. This can be done thanks to different insulation of the conductors, as well as a reserve in diameter at the tip skirt. The thinner product is stripped a greater distance, after which it is moved forward so that it ends up in the end first.
- At the second stage, the main wire is inserted into the tip all the way and crimping is performed.
A similar principle should be followed in the case of double NSHVIs - first the thin conductor is inserted, and then the main wires are inserted. For crimping, it is recommended to use STK-03 pliers. While working, make sure that the tool does not snap into place. To do this, hold the ratchet lever while crimping.
The procedure for crimping tips and sleeves
For crimping thick-walled tips and sleeves, it is best to use a hydraulic press. The press set initially includes universal dies for any tips and wires. Under no circumstances use a tool not intended for crimping (hammer, chisel, etc.). A contact pressed in this way will not last long, especially if it constantly experiences heavy loads.
- from tip length
- and matrix width
In the operating instructions for the press that comes with the tool, there is a plate indicating the required number of crimps. Please note one thing: this table is intended for tips and sleeves made in accordance with GOST. How they differ from other brands can be found in the article Cable lugs, markings and types.
Insert the tip into the press so that the matrix cross-section markings (35-50-70, etc.) are imprinted on the front side of the tip, and not on the side or bottom.
- The first crimping of the tip should be done closer to the blade (where the bolt is inserted)
- Perform the following crimps in order, moving from the blade to the tail of the tip
- the same rules apply for sleeves
This must be done in this sequence, because with each press the tip tends to lengthen (sometimes up to ten percent!). And if you start pressing from the end (not from the blade), during the last crimp, there is a high probability that you will have a void at the end of the sleeve. And you will not achieve the contact that was necessary.
First of all, this applies to all aluminum products. For copper this is not yet so critical.
When crimping from the side of the blade, the tip will seem to fit onto the core, tightening the connection more and more. The insulated tips even have special digital markings indicating the pressing order.
The crimping ends at the moment when the matrices close together. If you need to perform two or three crimps, step back 2-3mm from the previous crimping point and continue crimping.
When crimping, the formation of a small flash is acceptable. It can be removed or filed off. A very common mistake is the formation of large “ears” on the tip. This results from an incorrect choice of matrix.
If such “ears” do appear, you should not cut them down to the base of the sleeve. Otherwise, a gap may form in the tip and the crimp contact will become loose.
After the tip is crimped, it is advisable to insulate the area between where the shank ends and the remaining uninsulated part of the core. It is best to use heat-shrinkable tubing for this.
What to do if you don’t have a crimper on your hands?
The situation is more complicated when there is no special tool for crimping the NShVI. Here you have to look for alternative crimping methods so as not to disrupt the work process. One option is tinning using a soldering iron, rosin and tin.
This option is good, but not suitable in all cases. In addition, the work takes time, and with large volumes of work, running with a soldering iron from one place to another is inconvenient.
Some “masters” use ordinary pliers for crimping. The essence of the technique is to press on the tip in several places for reliable fixation. The convenience of the method is undeniable, but when using it there is a risk of damaging the wires. If earlier this method of installation was acceptable, today it is better to forget about it.
If you don’t have enough money for an expensive crimper, you can buy a more affordable tool. There are many mites on sale that have decent performance in terms of price-quality ratio. In addition, it is better to take universal tools that can perform several functions at once.
Basic rules for crimping
Follow several rules that will simplify the crimping process and improve the quality of the final result when working with cable lugs or sleeves:
- the tip must be selected technically competently, taking into account all the nuances;
- slowly strip the veins, removing all traces of insulation;
- When performing work, use only high-quality tools;
- find a matrix that is suitable for crimping;
- strictly follow the cable crimping sequence.
When using the tool, be sure to set the hole dimensions correctly, otherwise the connecting components may be damaged.
NShVI pin products
Pin sleeve lugs (abbreviated as NSHVI) are made from special electrolytic copper, the back of which is protected by an insulating layer. The material must be treated with galvanic tinning. In the domestic and industrial spheres, NShVI are used for crimping cables with a cross-section of 0.2 square meters. mm and above.
Note! In addition to letter markings, color markings are also used to indicate the diameter of the sleeve.
The nuances of working with NSHVI
NShVI are ideal for crimping multi-core wires, but will be inappropriate when working with a cable consisting of a single core. The crimping process is carried out as follows:
- Select the wire cross-section and cable lug of the desired brand. Make sure that the wires are inserted into the product from the “skirt” side.
- When choosing this component, make a certain reserve. For example, a wire whose cross-section is 1.25 square meters. mm, must be crimped with a tip with a cross-section of 1.5 square meters. mm and above with a “skirt” size of no more than 2.5 square meters. mm.
Required Tools
In the process of terminating a single or multi-core cable, a special tool is used to achieve the required force and ensure the reliability of the result. You should have on hand:
- Press pliers PK2 and PK2M are suitable for crimping wires whose cross-section does not exceed 10 square meters. mm;
- PK1 and PK1M are tools with increased power compared to hand pliers;
- hydraulic pliers, like PK2, can be used for cables with a cross-section of no more than 10 square meters. mm;
- In industrial enterprises, manual presses are used, suitable for cables with a cross-section of up to 250 square meters. mm;
- for conductors whose total cross-section is even larger, a hydraulic press equipped with an electric drive is used.
The presence of a ratcheting mechanism in the press jaws increases the reliability of the work: the tool will not loosen until it is completed.
Sleeves for wires for crimping
It is not always appropriate to use standard cable lugs, so instead of crimping, terminating with sleeves can be performed. For copper cables, GML (tinned copper) sleeves are used, for aluminum cables - GAO (closed aluminum sleeve). When two elements from different materials are connected, a sleeve made from an alloy of aluminum and copper is used.
Preparation for crimping
Before inserting the core into the tip, you need to perform careful preparation:
- Remove the insulation from the end of the wire of the required length (to do this, use a special tool to avoid damaging the wire).
- Twist all the strands by hand and push them inside the tip from the “skirt” side.
Tags: machine, beat, sconce, view, harm, choice, house, , clamp, isolate, insulation, cable, cable, like, computer, design, contour, , tray, , marking, matrix, installation, power, crimping, soldering iron , rule, principle, wire, start, , work, size, switch, row, system, connection, resistance, term, ten, type, current, , installation, Khrushchev, shield, electrical panel, effect
Double insulated tips (NSHVI-2)
To compress two stranded conductors, a special connector is used - NShVI-2. Its advantage lies in the ability to connect two wires at once into one socket of an electrical device.
In addition, if you need to install several conductors of the same cross-section (for example, 4 x 1.5 sq. mm), it is also better to use NShVI-2.
It is useful in cases where it is necessary to route lines in the panel to different terminals or, for example, to connect the neutral wire from an RCD or AV to several terminals at once. Using a jumper in this case will not work.
Tip design
The tip consists of two parts:
- A conductive tube made of tinned electrolytic copper.
- Insulated polyamide flange.
Special copper is used to make them. It is this connection that allows, when clamping, not to damage the conductor itself at the screw fastening points. NShVI are produced with a cross section from 0.25 to 150 mm. The material from which they are made is subjected to galvanic tinning.
The dimensions of NShVI and NShVI-2, as well as their color markings, are provided in the tables:
NShVI tips come in two types: single and double. The advantage of the double design is the ability to crimp two stranded wires. For example, they can be used instead of a jumper wire to supply power to a circuit breaker. Such lugs are used for two wires entering one socket of an electrical appliance.
The difference between single and double tips is the type of plastic flange. For singles there is one wire, and for doubles there are two, so they have a more extended flange.
The video below clearly shows what wire lugs are and how to use them correctly:
Popular products in Russia
There are many factories in Russia that produce NShVI tips. The leading position in this market segment is occupied by the KVT plant, which produces electrical installation tools and cable fittings of high quality and affordable prices.
Today, the plant’s product range includes more than four thousand items, which allows you to select the appropriate tools and components.
The plant produces the following products:
- Cable lugs and sleeves designed for crimping wires and cables.
- Bolted lugs and connectors - for convenient installation of cable cores. The peculiarity lies in the versatility and reliability of contact, which allows the product to be used as components for heat-shrinkable cable sleeves.
- Insulated tips, sleeves and connectors.
- Insulated clamps and terminals.
- Cable couplings KVT.
- Elements of cable couplings and other elements of equipment designed to work with wiring.
Purpose and scope
Aluminum and copper cable lugs
The main purpose of lugs is to ensure reliable contact between multiple conductors, busbar and wire, and clamp and wire. They are also used to simplify installation work related to electrical equipment when performing any technological operations.
Cable lugs serve as a high-quality analogue of various twists and all types of homemade connections, which are still very common. This inexpensive and easy-to-use device guarantees high-quality fixation of the wire inside the sleeve.
In conclusion
The use of NShVI and other types of lugs is mandatory if a multi-core cable is used to connect electrical devices and equipment.
Ignoring this requirement and installing the cable under a screw terminal without a sleeve leads to deterioration in the quality of the connection, heating of the contact point and burnout of the conductor.
In the absence of special pliers, tinning of a stranded wire using a soldering iron is used; alternative crimping methods are not justified.
Tags: Electric current
So, how to properly crimp wires with lugs
In addition to selecting the necessary wires and tips, to perform this task you will need a special tool called a “crimper” or press pliers.
Externally, the tool is very similar to pliers, at the ends of which a special matrix is installed, into which the tips and the non-insulated part of the cable are inserted.
This tool is designed to provide uniform ferrule force around the wire, eliminating poor contact when crimping the cable. In addition, there are universal tools that allow you not only to crimp, but also to cut the cable, remove the insulation from it and twist the core.
Particular attention should be paid to the type of cable; in domestic conditions, the power cable can be of two types:
- with a monolithic core;
- stranded
When crimping a wire with a monolithic core, it is enough to remove the insulation layer with a small margin (up to 0.3–0.5 cm), (using a tool or using an insulation stripping knife), then straighten and degrease the area to be worked with, after which you should put it on a thermal insulating tube onto the cord.
Then, we select on the tool (by a jumper in the matrix) a certain section and type of tip. After carrying out the above manipulations, you need to insert the prepared end of the wire into the tip, after making sure that there are no cracks in it.
Install the ratchet lock lever. Failure to comply with this point may result in poor-quality crimping of the tip and, accordingly, poor quality of the connection.
The final part of crimping a wire with a monolithic core with a tool:
- make sure the connection is correct;
- insert the tip all the way into the device so that the numbers with the matrix markings are knocked out on the front or back sides of the tip;
- completely recess the exposed section of the wire into the tip;
- applying force, press the crimper handles;
- as soon as the operation is completed, the handles will automatically begin to return to their original position (to do this, it is necessary to move the ratchet locking lever to the “locked” state);
- The cord has been terminated; the final step is to put the heat-shrinkable braid on the connection point and warm it up with a special hairdryer or lighter.
If the handles do not return to their original position, then this problem may be caused due to the following problems:
- too weak compression of the tool handles;
- malfunction of the ratchet mechanism;
- “weak” spring in the ratchet;
- The ratchet locking lever is not fully installed.
If you have to terminate multi-core wires, then the above method should not be used, as it has many nuances.
Therefore, wires with a large number of cores are crimped according to the following instructions:
- remove part of the insulation from the wire (with a small margin of up to 0.3–0.5 cm); when removing the insulation, it is highly advisable to use a special tool that allows you to remove the braid and not damage the cable cores, but if such a tool is not available, you can use a sharp knife (when removing the insulation, you should make sure that the wire cores were not affected);
- put a small piece of thermal insulating braid on the cord;
- after which the bare area must be degreased with alcohol and a special electrically conductive paste applied (the most common options are compositions such as “KVT” and “EPS”).
After the above manipulations, cable processing can be considered complete.
set the required cross-section and type of tip in the device matrix; install the tip completely into the device so that the numbers with the matrix markings are on the front or back sides of the tip; we insert the straightened cable cores into the lug until it stops (Attention! Twisting the cable cores is prohibited); applying force, press the crimper handles; The crimping of the stranded wire is completed, now we return the heat shrink that was previously placed on the cord to the connection point and warm it up with a hair dryer, soldering iron or turbo lighter; After completing the operation, the handles should return to the standard (unclamped) position; if this does not happen, then the reason for this may be the problems described above.
Connectors for wires for crimping: types of lugs, sleeves and terminals
There are many options for tips used for crimping. It is imperative to take into account how the wiring will be installed. If the cables are expected to be clamped in a circuit breaker, then it is better to use pin bushings for connection. Tips with or without insulation can be found on sale. The same product option is used for cables that are clamped using contact blocks.
If the wiring will be fastened under a nut-screw, then in this case special connectors are required. These include the following types of terminations: U, J and O. Once installed, the same screw is used to clamp them to the contact pad. There is another class of connections - male-female tips. They are quick-release products that are very convenient to use.
Cable lugs for crimping can be either with or without insulation
Based on the shape of the structure, the following types of wire crimping lugs are distinguished:
- ring;
- power;
- fork;
- tubular (sleeve);
- in the form of a socket (used for quick connection);
- pin.
In addition, tips are classified according to the type of material from which they are made.
Wire lugs: types of products, their purpose
The connecting element is selected taking into account the type of wires on which it will be installed. The most common and in demand are the following types of tips:
- copper;
- aluminum;
- aluminum-copper;
- bolted
Copper versions of the products are intended for crimping cables made of the same material. To produce these parts, seamless tubes are used. On one side of the tip there is a clamping part. On the other side of the connector there is a tubular hole where the wire will be inserted. Purpose of copper tips:
Copper and aluminum lugs are designed for wires made of the same materials as the products themselves
- connection to the circuit of input and distribution devices;
- installation of electrical appliances;
- grounding
Aluminum products, like copper ones, are intended for wires made of the same material. On one side they also have a tubular hole, but on the other side they have a contact blade.
Important! Before connecting the wires with a crimping tool for lugs, aluminum products should be treated with quartz-vaseline lubricant. It will protect the contact area from oxidation.
Sometimes copper bars are used in distributors. In this case, aluminum-copper connectors are used. For these elements, the landing tube is made of aluminum, and the contact blade is made of copper. Frictional diffusion is used in the production of these products. The gas-dynamic copper deposition technology can also be used, during which metal is sprayed over the tip, ensuring stable contact.
Bolt ends are one of the most popular
In bolt-type lugs, fixation is carried out using a clamping bolt. You will need a wrench to tighten it tightly. This method does not require crimping since the bolt itself makes the contact connection.
Main types of crimp lugs for copper wires
During the manufacturing process of copper connectors, the pipes are cut accordingly. After this, a contact blade is formed on one side by flattening. It has a hole for fasteners, the size of which depends on the diameter of the bolt.
There are two types of copper cable lugs:
- without a protective layer;
- with tinned coating.
Tin-plated contacts are much more practical because they have anti-corrosion protection. Thanks to this, this type of product has a long service life. Tin-plated connectors are resistant to the aggressive effects of various acids:
- sulfur;
- nitrogen;
- salty
Copper crimp ends are available with or without puddle coating
They are not destroyed under the influence of moisture, air and other negative environmental factors. Due to the presence of a protective coating, the level of electrical conductivity of the tips is reduced, but this does not prevent them from maintaining optimal performance.
As for copper connectors that do not have a protective coating, the oxidation of these products occurs much faster. Their current conductivity is very low, which increases resistance. As a result, the connection area heats up.
The scope of application of copper tips extends to:
- to create a contact between devices (possible use on a group of devices);
- forming a connection between the device and the electrical network;
- increasing the cable length by splicing wires.
Experts advise using lug crimping pliers to install copper connectors on wires. Despite the extensive selection of products offered by manufacturers, it is not always possible to select an element of the required size. In this case, it is worth making the tip yourself. To do this, select a copper tube of the required size and then flatten it at one end. A hole of the appropriate diameter is made in it for the mounting bolt.
Coated tips are resistant to air and moisture
Important! Tips made in home-made conditions are significantly inferior in their characteristics to factory-made products. It is very difficult to calculate what degree of load they can withstand, so it is not recommended to use homemade connectors in critical sections of the electrical circuit.
Using wire sleeves for crimping
In some cases, wire sleeves can be used as connectors instead of lugs. If splicing of cables in which the conductors are made of copper is required, products marked GML should be used for work. This marking means that the sleeve is made of copper and is protected by a tin-plated coating. Products marked GAO are intended for connecting aluminum wires. They are aluminum sleeves with a closed design. In addition, there are sleeves made from alloys. They are used in cases where it is necessary to connect aluminum and copper elements.
The connection by crimping wires with sleeves or lugs is of better quality than splicing by soldering. A multicore cable consists of several cores, each of which is hidden in its own insulating sheath. For reliable contact, they all must be bare, which creates certain difficulties when using soldering. Such problems do not arise with crimping, because during the compression process the insulating layer on each core is destroyed. This ensures a strong connection and ensures better contact.
If crimping will be carried out using sleeves, it is very important to pay special attention to the selection of products, in particular their material of manufacture. As a rule, current characteristics are written on them. The main difficulties in the process of purchasing products arise when it is necessary to choose the appropriate size. Manufacturers in this regard offer a limited range. In addition, it is difficult for a person without special education to decipher the markings.
The sleeves are ideal for splicing multiple wires
Crimping wires using sleeves is performed in exactly the same way as when using lugs, however, more crimps will be required.
Main types of crimp terminals for wires
Connection terminals can be divided into two categories: electrical and electrical. The difference between these products lies only in the amount of current load that they can withstand. This parameter must be taken into account when selecting terminals for crimping wires during installation or repair of a circuit.
Related article:
Wire lug crimping pliers: types of tools and methods of application
Functional purpose. Professional and household tools. Hydraulic pliers. Crimper for crimping Internet wires.
The most popular types of crimp terminals with the simplest design:
- fork;
- knife;
- pin;
- ring.
Knife-type terminals are the most common option. They are found mainly in household appliances, such as refrigerators, irons or heating devices. Knife terminals are mounted on stranded wires, the cross-sectional size of which is in the range of 0.26-6 mm².
There are crimp terminals: fork, ring, pin and knife
Insulated and non-insulated options are available on sale. The color of the insulating material depends on the design power. It can be yellow, blue or red. Such products are used in pairs (“father and mother”).
Important! The maximum voltage that such a connection can withstand is 5 kW. Therefore, knife terminals cannot be installed in large power plants with high current power. Also, their installation in apartment electrical panels is not allowed.
Fork terminals are used in secondary or power circuits. After their installation, screw fastening to busbars or electrical equipment is assumed. This product option is considered a temporary option. Fork type terminals can be used in areas where contacts are frequently reconnected. Externally, these terminals resemble a plug with two prongs. They are used for crimping wires whose cross-sectional size does not exceed 6 mm². Available in two versions - with and without insulation.
Ring terminals provide very reliable contact. Like fork ones, they are subsequently secured with screws. Due to the fact that the contact part has a round shape, the connection area increases. In addition, the likelihood of the tip popping out is reduced. Suitable for low-current and power networks. Cable cross-sections may vary. Ring terminals come in aluminum, brass, copper-aluminum and copper.
Ring terminals are reliable and come in a variety of materials
Pin terminals have a detachable design consisting of a plug and a socket. Blue products are intended for wires with a small cross-section - up to 2 mm², and yellow ones - from 2 to 6.64 mm².
Cable lugs for crimping: main characteristics
Wire lugs (terminals) are universal parts used for contact connection of cables. The use of such products has a positive effect on the functioning of the electrical circuit as a whole. There is a huge range of different types of lugs on the market, so it is not difficult for consumers to choose the appropriate option for performing certain electrical installation work.
Manufacturers offer a wide range of different types of tips
Ferrules for stranded wire allow you to create a reliable connection with various components of the electrical circuit:
- screw clamp;
- terminal block;
- household electrical appliance;
- another cable.
The lugs perform well in circuits where strong vibrations often occur. They can also be used in cases where standard joining methods are not suitable. For example, if the wires are not long enough, soldering or welding cannot be used. To crimp wires in such a situation, a tip or sleeve is simply installed on the bare end, after which this area is crimped.
Advantages of using tips:
- The bundle of veins remains intact, it does not flatten or fall apart.
- The connection area does not burn or heat up.
- The integrity of the wires is maintained.
- Metal conductors are reliably protected from moisture and air.
- All wires of the bundle take part in the transmission of current.
- The tips have a large contact area.
Thanks to the lugs, the bundle of wires remains intact and does not fall apart
Connecting cables using the crimping method is used in production (connecting power lines) and in domestic conditions. The popularity of this method, in contrast to the use of conventional clamps, is due to its high reliability. In addition, connecting wires using a ferrule is much easier than using soldering or welding.
Note! The size of lugs for wires for crimping, as well as sleeves, must be selected taking into account the main characteristics of the wire. These parameters include the diameter of the cable and the type of metal from which it is made.
Double terminal crimp
The connection of more than one conductor to a phase most often occurs on one contact. For example, when installing modular type circuit breakers, mutual connections are made using jumpers. Thus, two conductors come to one contact. When using single lugs, a problem arises in connecting two pins to one switch contact. In this case, it is more advisable to use NShVI lugs for dual-type wires.
The pressing process is similar to that when using a single tip. The only difference is the insertion of two conductors into the wide “cuff”. For double pressing, a crimper device is used. Can also be used for single spin. The matrices are large in size.
If a double lug is not available for installation, you can use a single lug with a larger bushing diameter, provided that both conductors must fit inside.
Purpose
What are all these tips for? They are needed in order to assemble together (in one monolith) a core of stranded wires. There are two types of wires:
- ⚡
single-core or mono-core (no crimping tips required) - ⚡
stranded or stranded (lugs required)
Without the use of lugs, stranded wires are almost impossible to fully clamp in any equipment.
Some save money and still manage to make such a connection. As a result of such “work”, the contact area will be insufficient, the contact will heat up and eventually burn out or cause a fire.
A couple of decades ago, when the technology was not yet so widespread, stranded wires were simply soldered, thereby assembling the stranded wire into a monolithic structure.
How to decipher the markings of a wire lug
To make it easier for consumers to navigate the proposed range of tips, a special marking system is provided. It allows you to determine the material from which the part is made, as well as its purpose.
Decoding of letter designations:
- L – products made of brass.
- T – tubular metal is used for the manufacture of parts.
- A – aluminum sleeve.
- M – copper product.
- U – angular tip.
By marking you can find out what material the product is made of and what its purpose is.
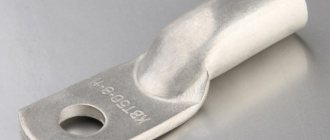
The explanation of the TML 70-10-11.5 tip is as follows:
- T – for the manufacture of the connecting part, a semi-finished product in the form of a pipe was used.
- M – the material used was copper.
- L - the third letter displays the method of processing the material from which the part is made. In this case, the tip is made of tinned copper.
- 70 – section size (measured in mm).
- 10 – size of the hole intended for fastening the bolt (diameter is indicated in mm).
- 11.5 – the size of the shank inserted into the wire. This refers to the internal diameter, which is measured in millimeters.
Table containing information about common marking options:
| Letter designation | Decoding |
| TML | A universal product made of tinned copper, which has a high degree of protection from external factors. |
| THERE | A lug designed for connecting aluminum wires. Has copper contacts |
| NSHVI | Sleeve pin type of products with insulation, used in domestic conditions |
| TA | A part made of aluminum that is used exclusively for connecting wires of the same material |
| SIP | Aluminum terminal with insulated tube and terminal made of copper |
Note! Sometimes the markings on wire lugs contain the letter “O”. This indicates that the product has a viewing window. It is used to monitor the splice area to ensure that the wires inside the grommet are positioned correctly.
Single terminal crimp
For high-quality crimping, you must follow a number of instructions:
- Check the color coding for consistency. Before installing NShVI lugs, read the manufacturers' instructions on the ratio of the cross-sections of the sleeve and the wire core.
- To prevent the cores from accidentally falling out of the input socket, it is necessary to fix the conductor when seating the sleeve in the tool matrix.
- The crimping process with pliers begins and continues until the ratchet mechanism operates. The mechanism allows you to block the press jaws from accidental release. If a defect is noticed, the mechanism is released. The tip is removed and removed from the structure. Then you need to repeat all the steps.
- When manually fixing the conductors (the tool does not have a ratcheting mechanism), control is carried out by lightly pulling the hands. High-quality crimping is characterized by a tight fit of the cores without movement.
- It is possible to use a double-circuit crimping tool. Pressing takes place by squeezing a metal bushing and an insulator into two cavities of different diameters. The “cuff” and the metal tip must be in their sockets.
- The last stage is to control the strength of the contact by lightly pulling the elements.
Return to navigation