Drywall allows you to simplify installation and construction work when finishing premises. Using gypsum boards you can level walls and ceilings and create multi-level and non-standard structures. Despite the fact that installation of the material is relatively simple, inexperienced craftsmen encounter difficulties when installing electrical wiring under drywall.
The method of installing wiring under drywall depends entirely on how the drywall will be installed.
This type of work requires compliance with safety precautions for using electrical networks. When faced with the question of how to conduct wiring under drywall, it is necessary to take into account whether the gypsum board is mounted on a metal frame or secured with an adhesive composition, as well as other equally important nuances.
Electrical wiring under drywall: installation features
There are various methods for running cables under drywall. It is important to consider that the material itself is mounted in one of two ways:
Expert opinion
Viktor Pavlovich Strebizh, lighting and electrical expert
Any questions ask me, I will help!
The first installation option is rarely used due to the fact that it is used only if the difference in height of the rough wall does not exceed 4 mm. If there is something you don’t understand, write to me!
Chasing walls for wiring
When carrying out repairs or building a house from scratch, you have to extend electrical communications or move it to a new location.
Electrical wiring can be laid on the outside of the wall, but this method is rarely used. Exposed wires degrade the overall appearance of the room, and besides, they can be easily caught and bent. Is it worth saying that damaged wiring is not only unusable, but can also cause a fire.
That is why they always try to cover the wires in the wall, where they will not interfere and will remain unharmed.
To disguise the cable in this way, the wall needs to be tapped. Nuances before gating When starting this kind of work, you need to know some requirements and recommendations for electrical safety.
The groove along the wall is carried out only in a straight line and only horizontally or vertically, not at an angle.
The size of the ditch has approximate boundaries. The width should be no more than 30 mm, the depth should not exceed 25 mm, and the length should be about three meters.
When sawing the grooves, you must move at least 40 cm away from the radiators and pipes supplying gas. It would not hurt to lay the ditch at a distance of about 10 cm from the floor and ceiling.
In panel houses, making cuts for wiring in a reinforced concrete slab is not recommended, as it can lead to a loss of strength and the appearance of cracks. How the gating process is performed
The process of gating walls can be performed with various tools, so we will analyze each option.
Making grooves using a hammer and chisel. Before you start, markings are made on the wall. After moving the chisel along the marking lines, the grooves are knocked out. Then they place the chisel across these two grooves and hammer it deep with a hammer so that the top layer of the surface falls off. Continue until the deepening of the groove is 2.5 cm along the entire marked plane. This method does not work if the wall is reinforced concrete.
Using a grinder for laying grooves. So, the first thing to do is to equip the tool with a diamond disk; it will cut the grooves without complications. The grinder creates even grooves, but during operation a lot of fine dust flies away. After making the grooves along the markings, use a chisel to knock out the required depth.
Using a hammer drill. As in previous versions, the first step is to mark the boundaries of future grooves with a marker. To break through them with a hammer drill, you will need attachments with a short wide drill and a spatula. Using a drill along the entire marking, make 2.5 cm indentations. We knock out a furrow along the punched holes using a spatula. When performing work, holding the hammer drill across the marked lines is prohibited, as this will lead to unnecessary chips on the wall.
Using specialized equipment such as a wall chaser. This device is no different in operating principle from an angle grinder. This power tool has such a useful element as a casing, with its help you can indicate the depth of the furrow and connect the vacuum cleaner tube. Let's note the main advantages of gating walls for wiring if the work is performed by a professional specialist:
— preparing the wall for marking and gating is carried out by reconnaissance of hidden wiring using a detector;
— strictly adhere to construction rules and regulations, and labor safety rules;
— draw the correct markings, laying out the wiring path to the exit points;
— turns the recesses for the cable as little as possible;
— specialized equipment for specific work is available;
— a professional approach to making recesses in the wall;
- the material of the walls does not matter (concrete or brick).
We hope that this information will help you do this work efficiently and safely.
Requirements and standards for wall gating
Before carrying out work, understand the standards that apply to electrical wiring in general and wall gating in particular. The first step should be to draw up a drawing in compliance with the requirements of the set of rules SP 76.13330.2016 “Electrical devices” Updated version of SNiP 3.05.06-85 (approved by order of the Ministry of Construction and Housing and Communal Services of the Russian Federation dated December 16, 2016 N 955/pr) .
Requirements and standards for wall gating
It indicates all installed points (sockets, switches, boxes) and the routes of wires.
Having a diagram is a must, because with its help it is easier to make repairs in the future and find a place to drill screws or drive nails.
It is necessary to trench walls for wiring taking into account the following points:
- The depth of the gates is up to 20-30 mm, width - up to 30 mm.
- The greatest distance of the recess between the distribution box and the electrical point is up to three meters.
- Ways to make grooves are vertical and horizontal. In the second case, the parallel arrangement is checked using a level. It is prohibited to “cut” the path to the outlet by laying the wire “directly”. This also applies to wavy styling. An exception is the attic floor with a sloping roof, where the wiring is laid parallel to the ceiling.
- The distance between the vertical groove and the window/door is at least 100 mm.
- Between the floor slabs and the grooves made horizontally there should be 150 mm or more.
- The distance from gas or heating routes to the place where the wire passes is from 400 mm and above.
Please note that chiselling in corners, floor slabs and load-bearing structures is prohibited, as this leads to a decrease in the strength of the building and can lead to damage.
When planning your circuit, try to keep the number of wire bends on the way to electrical points to a minimum. The best option is that there is only one right angle from the box to the socket/switch.
Correct drawing up of the drawing and subsequent gating, following the above rules, allows you to avoid many difficulties during operation.
Protection
In modern manufacturing, copper is mainly used to make electrical wires. The finished wire is placed in an insulating sheath.
In order not to damage it when laying the wire on a metal frame or self-tapping screws for the profile, the wire must be placed in a special protective sheath.
In this case, the tube will not interfere with installation and will prevent damage to the cable, which will make it possible to avoid a short circuit. Also, such a sheath can protect the wire from small rodents, which is especially important in some domestic premises.
Also for these purposes, PVC (polyvinyl chloride) pipes or special hollow cables made of plastic are sometimes used. They are not so easy to assemble and are difficult to install in hard-to-reach places.
Laying and installation of wiring
The method of laying electrical wiring depends on how the plasterboard finish is installed. The method without installing a frame is used quite rarely. In this case, it is necessary to groove the surface of the main wall and place the wire in it. For the places where switching and switching means will be installed, holes also need to be prepared. After this, the cable is attached to the wall with special clamps.
With the frame method of sheathing with plasterboard, the wiring underneath can be carried out along the wall (as in the option described above) or directly at the base of the finish, using frame posts as a cable support. To do this, you can purchase special slats that have ready-made points for wiring . Fastening in this case is often done using a plastic cable tie.
You can also drill holes in the rack profiles for horizontal lines. Most often, wiring is laid using a frame base.
Wiring under plasterboard made of metal profile
The first thing you need to do before starting work is to think over the layout of all inputs and outputs for the mounting locations of sockets and switches. You also need to plan where and how the electrical wiring lines will be laid. Two methods are used: wiring on the ceiling and along the walls. The choice of method depends on whether the ceiling is covered or not.
Installation of hidden electrical wiring under drywall
When carrying out repairs or finishing walls, sheets of plasterboard are increasingly used. If we ignore the small drawback of reducing the size of the room due to the thickness of the material, this method is the most convenient: it is not as labor-intensive as covering the walls with plaster.
If you decide to choose this option for finishing, you need to know how to properly lay electrical wiring under false walls.
There are 3 main methods of installing gypsum boards on the wall, each of them involves different ways of organizing energy supply.
- Gluing sheets to the wall using adhesives. Not much different from simple plaster, but laying the wire into the wall is somewhat easier. But installing socket boxes in drywall in this case is a more difficult task.
- Installing drywall on metal profiles without an insulating gasket. The cable is laid in the space between the base wall and the gypsum board.
- Installation of sheets on profiles, but heat and sound insulation is laid under the drywall. In this case, the cables are laid in a special way, taking into account the selected insulation material.
In cases 2 and 3, installing sockets in drywall is not difficult.
There is another option. It is non-standard, but occurs quite often:
The room is already finished with plasterboard, there is a decorative coating (paint, wallpaper), and there is an electrical network with sockets and switches. And you needed to install several more connection points (220 volt sockets, Ethernet local network, cable for TV). Is it possible to carry out the work without damaging the finishing layer? If you have a diagram for fastening drywall sheets, no problem.
Electrical wiring under drywall
Drywall is used to level walls and ceilings. It can be attached to the base using adhesive or mounted on a metal frame. This determines how the installation of electrical wiring under the drywall will be carried out. Let's look at how to do this step by step, as well as the nuances of laying wires in a plasterboard ceiling and bathroom.
Tools and materials
The list shows all possible accessories. You can reduce their number while ensuring general fire and electrical safety.
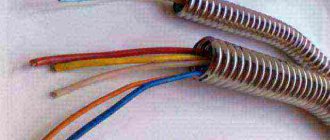
- Corrugation for laying cables. Desirable for installation between gypsum boards and the base wall. Can be plastic or metal. The latter is used if the insulation is made of a material that supports combustion.
- Instead of corrugation, you can use a cable box, but this is overkill from a cost point of view.
- Power cable. When laying in corrugation, one layer of insulation is allowed; if the wiring is without corrugation, the insulation must be three layers.
- When installing into a base wall (grooving), double insulation is sufficient.
- Grounding cable to create an additional potential equalization system. Profiles under drywall should be grounded.
- Accessories for fixing the cable (corrugation): clips, plastic bushings for holes in the profile, ties.
- Installation boxes for drywall or regular installation boxes if the gypsum boards are glued to the wall.
- A device for making holes in profiles and drywall - so-called “ballerinas”, or crowns. Of course, a drill.
Features of installing wiring under gypsum boards
There is no universal technique, so we will consider technologies depending on the method of laying sheets. Installation of electrical wiring under drywall begins with drawing up a detailed plan. The proposed locations for laying gypsum boards are marked on the wall, taking into account joints and the possible use of fastening screws. Installation points for sockets and switches should be planned at a distance of at least 20 cm from the edge of the sheet. The same requirements apply to metal profiles. Profile installation lines are also calculated taking into account cable routing.
Then measurements are taken and the plan is transferred to paper. After installing the drywall sheets, you won’t have to look for all the communications at random.
Plasterboard glued to the wall
Since this method is not much different from ordinary plaster, cable laying is done in the same way. Grooves are made in the walls. The laying depth may be less than with plastering, but between the cable sheath and the inside of the gypsum board there must be a layer of putty of at least 5 mm. It is not advisable to lay sheets directly on the wiring. Drywall is less durable compared to plaster, and there is a risk of mechanical damage to the cable.
Next, we choose the method of installing socket boxes in drywall.
- If the box is fixed on a sheet, a recess is made in the base wall with a margin of at least 2 cm in diameter. In this case, there are no difficulties with laying the cable: it is walled up in the groove, the mounting end is laid in a ring at the bottom of the recess as deep as possible. This is done in order not to damage the wire when drilling a hole in the gypsum board.
The hole is made carefully, as soon as the circle is separated from the sheet, the drill stops. The free end of the cable is threaded into the hole in the box, and the socket box is fixed in the drywall.
Important! When gluing drywall to the wall, you need to make sure that in the area where the box is installed there is no mounting adhesive (plaster) within a radius of 20 cm from the center of the hole.
Otherwise, the technological grooves for the installation screws will be bricked up, and you will not be able to screw the box.
- When using conventional mounting boxes (under alabaster), the technology is similar. Only the hole in the gypsum board is drilled in advance, according to the markings. The diameter is 10–15 mm larger than the size of the socket box. The cable is laid as usual, with a margin for connection. Before installing the sheet, drywall adhesive is applied around the recess in the base wall. After installing the gypsum board, the excess plaster is removed, the hole is monolithic, without a gap between the wall and the drywall.
After which the box is placed on the alabaster, as in an ordinary plastered wall.
Drilling holes for boxes with recesses into the base wall after gluing drywall is undesirable. There is a 100% chance that you will damage the prepared cable.
Drywall is mounted on metal profiles without insulation
In this case, the wiring is laid in random order between the drywall and the wall.
Holes are made in the metal profile. The edges must be sanded to prevent damage to the insulation. Then the cable is pulled according to the prepared diagram.
Regardless of whether the cable is laid with three-layer insulation or is corrugated, when pulling through the profile, it is advisable to install bushings in the holes. It can be made from scraps of polypropylene pipe.
Important! The intersection lines of the cable and the profile must be marked on the diagram. Self-tapping screws that are screwed into drywall should not be located closer than 10 cm from the cable.
Otherwise, the screw may get caught in the cable and cause a short circuit. Or, through a screw, a phase may get onto the entire profile frame (another argument in favor of grounding the profile).
For the same reason, electrical wiring under drywall should be located as far away from the drywall as possible.
Installation of sockets in drywall is carried out in the usual way.
The safety measures are simple: before installing the slabs, the wiring should be taken away from the place where the hole is supposed to be drilled. Then it will be easy to find it through the hole under the box.
Another way to lay the cable is to secure it to a load-bearing wall using clips. In this case, you can fix the profile on the wall with technological gaps through which the wire will pass. The likelihood of damage in this case is minimal. Of course, all profile breaks must be marked on the markings so as not to screw screws into the void.
Vertical installation is even simpler: the cable is attached to the profile using clips or nylon ties.
Insulation is laid between the gypsum board and the base wall
The installation technology is the same as in the previous case, but with mandatory compliance with fire safety measures. If mineral wool or other non-combustible material is used as an insulating material, there are no additional requirements. The insulation is simply placed neatly around the cable. If the material is fire hazardous, the cable is laid in a corrugated metal or plastic material that does not support combustion. Installation of bushings is desirable, as in the previous section.
The same rules apply when laying cables behind drywall in a wooden house. The rules for electrical installations also provide for the laying of steel pipes into which the wiring is inserted.
Sandwich: wall - glue - insulation - glue - drywall
When using rigid insulation, which itself is a structural material, a metal profile is not required. In this case, installation of wiring in plasterboard is carried out along the load-bearing wall. The insulation is glued with an air gap, or channels for wiring are cut out in it.
Sheets are glued on top of the insulating material. If the thickness of the sandwich allows, installation of socket boxes in plasterboard is carried out with fastening to a load-bearing wall.
Electrical wiring in the bathroom
A bathroom is a room with a high level of humidity, so wiring on a plasterboard wall must meet the following requirements:
- The distribution box must be located outdoors
- Sockets must be installed at least 65 cm from the water source
- All electrical elements must be of the moisture-proof type
- The line must be grounded
- Separate circuit breaker
- The grounding bus, pipes, drains, electrical appliances, heated towel rails must have a common potential equalization system
- It is recommended to install LED lamps
You should take a three-core copper cable with a cross-section of at least 2.7 mm 2, intended for wet rooms. The wiring is installed under the ceiling. The cable runs strictly vertically to the sockets.
Now you know how to lay a cable in a plasterboard wall. It's not difficult to do this yourself. The main thing is to do everything correctly in compliance with all installation rules.
Most often, this option is used in wooden houses, where it is not possible to use hidden wiring in the walls. It is impossible to chip wood, and there is no point in doing so. The use of plasterboard in repair and construction processes has reduced the complexity of work related to leveling surfaces and constructing partitions.
But there is one important operation in this whole process - electrical wiring under the drywall. It seems that there is nothing complicated in this operation, but given the safety requirements for using electrical networks, it is necessary to know exactly how this work is carried out. Grooving is the making of trench-shaped recesses that are cut into the surface. They can be made using hand tools (chisel, chisel, hammer), using a grinder and chisel, hammer drill or wall chaser. The concept of a major renovation of rooms involves a complete replacement of all elements. Wiring under drywall is no exception, because the performance and convenient use of all electrical appliances, of which the vast majority are found in apartments and houses today, will depend on these communications. However, some nuances of laying power lines should be taken into account, because they need to be fixed somehow, terminals for sockets must be arranged and protection from mechanical and other unwanted influences. The installation technology is the same as in the previous case, but with mandatory compliance with fire safety measures. If mineral wool or other non-combustible material is used as an insulating material, there are no additional requirements.
The insulation is simply placed neatly around the cable. If the material is fire hazardous, the cable is laid in a corrugated metal or plastic material that does not support combustion. Installation of bushings is desirable, as in the previous section.
If you decide to choose this option for finishing, you need to know how to properly lay electrical wiring under false walls.
- Open electrical wiring - laid along the surface of walls, ceilings, along trusses and other construction elements of buildings and structures, along supports, etc...
- Hidden electrical wiring - laid inside the structural elements of buildings and structures (in walls, floors, foundations, ceilings), as well as along ceilings in floor preparation, directly under a removable floor, etc.
If the rough ceiling is plastered or is a concrete slab, then the wiring can be laid directly along it, and if the ceiling is made of combustible material, such as wood, then laying in solid metal pipes (not metal corrugations or metal hoses, since they do not have localization ability) is mandatory. Either in PVC pipes or openly, provided that the clear distance from the cable with a sheath of combustible materials to the combustible structure is at least 10 mm (PUE 2.1.37.) I, too, was very interested in this issue at one time, I had to dig through a lot literature, crawling on the Internet through sites and forums, and it turned out that the question is rather ambiguous... So: the purpose of metal pipes and a layer of plaster is to localize (kill) this arc, prevent it from spreading and causing a fire.In most cases, for the electrification of wooden buildings choose an open cable laying method.This option for the electrical network involves placing electrical cables inside special channels made of non-combustible materials.
This method of organizing an electrical system is considered the most preferable due to its simplicity, functionality and safety. This option loses its relevance only if the owner decides to install plasterboard cladding inside the house. In such a situation, it may well be possible to organize electrical wiring behind the drywall , which also meets all modern safety requirements and fully satisfies the inspectors of state regulatory authorities.
Laying additional wiring for ready-made gypsum board finishing
How to stretch the wire and install a socket box under the mounted drywall? It all depends on what is between the wall and the sheets.
- If the drywall is glued to the wall, you will have to cut through the finishing surface and make shallow grooves. In this case, it will be necessary to restore the front layer (paint or glue a strip of wallpaper).
- When mounted on a profile, the task is simplified. Of course, you need to know the layout of the metal guides. In order not to spoil the upper part of the wall, the power cable can be routed from below, from under the baseboard. First, a hole is drilled for the socket box. Then, the plumb line determines the location of the cable entry (the plinth in this place is temporarily dismantled). A rope with a plumb line is lowered into the prepared hole, which is pulled out from the lower hole for entering the cable. The wire is attached to a rope and pulled up.
Next is the usual scheme: installing the box in any way. The input cable is pulled under the baseboard to the distribution panel.
- If there is soft insulation between the drywall and the wall, you can use steel wire instead of rope (which remains after installing the corrugation). This method does not work with rigid insulation boards.
Considering the uncontrolled position of the cable under the plasterboard, it is recommended to use corrugation. As a last resort, a wire with three layers of insulation.
Laying wires under drywall
Plasterboard finishing of walls and ceilings of premises includes not only the assembly of the frame base and its covering with panels, but also many other related works, including laying communication lines in the box. Some of them are carried out preliminary before starting upholstery repair work, while others can be carried out in a complex.
Example of wiring under drywall
Diagram of wiring under drywall
Full contents of the material
In what cases are walls tapped for wiring?
Creating a groove is an invariable attribute of hidden wiring. A groove is understood as a recess made in concrete, brick, plaster or other material for laying wires. With the help of the latter, household voltage is supplied to sockets, switches and lamps.
An alternative option is to create external wiring, when the wires are on the surface of the wall or placed in special boxes.
Hidden wiring is more in demand, because with its help you can hide communications in the walls and thereby improve the appearance of the interior.
The problem is that creating a groove requires preparation, considerable physical effort and time. In addition, it is important to know the requirements of the PUE and PTE, without which installation of wiring can lead to many problems.
It is also important to study the resolution 508-PP “On the organization of reconstruction and (or) redevelopment of residential and non-residential premises in apartment buildings and residential buildings.”
General provisions for electrical wiring
Even a novice electrician knows that the cause of short circuits in wiring most often occurs at the connection points of the cable cores, and in places where the integrity of the cord is damaged. To avoid the occurrence of such emergency situations, it is worth adhering to the general requirements for laying power under the finish.
- The wiring must be selected in accordance with the planned load on the line.
- You should try to avoid having a large number of connections (twists) of the cores; in these places there is greater resistance, which means the load increases.
- Under the drywall, the electrical wiring is laid in an additional corrugated pipe shell. This will protect the wire from damage by drywall screws during the installation of gypsum board sheathing.
Wiring process
- For easy access to the wiring and connection points of cords, distribution boxes are installed on the walls.
- Wire lines in a residential building must be located according to a single pattern, in compliance with standards. We lay the cable at the top at a distance of 100-150 mm from the ceiling, at the bottom - 150-200 mm (from the baseboard). At least 100 mm from windows, doors and corners. Sockets are mounted at a height of 300 mm from the floor and a distance of 500 mm from radiators, heating pipes and others. Switches at a height of 900 mm from the floor and preferably on one side in all rooms. Diagram for installing wiring in drywall
As an option, installation of an open line in cable ducts is allowed, but except for such rooms as a bathroom and toilet, where only hidden wiring is required. According to these principles, power supply is installed in all rooms, regardless of the type of finish.Installation of wiring under drywall can be performed in several variations, which are selected depending on the method of fastening the plasterboard, the type of main walls and the ease of performing the work.
The process of conducting wires under gypsum boards
Electrical wiring under drywall in a wooden house
There are strict regulatory requirements for the installation of hidden wiring inside structural elements of a building. The main point of the requirements is that even when the wiring is carried out using ducts and pipes made of non-combustible materials, they must be separated from the combustible materials of the house structure by a continuous layer of non-combustible material more than 10 mm thick. The one that has a minimum number of corners and turns is considered optimal. According to PUE standards, pipes and ducts are also needed so that the owner of the house (or an electrician) can replace the wiring without dismantling partitions, wall cladding and ceilings. Before stretching cables and wires in pipes, the insulation resistance is measured.
Then plastic inserts are inserted into the holes of each pipe so as not to damage the sheath of cables and wires. And with the help of a cable they are pulled. During its operation, dust with a large proportion of organic impurities collects in the voids of the internal cladding, partitions and ceilings of a wooden house. When dry, it ignites from any spark, which in a normal situation is not enough to ignite the tree.
Dust can accumulate even in a plastic socket and cause a fire if you pull the plug of an electrical appliance out of the socket under load without disconnecting it from the network with its own button or switch. In any case, there is a risk of short circuit, and the walls of a PVC pipe or a thin and leaky metal hose are not able to localize the resulting arc (even short-term).
Additional information on the topic:
- How to glue laminate to a plasterboard ceiling
- Connecting drywall profiles to each other without self-tapping screws
- Which plasterboard is best to use for the ceiling in the kitchen?
- Which ceiling is better to make in an apartment, suspended or from plasterboard? reviews
- Which insulation is better for the walls of a wooden house inside under plasterboard
How to treat the surface → Room decoration → How to choose the right paint → Surface treatment technologies → Leveling and finishing the walls → Selecting and applying a primer → Removal from the surface → Stretch ceilings and technologies → Reviews and testimonials
Choosing the method of laying the wire depending on the type of drywall fastening
Finishing using gypsum plasterboard can be carried out in two ways, frameless using gypsum mounting adhesive and the more common frame method. Depending on this, the appropriate wiring technology is selected.
In the grooves. This technique is more labor-intensive, since you first need to drill holes in the wall for the electrical cable with your own hands. After laying the line, it can be plastered and hidden completely in the masonry. The gating method is the only possible option for frameless installation of drywall, but it is also possible when sheathing it on a frame; The process of laying wires into grooves
The process of installing wiring in the frame
The first option for installing power lines is used before starting repair work with drywall. The other two can be carried out after assembling the frame on the ceiling. Wiring in a wooden house under drywall is done either along the wall or through the frame, so as not to damage the wall material. How to install wiring under drywall using various methods?
Installation in grooves
This method of laying electrical wiring with your own hands is simple, but more time-consuming. After all, you should first prepare the grooves - grooves.
The process of punching a wall with a hammer drill
All work is carried out in several stages.
- Initially, before ditching the walls, it is worth sketching out on paper the schematic location of the power lines and all the terminals for the infrastructure (sockets in drywall, switches, etc.).
Scheme for gating walls
How to groove a wall for wiring
Wiring grooves can be prepared using various methods:
- by hand, chisel/chisel and hammer. A labor-intensive method that is best used with relatively soft wall materials (gas block, raw brick);
- Bulgarian. Cuts are made along the grooves, after which the material is knocked out with a puncher or manually;
- wall chaser The simplest method that allows you to quickly prepare all lines for wiring. But it requires an expensive drywall tool.
This is what a wall chaser looks like.
You will also have to drill recesses under distribution boxes and socket boxes using one of the methods.
Ready-made groove for laying wiring
The finished grooves are cleared of debris. A cable is placed into the resulting recesses for the wiring and secured with clips.
After connecting and checking the cables, all lines should be plastered to hide from external influences, using gypsum or cement-sand mixtures.
The video shows the process of installing wiring in grooves.
How to make a concrete wall in a panel house
When choosing a gating method, decide on the scope of work and financial capabilities. For convenience, we provide brief instructions for different tools.
Hammer and chisel
The use of these devices is justified when you need to make a small groove (up to 60 - 100 cm).
The action algorithm is as follows:
- Make small indentations on the sides of the groove.
- Place the chisel along the opening and hit it so that it goes deep inside.
- Remove the top along the marked strip.
- Deepen the groove to the desired level of 25 mm.
- Clean the holes made from dust and apply a primer.
- After the primer has dried, lay the wiring and seal it with plaster or plaster, and then seal it with putty.
Hammer
A hammer drill looks more attractive from the point of view of efficiency. If you use it, you can dispense with the chisel and hammer.
An impact drill allows you to drill into a wide variety of surfaces, and to solve the problem you will need a small drill and a spatula.
Instructions:
- Make holes 25 mm deep. Try to keep a distance of 10 mm between them.
- Using a spatula, combine all the previously made indentations.
- Walk along the groove several times to clean the opening (if necessary).
Using a hammer drill is the optimal solution when it is necessary to drill a relatively small area.
Bulgarian
To obtain an even groove and speed up the process, it is recommended to use an angle grinder. It can handle any surface, including a concrete wall.
The algorithm of actions is as follows:
- Stock up on a diamond blade, because nothing else will work, as well as a razor and safety glasses.
- Make a couple of cuts along the entire length of the groove. Make sure the lines are parallel. Optimal values are from 20 to 25 mm width/depth.
- Remove the center using a chisel and hammer. If you have an impact drill handy, use it.
If everything is done correctly, the final recess for the wiring will look almost perfect. Dust, as noted above, can be easily dealt with using a vacuum cleaner or dampening the wall.
Wall chaser
The use of a wall chaser is the best solution for performing work of any complexity.
The device consists of the following elements:
- Powerful motor, reliably protected from overloads.
- Housing with adjustable position.
- Additional handle.
- Non-slip rollers.
- Target mark.
- Cutting discs.
- Side handle etc.
The process goes as follows:
- Make a mark where you will be cutting (draw a line with a pencil).
- Attach two diamond wheels.
- Adjust the position of the casing.
- Walk around the area where the wires should be.
- Clean up the residue with a hammer drill or chisel.
The use of a wall chaser guarantees maximum speed in solving the problem. The only drawback is the high price of the equipment.
Laying wiring on the wall
The easiest way to make cable wiring, which can be used before repair work, or already in a finished frame.
- The prepared circuit with power lines and the location of all elements is transferred to the plane.
Wiring diagram in the wall
Scheme of laying the cable in a corrugated pipe
. The wiring carried out in this way is covered from above with plasterboard sheathing on the frame and will be protected from external influences.
How to conduct wiring if the gypsum board is attached with glue
Now let's look at how to make wiring under drywall, which is attached with adhesive. This method requires cutting the wall.
Installation work is carried out in the following sequence:
- The location of all elements is marked on the wall. To avoid distortions, it is recommended to use a level. Turns of wires must be made as smooth as possible;
- Next, according to the markings, the walls are chipped. Using a hammer drill with an installed crown of the required diameter, holes are drilled for sockets and switches. Their depth should be more than 35 mm. Cable laying grooves can be made with the following tools:
- The wire is pulled through the protective pipe;
- A corrugated pipe with a wire threaded through it is placed in grooves made in the wall. The wiring leading out for connecting sockets and switches must be open;
- The grooves are sealed with putty.
Having completed the installation of electrical wiring, you can begin gluing plasterboard sheets.
.gif" />
Laying through the frame
A similar technique is relevant when laying soundproofing and insulation under plasterboard finishing. All work is carried out during the renovation process.
- First of all, a frame base is assembled from a metal profile. If necessary, insulator slabs are placed between the racks.
- The wiring, enclosed in a corrugated pipe (required), is pulled under the frame posts and fixed with clips or plastic cable ties to the base parts (for example, hangers).
- It is possible to drill openings in the racks. In this case, the drill diameter corresponding to the corrugated pipe is selected. Wiring can be routed through the holes.
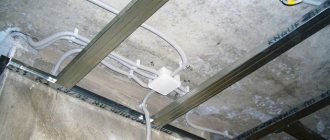
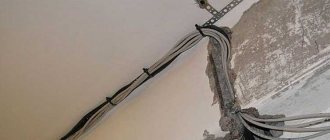
An example of mounted wiring in a metal frame
A good solution would be to purchase a profile for the frame with ready-made perforation for power lines.
If all technological nuances are properly observed, power supply lines will last for decades without any problem situations arising. You should not skimp on materials, otherwise low-quality wire or poor protective material (or lack thereof) can lead to dangerous consequences.