To connect a residential building to a power line made with insulated SIP wires, 3 options are most often possible:
- underground cable entry directly from the support
- installation of SIP to the facade of the house by air
- installation of a pipe stand for SIP in the immediate vicinity of the site and the existing overhead line
In the first two cases, you have to place the metering cabinet with the meter and all switching devices directly on the wall of the house.
It is rare that an electrical network company allows metering to be placed indoors, citing the lack of free access to take readings and check the connection diagram. Therefore, if you do not want to spoil your house facade with bulky cabinets, then a SIP pipe stand with a meter is the best option.
You can, of course, place it directly on the power grid company’s pole, but this must be specified in the technical specifications. And in this case, maintenance of power lines on such a support becomes difficult. Moreover, if some electrician accidentally damages your shield with a claw or a manhole while lifting, you will not receive any compensation.
Also, if the pole is located far from the house, there is always a risk of damage to the metering by unauthorized persons. The metal stand will be located on your site, under guard and will not disturb anyone.
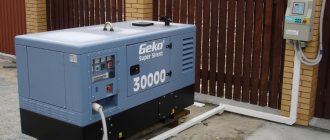
Well, the most common option is when the house has not yet been built, there is only a bare plot, and the voltage is already needed for its construction. This is where the pipe stand is the only way to safely connect electricity.
Installation of the pipe stand takes place in several stages:
- assembly and production of the structure itself
- excavation of a hole
- direct installation into the pit and fastening in it
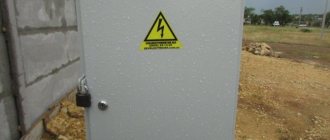
- assembly of a distribution cabinet with a meter and automatic machines
- securing the metering cabinet to an installed rack
- connection to the SIP line
- connecting a residential building from the cabinet
Making a pipe stand
Strictly speaking, the pipe stand today does not have any official technical definition or certification. That's why they make it at whatever cost. The best material for assembling a metal stand is a square pipe 80*80*3. It will ensure sufficient strength of the structure when tensioning the SIP from the support. Although standard technical solutions allow a diameter of at least 40mm.
Some, the base of the rack is made using a screw pile with a diameter of 108mm. They screw it into the ground with pieces of pipes d-40mm and 2-3m long. After which a pipe or square of the required height is inserted inside.
What should the height of the pipe stand be? According to the rules, the minimum distance from the SIP wire to the ground can be at least 2.5 m. That is if he doesn't cross the road. When passing over the road, the clearance increases to 5m!
However, they may not allow you to invent homemade structures of such a height, having written a reasoned refusal stating that you do not have a certified stand for crossing the road. In this case, you need to raise all legal documents and prove that installing additional support across the road is the responsibility of the network organization, and not yours.
Analysis of the provisions of the rules for technological connection (taken from forumhouse.ru) -
But some people accept such accounting without problems and everything is connected. So each case is individual and depends on the local office.
Based on the minimum dimensions above the ground (without crossing the road) and taking into account the depth of 1.5 m, we obtain the optimal height of the pipe stand of 4-5 meters. This can be either a solid version or component parts of more than two meters each.
It is better to choose a composite product, since it is already problematic to bring a 5m long pipe to the site yourself. You will have to hire special transport, and this is an extra expense. The method of joining individual pieces is welding or bolting.
When connecting individual pipes, it is better to choose profiles of different sizes. So that the diameter of the outer upper part fits tightly into the diameter of the inner lower part.
A more complicated option, but more stable and without the use of welding:
- take three pieces of square profile 3 meters each. Minimum dimensions 60*60*3.
- Bury 2 profiles into the ground at a depth of 1.5 m with a distance of 60 mm between them. There is still 1.5m above the ground.
- between two pieces protruding from the ground, place a third one, thereby, as it were, increasing the height of the pipe stand.
- drill the joints of the profiles in two places and tighten the whole thing with bolts or studs.
The final result will look something like this.
The top hole of any pipe stand must be welded. This is done so that moisture does not enter or accumulate inside, which is why the metal will begin to actively rust. The outside of the entire structure is painted. It is better to treat the lower part, which will be in the ground, with bitumen, or if finances allow, find the required diameter and shrink a heat-shrinkable tube. Such a base will never corrode or break over time.
A loop for attaching the SIP tension clamp is welded on the top itself.
If there is no welding, then you can drill a hole d=12-16mm and mount a special hook under the nut.
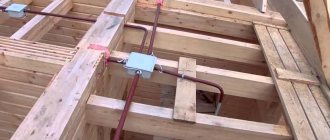
At a height of 1.7 m from the ground, two crossbars made of steel strip are fixed to support the metering cabinet. Measure the distances between the strips using the holes on the cabinet.
You can, of course, use special factory kits for metal cabinets using bandage tape and do without welding.
But this is if you have the necessary tool (bandage machine) and materials (tape and staples).
Electrical supply by air
The air supply method is attractive because it does not require a lot of time and money. But the standards set requirements that not all houses meet:
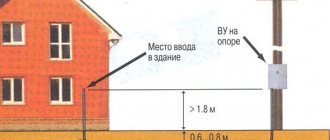
- The cable entry into the house must be located at a height of at least 2.75 m. If the height of the house is sufficient, a distribution panel with an RCD is mounted on the wall, and the cable from the pole is connected to it. If the house has a smaller height, a special rack (pipe rack) is installed. It can be of a curved shape called a “gander” (in the picture on the left) or straight (in the picture on the right). These two entry methods differ in the method of attachment to the walls of the house (see photo).
Methods for installing a rack for air supply of electricity into the house - The distance from the pole to the entry point should not exceed 10 m. If this distance is greater, additional support is installed. The distance from it to the power line should not be more than 15 m.
- The tap from the power line is made: up to 10 m - with copper wire with a cross-section of 4 mm;
- from 10 to 15 m - with a wire with copper conductors with a cross-section of 6 mm.
- aluminum wires are used in any case with a diameter of at least 16 mm.
Connecting to a power pole by air
Although copper wires require a smaller diameter, they cost significantly more than aluminum wires. Therefore, the introduction of electricity into the house from a pole is most often made from cables with aluminum conductors. There are two ways:
- Stretch a torso or wire between the posts and attach a current-carrying cable to it with special clamps.
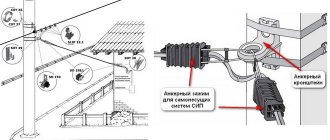
- Use self-supporting wires for which support is not needed: SIP (self-supporting insulated wire). It is connected using:
- insulators (glass, polymer, porcelain);
- special fittings.
Special fittings appeared not so long ago, but are becoming increasingly popular. It has a certain margin of safety. If it is exceeded (falling trees, massive snow melting, etc.), the fittings are destroyed, but the cable remains intact and the power supply is not disrupted.
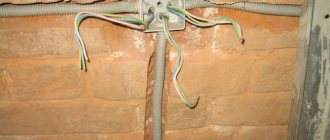
From the place where the input cable touches the wooden wall of the house to the place where the shield is installed, the cable must be laid in a steel pipe
Inputting electricity into the house from a pole through a pipe stand
Air supply of electricity to the house also has disadvantages:
- The electrical wiring is exposed, which can cause damage.
- Hanging wires limit the possibilities for accessing large equipment (truck cranes, aerial platforms, etc.).
Pit preparation
At what distance and where should I dig a hole?
Look at the technical conditions first! There may be a general ban on placing a pipe stand in the depths of the site, but only on its border. Such a claim may be contested. As a rule, it is allowed to place the stand no further than 25 meters DEPTH from the border of your property. In this case, the distance from the overhead line support to the pipe stand should be no more than 25 m.
According to the law, you cannot dig or place anything outside your borders; this is not your territory. This primarily concerns the requirement of the CO to place records near its support, far behind the fence, across the road. Do this, and all further actions to connect the light, install a cable or SIP to the house, maintain the switch cabinet, and its safety will only be your headache.
Therefore, the most important advice here is to not dig anything until you have agreed upon technical conditions that suit you. Otherwise, everything may have to be redone.
Using a crowbar, a shovel and water, you manually dig a hole. The depth of the hole is from 1.5 m to 2 m, depending on the height of the pipe and the soil. In order for the hole to be smooth and neat, the first 0.5-0.7 m can be passed with a shovel, and the remaining distance with a simple garden drill. If you have adapters and non-stony soil, you can speed up this process with a hammer drill.
Well, if you have a motor drill, then the entire depth can be easily penetrated with the help of it.
When it is inconvenient or difficult to walk the last tens of centimeters, you can simply drive the stand into the ground. Weld additional pieces of corners onto it on the side and drive the remaining distance with blows of a sledgehammer. After which, the corner that is no longer needed is cut off, and the welding area is carefully painted over.
Features and rules for do-it-yourself electrical wiring in the garage
Energy supply is one of the important stages of work on arranging a house for a car. The wiring here, as well as installation technologies and methods of organizing it, differ from the implementation of electricity supply to other premises.
Without electricity, the arrangement of a garage is not complete, since it often serves not only as a place to store a car, but also for repairs or other work related to the use of electrical equipment and power tools.
Rack Installation
A previously made rack is inserted into the prepared hole. If you fill it with earth, do not forget to compact it every 15-20cm. You can use crushed stone and concrete the entire base. Then you won’t be afraid of any bending, and corrosion won’t have such a strong impact.
Give the concrete 1-2 days to completely harden, only then can you hang the cabinet.
Of course, concreting significantly increases the installation time. Without it, with simple compaction, all the work can be done in 2-3 hours. In addition, without concrete, the grounding of the rack itself is significantly improved, due to better contact with the ground (unless, of course, you completely insulated the bottom with a heat pipe or bitumen). Therefore, here you will need to make a choice - reliable stability and durability or better grounding.
Garage wiring diagram
When drawing up an electrical wiring diagram in a garage, you need to take into account the construction features of this room, but the main positions must remain unchanged. All power supply must be supplied through one common input circuit breaker, taking into account the loads of all outgoing lines.
An electric meter is installed on each of the lines or after the input machine, which is sealed by services monitoring the illegal use and theft of electricity. If this is a garage cooperative, then its administration monitors the voltage received by the consumer.
In order to protect a person from falling under an electrical potential dangerous to his life and health, a sensitive and fast-acting RCD device (residual current device) is used.
When developing an electrical circuit for a garage, it is necessary to consider the possibility of connecting not a single-phase, but a three-phase circuit, since it is this circuit that is used for the normal operation of asynchronous electric motors that are equipped with machines used in everyday life (sharpening, drilling, etc.). With a three-phase option, the power of this electrical equipment will not be reduced, and this is important for organizing a workplace in the garage. The development of wiring and electrical circuits can be carried out both before and after connecting the electricity.
Accounting cabinet
Assembly of the cabinet is carried out separately and again depends on the issued technical conditions and the amount of electrical equipment in your home. Most often, an incoming and outgoing automatic circuit breaker or RCD, plus an electric meter, are placed there. The rest of the automation assembly already takes place inside the panel house.
In general, it is better to stick to minimalism here. Because the cabinet is located outside and is subject to constant fluctuations in temperature and humidity. Therefore, it is not advisable to install any expensive relays there.
The accounting cabinet itself can be secured in 4 ways:
- on self-tapping screws through the back wall. This should not be done, as the tightness of the cabinet and its IP54 requirements will be violated.
- on bolts with nuts through the side lugs
- using bandage tape
- or simply weld it to metal corners, but in this case it will no longer be a removable option
The junctions between the cabinet and the pipe stand must be cleaned of paint to ensure full contact and grounding of the entire structure.
How to place the cabinet outside or inside the area? To make it easier for inspectors to take readings, if the stand is not enclosed by a fence, place it so that the door faces outward. For convenience of your service - the door is inward. But then inspectors will have to be sent to the site every time.
The ground loop resistance here should be no more than 10 ohms. Whether you can provide it with one 3-meter corner or a pin driven in next to the pipe support depends on the composition of the soil.
To use the metal rack itself as grounding, its depth must be at least 3 meters.
Again, when connecting, inspectors from the inspection team can measure the grounding and demand compliance with its parameters. Or they may be satisfied with its simple presence. Everything is individual. But for your own safety, do it according to the rules.
Underground (trench) electricity input
Another way to introduce electricity into a wooden house is underground, through a trench.
Inputting electricity into a wooden house through a trench
In this case, the cable is lowered along a pole inside a steel pipe; its height must be at least 2 m from the ground level. Then, from the pillar to the entrance to the house, a trench is dug. Its depth:
- 0.7 meters, when laying the cable in a plastic or asbestos pipe or under the protection of a brick (concrete) slab
- 1 m - without protection.
The power cable also enters the house in a metal pipe. It can be passed through the foundation (strip), but not under it. The second option is to raise the pipe along the wall by at least 2 meters, and at this height pass it through the wall, also in a metal pipe.
Method of wiring electrical wiring through an external wooden wall
When connecting underground to a pole, it is recommended to use a power cable with copper conductors in reinforced insulation, preferably armored. With a power consumption of less than 15 kW, there are no restrictions on the cross-section of copper conductors, but most often they use a VBBShV cable with a conductor of 10 square millimeters.
All this work - right down to connecting power to the electric meter and sealing it - must be carried out by a special organization. Independent connection is prohibited, and even threatens with fines: an agreed project and a certain level of clearance are required. But you can choose the type of connection, and then do all the other work on installing electrical wiring in the house yourself.
Read how to assemble an electrical panel here. It will also be useful to read about the rules for connecting wires in junction boxes.
Solving administrative and legal issues
Normogrand Mikhail Gromov,
for clarification :
- To organize the power supply at home, first of all it is necessary to make a project. If the homeowner does not want to bear the costs of design, then sooner or later he will face administrative problems or, most dangerously, fire and electrical safety problems of his electrical installation.
To supply electricity to your home, it is important to remember that:
A house power supply project is technical documentation that contains all the information about the placement of electrical wiring, electrical equipment and lighting in the house, as well as the characteristics of the materials used, electrical panel diagrams, plans for laying out cable routes and placement of electrical consumers, specifications of the materials and equipment used.
Technical conditions (TS) are a document obliging the owner of the house to carry out the project, approve it in all the authorities specified in the TS, and perform a number of other actions of a technical construction administrative nature that are necessary, in the opinion of the organization that issued the TS. Fulfillment of the specifications gives the right to obtain Permit for the use of the required allocated power by the homeowner. Also, this document includes a list of all technical conditions for electrical installation work and the point of connection to the electrical networks.
Connecting the ground loop
The copper grounding conductor goes to the PE bus - the main grounding bus. The grounding loop is connected with a large-section copper stranded wire. It is best to use a special wire with yellow-green insulation, which is sold specifically for grounding and has the appropriate color marking. The cross-section of the ground wire must be larger than all other wires (phase and neutral) that were used to connect the boiler. This is necessary for minimal resistance in case of operation.
A powerful threaded terminal with the corresponding symbol is specially provided for connecting the ground loop on the boiler. Connection is necessary precisely to this point, and not to others, even if they are located on a common body.
Request a free consultation and price estimate
Fill out the form, we will call you back within 10 minutes:
By clicking the submit button, you agree to our Privacy Policy
Some of our works:
You can find more photos of pipe stands and our other works in the “Photo Gallery” section
Remove the phases and neutral wires from the pole
Switching electrical wiring and the composition of the distribution box in the area of the pole
A normal pole is topped with a lightning rod. According to the rules, a steel stake of sufficient length (with a cross-section of over 14 square millimeters) is driven into the base, and the local tire is started. Lightning immediately hits the ground. The lightning rod bus is electrically combined with the neutral wire. A distribution board with a meter is hung nearby. The electrical cable then goes into a trench or reaches the building by air. More often than not, there is an empty plot of land. There is a pillar, work needs to start from here.
According to the plan, an electrical project is in hand:
- An energy consumption quota is prescribed. Guaranteed by the state, those who do not reach the limit will get problems in the future. A well-designed electrical project is a guarantee that once the cable is inserted into the house, nothing will have to be changed.
- Often modern households are supplied with three phases. It is clear that the likelihood of a complete loss of electrical energy is reduced. In the future, on the territory of the house we will install a relay for monitoring the presence and switching of phases, with the help of which the principle is implemented in practice.
Construction requires electricity; below the main box we will place a small temporary one equipped with an outlet. Builders are provided with energy. After construction is completed, the temporary distribution box with socket is removed. Most units here need to be sealed. Contact your local power grid inspectors and we'll list your options: