Electrical overhead lines (OHLs) are now mainly built using insulated self-supporting wire. Its distinctive feature is the presence of surface insulation made of thermoplastic or cross-linked lightproof polyethylene, which makes the operation of lines and bends safer.
Let's look at how SIP installation is carried out as part of the arrangement of electricity input into the building.
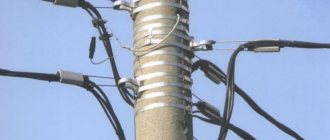
Inserting wires into a residential building Source izion.pro
Structural differences of SIP
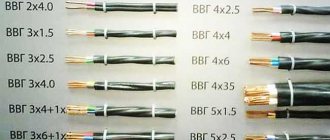
In networks with voltages up to 1 kV, only two types of insulated wires are used, although there are more of them. To understand what the difference is between them, we have provided a small informational list:
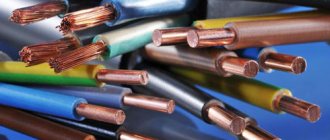
SIP – 1 Source 1sip-kabel.ru
- SIP-1 is a bundle of twisted phase wires with insulation and one uninsulated neutral conductor made of high-strength ABE alloy. Has from one to four conductive cores.
SIP – 2 Source provodok.site
- A distinctive feature of SIP-2 is the presence of insulation not only on the phase wires, but also on the neutral core, and naturally, it has a higher cost. That is why it is used mainly on high-voltage lines.
SIP – 4 Source promkabel.org
- This type of wire has at least two current-carrying wires, but it does not have a carrier (zero) wire. It is designed specifically for making branches from power lines towards buildings and laying along walls.
Note! Other types of SIP differ from each other not only in the type of insulation, but also in the number of cores. However, to carry out electrical inputs into the house, only SIP-1 and SIP-4 are most often used - the rest are intended for lines with voltages up to 35 kV.
Due to the presence of insulation, the SIP wire has an aesthetic appearance. This is, of course, an important nuance - but more for the consumer. Energy supply organizations value SIP because the insulation does not allow for “throwing” onto the wire, and thus using the resource bypassing metering devices. Another advantage is that the sheath makes it possible to connect two wires to each other without removing the voltage from them - however, this requires special fittings.
Next, let's look at how to connect the SIP cable to each other and perform any other manipulations with it.
VLI - overhead power line with self-supporting wires
Overhead power lines in power networks up to 1 kV are carried out by a self-supporting system of SIP wires. The central neutral wire serves as the supporting wire. The abbreviation for such a system is VLI. Branches from the main can be made with SIP wires without a supporting central wire. The cross-section of the main wires must be at least 25 mm², the cross-section of the branch wires must be at least 16 mm².
The cross-section of SIP wires is selected depending on the design load. Fastening, suspension, connection, tension of wires is carried out by special linear fittings.
Diversion of SIP from overhead lines to the house
In order to connect a SIP wire from a pole to a house, you need to accurately measure the distance to the nearest support. If it exceeds 25 meters, you will have to install an additional power pole - perhaps right in the yard.
Maximum distance to the nearest pole Source fs137.myvi.tv
If the standard is met, you can lay the wire directly from the street support. Let's figure out what is needed for this.
Required fittings
To carry out installation work, the following fittings are required:
Branch (piercing) clamp with protective cap Source static-eu.insales.ru
- The number of clamps corresponds to the number of current-carrying cores of the wire.
Anchor clamp Source must.su
- To install a SIP cable from a pole to a house, you need 2 clamps, and two more for an additional branch support, if one is installed.
Steel fastening tape (bandage) Source kvt-pro.ru
- A galvanized steel tape is used to secure the SIP to the power line pole. One support requires 1 meter of tape.
Book clip Source infoyar.ru
- Reinforced clamps (buckles) are used to fix the steel bandage. There are 2 pieces per bracket.
Bracket Source dixi-st.com
See also: Catalog of flat roof house projects
- To secure the branch wire to the support, you will need 2 or 4 brackets. They are attached to the pole with tape, and to the facade of the building with anchors.
Strap (tightening clamp) Source svetelektro.net
- It takes 5 straps to make one connection.
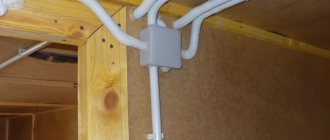
Fastening Source stofasadov.ru
- Fastening SIP to the wall of a building is carried out using this simple device. Installed at 70 cm intervals, so the quantity is calculated based on the total length of the input.
Process in action
Now let’s illustrate how all this comes together into a single structure.
Installing anchors and pulling wires
It is impossible to drill an electrical support, so to install the brackets, not anchor bolts are used here, but bandage tape. It is wrapped in two rows around the post and secured with paper clips (buckles).
Attaching the bracket to the pole using tape Source youtube.com
- Then the wedge, which is shown in the photo with a red arrow, is removed from the anchor clamp, the wire is pulled through it and the wedge is inserted back.
Pulling the wire through the anchor clamp Source youtube.com
- Now, using the clamp fork, the wire is fixed to the bracket.
Installation of SIP on supports using an anchor clamp Source youtube.com
See also: Catalog of companies that specialize in electrical work and related services
- To connect to an overhead line, you need to install branch clamps with one side on the main wire, and the other on the wire that will go to the house. The arrow in the picture shows the central bolt. It must be tightened with a spanner until it comes off.
Installation of branch clamps Source youtube.com
- Protective caps are put on the exposed ends of the wires, and the wire strands are tightened with a clamp.
Wire lugs Source youtube.com
- The wire is thrown towards the house, where a bracket is also installed to secure it. Only here it will be fixed not with a bandage, but with bolts.
Mounting the bracket to the facade Source youtube.com
Note! The height of the wire to the building according to SNiP is 2.75 m, but if the house itself does not meet this parameter, the entry can be made through the roof.
The type of anchors for installation on the facade is selected based on the wall material. After securing the bracket, an anchor clamp with a wire threaded into it is attached to its eye in the same way as was done at the opposite end. The clamp must be installed so that the wire between the pole and the wall of the house is tensioned and not sagging.
Attaching the wire to the facade Source youtube.com
Important! The wire is tensioned using a hand winch, which has a mechanism for capturing and compressing the load-bearing core or the entire bundle. The force applied to the wire must be accurately measured, for which a dynamometer is used. If work is carried out according to a project, then data on the tension force is taken from it. In the absence of regulatory documentation, the amount of force that must correspond to the cable brand and its span between the anchors can be taken from the installation table.
If the distance of the nearest VLI pole to your house was more than 25 meters and you had to install an intermediate support, the wire will be attached to it as shown in the picture below.
Attaching SIP to an intermediate support Source youtube.com
Why do you need SIP telephony?
SIP telephony in everyday life is an opportunity to reduce the cost of long-distance and international calls. Subscribers can expect fast connections and clear tariffs without a subscription fee. For more demanding and talkative users, package tariff plans are available, including hundreds and thousands of minutes of conversation. In addition, SIP telephony is useful when traveling - we connect to mobile Internet or Wi-Fi in another country, and call home at home rates.
SIP telephony is also needed in business. Here it helps to reduce communication costs and provide telephone access to all workplaces. In business, virtual PBXs are often used - these are software systems for installing telephones in offices, packed with functions for managing calls, consultants and sales. SIP telephony capabilities within a virtual PBX:
- Distribution of incoming calls between consultants - a solution for organizing call centers and hotlines;
- Transfer and forwarding of calls to other PBX subscribers;
- Integration with CRM – allows you to manage sales, simplifies work with clients;
- Support for voice menus – helps direct the caller to the right department, automates the provision of information.
Virtual PBXs support hundreds of functions needed in business.
Feedback from our reader
My company required IP telephony that would meet a number of requirements: the presence of a PBX, the ability to use numbers from different regions, reasonable prices and the ability to quickly resolve issues. I chose from several providers on the market, and finally settled on Zadarma, it meets all our requirements. Read more >>>
IP telephony providers
Let's compile a mini-rating of SIP providers by price and present it in the form of a table.
| Place | Name | Price | Rating |
| 1 | Zadarma | From 0.36 rub/min | ★★★★★ |
| 2 | Sipnet | From 0.5 rub/min | ★★★★★ |
| 3 | Telphin | From 0.9 rub/min | ★★★★★ |
| 4 | YouMagic | From 1.5 rub/min | ★★★★★ |
| 5 | Comtube | From 1.8 rub/min | ★★★★★ |
The rating is indicative, but a thorough analysis showed that Zadarma is one of the cheapest SIP telephony operators. In addition, it provides excellent call quality and quickly connects subscribers to each other. Users can also enjoy cheap virtual numbers all over the world.