Resistive cable is one of the first heating elements used for electric underfloor heating (HE). It is sold in coils and the user must independently determine the method of its fastening, the frequency of laying and the required length. These indicators are calculated based on the power that will be required for the main working heating of the room or comfortable additional heating of the floor covering. As a rule, installation of cable heated floors is carried out in a sand-cement screed. The cable itself can be secured to the surface of the base using a special tape with fasteners or to a metal mesh using plastic ties.
IMPORTANT! If it is necessary to install electrical heating in a thin layer of mortar or directly under the tile (in the adhesive), it is better to give preference to heating mats. They can be equipped with a cable with a diameter of only 3 mm, which is fixed to a mesh, which also serves as cement reinforcement.
Resistive cables
Such heating elements are produced in single- and double-core versions. They are connected to the network using special couplings. The principle of operation of these cables, regardless of the number of cores, is similar: heat begins to be released when current passes through them.
However, there is a difference - this is the connection method. In single-core elements, the current passes through one conductor and in order to make the circuit closed, both ends of the coil must be connected to the power supply.
The installation process is as follows:
- The adapter coupling is attached at the connection point (this is prohibited from doing near the thermostat).
- The cable is unwound and laid so that its other end, located near the coupling, is placed in the installation box.
When both couplings are connected, a closed loop is obtained and the wiring is completely ready for use. In this case, the couplings are on the floor and are filled with screed.
Connecting a resistive two-core cable is simpler, since one end is connected and a plug is placed on the other. To make the circuit closed, there is a second current-carrying core.
The design of both types of cables has much in common: one or two insulated cores, to give greater rigidity, a metal protective braiding against damage, and on top everything is covered with an outer insulating layer. In some products, the cores may be drainage, which serve to reduce the efficiency of electromagnetic radiation.
The price of two-core products is higher, but it is still in great demand for two reasons:
- It is easier to lay the cable, since the second end is not connected to the thermostat;
- electromagnetic fields of lower intensity are formed.
But both types of resistive conductors have a big drawback, which is the constant amount of thermal energy released. If heat is not removed for any reason, overheating occurs. This ends with a breakdown of the floor heating system.
Therefore, the resistive cable is not laid under furniture and make sure that there are no voids in the screed. The fact is that air has low thermal conductivity and in the area where the bubble appears, heat begins to be removed at a low speed, and this leads to an increase in the temperature of the cores, which fail.
Types of cable
Before installation, it is important to study what heating wires are available and how to install them. There are two types of cables: resistive and self-regulating
There are two types of cables: resistive and self-regulating.
The difference between them is that when an electric current passes through the cable, the resistive one heats up evenly along the entire length, while the feature of the self-regulating one is that the electrical resistance changes depending on the temperature. This means that the higher the temperature of the section of the self-regulating cable, the lower the current strength will be on it. That is, different parts of such a cable can each be heated to the desired temperature.
In addition, many cables are available with a temperature sensor and automatic control, which significantly saves energy during operation.
A self-regulating cable is more difficult to manufacture and costs more. Therefore, if there are no special operating conditions, then a resistive heating cable is often purchased.
Resistive
A resistive type heating cable for water supply has a budget price.
Cable differencesSource teplina.rus
It is divided into several varieties, depending on the design features. Each of them has its own advantages and disadvantages:
| Cable type | pros | Minuses |
| Single-core | The design is simple. It has a heating metal core, copper shielding braid and internal insulation. On the outside there is protection in the form of an insulator. Heats up to a maximum of +65°C. | It is inconvenient for heating pipelines: both opposite ends, which are far from each other, must be connected to the current source. |
| Two-core | It has two cores, each of which is separately insulated. The additional third core is bare, but all three are covered by a foil screen. The external insulation has a heat-resistant effect. It heats up to a maximum of +65°C. | Despite the more modern design, it is not much different from a single-core element. The operating and heating characteristics are identical. |
| Zonal | There are independent heating sections. The two wires are insulated separately, and a heating coil is located on top. The connection is made through contact windows with conductive conductors. This allows heat to be created in parallel. | No shortcomings were found, if you do not take into account the price tag of the product. |
Resistive wires of different typesSource yandex.net
Most buyers prefer to lay the wire “the old fashioned way” and purchase a wire with one or two cores.
Due to the fact that a cable with only two cores can be used to heat pipes, the single-core version of the resistive wire is not used. If the owner of the house unknowingly installed it, this threatens to short circuit the contacts. The fact is that one core needs to be looped, which is problematic when working with a heating cable.
If you install the heating cable on the pipe yourself, then experts advise choosing a zonal option for external installation. Despite the peculiarity of the design, its installation will not cause serious difficulties.
Wire designSource otdelkaexp.ru
Another important nuance in single-core and double-core designs: on sale you can find already cut and insulated products, which eliminates the possibility of adjusting the cable to the optimal length. If the insulating layer is damaged, the wire will be useless, and if damage appears after installation, the entire system will need to be replaced. This disadvantage applies to all types of resistive products. Installation work of such wires is not convenient. It is also not possible to use them for laying inside the pipeline - the head of the temperature sensor gets in the way.
Self-regulating
Self-regulating heating cable for water supply with self-regulation has a more modern design, which affects the duration of operation and ease of installation.
The design provides:
- 2 copper cores in a thermoplastic matrix;
- 2 layers of internal insulating material;
- copper braid;
- external insulating element.
It is important that this wire works great without a thermostat. Self-regulating cables contain a polymer matrix
When turned on, carbon is activated, and when the temperature rises, the distance between its graphite components increases.
Self-regulating cableSource moydomik.net
Self-regulating cables
Thanks to their special structure, heating wires of this type do not overheat. A self-regulating cable for underfloor heating consists of small segments connected in series. Each of them has two conductive cores, between which there is a polymer that generates heat.
Self-regulation of this type of electric floor is based on the properties of the polymer, whose electrical resistance largely depends on the temperature regime. The higher it is, the greater the resistance.
For this reason, as the polymer heats up and the degree of resistance increases, the current flowing through the element decreases, which means the amount of thermal energy released decreases. This is how the heat transfer of each segment is regulated. In this case, the temperature of neighboring elements does not depend on each other. The cost of such wiring under heated floors is much more expensive than resistive cables.
Thermal insulation
The insulating layer is created to retain heat inside the room, rather than wasting it on the rooms below. The amount of material used will depend on the room itself, its configuration, as well as the type of surface in the room. Thermal insulation also has its own goals, which must be demonstrated during operation:
- A warm floor can act as an additional source of heating in a room. In this case, it will be enough to purchase foamed polyethylene with a foil coating (penofol). This will act as a substrate for the heated electric floor under the screed during the installation process.
- Sheets of extruded polystyrene foam or expanded polystyrene will look great on the subfloor when the lower floor has heating. The appropriate thickness is also selected in the range of 20-50 mm. You can choose from the entire list another insulation that has a sufficient level of strength. The main thing is that it has the appropriate thickness.
- The rooms below do not always have their own heating system. This mainly applies to basements and garages. Here the insulation should have a layer of up to 100 mm. An alternative material is mineral wool, which has similar qualities and characteristics.
Insulation can also be installed along the walls. This will also help dampen the thermal expansion of the screed during operation of the heated floor system. But here the insulation must be compressible and have a thickness of no more than 20 mm.
Next, the reinforcing mesh is laid, which not only creates a very durable “pie” of the heated floor, but also makes it possible to attach heating elements to it. Instead of a reinforcement layer, adding microfiber to the solution along with plasticizers is suitable.
Nuances of arranging cable floor heating
If any heating wire is damaged, the system loses its functionality. For this reason, heated floors constructed using cables are laid in a screed. At the same time, its thickness is selected so that the high load from the cement layer does not damage the wiring located under it.
In addition, a screed that is too thick in this case will greatly reduce the efficiency of the heating system, making it inertial. A thicker layer can cause a lot of trouble, since the floor will not heat up even when the power is set to maximum.
In the electrical cable laying diagram for heated floors, it is always necessary to provide for the placement of a thermostat and a floor surface temperature sensor. You can do without these devices by directly connecting the cables to the power source. But then the heat supply system will not work for long.
This is especially true for resistive cables. Therefore, when installing a wired underfloor heating system, you first need to install a thermostat.
First of all, it is necessary to measure the resistance and insulation of the wire. Since each bay is accompanied by a passport, which indicates the technical characteristics of the cable for heated floors, it is necessary to compare the indicators obtained during the measurements with the data in the document. If the deviations do not exceed 10%, then installation work can continue.
Installation of electric heated floors under tiles
Features of installing heated floors under tiles
The installation procedure for electric heated floors depends on the type of finishing floor covering. If laminate, carpet or linoleum are used, two installation options can be used - pouring into a screed or laying under sheet flooring without pouring a concrete layer. However, only the first method is suitable for tiles - pouring screed followed by installation of floor tiles.
The process consists of several stages:
- preparation of the subfloor;
- installation of the control unit;
- laying the heat insulator;
- laying and connecting resistive cables or heating mats;
- pouring screed;
- laying tiles.
The optimal sequence of operations is given. Inexperienced users often violate it, planning to install the control unit almost as an afterthought. This is a serious mistake, since the wall should be tapped for hidden placement of cables before the heat insulator is laid.
Let's take a closer look at the stages of making a heated floor for tiles:
Preparation
Preparing the surface for installation
Preparatory work consists of clearing the surface of the subfloor from all top layers - from coatings (linoleum, carpet or laminate), board flooring with joists (if any) and other layers. As a result, only the concrete floor slab should remain. She is examined and her condition assessed. It is necessary to repair all potholes and get rid of protruding objects (remnants of fasteners, pipes, wires, etc.).
If noticeable cracks or potholes are found, they must be sealed with a layer of mortar. If the number of defects is too large, a rough leveling screed is made. This step should not be neglected, otherwise constant deforming pressure will be exerted on the heating cable. Sooner or later it will lead to an emergency, and repairing a heated floor in a screed is a very labor-intensive and expensive procedure.
Installation of the control unit
Installation of the thermostat control unit
The control unit (thermostat) is installed on the wall in a pre-selected location. It is recommended to select the installation point so as to avoid laying too long wires.
The device itself is small in size. Most of them are designed for overhead installation, but there are also built-in designs. For them you will have to make a nest in the wall. In addition, you will need to make a groove to make a hidden connection for the power cable and connecting wires for the heating cable. You cannot simply plug in a heated floor into an outlet; it requires a separate cable with its own RCD from the panel.
The grooves must be strictly horizontal and vertical. Inclined grooves cannot be made, this contradicts the requirements of the PUE and SNiP. The horizontal groove should be located no closer than 150 mm from the floor slab. All this work is dusty and produces a lot of debris and concrete chips. That is why it must be done immediately, so that later you do not have to sweep away concrete chips between the bends of the laid heating cable.
Laying the heat insulator
Laying thermal insulation
The next step is to lay the insulation. It is necessary to purchase the required amount of material and lay it tightly on the surface of the subfloor. Many online sources advise purchasing penofol. However, this is a dubious recommendation - penofol is good for insulating walls, but the operational loads on horizontal planes are excessive for it. The material will sooner or later sag, and cracks and collapsed areas will appear on the screed.
The best option would be dense penoplex. It is stronger, more resistant to loads, and has high performance qualities.
The slabs are placed tightly on the floor, without cracks or gaps. If they do appear, polyurethane foam is used to seal them. The minimum layer thickness is 15 mm. You can use a thicker insulator, but you cannot reduce the thickness - the heating cable will begin to transfer thermal energy to the ceiling, which means unproductive losses.
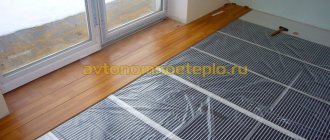
Laying the heating cable
When the heat insulator is laid, proceed to the main installation stage - laying the heating cable. The procedure can be performed in two ways:
laying fiberglass mesh on the floor
laying finished heating mats
The first method is usually used when installing heated floors in rooms with a lot of equipment (for example, in a bathroom), where there is simply nowhere to lay the mats. The second option is optimal when laying heated floors in fairly large rooms.
Laying heating mats is a simple procedure. The roll is unwound on the surface, periodically fixing its position with double-sided tape. The distance between adjacent strips must be at least 10 cm. The laying direction is chosen arbitrarily, guided by the location of the control unit on the wall.
The procedure for laying the resistive cable on the mesh is considered more complex. Here you must first select a suitable installation scheme, take into account the configuration of the room and the length of the cable.
There are a lot of installation schemes:
- spiral;
- snail;
- snake;
- zigzag, etc.
The cable must be laid so that the distance between the turns is about 20-25 cm. The turns are laid on a fiberglass mesh and secured to it with nylon clamps.
In addition to the cable itself, it is necessary to install a temperature sensor. For it, a nest is cut out in the heat insulator, choosing a place so that the device is surrounded on all sides by turns of resistive cable (not from the very edge). The sensor wire is attached to the heat insulator with pieces of tape, ensuring the stationary position of the sensor and connecting elements. Some manufacturers recommend placing the temperature sensor wire in a corrugated pipe, for which a socket is cut out in the heat insulator. This method will allow you to replace the temperature sensor if it fails.
To connect a resistive cable, you must connect the power wires and the temperature sensor to the appropriate terminals. In order to complete the procedure without errors, you should first study the instructions. When the connection is completed, you need to start heating and check the operation of the system in all modes. If any problems are found, they are corrected immediately.
Filling the screed
Features of pouring screed
After laying and checking the functionality of the heating cable, it’s time to fill the screed. Its thickness should be 40-50 mm (at least 30 mm above the top of the resistive cable). For pouring, it is recommended to use a ready-made screed mixture, which is purchased in a store and diluted in the required amount of water immediately before pouring. The ratio of mixture and water is indicated on the packaging. The information should be carefully studied, as some specific conditions for performing the work are possible.
Before pouring, damper tape 5 mm thick is glued to the walls along the entire perimeter of the room. It is needed to compensate for thermal expansion of the screed. The mixture is poured onto the surface and carefully leveled, achieving the most even and horizontal plane possible.
You can turn on the electric heated floor only after the screed has completely hardened. It is generally accepted that the time is determined by the thickness of the screed - 7 days are allotted for each centimeter. That is, a 5 cm screed will dry for 35 days.
However, this is the time for complete drying. To carry out further work, it is enough to wait for the screed to gain structural strength, which occurs approximately twice as fast. At the same time, it is recommended to keep the screed under the tiles for a little longer, since the coating is almost impermeable to moisture and significantly slows down the process of concrete crystallization.
Laying tiles
Laying tiles
The tiles are laid after the screed has dried. It is necessary to use floor (not wall) tiles with a thickness of 8 mm or more. The best option would be porcelain stoneware - it has a balanced set of working qualities and performs well in combination with a heated floor.
It is recommended to turn on the heating only after the tile adhesive has hardened and the joints have been opened. This will allow the adhesive and grout composition to dry normally and gain maximum strength.
Installation of thermostats
First of all, you should determine the location of the thermostat. It must be mounted on one of the walls of the room at a distance of at least 30 centimeters from the floor surface. Typically, thermostats are located close to switches. A recess is made in the wall the size of a standard socket box.
After installing the installation box, the power supply is supplied without connection - zero, phase and ground. Then lay the groove in the direction from the thermostat to the floor. Several sections of pipe or corrugated hose are placed in it. 1 – 2 segments are taken out of the wall near the floor surface and connecting wires from the cables are placed in them.
The section of pipe located between them must be laid along the floor to a mark located 50–100 centimeters from the wall. Now, if the sensor breaks down, it can be replaced without any problems; to do this, remove the thermostat panel and remove the damaged element by the wires from the pipe. Then the new product is inserted and connected.
Installation of heated cable floors
When installing cable floor heating, proceed as follows. First, the base is cleaned and leveled. If necessary, a screed with a thickness of 3–7 centimeters is poured for this purpose. A level base is important.
If this requirement is neglected, then heating will not be uniform. When an air bubble appears under the resistive cable due to unevenness of the base, it will soon burn out.
On a prepared, clean base, in order to reduce heat loss, install thermal insulation, consisting of two parts: a tape laid around the perimeter of the room, and insulation. When choosing an insulating material, pay attention to its heat resistance - it should easily withstand temperatures up to 100 degrees.
If there is a cold basement below the room, a thicker layer should be created, and if there is another apartment, then 2 centimeters will be enough. If the heat insulator is not used, a third of the system’s power will go down.
When choosing insulation when laying a cable in a heated floor screed, it is better to give preference to a material that has a metallized surface. As a result, the heat going down will begin to be reflected and heat not the ceiling between the floors, but the screed located above the wiring.
You can save money by purchasing regular insulation and laying a film with a reflective effect on top of it. At the same time, experts do not recommend using foil, since it will collapse in a few months. You can buy heat insulation in both rolls and slabs.
It is unacceptable to leave gaps between the sheets and strips of insulation: they are laid closely, since any gap creates a cold bridge through which heat leaks out.
Depending on the base, the following can be used to attach heat-insulating materials: double-sided tape, staples plus a construction stapler, and adhesive. For joining points, tape is used - it can be mounting tape, but the best choice would be metallized tape.
When there is often high humidity in the room, waterproofing is placed on top of the thermal insulation layer. To do this, use polyethylene film or other modern material.
Then you can proceed in one of two ways. In the first case, a small height preliminary screed is laid from a mixture of sand, cement and water. Thanks to its presence, heat is distributed more evenly and overheating of the floor heating cable is prevented.
The second method involves installing a mesh with cells of 10–15 millimeters or a special mounting tape on top of a polyethylene film. The tape must be placed with a laying step of 40–50 centimeters. The grids are mounted close to one another.
Tools
To install a heated floor, you should stock up on a certain set of tools, which will differ depending on the specific conditions and the list of work performed. Among the main ones are:
- Heated floor kit, which includes heating elements, temperature sensors, and an RCD protection system.
- Electrical wiring, selected cable option (single-core, two-core).
- Fastenings and connecting wires.
- Copper cable acting as ground.
- Reinforcing mesh or module.
- Temperature regulator, etc.
As for the actual installation of the electric heated floor in the screed, you will have to use pliers, special clamps, a hair dryer when connecting the heating cable, etc. When all this is available, you can begin planning the surface and high-quality distribution of heating elements. This in turn will allow you to correctly calculate the required amount of underfloor heating.
Perform power calculations for heating cables
When calculating thermal power for a cable system, the purpose of this heat supply method is taken into account. If the heating cable for a heated floor is planned to be used to provide auxiliary heating for a property, then 110-140 W will be required for each “square” of area. When the system is the main one, in this case 150 W or more is needed.
In addition, you should know the size of the area where the cable will be laid out. It should not pass under furniture, plumbing fixtures or objects located low above the floor surface. This is especially true for resistive cables, which are at risk of overheating, but for self-regulating wires there is no danger.
By subtracting the area of these zones, you can find out the actual heat supply area and the power of the entire underfloor heating system, for which the heating area is multiplied by the norm for one square meter.
Next, you should calculate the length of the floor heating cable: in the passport for this product, manufacturers indicate the power of one meter. The required footage is determined by dividing the total power by the cable capacity. For example, the result of calculations was 93 meters.
You need to purchase several bays, the total length of which is close to the calculated value. It should be remembered: if there are extra meters of cable left, they cannot be cut off, since there are couplings at their ends, secured using special equipment.
You can make something similar yourself, but the service life instead of 10 - 20 years will be several years, and sometimes months. Therefore, the cable is laid along its entire length.
Cable for heated floor
Each cable option has its own power and length. If you cut off a smaller piece of the cable, it will immediately reduce the resistance required for a voltage of 220 V. This will all lead to overheating and damage.
There are some recommendations that can help you choose a high-quality heating cable option. Much depends on the power density of the product, which includes the number of watts required for each meter of square footage of the room.
If there is a floor covering such as laminate, parquet or cork, the minimum power density should be 80 W/m2. Tiles or porcelain tiles have high performance - at least 100 W per square meter. There may be cases of using a heated floor system as the main heating system. In this case, “cold” rooms should have a specific power of 200 W per sq. m., and thermally insulated rooms - 150 W/m2.
The length of the cable will be determined depending on how much area in the room will be covered by it. The manufacturing step of laying the heating element will also play a significant role. Since the store offers cables of standard length for sale, it is best to focus on them. When calculating everything is done as follows:
When the room has an area of 15 m2 and requires 1 kW of cable power density, a standard length of 80 meters is purchased on sale and the calculation is made: 15/80 and we get 0.1875 meters - the optimal laying step. The standard cable should remain unchanged in its parameters. It is better to slightly reduce or increase the laying step than to subsequently not obtain the necessary efficiency from the heating system.
The cable can also be single-core or double-core. This or that situation has its own characteristics and subtleties. A single-core cable must be connected to the network at both ends. That is, it is directed across the entire heated area in the room, after which it returns back.
It is better and easier to install a two-core cable, where only the “cold” end needs to be connected to the network.
Laying heating cables
The power ends must be led to the wall to the thermostatic device. In this case, the couplings must be in the screed. Lay the floor heating cable according to the diagram in the shape of a “snail” or “snake”. The first method is more difficult to implement and has no advantages, so the second installation option is almost always used. Sometimes a double or triple “snake” is laid.
The size of the installation step is selected taking into account the required power: the closer the wires are located, the greater it will be. The maximum distance between adjacent conductors is 30 centimeters, and the minimum is 5 centimeters. A more precise step is determined based on the purpose of the room: in bedrooms and children's rooms it is usually larger, and in common rooms it is smaller.
In addition, if desired, the distance is reduced in areas near window and door openings, as well as in the center of the room. The main thing you should pay attention to when developing a wire layout is that they cannot intersect or touch, and the gap between the walls and cables must be at least 15 centimeters.
After completing the installation of the heating elements, you need to install a floor temperature sensor, the wires from which are connected to the thermostat via a corrugated hose. It is advisable to place it centrally between two wires. If the screed height is sufficient, the tube with the sensor can be placed on top and fixed. When the thickness is not enough, the subfloor has to be tapped.
Final pouring of the screed
Before final pouring of the solution, you need to make sure that the cables are working properly. To do this, take a tester and measure the resistance. This parameter must match the data in the passport. Permissible deviation is maximum 10%.
When everything is in order with the heating elements, you can start pouring the screed. If thermal insulation was not installed, and the installation was carried out directly on the subfloor, then the height of the solution can be 3 centimeters.
If there is insulation, the concrete layer must be at least 6 centimeters. Only with such a thickness of the screed is it possible to ensure the required rigidity of the floor covering. The height can be made smaller provided that hard finishing materials are laid - parquet boards, laminate, etc.
After leveling the concrete layer, it is left for at least 4 weeks. Only then do they begin to connect the cables to the thermostat. It has clamps to which the heating conductors are first connected, and then the power wires. The electric heated floor is ready and all that remains is to install the floor covering.
To lay a cable for a heated floor with your own hands, you need to have the appropriate knowledge and skills, otherwise the best solution would be to contact specialists who provide this type of service.
Features of electric underfloor heating with heating cable
Maria A Member of FORUMHOUSE
I have a house with an unheated basement. The ceiling is concrete slabs. I want to make an electric heated floor on the first floor in the kitchen and hallway under the tiles. I thought: what kind of warm floor should I choose, what layers does the correct “pie” consist of? Is it necessary to install insulation under a warm floor and what kind? How to properly make and fill a screed.
To answer these questions, you first need to understand the types of electric heated floors.
1. Film heated floor. It is laid directly (“dry”) under the final finishing floor covering - laminate, carpet or linoleum. Among the advantages, we note: the minimum thickness of the system and high installation speed. Disadvantages - such a warm floor cannot be placed under tiles in “wet rooms”, because the film is afraid of moisture and aggressive alkaline solutions - tile adhesive or sand concrete-based screed.
The finished floor covering (for example, laminate) must be certified for use with a heated floor system and allow heating.
2. Heating mats (thermomats). This is a finished product with a certain, calculated cable pitch, in durable insulation, laid in a mesh. This simplifies the calculation of the power of the heated floor and reduces the time for installing the entire system. Most often, heating mats are chosen when it is not possible to increase the height of the floor and pour a full screed, and the mats are mounted directly into the layer of tile adhesive.
Heating mats are produced with a certain width and multiplicity of heating area 0.5 m², 1 m², 2 m², etc.
For example, for dry, insulated rooms and as a heating system additional to the radiator, the power of thermomats is selected at the rate of 120 - 140 W/m². For the main heating system - at least 150 W/m². For rooms with high humidity and non-heat-insulated rooms - 180 - 200 W/m².
The power of the heating system is calculated based on the heat loss of the house, which it must compensate.
3. Warm floor based on a heating (single-core or two-core) cable in a shielding braid, which minimizes the level of electromagnetic radiation.
Anna Ruzhitskaya Product Manager at LafargeHolcim
A heating cable is usually cheaper than a thermomat. Using a cable, you can vary the power of the underfloor heating system per square meter by adjusting the pitch of the cable on the mounting tape. Unlike heating mats, which are laid in a thin layer (about 5 mm) of tile adhesive, the heating cable is embedded in a screed made of cement-based mortar (sand concrete) 3-6 cm thick, which accumulates heat well (the inertia of the system increases).
The thicker the screed, the longer it takes to cool, but also the longer it heats up, because... a heating cable laid in a sand concrete screed needs much more time to completely warm up the room and the floor covering itself. When using heating mats located directly in the adhesive layer under the tile, heating of the coating (the system reaches operating mode) occurs much faster.
Important: when choosing a heated floor system between thermomats and a heating cable, you should remember that the height of the floor (the thickness of the entire structure when using a cable) will be raised by at least 4.5 cm, taking into account the thickness of the screed (about 3 cm), tiles (1 cm) and tile adhesive (0.5 cm). You can turn on a warm floor made from heating mats within 10-14 days after laying the tile adhesive. When using a heating cable and sand concrete screed, this period increases to 21-28 days, because The sand concrete screed must gain the necessary strength.
Cable underfloor heating and flooring
Warm electric floors may not be used with all types of floor coverings. When resistive cables are installed, the finish can be made from any tile, wood plank, laminate or linoleum. As for the last two types of flooring, they should not have a heat-insulating layer.
When purchasing laminate or linoleum, it is advisable to pay attention to the presence of such characteristics of the materials as suitability for heated floors. When the heating system is installed using a resistive cord for underfloor heating, the floor surface should not be covered with carpets or heating elements should not be placed under furniture.
But a self-regulating cable can be installed anywhere. If you are going to use glue, grout and adhesive composition, you need to purchase special ones. They are intended specifically for floor heating systems, since they have greater elasticity and better thermal conductivity.
Material calculation
Some manufacturers provide their consumers with ready-made tables that allow them to determine exactly how many elements of a warm electric floor should be purchased for high-quality installation. Much will depend on the room itself, on its heat loss. This will allow you to determine the necessary step for laying heating elements that will cover the entire possible area. It is worth noting that when using an electric heated floor as the main heat source, the heating cable under the concrete screed must cover more than 70% of the area of the entire room.
It is easier to make calculations when using infrared heated floors. It is enough just to purchase the number of heating elements that will cover a predetermined area in the room.
The electrical cable is calculated based on its length for connection to the wiring, to the thermostat, from the meter and other elements of the heated floor. It wouldn’t hurt to even have some reserve so that when installing a heated floor you don’t have to be distracted from work.
When installing an electric heated floor, you should immediately forget about directly connecting all components directly to the outlet. This is strictly prohibited for your own safety.
It would be a good idea to check the electrical input in the apartment or house, which must withstand the entire load and with a margin from the heated floor. Otherwise, you will have to replace it with the appropriate one, as well as install the appropriate fuses (automatic circuit breakers).
Other options for arranging a warm electric floor
It will take a lot of time to make a warm electric floor; this work cannot be done in a short time. Most of the time is spent ensuring that the screed solution completely hardens. The mixture must be laid in a layer at least 6–7 centimeters thick.
A linear meter of cable is inexpensive, but to the costs of installing a heated floor, you should add the costs of installing a screed, thermal insulation, purchasing fastening tape and other materials.
Taking into account the above information, before making a final decision, it would not hurt to familiarize yourself with other options for arranging a warm electric floor, for example, using film and rod heaters. They emit heat in the infrared range, which is well perceived by the human body, which is their huge advantage.
When heating with infrared heated floors, the temperature seems comfortable, although it is several degrees lower than with thermal radiation. As a result, energy costs are reduced. Among the advantages of the infrared rod floor is its ability to self-regulate.
Advantages of using self-regulating cables for floor heating
- Energy savings due to the fact that it heats only where there is not enough heat.
- The power per linear meter of cable is the same and does not depend on the total length. It will be the same for both 0.5 meters and 15 meters at the same temperature. However, it is worth noting that power consumption depends on temperature - the colder the cable section, the more power it will consume and heat up more.
- It does not overheat and does not burn out when the turns overlap or come close together.
- It can be cut into pieces of various lengths - from 20–30 centimeters to tens of meters (the maximum length is limited, you need to look at the technical characteristics of a particular brand, usually 85–100 meters).
- Self-regulation - the cable regulates the intensity of its heating itself, even without a separate temperature sensor.