Hello readers of my blog! Today we will talk about how to properly install an infrared heated floor with your own hands. It would seem that the matter is not tricky, but when you are faced with this problem, you have to think about how to do it correctly, what preparation to do, what materials to choose. Thus, I decided that this article would be useful to someone, and I am devoting my efforts to this subject. In it I will answer a number of questions that will arise immediately before How to properly install an infrared heated floor with your own hands, and some even after that. This topic is quite broad, because before work, thorough preparation is necessary, but how to do this? And this is a separate topic. You can learn about all this in great detail in the article below. Installation of film heated floors
1 Installation of a heated floor system
The rules for selecting and installing an electric heated floor differ significantly from the selection and installation of a water heated floor.
1. Selecting a heated floor kit
The recommended temperature is 20-21oC for the room and 24-26oC for the floor. The desired temperature for the room is set by the thermostat.
For comfortable heating, the installed power for the entire area should be at least 80 W/sq. m, with the main one - 140 W/m2.
2. Determine the area and configuration of the surface on which you will lay the heated floor.
When installing a heated floor with your own hands, lay the thermal film only on the free area, i.e. on the area that is not occupied by furniture and appliances (refrigerator, stove, kitchen wall, washing machine, wardrobe, etc.). When installing heating, heated floors should be laid on 75-80% of the total area. Can only be installed in areas that need to be heated.
3. Lay down heat-reflecting material.
4. Place sheets of thermal film on heat-reflective material
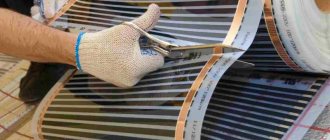
Cut the thermal film into strips of the size you need.
The cutting line is marked on the thermal film (cut space) and is located every 17.4 cm. It is prohibited to cut the film along other lines. Install the contact clamps onto the strip.
The contact clip is installed on the copper strip (the smooth side of the clip should be inside the thermal film, the other side should be outside on the copper strip).
Clamp the contact clamp with pliers or a special tool. Make sure the clamp is tight and there is no sparking. Insulate the cut lines of the copper strip located at the end of the strip of thermal film, for which use short bitumen insulation from the bag.
For example, on the thermal film, contact clamps are already installed at the beginning of the strip and insulation is installed at the end of the strip. Lay out the pieces of thermal film over the area of your room so that the copper conductor is at the bottom (turned towards the heat-reflecting material). The front side of the thermal film will be the side where the carbon semiconductor strip is longer, that is, the copper conductor will be at the bottom.
The thermal film is unwound on a clean, dry and flat place. It is advisable to lay the thermal film along the length of the room, avoiding damage to it; in this case, there will be more solid strips and fewer connection points for installation wires. Thermal film strips must be secured with tape to the reflective material to prevent it from shifting during further installation of the floor covering.
5. Install the thermostat
The regulator can be installed permanently, as an electrical outlet for hidden or external wiring, or connected to an existing outlet using a cord.
6. Lay out the installation wires and determine where to strip the insulation.
7. Connect the thermal film to the wire
8. Isolate connections
Each strip of thermal film includes 5 pieces of insulation. Use 2 pieces for each connection.
One piece is attached to the outside, the other covers the inside of the thermal film and the tip with the wire. The fifth section is used to insulate the copper busbar. Thus, we obtain electrical insulation and waterproofing of the connection.
9. Connect the connecting wires to the thermostat.
10. Install and connect the floor sensor to the thermostat. The floor sensor is installed under the thermal film closer to the thermostat and is attached to the black strip of the film using tape.
To level the floor under the finishing coating, make grooves (recesses) in the heat-reflective coating under the floor sensor and the wire connections.
11. Connect the thermostat to the electrical network.
12. Test the heating system.
13. Lay the finishing floor covering.
14. Installation of the heated floor is complete, turn it on and enjoy the warmth.
The heat-reflecting material is laid on the prepared and leveled floor surface. Then the sheets of material are secured with tape. After the surface is prepared, thermal film can be laid directly on it. It is recommended to install the regulator close to existing electrical wiring, unless special wiring is required to connect the system. It is installed on the wall, in the most convenient place for the user (near the sockets), so as not to interfere with the further arrangement of furniture, kitchen installation and installation of household appliances. The thermal film is connected to the network in parallel, that is, all installation wires are connected to one side of the room. The kit includes wires of two colors. One wire color is connected to only one end of each strip. Position the wires so that the main wires run under the baseboard. If you want to make the connecting cable hidden, you need to cut a channel in the wall; if you want to make it external, use a decorative mounting box. Remove the insulation where the thermal film is connected to the tip. Bring the bare wire to the terminal and clamp it tightly using pliers. The wiring diagram is indicated on each thermostat. The connection of the thermostat and power supply from the electrical network must be carried out by a qualified electrician. Be sure to consider additional electrical devices that may be connected to the same network. For a system with a power of 2 kW or more, we recommend connecting through a separate circuit breaker with a power of at least 16 A.
Turn on the system and set the floor temperature. Check the heating of each strip of thermal film. Check with a tester the connection points of the installation wires, as well as the insulation along the cut line. When installing under a laminate or parquet board: Lay the laminate or parquet board on top of the plastic film according to the instructions. When installing under linoleum, laminate, carpet: Lay the protective material (fibreboard, SML, hardboard, plywood) on top of the polyethylene film. Apply double-sided adhesive tape specially designed for laying soft floor coverings onto the protective material. Lay flooring on it. All information provided is advisory in nature. For installation, connection and maintenance of electrical devices and/or circuits, contact only professionals who have undergone appropriate training and are authorized to work. Do-it-yourself film heated floor
In previous articles, I talked about laying electric underfloor heating cables and laying heating mats. In this article I will talk about electric film flooring and how to install it with your own hands.
What is an electric heated film floor?
The floor is called film because it is not the cable that heats the surface, but a special film. Its thickness is only about half a millimeter. It consists of copper wires and carbon semiconductors.
The film does not emit an electromagnetic field, as it heats due to infrared waves, which have a beneficial effect on your health. It heats only those materials that stand in their path, and almost does not heat the air. For this specific heating property it is called infrared film heated floor.
The temperature sensor can be placed both on the film and under it (along the groove). Which method is preferable for specific films, check with the seller or manufacturer.
Floor insulation
Choose thermal insulation material covered with foil. Infrared waves will be reflected from it into the room, and not spread down to the neighbors.
Roll out a roll of thermal film over the surface with the copper strip down. Cut it without fear, but only along the special lines specified by the manufacturer.
The lines are located on the film, so there will be no problems with choosing a cutting location. Do not allow stripes to overlap each other.
Secure the thermal film with construction tape. Install clamps or rivets under the connecting wires. Be sure to use bitumen tape and then insulating tape (insulating tape) to cover the bare copper wires that remain in the cut areas (only on one side, opposite to the place where the thermostat will be located). Now connect the strips of thermal film to each other with wires. How to do it?
Connect the right copper wire of the first strip to the right copper wire of the next strip of film. And so connect all the strips of warm floor. If the width of the film roll is 0.5 meters, then the length of one wire to connect the strips will be about 0.7 meters.
IMPORTANT!!! High-quality insulate with bitumen and then with insulating tape all the connection points of the wires. This will help avoid further troubles associated with electricity.
Connecting the system
The infrared heated floor film is laid out for thermal insulation based on the previously selected scheme. If it is necessary to select an exact length, it is cut in certain areas that are marked on the material. Laying the infrared floor under laminate and other floor coverings is carried out with the copper side of the contacts down towards the wall where the thermostat is located.
A contact clamp is connected to the edge of the copper strip, after which the wires themselves are connected. In those places where the film was cut or contacts were connected, it should be treated with bitumen mastic, specially designed for infrared heated floors. The number of contacts will be reduced in proportion to the increase in the length of the heating system. But it is worth considering that the strip can be a maximum of 8 meters in length. Some contacts will also be located inside the film. The distance between the panels must be at least 5 mm. All of them should be located on the base of the floor parallel to each other.
A temperature level sensor is connected to the bottom of the film. At the same time, it must be well insulated. When the film base has been laid and all contacts are connected, you can begin installing the thermostat. It is better to run some of the connection wires into the floor baseboard to hide it from view. Next, the system is connected to the electrical network.
Finish coatings for film heated floors
You can use carpet, linoleum and other soft materials as a finishing coating. The main thing to consider is that the film underneath is easy to damage.
Also keep in mind that cork flooring is a poor conductor of heat. In this regard, laying a heated film floor under this coating is impractical, but possible.
If there is a need to lay heating film under soft coverings, do it in places that will not be subject to heavy loads and damage (wardrobe, armchair, sofa, sectional, etc.).
Ceramic tiles are not very suitable for such a floor. Tile adhesive does not adhere well to film and you will have to use reinforced mesh to hold the adhesive. For tiles it is better to use an electric mat.
The ideal finishing floor covering for a warm film floor is laminate parquet boards.
Quick installation and the absence of specific construction and finishing work, ideal for those who want to install an electric heated floor with their own hands.
Is it possible to heat such a coating?
The first thing I would like to tell you about is whether it is possible to lay an electric heated floor under linoleum and what are the requirements for installation. The fact is that the film coating can, when heated, release toxins that are harmful to the human body.
In addition, the material may shrink over time, causing its appearance to deteriorate. Well, the last nuance - this coating option can be additionally thermally insulated, as a result of which the heating system will be completely ineffective. As you can see, there are nuances in choosing the right linoleum, and now we will tell you which type is suitable for laying an electric heated floor.
Firstly, there are natural and artificial materials.
It is advisable to give preference to the first option, since in this case no harmful substances will be released during heating.
Secondly, manufacturers indicate on the packaging the suitability/unsuitability of using products for an electric floor heating system. You understand that you need to choose products with appropriate labeling. And, thirdly, multilayer PVC linoleum has proven itself best in terms of reliability, durability and heat transfer, which we recommend buying for laying a heated film floor with your own hands!
Another important nuance is that there is a maximum allowed temperature for heating linoleum. An electric heated floor should heat the coating by no more than 30°C, which is even stipulated by SNiP rules. If you ignore this point, the material may begin to melt, darkened marks will appear, and the likelihood of the coating igniting will increase.
Installation sequence
All procedures are quite simple and occur in the following sequence.
Installation of heated floors
Stage 1. Buying everything you need
The following components are required for operation:
- polyester film;
- silver plated copper wire;
- thermostat;
- temperature sensors;
- heat-reflecting substrate;
- liner between the floor and the film (depending on the floor covering).
What is needed to install film heated floors?
Now a few words about this coating. As noted earlier, carbon film is suitable for any finishing material; this has virtually no effect on the system kit. At the same time, the substrate for each coating requires an appropriate material.
- For wooden floors, the heating film is covered with polyethylene.
- For tiles everything is the same, only the plastic film is additionally covered with a painting mesh. Dowels are used for fixation, and when laying, a special adhesive solution for heated floors is used.
- With a soft floor covering, the floor is protected by a hard substrate - plywood, chipboard, etc.
Note! Film flooring is best combined with tiles. The fact is that this material has good heat-saving properties, so energy is consumed more economically.
Prices for infrared film "Teplolux"
infrared film teplolux
Rod infrared heated floor
Stage 2. Surface preparation
Step 1. The IR floor is extremely demanding on the coating on which it is installed, so first the base is cleaned of dirt and dust. To do this, you can use a vacuum cleaner.
Removing old flooring
Preparing the base
Step 2. Then the surface is checked with a horizontal level and if the “difference” exceeds 3 mm, then leveling and re-cleaning are carried out.
Step 3. Upon completion of cleaning, a waterproofing layer is installed to protect the floor from moisture.
Step 4. Insulation is installed on top of the waterproofing. This will prevent heat loss from downward rays and, as a result, reduce the amount of electricity consumed. You shouldn’t believe “experts” who claim that this is unnecessary.
The joints are sealed with tape
Any of the existing options can be used as insulation, but only technical cork must be laid under the ceramic tiles. The insulation is laid with the metallized surface up, leveled, and the joints are sealed with mounting tape.
Prices for technical plug
technical jam
Stage 3. Scheme of the future floor
Step 1. Before starting installation, you need to decide on the location of the thermostat - ideally it should be 15 cm from the floor surface.
Scheme of the future floor
Step 2. Next, a diagram for installing the heating film is drawn up. There are a number of nuances to consider during the process:
- the system cannot be installed under household appliances and large furniture;
- the first strip should be laid at a distance of 10-40 cm from the wall;
- if the film floor will be the only source of heat, then you need to make sure that it occupies at least ¾ of the entire room;
- if it is only an auxiliary system, then ½ will be enough.
Stage 4. Installation and final connection
Step 1. According to the diagram drawn up at the previous stage, a heating film is laid on top of the insulation. If necessary, the material is cut along the marked lines.
Cutting thermal film
Step 2. The film must be laid so that the copper surfaces of the contacts are directed downward. In this case, you need to move towards the wall on which the thermostat is installed.
Laying thermal film
Step 3 . Clamp terminals are connected to the edge of each copper strip, after which the cables are connected.
Note! All joints and cuts are carefully sealed with a special bitumen-based mastic.
System connection process
It should be remembered that the greater the length of the heating film panel, the fewer contacts there will be. But the maximum length should not exceed eight meters.
The thermal film is connected to the network in parallel, that is, all installation wires can be connected on one side of the room
Step 4. Some of the clamping contacts need to be placed on the surface through which current will pass, while the rest should be placed in the film itself.
Next you need to secure the contact clamps
For this purpose pliers are used
Wires are attached to terminal clamps
Connection points are isolated
Another photo of the process
Step 5. Next, a pre-insulated temperature sensor is connected to the bottom of the covering.
Cutouts are made in the insulation
Step 6. Upon completion of installation, connection of all cables and clamping contacts, the thermostat is installed. It is recommended that this device be installed permanently, but if desired, it can be connected like an ordinary electrical appliance - using a socket.
Connecting an infrared floor heating thermostat
Electromechanical thermostat
Installing a thermostat
The process of connecting the thermostat
Note! Experienced builders assure that most of the cables leading from the thermostat to the film must be routed under the baseboard.
Step 7. At the end, the structure is connected to the electrical network.
Stage 5. Test run of the system
Before laying the finishing coating, you should test the performance of the film floor. If everything was done correctly, the film will heat up evenly, and the contact connections will not spark or overheat. After successful testing, the infrared floor is covered with another layer of polyethylene film, and then you can begin laying the finishing coating.
Prices for thermostats for heated floors
thermostat for heated floors
What type of heater is best to use?
We have already looked at the types of electric heated floors, which can be represented by a thermomat, infrared film or heating cable. All three options are suitable for laying a heating system, but it is best to use an infrared film coating.
This is due to the following advantages of the material:
During installation, you can do without a screed, which will save time, money and, most importantly, the height of the ceiling. The infrared system can be put into operation within 1-2 days after installation.
At the same time, the screed hardens for about 4 weeks.
A heated film floor under linoleum can be easily installed with your own hands, and this can be done even after a major overhaul, since this type of work is “clean”.
As you can see, the advantage of this version of the system speaks for itself, so we strongly recommend using it at home. The only negative is that the infrared coating is afraid of water, so installation in wet rooms is prohibited. In addition, linoleum itself begins to rot in a humid environment, which immediately prevents its use in the bathroom, bathhouse, and damp rooms.
Trial
When the infrared film heated floor is connected to the network, you can begin testing it for performance. This is done before laying the floor covering. Normal operation includes the absence of sparking, the temperature at the contact junctions should not rise to the point of overheating, the film along its entire length is heated equally and at the same temperature level.
When the system has been tested successfully, a polyethylene film should be laid for additional waterproofing. Next, you can begin laying the flooring.
Installation procedure
So, for your attention, the procedure for laying a heated film floor under linoleum with your own hands:
Calculate the heating system in order to correctly select the power of the infrared film and its size in accordance with the usable area of the room. Prepare the surface - remove the old coating and if the floor is uneven, pour a small screed to level the surface. After the solution has hardened (which may not be necessary) , lay heat-insulating material over the entire surface.
It is best to use extruded polystyrene foam. Glue a heat-reflecting layer on top of the polystyrene, which will increase the efficiency of the system. You can “kill two birds with one stone” by covering the surface with penofol, which is both a heat-insulating and heat-reflecting layer.
Cut the film into suitable pieces. This must be done in specially marked places (indicated by the manufacturer). Install an infrared heated floor under linoleum.
Please note that it is prohibited to overlap the film. Another requirement is that material cannot be laid under furniture. Also, do not forget that the film covering must be laid at a distance of at least 30 cm from other types of heaters to prevent overheating of the system.
You can find out about other requirements for laying film heated floors in the corresponding article!
According to the diagram, connect the thermostat and temperature sensor to the film and check the operation of the system by connecting it to the power supply. If everything is correct, lay a layer of plywood over the film coating, which will additionally protect the material from mechanical damage.
Lay linoleum on plywood over the entire area of the room with the heating on. After this, make a trim and leave everything as is for 2-3 days.
When this period has passed, you can trim the edges again (if necessary) and proceed to gluing the material to the plywood.
Set the thermostat to a setting of no more than 30 degrees, at which point the installation of the film heated floor under linoleum is completed!
We also recommend watching the step-by-step video instructions for installing infrared film, which discusses all stages of the work in more detail:
That's the whole procedure for laying a heated film floor under linoleum with your own hands! As you can see, there is nothing complicated and you can do everything yourself, without calling a specialist. Finally, I would like to note once again that an infrared heater is still better than an electric one (heating cable and thermomat), so use this particular installation technology in your home!
Installation of infrared floor
Non-traditional heating systems have recently been widely used in modern construction.
They can significantly reduce energy consumption, which has a significant impact on saving the family budget. Such innovative solutions include film infrared heating of the room. We will tell you how to properly install an infrared heated floor.
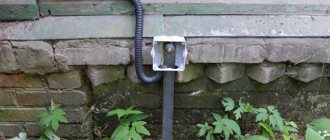
How to prepare a place for a thermostat
It is convenient to install this device in the wall, raising it approximately 20-30 cm from the floor. A 2 cm recess is made in the wall. The size corresponds to the dimensions of the thermostat.
From the resulting hole down to the floor, cut a groove. Cables will subsequently be laid there to connect the film floor to the thermostat and the electrical network.
Advice. It is best to hide the cables in a corrugation. This will greatly simplify the task of repairing them.
What is a warm film floor
Warm infrared film floors are a heat-resistant polyethylene film in which strips of carbon paste are packed. In turn, the paste is connected by copper bars, which are also soldered into the film.
The entire structure is called IR thermal film. If a current of a certain strength and frequency is supplied through the tires, the carbon elements begin to emit infrared radiation with a wavelength of 5 to 20 microns.
It does not cause heating of the surrounding air and drying it out, as traditional radiators and heaters do. Infrared rays heat surrounding objects - flooring, walls, ceilings, furniture.
It is important to know! It should not be confused with electromagnetic radiation, which has a harmful effect on the human body, animals and plants.
This heating system has virtually no side effects and is environmentally friendly. Scientists from around the world have proven the beneficial effects of infrared rays on living organisms and humans in general.
Infrared heated floor technical characteristics have the following:
The energy consumption of an infrared heated floor directly depends on its area and mode of operation.
On the modern market, many manufacturers present their options for warm film floors. They all have approximately the same characteristics. So which infrared heated floor is best for you to decide.
The thickness of the thermal film is 0.4 mm, which allows it to be installed under any floor covering - ceramic tiles, laminate, parquet boards, linoleum and carpet. In addition, this film can be installed on walls and ceilings. In this case, heating will occur throughout the entire volume of the room.
Of course, installing infrared heated floors under one or another coating has its own characteristics. For example, to lay a film floor under carpet or linoleum, plywood should be laid on the heating strips.
Advantages and disadvantages
The advantages of infrared heated floors are:
- Versatility - infrared heated floors are used to heat not only residential premises, but also various warehouses and large greenhouses.
- Easy installation with your own hands - installation of this type of electric heated floor can be carried out without much difficulty by anyone with a minimum set of tools and skills in working with them.
- High installation speed - installation of a heated floor based on infrared heating film takes no more than 2-3 days.
- Local heating - a wide variety of standard sizes of heating film allows them to be used for heating not only spacious rooms, but also small local areas (workplaces, recreation areas, etc.).
- Uniform heating of the air in the room - unlike electric convectors, batteries of the central heating system, a warm infrared floor contributes to more uniform heating of the air in the room: warm air masses heated from the floor and rising to the ceiling cool very slowly. Thanks to this, a comfortable temperature from +22 to +24+25 °C is created in the room at a height of average human height (1.7-1.8 m).
- High efficiency - approximately 80-85% of the infrared radiation emitted by carbon strips of film is spent on heating the air in the room.
- Low thermal inertia - infrared floors have a very high heating rate, ensuring the maintenance of a comfortable temperature in a heated room.
- Possibility of quick dismantling of heaters - if necessary, the infrared heating element can be quickly and easily dismantled by disconnecting it from the power cable and rolling up a compact roll.
- Environmental friendliness - the infrared rays emitted by the heating film do not have a negative effect on the human body.
The disadvantages of this heating system include
- Energy dependence - when the electricity is turned off, such a heating system stops working.
- Electrical Hazard—Electric current flowing through copper bars poses a potential hazard to the human body.
- High electricity costs - when using infrared heated floors as the main heating system, electricity costs during the cold season can be very high.
- Additional costs for protective coating - when laying infrared floors under a soft covering - carpet, linoleum - they are additionally protected with sheets of plywood and moisture-resistant plasterboard. The use of these materials increases the cost of installing the heating system and increases the final thickness of the floor.
You may be interested in Installing an electric meter on the street
How to lay film flooring under laminate yourself
Armed with this knowledge, it is necessary to draw a plan for the placement of heating elements. On paper it is necessary to reflect the location of the furniture and heating film.
It is important to know! Laminate flooring is laid on a pre-leveled surface.
The concrete screed should not have a difference exceeding 1 mm per 2 linear meters. To ensure that the heat from the thermal film does not escape through the floor slabs to the neighbors, a thermal insulating substrate is laid on the floor. This is foamed polypropylene 3-4 mm thick and has a foil coating on one side.
Thermal insulation strips are laid joint to joint and secured together with thermal insulating tape. The strips are carefully trimmed around the perimeter of the room. Thermal film strips are measured, cut and laid on the floor in accordance with the drawn up plan.
The heating film can only be cut in the places marked on it. They are highlighted with a dotted line and a scissors symbol.
Connection diagram for heating elements
If you cut the film diagonally, it will be damaged. The cut points are located approximately every 18 cm. The heating film should not be closer to the wall than 10 cm.
The heating film strips are laid on the substrate one next to the other with a gap of at least 5 mm, but not more than 1 cm. The heating element cannot be bent at an angle of 90 degrees or more, as it will fail.
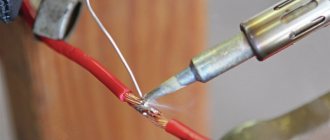
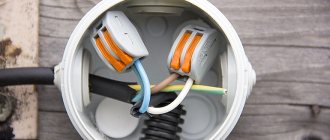
The places where the thermal film is cut, where the conductive busbars are cut, must be insulated with strips of bitumen insulation, which is supplied with the heated floor. To install the contact, insert it exactly in the middle of the end of the conductive busbar and press firmly with pliers.
Current-carrying wires are stripped to 5-10 mm with a sharp knife and clamped with pliers in the contact terminal. After this, the entire contact is isolated with a piece of bitumen insulation.
The connection of infrared heated floors (heating strips) is carried out in parallel with copper stranded wires with a cross-section of at least 1.5 mm2. In order for the automatic floor heating thermostat to work correctly, it is necessary to install a temperature sensor.
Application
Infrared heated floors are used as a system for additional heating of rooms in country cottages and houses, in apartments and offices of high-rise buildings. It is used as the main heating system for small warehouses and greenhouses.
You might be interested in this Description of loading machines
Also, with the help of infrared heated floors, many owners of private houses heat the entrance porch and polymer water supply pipes.
On a note. In some cases, such a system is used to heat load-bearing cold walls. This allows you to make corner rooms in high-rise buildings warmer, reducing heating costs by 20-30%.
Installing a water heated floor on a wooden floor is absolutely safe
The heat source with this device is heated water circulating through tubes located directly under the laminate.
Modern industry produces pipe products for these purposes, made from the latest materials using innovative technologies. Thanks to this, polyethylene and metal-plastic pipes ensure complete safety of system operation. Any water leaks are excluded.
The initial stage of arranging a water-heated floor is laying a cross-linked polyethylene pipe on a heat-insulating substrate
To lay a water-heated floor, it is necessary to lay a damper tape around the perimeter of the room. Then install hydro- and thermal insulation on top of the rough base and lay out the reinforcing mesh.
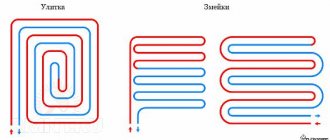
Then the pipes are laid in a parallel or spiral manner. In the first case, the pattern looks like a snake, and in the second, like a spiral. The ends of the pipe are closed to the heating circuit so that water circulates freely inside.
Options for laying pipes for water heated floors
The next stage is pouring the entire structure with a sand-cement mixture. The resulting screed is leveled for laying the laminate. As the coolant circulates through the pipes, the cement will warm up, uniformly transferring heat to the laminate.
This type of heated floor has a number of advantages:
Combining various options for arranging the “pie” of a water-heated floor within one living space
This system is absolutely safe for installation on a wooden floor. A warm laminate floor constructed in this way will last a long time.
Electric floor heating device
The operating principle of the system is based on the property of conductors to heat up when electric current passes through them. The heating element is a special self-regulating electrical cable.
It is capable of automatically changing resistance in those areas where overheating is detected. This is necessary to avoid burnout. The cable is available in single-core and double-core.
Most often, electric heated floor mats are laid next to and parallel to each other.
Before installation, the surface is leveled and a thin sand-cement screed up to 0.3 cm thick is made. If necessary, thermal insulation is installed underneath it.
Drying will occur in 3 days. Only after this can the mounting tape be attached. Then you need to secure the thermostat in a convenient place and lay the cable according to the instructions on the package.
Upon completion of installation, a screed from 3 to 10 cm thick is made again.
It will reach complete drying only after a month. Only then can the flooring be laid. Waterproof laminate class 33, 12 mm thick, produced in Germany, is very suitable for this.
On top of the electrical mats it is necessary to make a concrete screed with a thickness of 3 to 10 cm
Main advantages:
The disadvantages include the following:
Stages of installing an electric heated floor
Made in Germany, waterproof laminate 33 class 12 mm is perfectly combined with electric type heated floors.
Helpful advice! To install a heated floor at home, it is better to buy a two-core cable. It is much easier to install.
The peculiarity of using an electric type of heated floor is the selection of the optimal mode, which ensures sufficient heating with optimal use of electricity.
Connecting a rod heated floor with your own hands
A core floor is a type of infrared heating system. It consists of mats on which parallel rods made of carbon, copper and silver are fixed. Unlike film flooring, a single-core wire connects the rods together like a rope ladder. DIY connection instructions:
- Lay out each mat parallel to each other.
- Connect the wires in series using a thermal sleeve, insulate with a heat-shrinkable tube and “bake” the connection with a hair dryer.
- Secure each heating mat with tape to a floor previously covered with heat-reflecting material.
- Connect the wire of the first mat to the thermostat.
- Install the temperature sensor between the two carbon rods of the middle mat.
- Connect the sensor to the thermostat.
- Check system functionality.
- Fill the core floor with screed or you can lay ceramic tiles on top.
Advice! For high-quality adhesion of the finishing screed and the rough surface, it is necessary to make rectangular holes in the heat-reflecting material. For every square meter - 3-4 cutouts.
A ground wire is also connected to the thermostat. Typically, manufacturers include detailed instructions for the device, where everything is clearly described.
Infrared film heated floor
This is the most innovative floor heating system. It is a film that, as a result of exposure to electric current, is capable of emitting infrared electromagnetic waves.
This range of the spectrum is invisible to the human eye, but is felt by the skin as heat. Half of the sun's energy is infrared rays. The absence of glowing elements is the main feature of this material.
Infrared film heated floor - a modern system of efficient heating in the house
This system is the most convenient to install.
It is enough to lay a heat-reflecting coating on a leveled base, and then an infrared film on it. The final coating, which may be a waterproof laminate33 class 12 mm thick made in Germany, is laid directly on the film itself. There is no need to arrange a screed, which is a long and labor-intensive process.
Helpful advice! Under the laminate, it is better to place a backing not made of foamed polyethylene, as is most often done under normal conditions, but tuplex or isoplat. These materials have waterproof properties.
Scheme of arrangement of the “pie” of infrared heated floor
Advantages of infrared film:
The disadvantages are:
Laying laminate film infrared heated floor
A special feature of using such a floor is extreme caution. He is afraid of rough mechanical influence.
Therefore, you should not place heavy furniture on such a surface. This may damage the film and render it unusable. It is better to use such a system in open spaces.
Each owner independently chooses the type of heated floor to install in his home. The decision is made depending on preferences and availability of financial capabilities.
Well, now it's time to finish the article. All the material I wanted to share has been reviewed. I hope it will be useful to you, and you will use it if you need to lay an infrared heated floor with your own hands. Improve your own practical skills and gain new knowledge, as they say: “It’s never too late to learn!” That's all, thank you for your attention, successful and easy repair!
Models
When installing heated floors under laminate, the manufacturer's instructions must be followed without deviation. It is in it that all possible nuances are spelled out that will lead to errors in the installation of heated floors. There are two main infrared heated floor systems:
- Film. The film allows you to protect the entire system from moisture, as well as from possible electrical breakdown. Its weight is approximately 0.5 kg, which does not affect the overlap. Consequently, even old buildings can be equipped with infrared heated floors. Additionally, the film can be laid on the walls in the room and even on the ceiling.
- Rod. Its composition is such that it can be installed in a screed or in adhesive under tiles. The rod model is suitable for rooms with high humidity, such as bathrooms or kitchens. During its operation, almost no electromagnetic radiation is generated. The difference from the film model is that there is no fear of overheating, the presence of self-regulation properties. Bulky furniture can be installed on top of the rod model, which is not possible with films.
Film ones are further divided into carbon (heating strips are connected to each other in parallel, after which they are sealed in a Mylar film) or bimetallic (base - polyurethane, heating elements - an alloy of copper and aluminum).
When choosing one option or another, the ceiling height remains almost unchanged, which cannot be said about other possible systems that require a thick structure.
The structure of the rod model is as follows: composite material for heating elements. As the temperature increases, the graphite, which is a component of this model, increases and the gap between the grains increases. There are fewer points of contact, resistance begins to increase and power decreases, which can be calculated independently.