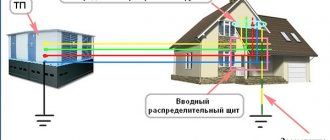
For any car owner, a garage is not only a place to park the car, but also its own workshop. Here, feasible repairs of a four-wheeled friend are often carried out, which involves welding equipment and other electrical tools. A particular danger of the garage power supply system lies in the lack of protective grounding, which the vast majority of domestic garage cooperatives are not equipped with. And without it, it is impossible to protect a person in case of damage to electrical appliances or other elements of garage wiring.
If electrical potential comes into contact with the chassis, there is a risk of electric shock that may result in electrical injury. To avoid this, many car owners are wondering how to make grounding in the garage with their own hands. To connect the grounding loop, it is necessary to fulfill a number of requirements and observe certain nuances.
Nuances and requirements for PUE
The requirements for grounding a garage, like any other, are stipulated in clause 1.7 of the PUE. The main parameter for the garage grounding loop is the transition resistance between the ground electrode and the ground. This value determines the path of current flow, either through the human body (if its resistance is less) or through the ground loop of the garage. Therefore, in accordance with clause 1.7.103 of the PUE, the grounding resistance should be no more than 5, 10 and 20 Ohms for lines whose phase voltage is 380, 220 and 127 V, respectively.
It should be noted that not all designs are suitable for connecting a grounding conductor. Thus, according to the requirements of clause 1.7.123, it is strictly prohibited to use cable sheaths, various pipelines and gas pipelines, supporting cables, sewerage and heating networks to connect protective grounding in the garage. Therefore, the grounding in the garage must be connected with a separate or joint protective conductor. Which, according to clause 1.7.3 of the PUE, can be a PEN or PE wire, and depending on the method of connecting them, various garage grounding systems are implemented.
Vertical ground electrode
- stable operation of the ground electrode and equipment due to a constant level of ground resistance. The heat emanating from the internal communications of the house will prevent the soil from freezing and increasing its resistivity;
- saving space on the site. A particularly important advantage for small properties. It is possible to carry out excavation work throughout the entire site without fear of damaging the underground structure of the ground electrode;
- ease of connection. Grounding in the basement can be easily located in close proximity to the switchboard, so it will be convenient to connect it to the grounding bus. It also saves cable - a small thing, but nice.
Choosing a grounding system for a garage
In total, according to clause 1.7.3 of the PUE, there are six power supply systems for electrical networks, but only four of them are relevant for supplying garages:
- TN-C – with a combination of protective and zero;
- TN-CS – with partial alignment;
- TN-S – with dedicated protective and zero;
- TT – with solidly grounded neutral.
Depending on which of these wiring power supply schemes is used in your case, the most relevant option for connecting the protective circuit from the general system or installing individual grounding is determined.
TN-C.
The TN-C system implies that a four-wire line is connected to the input panel in the garage, which includes three phases and a combined protective and neutral conductor PEN. This grounding system is quite common, since it allows significant savings on a separate grounding wire. But there is an equally significant flaw in her work.
Connection example according to the TN-C scheme
Look at the figure, here is an example of an emergency situation when the PEN conductor breaks in the area from the substation or switchgear to the garage. In the event of such a break and the simultaneous connection of electrical appliances to the socket, the potential from the phase can transfer to the equipment body and all grounded parts. If a person touches them, they will receive an electric shock.
It should be noted that such a threat in the TN-C system is especially dangerous in three-phase devices, where the wiring diagram does not use a neutral wire for every consumer, and they will calmly continue their work. With a single-phase connection, damage to the PEN conductor will be immediately detected - not a single device will work, which is clearly visible on the same lamps. Therefore, connecting grounding to a PEN conductor in a garage is extremely dangerous, and it is better to implement it through an individual circuit.
TN-CS.
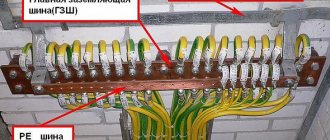
This method is a safer development of the TN-C system, when the circuit is powered from the substation via a four-wire line with a combined PEN wire. In a certain section, the combined wire is divided into PE - protective wire and N - neutral wire by two separate wires. In this case, re-grounding must be carried out at the separation point.
Rice. 2. Example of connection according to the TN-CS scheme
This method is relevant for garage owners whose premises are powered by TN-C. In this case, divide the combined core from the input cable into two and arrange an individual circuit. Instead of a two-wire one, a three-wire wire will be inserted into the garage. It should be noted that an RCD must be connected to the neutral wire at the entrance to the garage, since from the side of the substation and other garages there will be a threat of potential contact if the combined conductor is damaged.
TN-S.
It is a system in which there are five supply lines at once - three of which are diverted to phase lines, one for neutral, and one for grounding. Thus, the PE conductor has a separate core. Due to this, power supply according to the TN-S circuit is the safest. But due to the need to include an additional core in the line, this power supply method is more expensive, and is rarely used to power garage buildings and cooperatives.
Look at the figure; if the neutral wire is damaged, the grounding will continue to perform its functions with the same parameters, regardless of the other elements of the network.
TT.
It is the most common power supply scheme for household consumers in domestic networks. In this case, the supply is carried out via a four-wire line, which includes three phases and zero. The neutral conductor is grounded here, and the system is called three-phase with a solidly grounded neutral. There is no PE wire in such a system, so a separate circuit is installed to ground the garage.
Rice. 4. Example of connection according to the TT scheme
Arranging an individual circuit for a garage is the most reliable and safest way of protection.
Installation of a ground loop in a garage
The circuit is assembled from horizontal and vertical electrodes, which are buried in the ground, and various metal structures are used for grounding conductors. All grounding elements inside the garage belong to the internal circuit, and outside to the external circuit. As a rule, a metal strip, fittings, corner or other products are laid along the perimeter of the walls as an internal grounding loop, and all equipment is connected to it.
Rice. 5: installation of a ground loop in the garage
Look at the picture, here is one of the options for grounding in the garage, it is suitable for those situations when you have the opportunity to arrange a circuit around the entire building. The best option is at the construction stage, when all the electrical installation takes place. If access to a certain area is blocked by other buildings, then the metal electrodes are shifted to a free area.
The main task is to ensure that the grounding resistance is as low as possible. To do this, you will need to provide a sufficient area of contact between the metal and the ground. Therefore, if you do not have the opportunity to install a sufficient length of horizontal electrodes, it is compensated by the required number of vertical grounding electrodes. The method of their installation and connection can be performed:
- In line - the least reliable option;
- A closed figure (triangle, circle, etc.) – more reliable grounding;
- Complex shape - if installation is carried out in a small area.
Rice.
6: how to connect ground electrodes into a circuit. Ordinary steel pipes, angles or copper elements are suitable as a grounding electrode. Any copper conductors are a more reliable option, since over time the copper does not deteriorate and the circuit resistance does not increase. The dimensions of grounding conductors, depending on their design and material, are selected in accordance with clause 1.7.111 of the PUE according to Table 1:
Table 1
| Material | Section profile | Diameter, mm | Cross-sectional area, mm | Wall thickness, mm |
| Steel | Round: | |||
| black | for vertical grounding conductors; | 16 | — | — |
| for horizontal grounding conductors | 10 | — | — | |
| Rectangular | — | 100 | 4 | |
| Angular | — | 100 | 4 | |
| Pipe | 32 | — | 3,5 | |
| Steel | Round: | |||
| galvanized | for vertical grounding conductors; | 12 | — | — |
| for horizontal grounding conductors | 10 | — | — | |
| Rectangular | — | 75 | 3 | |
| Pipe | 25 | — | 2 | |
| Copper | Round: | 12 | — | — |
| Rectangular | — | 50 | 2 | |
| Pipe | 20 | — | 2 | |
| Multi-wire rope | 1,8 | 35 |
Once you have decided on the installation location for the garage grounding and all the materials, proceed to the procedure itself.
Vertical ground electrode
It is important to note that digging in vertical grounding conductors is prohibited.
Instead, they must be driven directly into the ground. The distance between the electrodes should be within 1.5-2.5 meters. Before starting work, a trench up to 50 cm deep is dug in the place where the ground loop will be created.
All electrodes are connected to each other by a metal strip or rod. The cross-section of the first should not be less than 100 sq. mm, and the diameter of the second - 10 mm. All components of the circuit are connected by welding, and new seams must be painted to avoid the formation of corrosion on the ground.
Do-it-yourself grounding in the garage
The construction of your own ground loop is divided into several stages. To do this, follow these procedures:
- Before installing the grounding, dig recesses for placing vertical electrodes - about 50 cm deep and connect them together with a trench of such a depth that the distance from the circuit to the ground surface does not exceed 20 cm.
- Drive the vertical electrodes to a depth of 1 - 1.5 m. Before driving, they are sharpened so that they fit easier. Lay out the horizontal elements of the circuit so that they connect 2 electrodes located nearby.
Rice. 7: example of grounding electrode arrangement - Connect the vertical and horizontal grounding conductors by welding (if they are made of steel) or by bolting (if made of copper).
Rice. 8: connection of vertical and horizontal grounding conductors
The electrical contact at the places of such connections should be as reliable as possible; avoid weak fastenings that could be destroyed during the stage of backfilling the trench.
- Check the ground loop using a multimeter or test light. It is best to do this with the help of a special bridge, but in the absence of one, more affordable means will do.
- If the garage ground resistance is too high, try reducing it by installing a few more metal pins. If the excess is small, after filling the trench, the value will decrease. And for soils with high resistance, it is important to pour a mixture of coal and salt around a metal corner or tire - they significantly reduce the spreading resistance.
- Make a connection from the circuit to the electrical panel; it is also necessary to install an RCD through which the internal circuit of the garage will be connected.
Rice. 9: grounding connection to the panel - From the internal circuit, make wiring to the metal housings of lamps, grounding contacts of sockets and other equipment.
- Fill the trench with soil; painting or otherwise covering current-carrying elements with materials that worsen the contact resistance is prohibited.
Vertical ground electrode
It is important to note that digging in vertical grounding conductors is prohibited.
Instead, they must be driven directly into the ground. The distance between the electrodes should be within 1.5-2.5 meters. Before starting work, a trench up to 50 cm deep is dug in the place where the ground loop will be created.
All electrodes are connected to each other by a metal strip or rod. The cross-section of the first should not be less than 100 sq. mm, and the diameter of the second - 10 mm. All components of the circuit are connected by welding, and new seams must be painted to avoid the formation of corrosion on the ground.