Selection of wires and cables according to load power
One of the main principles of organizing power supply is the correct selection of cross-section, type of insulation and material of the power cable. For this purpose, there are standard diameters and corresponding power and current load values. For example, for 500 Watts and a current of 2.17 Amps, a copper wire of 0.43 square millimeters (0.62 aluminum) is sufficient.
In general, the choice between copper and aluminum, exposed wiring and laid in the walls will always be relevant. Copper cable can withstand a larger load with a smaller cross-section, but it is more expensive. Aluminum wire is stiffer; splicing it with copper is not recommended to avoid electrochemical corrosion. Open electrical wiring (laid in a plastic or metal sleeve) is simpler to install, but buried wiring is safer.
The use of low-voltage lamps for lighting can reduce energy consumption and increase safety. Most modern spotlights are created using LED technology, have increased brightness with minimal energy consumption, and are designed for 12-volt power supply.
If there is no possibility (ability) to perform the necessary calculations, turn to electricians. But you cannot choose the quantity or cable cross-section at random, blindly. Circuit breakers are installed strictly according to the size of the current load. It’s better to have them with a little extra than with a shortage.
Rules for creating a schema
DIY garage wiring includes the following components:
- power distribution board, preferably with an RCD;
- metering devices;
- wires;
- lighting devices - lamps, spotlights, and switches;
- sockets
If there are other consumers in the garage, such as a heater or heat gun, they are also included in the circuit.
How to make a project
The electrical wiring diagram is developed taking into account the dimensions of the room and the vehicle, the installation location of electrical appliances and the location of the panel. The plan is displayed on the drawing, where the true dimensions are indicated.
To calculate the correct scheme, a step-by-step algorithm is used.
Draw up a plan for the garage to scale. For each wall, floor and ceiling they make their own sketch.
- Mark the coordinates of each lighting fixture. If the garage has a basement or inspection hole, they are equipped with their own lamps. It is taken into account that an ultra-low voltage current of 42 V or less can be used to illuminate them. To do this, step-down transformers are included in the circuit. Lamps or tools that are intended to be used in the inspection pit must be designed for this voltage.
- Mark the installation location of the distribution panel and use the diagram to find the optimal routes for laying the wires. Here they also determine where it is more convenient to install sockets and switches.
- Depending on the number of electrical appliances, a protection system is developed: RCD, voltage control relays, voltage limiters, step-down transformers.
- If the garage is a separate building, provide grounding along the circuit and indicate this on the plan.
Typically, car owners are limited to installing an RCD in the distribution panel. But if overhead wiring is installed in the garage, you need to introduce voltage limiters into the circuit - they prevent a sharp increase in voltage. If the garage box is located in a long row of cooperative ones, it is better to install a control relay.
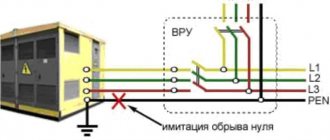
Home craftsmen experimenting in their garages sometimes cause their neighbors to break zero.
Preparation for work
The preparatory procedure includes the selection of the necessary materials and tools that will be needed to carry out installation work on laying, fastening and connecting electrical wiring in the garage.
List of tools:
- flat and Phillips screwdrivers of different sizes;
- pliers;
- round nose pliers for making accurate connections to machines;
- hammer drill, grinder for grooves, holes for sockets, as well as installation of mounting brackets for cable fastening;
- voltage indicator to check the absence of potential and safe operation, since even with the input circuit breaker turned off, one cannot be absolutely sure that there is no voltage in a separate section of the circuit (the current-carrying elements of the circuit breaker are hidden in the housing, so the installer cannot verify the reliability of the connection of its contacts, that is no visible circuit break);
- hammer, chisel;
- insulating materials (insulating tape, PVC pipe, etc.).
List of materials needed to organize electrical supply to the garage:
- current-limiting and protective devices for supplying voltage and its control (circuit breakers, RCDs, stabilizers);
- electric meter with electrical panel;
- cable products (wires);
- distribution boxes;
- lighting switches;
- sockets
After acquiring all the necessary materials and tools, you can begin preparatory work and directly laying the wiring in the garage with your own hands.
Selecting cable products and protection devices
Before you begin wiring in the garage, you will need to select a suitable cable product for this. To enter it, it is most convenient to use a self-supporting SIP wire, popular among users.
Electrical cable
For electrical wiring in the garage itself, one of the following types of cable products is selected:
- NYM
- VVG
- PUNP
When choosing a suitable cable for electrical wiring in a garage, which is equipped by its owner with his own hands, it is important to take into account the number of cores and their cross-section. In this case, preference is given to VVG wires, the number of cores of which can be from one to five.
Four-core cable VVG
Three-core cable PUNP
Three-core cable NYM
The advantages of products of this class include the ability to operate in a wide temperature range (from -50 °C to +50 °C). In addition, wires of this brand are distinguished by their durability, resistance to moisture and the presence of many designs.
When choosing the cross-section of products of the indicated type, proceed from the following requirements of the PUE:
- for the lighting part, wires with a core cross-section of 1.5 mm2 are used;
- when installing power supply to sockets, it increases to 2.5 mm2;
- when laying a separate line intended for connecting “powerful” equipment, the cross-section of the core increases to 4 mm2.
Selection of cable cross-section by power and current for supply voltage 220 and 380 Volts
To select the cable cross-section by power, you can use the online calculator on our website.
When choosing a type of VVG, a number of technical requirements contained in the regulatory documentation are taken into account. According to the provisions of the PUE, the selected type must meet a number of requirements, the main of which are the inadmissibility of fire of wiring and failure of equipment connected to the electrical network.
Automatic protection devices
To protect power lines from short circuits and overcurrents, circuit breakers are installed in them. To prevent the user from being harmed by high voltage, a special protective device is provided - an RCD.
Single-pole circuit breaker AB47-29 manufacturer IEK
Two-pole circuit breaker AB47-150 63A manufacturer IEK
Three-pole circuit breaker AB47-29 25A manufacturer IEK
Residual current device RCD VD1-63, 16A, 10mA
Even at the stage of developing the wiring diagram, you will need to perform the following operations:
- Prepare an installation diagram linked to the layout of the garage space.
- Break down consumers into groups, each of which will require a separate power supply.
- Calculate the maximum loads and currents in these branches (including lighting lines and power circuits).
- Determine the need and type of circuit breakers and RCDs installed in them.
At the final stage of preparatory activities, you will need to purchase all the necessary materials and components. AB settings are selected in accordance with the calculated values of the maximum currents in each of the supply lines. The rated currents of circuit breakers (AM) and residual current devices (RCDs) are indicated for each group of consumers in the diagram below.
Connection diagram for circuit breakers and residual current devices
Using a Step-Down Transformer
In any garage building, working in an inspection pit may require a portable lamp (the so-called “carrying”). On the other hand, according to the requirements of the PUE, in high-risk areas, the use of 220 Volt illuminators is strictly prohibited. Since garage buildings (both metal and permanent structures) are classified as particularly dangerous, they are allowed to use voltages not exceeding 50 Volts .
Important! Taking into account the fact that you will have to work in cramped conditions, when a person is in an uncomfortable position, the permissible value for lamps is limited to 12, 24 or 36 Volts.
To obtain them, proceed in one of the following ways:
- They purchase a transformer for the appropriate voltage, which leads to additional costs.
- Connect the carrier to the car battery terminals.
The first option, despite the additional costs, is more preferable, since it guarantees the availability of the required voltage, regardless of the state of charge of the batteries. The transformer for lamps used to illuminate the inspection pit and for carrying is mounted either in the panel or in a separate box located not far from it.
From the products offered by the industry, it is best to choose a step-down transformer installed on a DIN rail in the electrical panel, or a metal box with a step-down transformer, equipped with two circuit breakers and a separate socket.
Calculation of the quantity of materials
How many machines, meters of wire, junction boxes and fasteners, as well as lamps are needed is determined based on a pre-drawn diagram. The number of outlets depends on the planned ease of use and the presence of functional areas in the garage.
The minimum required quantity is 2; ideally, there should be an outlet on each wall where electrical equipment will be connected to it. It is permissible to install a block of several network sockets, this will allow you to simultaneously power several units of consumers from one point. All connections are parallel. Cable consumption is determined by the length of the straight sections, taking into account the roundings when laying in the sleeve and a small margin within 10%.
For a single-phase network with grounding, take a 3-core cable that stretches from the junction box to the outlet. It is better to avoid splices by using whole pieces: in the humid environment of a garage, every extra joint will be a source of problems.
Ceiling lamps can be mounted on a stretched steel wire, so there will be no problem with their installation.
Before starting the calculation, it’s a good idea to take measurements from the walls (length and width), so that you can then place energy analysis points on the plan, and only after that determine the cable consumption. Grounding can be laid with a separate bus of larger cross-section, but a standard 3-core cable is more often used.
How to properly plan your garage's power supply
To service 1-2 cars, it is enough to install several lighting fixtures and a power outlet group to connect power tools. The power of the latter is small, so single-phase power supply with a voltage of 220 V is installed in the garage.
If the garage is a car repair shop and powerful equipment is installed here - heating boilers, welding devices, machine structures - you need to install three-phase power with a voltage of 380 V.
It is also necessary to correctly calculate the number of lighting fixtures; this depends on the size of the box, the presence or absence of a basement and inspection hole. It is also important to keep in mind the type of garage. If it is, for example, part of a garage cooperative, its own substation is installed to service the garages. If the building is located on a summer cottage, the cable connection is carried out from the house.
Safety precautions before starting work
Before you begin installing an electrical panel, you need to familiarize yourself with safety precautions, which will significantly reduce the risk of injury from electric shock. When working with the electrical network, adhere to the following rules:
- Mandatory check of the electrical panel for damage and other defects. All electrical appliances are designed to be used with care. Therefore, before use, check the integrity of the insulating elements and the housing. A shield with defects cannot be used, as it can be very dangerous.
- Cleaning the room from water containers. Electrical equipment should not be near liquid, as it conducts current well. Also, do not operate devices with wet hands.
- Read the instructions. Before working with any electrical appliance, you should read its instructions, which describe the main features of its use.
- Do not touch heating radiators and electrical panels at the same time.
- Experts do not advise overloading the electrical panel and connecting many devices to it, as this will lead to network overload and short circuit.
Differential machines
Designed to automatically shut off power supply in case of overload to protect against fire. They also allow you to quickly turn off the power supply if it is necessary to modify the electrical wiring. It is customary to divide the premises into groups of consumers, for each of which their own machine is installed. At a minimum, install one circuit breaker for lighting and socket group.
If there are many consumers, and accordingly there are several outlet groups, a separate machine is installed for each of them. The rating of the machine is determined based on the maximum load and wire cross-section.
Designed to protect against leakage current. The latter occurs when the circuit insulation is damaged. The use of RCDs is especially important in garages with inspection pits, where work with power tools is carried out. There is usually high humidity in the pit, which increases the likelihood of a leakage current.
«> «>
Garage Wiring Diagram: Planning Tips
Lighting in a garage plays a very important role, especially if the garage is used not only for storing the car, but also for regular maintenance. The electrical circuit of a garage should not only provide comfortable working conditions with electrical appliances and the correct placement of lighting elements, but also be safe for the owner.
In this article we will tell you how to correctly draw up an electrical circuit and describe the basic rules for placing important elements.
Garage wiring diagram
When drawing up an electrical wiring diagram in a garage, you need to take into account the construction features of this room, but the main positions must remain unchanged. All power supply must be supplied through one common input circuit breaker, taking into account the loads of all outgoing lines.
An electric meter is installed on each of the lines or after the input machine, which is sealed by services monitoring the illegal use and theft of electricity. If this is a garage cooperative, then its administration monitors the voltage received by the consumer.
In order to protect a person from falling under an electrical potential dangerous to his life and health, a sensitive and fast-acting RCD device (residual current device) is used.
Required tools for installation
Step-down transformer for the electrical network from 220 to 36 volts
To install electrical wiring you will need the following tools:
- pliers and side cutters;
- Phillips and slotted screwdriver;
- hammer and chisel;
- electric drill and hammer drill;
- grinder with disc for concrete;
- electrical tape and an indicator screwdriver.
It is advisable that the handles of hand tools be made of rubberized materials. If the handle is made of plastic, then before performing work it must be wrapped in several layers of electrical tape.
Connection diagrams and location of consumers
Electrical supply to a garage is a responsible subject. Operation without failures, failures of consumer devices, as well as the safety of people depends on its organization.
The functioning of the wiring and its arrangement are subject to the rules of electrical installations (PUE). This is the main document for every electrician; those who decide to start electrifying a garage or workshop on their own are guided by its requirements.
There are 2 independent areas of energy supply implementation:
- connection according to the established scheme;
- orderly arrangement of consumers.
The first option takes into account the calculation, placement of electrical devices on the drawing using standardized symbols, depending on the type of connection (3 phases, single) and network voltage. Grounding must be provided (not to be confused with a neutral conductor); it is also a good idea to install a residual current device: it is triggered when a person comes into contact with current-carrying elements, breaking the circuit.
The RCD at the input is convenient in that it can be set to a current value less than the dangerous limit (0.1 Ampere). So, if you carelessly touch the socket or socket, the smart unit will instantly turn off the power, protecting a person from electric shock.
Distribution to consumers involves distribution into groups, each of which is assigned its own current value and a separate circuit breaker. This method allows, if necessary, to cut off “extra” subscribers, for example, when searching for the cause of a malfunction or during repair of a network section. Practice shows that, among other advantages, this scheme optimizes the load on the highway.
The main switch makes a connection to an external power source, and within the local network distribution is carried out to sockets and lighting or internal wiring and a separate socket for an energy-intensive welding transformer. There are industrial (380 Volt, 3 phases) and household (220 Volt, one phase) networks.
The connection diagram, size (cross-section) of conductors, and design of switches depend on this condition. When making a drawing, it is not necessary to scrupulously follow the requirements for compliance with scale and accuracy of symbols. The main thing is that everything is clear to the performer of the work.
Purchasing consumables
Having drawn up a diagram, purchase everything you need to complete the work. We will do this thoroughly and for a long time, so we will consider installing hidden wiring. To be fair, there are other ways to run wires in the garage, which you can read about here.
In order not to waste precious time and effort in vain, purchase or rent a wall chaser and a hammer drill with a set of drills and a concrete bit, the diameter of which will allow you to install socket boxes and distribution boxes in the holes cut with it. We won’t even talk about a chisel and a hammer, since such a tool should be in any garage.
For further work you will need:
- Distribution panel – 1 pc.
- Electricity meter – 1 pc. (if needed).
- RCD – 1 pc.
- Socket boxes - according to the number of mortise switches and sockets.
- Distribution boxes - in each place where there will be a outlet for sockets and switches.
- Automatic switches - type and quantity according to the diagram. It may be necessary to install some machines separately, for example, near a grinding machine, compressor, etc.
- Wiring. It is better to purchase a copper three-core wire. For lighting - 1.5 mm2. For sockets - 2.5 mm2. For wiring in the garage to the panel - 4 mm2. Quantity - according to the scheme + 10% for unaccounted terminals in distribution boxes and socket boxes. In order to power more powerful consumers, it is recommended to run a separate wiring line from the distribution panel to the desired location.
- Corrugated PVC pipes for electrical wiring. The diameter and quantity are selected to match the existing wiring. If the wiring will pass through flammable materials, then a metal corrugated pipe should be laid in such places.
- If there is a point in the garage for connecting 380V electrical equipment, then you need to take care of purchasing a specific outlet and the appropriate cable.
- Sockets. Their number should be sufficient for convenient use. It is important to remember that there can be several lamps above the workbench - they can be connected either through junction boxes or directly into sockets.
- Switch. Someone prefers to turn off the lighting in the garage with one switch, another likes to divide it into several groups, and a third installs a switch under each lamp - everyone can do it in a way that is convenient for them to use.
You can make a distribution panel yourself, like the author of this video:
Sequence of actions for installing electrical wiring with your own hands
They begin work by drawing up a diagram. The next stage is the installation of a meter and a group of circuit breakers along with the main one located at the entrance. If necessary, replace/arrange the cable entry from the external distribution panel to the garage.
It is convenient to place the metering device and switches in a special box (plastic or metal), providing signs indicating which machine belongs to which section of the network. This algorithm will allow you to easily lay cables in the garage, leaving the connection to the supply voltage for last.
Having installed sockets, switches, mounted lighting sources, a cable is connected to them. All bolted connections are securely tightened; the quality of equipment operation depends on this.
At the very end, they connect to the machines, after which they carry out a test run. In a correctly assembled circuit, everything will work.
Street work
In order to properly organize the wiring and electrical installation work, you must first lay the external line. This can be done by specially authorized specialists from the local branch of Energy Supervision, trained in the electrical safety group. They also install and seal the meter.
Grounding is laid from the circuit. This can be a thick metal sheet buried in the ground or a barrel to which a pin with a special terminal for attaching the line is welded. The cable (copper or aluminum) is bolted to the pin, providing protection from external atmospheric influences, and then inserted inside the garage.
Input of power cable and installation of electrical panel
A distribution panel is installed at the input. In some cases, it is mounted on the outside of the building, which may be due to the peculiarities of the electrical supply to the garage.
Usually the shield is mounted next to the entrance for easy shutdown when leaving the facility. The panel must allow placement of all required protective and distribution devices. The panel also houses an electricity meter (meter) if the garage is located on the territory of a garage cooperative. In suburban areas, one meter is usually used for all buildings.
You can make the shield yourself from a profile and sheet metal or purchase a finished product.
External wiring
Pulling power cable underground
The complexity and scope of work on connecting the power cable to the garage will depend on the territory on which the building is located. If the garage is located in the local area, then it is enough to dig a pit of the required length and lay an armored cable.
For a structure erected on the territory of a garage cooperative or which is a separate building, you will need to submit an application to the organization that services the power line.
Next, the organization will review the application, ownership documents and the drawn up power supply diagram. After which a decision will be made and requirements that the owner must comply with before connecting the electrical network will be assigned.
Arrangement of the introductory part and panel of the garage
The easiest way to conduct electricity indoors is with the help of a so-called gander. This is a metal inch pipe installed on the roof of a building. A pin with a ceramic barrel insulator is attached to the top of the tubular stand. If the technical specifications issued by the electrical network company allow such a scheme, you will have to run a three-core SIP cable from the machine on the electrical panel through a corrugated or tubular duct and a gander pipe to the roof of the garage. The height of the gander is assumed to be 200-220 cm, the overhang of the outlet piece of cable should be at a height of 200 cm. The power grid company must run its cable from the line to the ceramic insulator on the gander. The connection is made by connecting the corresponding cable cores.
In most cases, power engineers consider this method of supplying electricity obsolete and insist on an external support pole. In this case, it is easier for the company to run the cable from the line on the pole to the entrance panel on the wall of the building. For a residential building, this method is quite reasonable, but for a garage it is not suitable, since the meters on the external wall of the garage premises were often simply broken by vandals. Convincing power engineers is not easy, since the electric grid company suspects that it is very easy to connect a welding machine or oven to the contacts on the roof yourself, before the electric meter.
The second option for running the cable inside the garage involves laying the power cable underground in a metal pipe from the nearest pole with a power line. You will need to dig a trench to a depth of 80 cm, lay a pipe and run a cable from the electrical panel to the pole. In this case, the steel pipe must extend from the ground to a height of at least 2.5 m.
The easiest way to run the cable is from the garage cooperative line. Most often, the line is laid under the overhang of garage roofs or by air on supports installed above the terminals - goosenecks. This option of installing and connecting electricity will cost ten times less than fooling around with a trench. The SIP cable from your garage is led through a metal corrugated sleeve to the nearest distribution box. Typically there is one box for every two garages.
Specification of electrical equipment and materials
A specification is a list of required materials. An incorrectly drawn up specification will lead to bundling errors.
The specification takes into account the number of cables for each type separately and the installation method with fasteners, boxes or corrugated hoses.
If the quantity of materials is large enough, then it makes sense to order materials online or contact an electrical equipment distributor.
Our specialists will design the garage's power supply both according to a standard electrical project and individually, according to any technical conditions for power supply. The company operates in Moscow and the Moscow region, as well as in surrounding areas. Remote collaboration is possible. You can contact representatives or leave a message by phone and the feedback form on the “Contacts” page.
Methods for connecting a garage to electricity
There are several ways to run electricity into your garage. This can be done legally or illegally. But we will tell you how to legally install electricity into the garage.
Today, even experienced car enthusiasts have abandoned dangerous experiments with illegal taps and connections. In addition, power engineers have learned to easily identify unauthorized burglars. Therefore, we act according to the law.
If the garage is cooperative, then the easiest way to solve the problem is to write a statement addressed to the chairman of the GSK and resolve the issue with the cooperative electrician.
If you connect to electricity bypassing the cooperative, for example, by running a cable from a neighbor in the garage, then sooner or later this fact will come to light and the offender will not have any trouble.
Owners of individual garages need to privately conclude an agreement to connect to electrical networks, issue a personal account, a book and pay for the electricity consumed.
Necessary equipment
Cable power table depending on cross-section
The following tools will be required for work:
- knife or special tool for stripping insulation;
- cable of the required cross-section;
- wire cutters;
- flat, Phillips screwdrivers;
- multimeter;
- grinder for gating walls;
- sampler
Particular attention should be paid to the choice of cable. What cross-section is needed for connection depends on the connected load. The diameter can be determined using special tables. When calculating the total power of devices that will be connected to the power point, you should add a margin of 20%.
It is recommended to wire with ground, even if the electrical network does not provide grounding. When choosing a wire, you need to check the quality of the insulation and its integrity. The insulation must be strong, but the wire must be elastic, bend easily and not break. When choosing wire material, preference should be given to copper. It is more reliable than aluminum, has more advantages and a longer service life.
Connection cost
The financial aspect is also important. How much does it cost to install electricity in a garage? The cost of funds depends on the price of the electrician's services. The average cost of connecting light to a private room is about 5,000 rubles. But the amount may increase if additional work is necessary.
In conclusion, it is worth adding that you need to connect electricity to the garage only by legal means, no matter how troublesome it may be. Unauthorized cable laying is fraught with unsafe consequences.
How to connect to electricity in GSK?
Installing lighting on the terms of a garage cooperative is as easy as shelling pears. You need to contact the chairman of the cooperative and coordinate the issue with the GSK electrician.
A specialist will come to your garage, check the garage connection and wiring for the presence of illegal sockets, and if everything is in order, he will simply connect the cable contacts in the distribution box from the common line to the input breaker or meter.
After sealing the input and the electric meter, a payment book and registration card will be issued at GSK. Next, the garage owner pays monthly receipts for consumed electricity.
If you are thinking about how to connect a garage to electrical networks without a power grid, then this method cannot be called legal. It is possible to join the power grid without going through the cooperative, but the secret will still become apparent and then the violator will be held accountable.
Clause 17 of the RF PP No. 861 interprets the norm for connecting to electricity in the GSK as a collective one. A simplified approach in this case can result in very serious problems, from fire to regular accidents on the line.
How much does it cost to connect to electricity at GSK? In relation to gardening and garage cooperatives, the fee for the technical connection of power receiving devices should not exceed 550 rubles, provided that no more than 15 kW is connected by a member of the GSK from one source of power supply.
Types of light sources
When choosing a lamp or other light source, you need to pay attention to several points: equipment safety, operating life, protection from moisture and dust, resistance to temperature changes. Therefore, you need to evaluate all the pros and cons of each type and make the right decision.
Types of lamps
Various options are suitable for a garage, but you need to take into account the conditions of use and the features of the structure. Based on them, you can choose one of the following types:
- Incandescent lamps used to be installed in all garages, but today they are rarely used due to high electricity consumption and short service life. The filament does not produce very high-quality light and distributes it unevenly. Garage lamps are often bulky due to the large diffuser and massive body. During operation, they become very hot, which creates additional danger.
Example of incandescent lighting - Halogen light bulbs are advanced products with a tungsten filament and an inert gas pumped into the bulb. The light from them is much brighter, but the electricity consumption is also high. During operation, the surface gets very hot, so you definitely need a lampshade; this type does not tolerate shocks, voltage surges, or dust, so it is not suitable for the garage. A plus is the ability to use low-voltage lamps operating on 12 V through a power supply.
- Fluorescent lamps provide bright light without consuming much electricity. They can be either in the form of flasks or in a compact design for a standard cartridge. Suitable only for heated garages, since at temperatures below 5 degrees they work poorly and quickly fail. Another drawback is the mercury vapor inside, which evaporates into the air when the flask is damaged.
- LED lamps and luminaires consume the least amount of electricity and provide even, flicker-free light. You can choose different color temperatures, which is also important for comfort. For good visibility, it is better to choose cool colors that provide bright, uniform lighting. Instead of lamps, you can use lamps or LED strips, which can serve as backlight or full illumination of individual zones.
LED lighting is the safest and most economical to date.
You can combine different options if it gives a good result. But if possible, it is better to equip the garage with low-voltage LED lighting to ensure safety. A good LED garage lamp is more expensive, but due to energy savings and a long service life, it will ultimately cost less.
Electrical equipment layout plan
The layout of the electrical equipment is carried out on the garage plan. The plan shows all the equipment with cables going to them. If junction boxes are used, the type, length and cross-section of the cable are indicated separately for each section. An installation option is possible in which all cables go to the terminal block in the electrical panel. This increases reliability, but increases cable consumption.
Near the omissions, indicate the length of the cable, and near sockets, switches and wall-mounted lamps, mark the installation height.