Fantasy to help
Store food products, create a mini-laboratory for growing seedlings, etc.
How to do it? It’s simple, a case is perfect for this. We will tell you what exactly can be done from an unusable oven.
It often happens that making a microwave yourself is more expensive than buying a new device. If, for example, the magnetron breaks down, then it will be extremely difficult to find a spare part for a ten-year-old device. Often a heating element is used as a heater.
But, before you start doing something, you should think through everything to the smallest detail. The most important thing is safety. Insulate the wiring and ground the housing.
Let's make a device in which you can actually heat up any dish:
- Remove everything you no longer need inside. Remove the back wall, discharge the capacitor (it is high-voltage), unscrew the transformer, magnetron, and electric plate motor. Do not throw it away under any circumstances, all this will be useful for creating various devices, for example, spot welding. Take out the plate and the wires going to it.
- Buy an air heating element with a power of no more than 1 kW. Place it from below, fix it on the metal guides. Position the heating element so that all parts are out of the heating chamber. You can make two holes. After this, the heating element is connected to the wiring that comes from the electrostatic precipitator.
- Place a grill/tray in the chamber 3-4 cm from the heating element.
- Everything can be connected to the network.
In such a device you can actually heat food. For a more complex design, a thermal relay and tempered glass will be required.
Homemade products from the microwave
Do-it-yourself microwave oven crafts
Many craftsmen wonder what can be made from an old microwave. To understand and understand this, you should consider in this article from the construction magazine samastroyka.ru what a microwave oven consists of and what mechanisms it has inside.
What does a microwave oven consist of?
In order not to delve too deeply into the structure of a microwave, the article is still not about that; you can briefly take a look at what this useful household appliance actually consists of.
So, the main elements of a microwave are:
- Heating element, which uses special vacuum lamps;
- AC step-down transformer;
- Fan;
- “Brains” with a microcontroller and all kinds of electromagnetic relays, a buzzer, and other parts;
- Metal body;
- Engine.
From some models of microwave ovens, for example, with a grill, you can remove various heating elements, infrared emitters, etc. They can also be adapted for making useful homemade products.
As you can see, a microwave oven consists of many elements that can be easily adapted to your own needs. However, we will start with the simplest things, and moving from simple to complex, we will show what exactly can be made from a microwave.
What homemade products can be made from a microwave?
So, let's look at the most popular microwave homemade products that you can make quite easily with your own hands.
- Electric oven;
- Microwave bread bowl;
- Small locker;
- Low-power 220 Volt generator;
- Spot welding machine;
- Charger for car.
In addition, microwave electrical components are useful for making all kinds of electronics.
Microwave bread bowl
Making a simple but original microwave bread bowl is very easy. For these purposes, you will need to use one single thing from this household appliance - a metal case.
It would be best to remove everything unnecessary from the microwave in advance and unload it as much as possible. In order to decorate a homemade bread box, you can use various stickers, of which in our age there are countless different options.
Microwave welding machine
You can make a welding machine for spot welding from a microwave transformer. The essence of altering the transformer is to change the number of turns of the secondary winding, for which thicker copper wire is used.
A charger for a car is made in almost the same way. For this purpose, you will have to select the required number of turns of wire (so that the output is 12 Volts), after first getting rid of the secondary winding of the transformer.
Generator from microwave engine
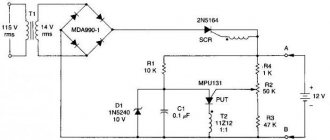
Some craftsmen make a homemade generator out of a microwave engine. The motor installed in the microwave is capable of generating electric current, and its power is about 50 W.
To make a small generator from a microwave, you will need to build a housing and attach a handle to the motor shaft. Also on the case you need to place a small socket to which you could connect a flashlight and other electricity consumers.
Attention, a homemade generator from a microwave engine is capable of generating voltage over 110 Volts, which is very, very dangerous to health. Therefore, be more careful when making this kind of electrical homemade products.
Microwave oven
In addition to all of the above homemade microwave ovens, individual parts of this household appliance can be skillfully used for a variety of purposes.
For example, a fan from a microwave oven is perfect for installation in a homemade incubator.
By the way, using an electric heating element with a power of no more than 1 kW, you can make an excellent oven from the body of a microwave oven. What you need to do is to place the heating element in the lower part of the body, having first removed from it all the parts unnecessary for use.
As easy as pie
If you are not going to tinker with spare parts, wires, or make at least some kind of device, it is quite possible to create a storage facility for bread. To do this, you need to remove all the insides and cut off the cord. The box will become much lighter.
To give it a presentable look, the top can be decorated to your taste. Some people use the decoupage technique, others solve the problem even simpler - they cover it with self-adhesive wallpaper.
What is important is that here any bakery products can be perfectly stored in paper bags without drying out. What else can you make from a microwave with your own hands?
What types of wall mounts are there for microwave ovens?
The whole variety of brackets comes in two main types - fixed and telescopic. The first is a static structure made of metal profiles and pipes that does not change its size.
The advantage of a fixed bracket is its strength: the absence of sliding units strengthens the connections. Often the fixed mount for a microwave on the wall is monolithic, which is good with maximum weight.
The telescopic one changes size, both vertically and horizontally. This fact allows you to adjust the dimensions within the permissible dimensions and load of the bracket. The solution allows us to obtain much less strength, which is definitely not good for the owner.
If you decide to buy a microwave for a long time, then it is more profitable to buy a fixed bracket without risking its strength and health. If you need to change your microwave in the near future, buy a telescopic one - preferably with universal fasteners.
All the details come into play!
The most interesting thing is that you can use not only the body of a broken microwave oven, but also its entire “internals”.
When you make a bread box, even an “oven,” you don’t use the parts inside.
We didn’t just warn you that you shouldn’t throw anything away! The easiest option is to sell whole elements. Even if it’s small, it’s money.
But for DIYers, this is a great reason to create something unique and unusual.
Causes of touch keyboard malfunction
The touch keyboard, with which the user controls the operation of the microwave oven, is the weakest point of such fairly reliable electrical equipment. When the touch buttons are broken, the microwave oven reacts with unpredictable behavior, for example, sudden switching of operating modes, lack of response to touching one or more sensors, as well as spontaneous turning on or off (breakage of the “Start” button). In this case, the problem may also suddenly disappear, and after some time appear again.
All malfunctions due to which the touch keyboard stopped working can be divided into three groups:
- sticking of the membrane contacts, due to which the touch panel buttons cannot be pressed;
- breakage of current-carrying conductors;
- broken contacts at the junction of the cable and the connector on the control unit.
The owner of a microwave oven can easily fix all these breakdowns on his own. The exception is models manufactured by Daewoo, in which the appearance of the facade is disrupted when the touch panel is removed. It is recommended to repair such microwave ovens in a certified workshop, where they can replace the sensors with regular buttons.
Using a microwave instead of other household appliances
Modern stoves are multifunctional. Therefore, you can cook a variety of dishes in them.
In addition, the device can also replace well-known household appliances. Let's study this issue in more detail.
Oven
An ordinary microwave oven can become an indispensable assistant in a kitchen where there is no possibility of installing an oven.
Important ! Using an old microwave instead of an oven in full mode can only be done with convection and grill.
If this condition is met, the housewife will be able to enjoy almost all varieties of dishes that are cooked in the oven. This list includes pies, baked meats, casseroles, cakes, biscuits and all other options.
Some housewives say that in such an oven they make a successful Easter cake.
Unfortunately, if there is no convection or grill function, you must take into account the proposed recipe from the manufacturers. To do this, you just need to purchase a special book with dish options and start experimenting.
Fan
The design of the microwave device is quite complete. One of its useful elements is a fan. It can be used as an independent device, which will become a real salvation in hot weather.
Important ! Before using this part, it must be thoroughly washed.
Let's take a closer look at its correct connection to the power supply using the example of SMF-3RDEA E Class 230V 50Hz BE 03.H.22 D.
This model has three conclusions, which are differentiated by location. Two of them are located in close proximity, and one stands separately. This is the beginning of the winding.
The wire that is closest to the freestanding one is responsible for the increased speed of the device and is the first tap, and the second tap contributes to the rated speed of the equipment.
The optimal connection option is considered to be the connection between the beginning and end “2”.
If, however, there are certain difficulties in identifying these contacts, a resistance measurement is required. Between the indicated wires it should be a maximum value of approximately 500 Ohms.
Important ! If a person does not understand the electrical network, then independently connecting the fan to a 220 V network can lead to irreparable consequences.
Before engaging in this assembly, you should carefully study all the features of the process. It's best to contact a specialist .
yourmicrowell.com
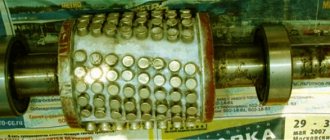
The previous article discussed the functions performed and the purpose of the timer - a regulator used in mechanical control panels of microwave ovens. Now it’s time to look inside this mechanical miracle and see how it works. One of the possible versions of this device is shown in Figure 1. The timer-controller is a very complex mechanical device and belongs to the category of those things that, if a person has disassembled, he will not always be able to assemble. The entire contents of the regulator is located inside a plastic box consisting of two parts, let’s call them the front part and the back part. On the front side there are controls - a timer shaft and a power regulator gear. On the back side there is an electric motor, a bell cup - a signal for the end of the furnace operation, a bell shaft and hammer, as well as the terminals of the regulator contact groups. To disassemble the regulator body and look inside, you need to remove the front part of the box. To do this, unscrew the three screws securing the housing to the metal chassis, the same screws tighten both halves of the regulator housing together. After this, we gain access to the last – fourth screw, located to the right of the power regulator gear, and unscrew it. Then, we take some flat and sharp tool, such as a knife or a thin screwdriver, and use it to very carefully separate the front part from the back. At the same time, in order to prevent the insides of the regulator from spilling out, the body must be held horizontally, with the back side down, and try to make sure that when removing the upper - front half - all the gears remain on the lower - rear part of the regulator body.
Picture 1
The axis of each gear of the device has support points - anchors, both in the back and in the front part of the housing. After removing the cover, a picture should appear in front of us, approximately the same as shown in Figure 2. When I first had to disassemble this thing and see so many gears of different calibers, the first thought that came to my head was: “Well, why the hell am I here?” climbed?" At first there was a feeling of panic and confusion, “how does this all work?” and “how can I put it all back together later while still working?” But, as popular wisdom says: “The eyes are afraid, but the hands do it.”
Figure 2
So, let's figure out what all these gears are for. To make it easier to understand, let us remember that the timer-controller combines two devices, a timer and a power regulator, and the common unit for both devices is the electric motor. It is the electric motor that powers both of these mechanisms. Therefore, we will select the engine gear shaft as reference point 0, and from here we will begin our study. Let's number all the gears in order, from the electric motor shaft onwards. First, rotation from the engine is transmitted to gear 1, then sequentially to gears 2, 3 and 4. Most gears have two tiers with different diameters. The rotational movement is transmitted from the smaller diameter to the larger one. Gears 1 and 3 sit on the same axis. The above gears together form a gearbox that transmits rotation from the electric motor shaft to the control elements of the timer and power regulator, and also reduces the engine speed to the required value. The last one, the fourth gear of the gearbox, is the transfer gear. From this gear, rotation is transmitted in two directions: to gear 5 and then to the timer, and in the other direction – to gear 11 and then to the power regulator.
Now, let's look at the operation of each device separately. Let's start with the timer.
The timer mechanism consists of the following parts:
- Transfer gear 5. Transmits rotation from transfer gear 4 to the timer mechanism.
- Gear 6 – friction clutch. Transmits rotation from gear 5 to timer gear 7. It works in one direction, thereby preventing the gearbox from turning in the opposite direction when setting the time - turning the timer knob clockwise.
- Timer shaft and timer gear 7. Serves to set and count the timer.
- Program disk 8. Controls lever 9 of the timer contact group.
- Lever 9. Under the control of the program disk, it performs reciprocating movements, and thus controls the contacts of timer 10.
- Timer contact group 10. One pair of normally open contacts. Supplies power to the electric motor and to the contact group of the power regulator 16.
The time setting knob is mounted on a metal shaft. Let's call it the timer shaft. Timer gear 7 sits rigidly on the timer shaft. The timer gear has a three-tier design. The middle tier of the gear is a gear and interacts with clutch 6. The upper tier contains a rectangular protrusion that plays the role of a stopper, which, in interaction with the protrusion inside the front part of the housing, limits the rotation of the time regulator knob in a given sector, that is, it does not allow it to be turned to all 360 degrees. The lower tier of gear 7 also has a protrusion designed to interact with another part; let’s designate this part as a program disk (position 8 in the figure). The program disk is installed under the timer gear, on the same shaft. The protrusion of the lower tier of gear 7 fits into the groove of the program disk, thus ensuring their joint rotation. At the end of the program disk there is a recess in the form of a sector, designed to control the contact group of the timer using lever 9. Separately, I would like to talk about gear 6. This gear is a safety friction clutch, has two tiers and consists of two parts - driving and driven. The principle of operation of the clutch is based on the transmission of rotational motion from one part to another through friction force. Considering our example specifically, the leading part of the clutch - a tier with a large diameter - has a hollow structure. A metal spacer ring - a spring - is inserted into the cavity of the leading part around the entire circumference. The rupture of this ring creates a groove. The driven part - the upper tier with a smaller diameter in its design has a protrusion and is inserted into the cavity of the driving part with the protrusion into the groove. Thus, if you do not load the driven part with anything when rotating the driving part, then both parts of the clutch will work as a single whole, like one solid gear. The friction force created by the spring, when the driving part rotates, will drag the driven part along with it. But, if you load the driven part of the clutch - mechanically stop it, the driving part will continue to rotate, overcoming the friction force and slip along with the spring relative to the driven part, which is not moving at that moment. In Figure 2, red and blue arrows indicate the direction of rotation of both parts of the clutch. As you can see in the figure, the driving part can rotate only in one direction (blue arrow), and the driven part can rotate in one direction or the other.
Figure 3
Well, we are familiar with all the details of the timer. Now, let's see how it works. The initial state - the oven is turned off (the time regulator knob is at 0) corresponds to the position of the program disk when the cam of lever 9 is in the recess on its end part (Figure 3, image on the left). In this case, the lever is located at a certain distance from the movable plate of the timer contact group, and the contacts are open - the oven is de-energized. By turning the timer knob clockwise, the program disk also turns, the cam of the lever 9 comes out of the recess of the program disk and presses on the movable contact plate - the contacts close and supply power to the electric motor and the contact group of the power regulator (Figure 3, image on the right). When you turn the timer knob, the timer gear rotates the driven part of the clutch, and since at this moment the leading part of the clutch is loaded by the gearbox, the driven part rotates relative to the driving part, leaving the latter motionless. In other words, we turned the handle, but not the gearbox. After the timer contact group was triggered, supply voltage began to flow to the engine. The engine shaft began to rotate, the gearbox gears began to move, and transmitted rotation from the engine shaft to the timer gear, rotating it counterclockwise and returning it together with the program disk to its original position. Since the timer gear is not a serious load for the clutch, at the moment, both parts of it work as a single whole. The time control knob slowly creeps in the opposite direction, trying to return to zero. When the zero mark is reached, the program disk reaches a position where the recess in its end part becomes opposite the cam of the lever 9. The cam falls into the recess, the lever moves away from the contact plate and the contacts open, de-energizing the engine. When the cam enters the groove of the program disk, lever 10 makes a sharp movement and activates the bell hammer installed outside. The hammer hits the bell cup and a signal is heard indicating the end of the oven operation. That's it, the motor shaft no longer rotates, the timer has stopped and cut off the power to the inside of the microwave.
The main elements of the timer are, without a doubt, the friction clutch and the program disk. The clutch allows, when setting the time, to rotate the control knob separately from the rest of the mechanism, even while the oven is operating, and then synchronously return it to its original position. The program disk, due to its design, provides the timer device with two stable positions: “On” and “Off” (Figure 3). Well, that seems to be all about the timer. We will talk about the operation of that part of the timer - the regulator, which is responsible for regulating power - in the next article.
How to use the microwave oven
It happens that a household appliance burns out completely, that is, the model cannot be repaired. If it’s a pity to throw away your favorite, then you should think about its neutral use. For example, in the form of a bread box or a special storage container.
The advantages of a self-made bread bin include the tight fixation of the door. This will prevent even the smallest bugs from entering the food.
- First, all internal elements are removed from the equipment. This allows you to reduce the weight of the product.
- The power cord is also removed.
- After this, the appearance is decorated. The microwave oven panel can be painted using metal paint or pasted over with interesting pictures. This requires your own imagination.
DIY microwave bracket on the wall
This part of the article is devoted to how to make a microwave bracket for the wall with your own hands.
The easiest way to do this is with a jigsaw. The edges are rounded by marking the corner with a plate, giving a suitable shape. Using the resulting marking, a corner is cut out with a jigsaw. Sand the corners with sandpaper. Next comes the preparation of the bars to serve as the angle of support. A similar radius is made on the block using a plate in order to subsequently saw it. After preparation, begin to assemble the structure.
This is done using hexagon anchor screws. Drill holes in the side where the screws will be screwed in. Insert the screws and screw the self-tapping screws into them using a hex key.
It is important here that the screws fit into the end that is not covered with laminate. The corner fasteners are also screwed in. Corner fasteners must be secured on both sides. Next is cutting out the screed. This will bring the two corner support bars together.
First mark it according to the size obtained from the distance between the corner strips. Subsequently, the plank is sawn and inserted. Afterwards, all ends can be covered with trim tape to improve the appearance of the product. Attaches both to dowels and to other types of fasteners to the wall.
How to use individual microwave parts
When making a bread box from a broken microwave oven, the body must be completely cleaned of internal parts. It is these spare parts that can be sold if their dismantling was carried out correctly :
- Transformer. It will be required as the main element for making miniature resistance welding with your own hands. If completely unnecessary or unsuitable, it can be sent for scrap.
- Small switches will be useful for the home handyman or electrician.
- The motor responsible for rotating the dishes may be needed when designing various models.
- A plateau with radio components will attract the attention of radio amateurs.
- Heat-resistant light bulb with a voltage of 220 V.
- Magnetron - magnets are removed or used as equipment for drying firewood. Extreme care is required.
This is how a microwave oven that cannot be repaired can become a useful thing for its owner.
Safety relays
Before talking about the grill, the magnetron cooling fan, the work compartment light bulb and the table motor, I would like to mention the protective relays. Contactors ensure complete shutdown of mechanisms when the door is opened. Two break the power circuit (ground and phase), one necessarily controls the performance of the other:
- The door is open, the relay buttons are released, the contacts that were initially normally closed are connected.
- In this case, the power supply circuit must be broken twice.
- But in the second relay the ground is shorted to phase.
- The first relay worked - nothing bad happens, the circuit is already broken.
- The first relay is stuck and the fuse will blow because the ground is shorted to phase.
Interrupt the program by opening the doors. Perform the necessary operations. Close the compartment. The program will continue executing. Electromagnetic radiation instantly disappears as soon as the protection relay breaks its contacts.
Not a power fuse placed in the housing and hanging under the magnetron, but located on the electronic board. Consider the curious features of protective relays. One (third) supplies a phase to the starting relay. Without this, supplying voltage to the magnetron is in principle impossible. The power fuse estimates the energy consumption of the magnetron. If an emergency situation occurs, the protective element burns out, protecting the generator from damage. The described thing will happen if you turn on an empty microwave oven, or put a fork, spoon, or metal object inside. The only bordering golden ring of the plate can provoke an emergency situation.
Low-power oven
If your microwave or microwave oven with mechanical control is broken and you are not going to repair it, then you can make an ordinary low-power oven out of it. To do this, the electric motor that rotates the platform is dismantled and a heating element or a burner from an electric stove is installed.
Remember that before dismantling, the microwave oven capacitor must be discharged by shorting it to the housing, because it can retain a high voltage charge for a long time.
It remains to consider the issue of installing guides for the baking sheet, installing a regulator for modes and replacing the glass with a more heat-resistant one . The new product will not be able to bake pies: the door and many parts are not designed for prolonged exposure to high temperatures, but it will perform the heating function perfectly, working as an oven in a solo format.
What to make from an old microwave?
Today it is easier to buy a new household appliance than to repair an old one. But in the case of a microwave oven, it’s a pity to throw away a nice case, especially considering that half of the “filling” remains intact. We suggest you figure out how to use a broken microwave oven for other purposes - for benefit or for the soul.
Important! When working with electrical devices and their parts, follow safety precautions and properly insulate the wiring.
Let's find out what you can make from a microwave with your own hands.
Low-power oven for heating food
Proceed strictly according to the scheme:
- Remove unnecessary parts from the housing. To do this, remove the back panel, having previously discharged the high-voltage capacitor using a well-insulated high-resistance conductor. Twist the transformer, magnetron and turntable motor. All this will be useful in the manufacture of other useful products. Be sure to remove the glass disc and its drive from the camera.
- Go to the market, to an electrical parts store, or find an online market of the appropriate profile. You will need an air heating element up to 1 kW. Install the unit at the bottom of the device. The heating element requires reliable fixation, so before installation, take care to install the metal guides. The heater must be positioned so that the connected part is completely removed from the chamber.
- Connect the heater to the wires that come from the microwave oven's electrical filter.
- Place grates or a baking tray of a suitable size inside the chamber, leaving 3-4 centimeters from the heater.
- When connecting the product to a 200V network, use high-quality wires with a high-temperature insulating layer.
So in just a couple of hours you can turn broken equipment into a fully functional device with which you can easily heat up food, prepare hot sandwiches or defrost semi-finished products. To cook in an “oven”, you need to include a thermostat in the electrical circuit, and equip the door with special tempered glass, which in turn is taken from an old oven. In such a homemade oven you can already cook any dishes, including meat and baked goods, at temperatures up to 200 °C.
Vintage bread box
Don't want to fuss with electrical parts? Use your creative imagination and transform the unsightly body of an old microwave oven (MVP) into an original antique bread box. Your manipulations with tools will be limited only to dismantling the internal parts. It is necessary to dismantle not only the parts, the turntable with the motor, but also the power cord. Next, carry out the following work (one or all at once):
- Paint the body with paint of your choice. We have already written about how and with what to paint a microwave.
- Decorate the outside walls with stickers or decorate them using the Decoupage technique using napkins with vintage patterns.
- Add an LED strip to the camera - regular, blue, green, red or RGB, and activate it in the dark. In this case, you should leave the power cord, and you will have to install a step-down transistor inside the case to power the backlight.
As a result, depending on your efforts, you will end up with a bread box - either simply unusual or with the function of a lamp.
Put electrical components into use
If you made a bread box or an oven, you still have a mountain of unused components. Working spare parts can be put up for sale on Avito or other trading platforms. And give the rest a second life if desired.
- Fan. Use it for a homemade freezer or incubator. Having beautifully designed the fan, you can install it indoors.
- from a transformer , including welding machines and chargers.
- Turntable electric motor . It will be useful in a homemade incubator for the purpose of automatically turning eggs. To adjust the time intervals between procedures, you need to build a time relay into the electrical circuit. Also, together with the glass disk, the engine turns into a decorative stand or an unusual lighting fixture in a garden or summer cottage.
- The capacitor, control module and other radio components are excellent “toys” for radio amateurs, who, at their discretion, turn them into intricate, sometimes unnecessary, but very interesting products.
Important! When using MVP parts, be careful: they may contain dangerous components.
Tips from the web
The former trend of going to forums for advice has become obsolete. Nowadays, few people are nostalgic for these nice conversations in cozy “online rooms,” and advice is drawn from social networks or information sites. After reading a couple of such conversations, we found both banal and creative advice on re-equipping the profit center. The winner was the advice - to make a house for cats out of the microwave casing. The author of the post advises first to correlate the device with the size of the cat, and then remove the door if necessary.
Important! Don't put your cat in a microwave, even if it's not working. We are for respectful and decent treatment of animals.
As you can see, an old microwave should not be sent to a landfill! With a little ingenuity and your own efforts, you can make anything out of it (within reason). Share your own original ideas and homemade products in the comments to the article. Thank you for your attention.
Original bread box
If many parts from an old microwave are broken, then your assistant can no longer be restored, but you can make many homemade products or very original devices from them. For these purposes, a housing from a microwave oven is used. Although it will take up a lot of space in the kitchen, you can repaint it or make modern decoupage - decorate it with an original design or ornament, and then cover everything with colorless varnish. This will reliably preserve the unique, homemade composition and help it fit harmoniously into the interior design of a modern kitchen.
The microwave bread box will be quite spacious, and if the processor module is not broken and is in good condition, then it will be equipped with a clock.
The device of a simple microwave oven
In a microwave oven, electrical components are connected in series. Let's start with the magnetron power circuit. Open the lid and you will see a huge transformer, next to it is a large (really large) capacitor, next to which there is a diode and a fuse in a ceramic case (insulator). These things are the first thing that attracts the attention of a beginner. This is a circuit for generating high voltage (3-5 kV) power supply to the magnetron. Don't put your hands or a screwdriver in there. We believe that the capacitor will gradually discharge, and if the plug is pulled out of the socket, an electric shock is unlikely. The operating principle is as follows:
- A voltage of 230 V is supplied to the primary winding of the transformer. The coil is located at the bottom, wound with a copper core, which at times appears to be bare. The metal is coated with transparent lacquer insulation. The coil is located under the secondary windings.
- There are two secondary windings. One is literally several turns of copper wire wound carelessly next to the primary: cathode heating. Provides 6.3V AC voltage to help electrons escape the surface. Above, in good, high-quality insulation, the high-voltage winding is located. Gives 2 kV going to the output, powering the magnetron.
- At the output there is a capacitor shunted by a diode. It turns out that the negative half-wave passes to the cathode, the positive half-wave charges the capacitance. At the next half-cycle, the electrode will already be under double the voltage: that taken from the transformer and the discharge of the capacitor. The result is about 4 kV. Enough to start generation.
Please note: the output windings are paralleled on the magnetron, the cathode has two inputs. The anode is grounded separately.
This results in an electrical layout:
- A current with a voltage of 6.3 V flows through the heating coil.
- A potential of 4 kV is applied to the cathode, which is balanced by ground at the anode.
The heating coil and cathode are electrically connected. The power of the magnetron is controlled by a timer, and to prevent sparks from occurring, a starting relay is added to the circuit. Let's move on to the front panel!
Fan
Such a product will always find application, for example, for cooling eggs in an incubator, which many users did not even realize. But cooling is a very important technique in improving the development of embryos during the incubation process. The quality of hatched chicks is no worse than in a natural way, because cooling occurs in a very similar way, when the hen moves away from the nest to meet her needs. In chickens and turkeys, this process occurs by air, and in waterfowl - combined, due to the evaporation of moisture from the surface of the eggs when the duck or goose returns after water procedures.
Step-by-step repair instructions
If faults are detected, a specific element is replaced with a similar part, and assembly is carried out in the reverse order.
Repairing a microwave oven when the magnetron burns out or sparks occur
magnetron
- You need to disassemble the stove and first of all evaluate the serviceability of the working panel and door. They will likely show enamel chips and small cracks.
- As a result of deformation of the uniformity of the coating on the inside, the magnetic base suffers, so the stove may begin to smoke.
- If such symptoms are not observed, you need to get the magnetron. It is mounted using a clamp and 4 screws that secure it to the base of the oven. In practice, this element requires replacement in rare cases, but if this happens, the technician needs to unwind the waveguide and transformer.
- It often happens that when the device is turned on without load, the waveguide begins to break through. For this reason, sparks can form, causing it to crack and char. In this case, the technician needs to check the waveguide.
Repair of high voltage fuse
fuse
- The high-voltage fuse is made in the form of a small glass container, inside of which there is a spring with a thin combustible wire. The fuse itself is placed in an insulating plastic sleeve.
- The integrity of the device can be traced in its appearance. To do this, it is necessary to completely disassemble the insulating sleeve.
- Before this, you need to disconnect it from the board and connect it in series with a low-power incandescent car lamp. The lamp must emit light.
- After this, the spring should appear stretched.
- If the insulating sleeve cannot be disassembled, the serviceability of the fuse can be checked without opening the casing.
- If the lamp does not light, the technician needs to install a new fuse.
If the microwave oven is making a loud noise
transformer
- The first step is to find out which part is causing problems. The fans and transformers are most susceptible to breakdowns. The first one is much faster and easier to repair, but if the transformer fails, it will have to be replaced.
- In rare cases, the fan begins to hum as a result of overwork if the system has been running for a long time without rest. In this case, the device must be moved slightly away from the wall and the fan blades thoroughly cleaned.
If the device refuses to rotate the tray with products
- You should check the connection of the plate and the motor itself.
- Disassemble the mechanism and remove the pan. A wire must be connected to it from the motor.
- If the wire is disconnected or the contact is clogged, you need to clean it and reattach it to the previous area.
If the microwave oven operates without turning off
relay
- Often, violations are caused by malfunctions of the relay. This mechanism is necessary to turn off the electricity. Typically, the problem occurs due to stuck contacts.
- The microwave oven needs to be disassembled and the relay removed from it. The operation of the device is checked using an ohmmeter; if there is a break, the device is replaced with a new one.
Other breakdowns
thermal fuse
- If the microwave heats well, but turns off after a few seconds, this may indicate a broken thermal fuse. It cannot be repaired, so you will have to buy a new one.
- When fan malfunctions occur, it is necessary to check the power circuit. If necessary, it must be replaced with a new one.
- Sometimes the device refuses to turn on at all. The technician needs to check the fuse on the power filter board, and the filter itself for visible faults.
We use electrical parts
Garage specialists successfully make spotters from a microwave transformer - special devices for body work, the basis of which consists of contact welding, which helps to level out various dents on the car body. The design technology can be found on the Internet, or read our publication on this topic, which contains all the recommendations and a detailed algorithm of actions.
Many farmers use a motor from a turntable together with a gearbox in incubators for turning eggs, but they only need to add a time relay to it, because everything must be done strictly according to the clock.
The control unit can be adapted for a completely different job, although the appearance and markings on the terminals may differ, but the operating principle of all similar units is identical. Contacts can be established using a special device. Any radio amateur, especially beginners, needs to have a soldering iron with adjustable tip temperature. A similar device made by other specialists can be found on the Internet and the circuit can be borrowed and then assembled at home.
For those who are not yet closely familiar with various electronics, a mechanical regulator is suitable, which has a number of advantages: you can regulate the power of the soldering iron using a step-down or isolation transformer. Such a regulator has a wide range of power control, which can be used when melting plastic parts, when heating a pickling solution or a tin bath.
As you can see, you can make a lot of useful household gadgets from a microwave with your own hands; all you need is desire and a little free time. You may also find useful information about repairing a microwave oven yourself.
Buttons don't work, microwave fuse is on - repair
A microwave oven as a kitchen appliance provides us with comfortable conditions when heating or cooking food. But sometimes she starts to behave very strangely. It turns on when it shouldn’t, doesn’t respond to commands, or switches operating modes without permission. Let's look at what could be the reasons for this strange behavior and how to eliminate them.
What to do if the microwave buttons do not work?
The keyboard for controlling the operation of a microwave oven is usually made in the form of a multilayer film or according to the principle of television remote controls. The keypad or touchpad wears out over time and needs to be replaced.
The main reasons for keyboard failure are as follows:
- break in the electrical circuit;
- control board malfunction;
- loss of contacts in the connector;
- sticking of contacts.
Before you start repairing the microwave oven keyboard, you should make sure that it is the button that is not working, and not the entire control system.
Diagnostic procedure and troubleshooting methods:
- if the indicator panel lights up . It is necessary to check the reliability of the keyboard bus installation in the control unit connector. If the contact in the connector is reliable, then you should replace the keyboard with a new one;
- if not all keyboard buttons (keys) work . In this case, it is also necessary to check the bus contact in the control unit connector. If the contact is good, the keyboard is replaced with a new one.
Bringing the sensor back to life
To disassemble the touch panel, you must first unplug the microwave, and then:
- unscrew the bolts that secure the microwave cover;
- slowly disassemble all existing connections;
- Unscrew the screws on the special protective panel;
- remove the control module from the panel;
- use a thin knife to disconnect the touch plate;
- divide the plate into two parts;
- check the integrity of the conductive tracks on the plates. In the case when all the tracks are intact, the problem may be the contacts are shorted. To prevent a short circuit, it is necessary to increase the distance between the plates. To do this, insulating tape or tape is glued to the inside of the plates;
- connect the plates and connect the cable to them;
- glue the sensor in place;
- assemble the microwave;
- check the functionality of the buttons.
How much will the repair cost?
Repairing a microwave oven yourself involves some financial expenses, but they are not significant, since a high-quality fuse costs about 50 rubles, capacitors 100-150 rubles, high-voltage diodes from 15 to 200 rubles, depending on the design features.
The most serious costs will be incurred by purchasing a new magnetron; its cost depends on the specific model, but on average it is 1500-2000 rubles.
However, in some situations, it is not possible to carry out repairs yourself and the help of a qualified specialist is required; below are the approximate minimum costs for the most popular repair services:
- Replacing the power cable usually costs 200–250 rubles.
- Work to replace sensors, capacitors or high-voltage fuses costs from 300 – 350 rubles.
- Repairing the furnace door, replacing mica, electronic control unit, fan or tray motor costs from 400 – 500 rubles.
- Work on troubleshooting the waveguide on internal surfaces, replacing the magnetron or power transformer costs from 500 to 600 rubles.
- The most expensive thing is to completely replace the grill heating element; usually this procedure costs 650 – 700 rubles.
Results
- A microwave oven is a complex and high-tech device that requires careful handling and unconditional compliance with all recommendations given by the manufacturer.
- Self-repair is only possible if the owner of the microwave has knowledge of electrical engineering and electronics.
- When making repairs, you must follow safety rules when working with high voltage and microwave radiation.
- Replacing the magnetron in a microwave oven that has served for more than 5 years is not economically viable.
Characteristics of Samsung washing machines
First, you should familiarize yourself a little with the main features of these machines. Firstly, it is a stylish design.
The appearance of Samsung devices is always elegant. It is recognizable at first sight, and this indicates a responsible approach to design and high quality assembly
Secondly, this is the original drum design. Modern modifications of Samsung washing machines are equipped with a fundamentally new technical solution - the Diamond Drum.
It refers to an innovative type of honeycomb drum with a surface covered with many convex pyramids and small holes for water into which the fabric is not pulled in.
Thanks to this design, a gentle washing regime is ensured. These drums can be very spacious - with a load of up to 12 kg of laundry, depending on the model of the machine.
Thirdly, heaters with double ceramic coating that do not become covered with scale, as well as an inverter motor attached directly to the drum in some modifications, are worthy of attention.
In addition, the Fuzzy Logic and Smart Check functions are interesting, which are responsible for the correct calculation of the washing mode depending on the amount of laundry loaded, as well as for diagnosing various machine malfunctions.
The appearance of Samsung devices is always elegant. It is recognizable at first sight, and this indicates a responsible approach to design and high quality assembly
The number of washing programs depends on the model of the washing machine. Even the simplest modifications are equipped with all the necessary set of programs, and new models have a washing mode called ECO Bubble - with the help of air bubbles, laundry is easier to wash even in cold water.
If a machine is marked with the WF sign, this means that this model has a front loading, and if its name contains the abbreviation WD, it means that the machine is equipped with a built-in dryer.
But Samsung branded machines also have one small drawback - their instability to voltage surges in the network, which is important in our Russian reality. When the voltage becomes either too high or too low, a control system called Volt Control simply turns off the washing mode to resume it immediately after the mains voltage has stabilized
This is not always convenient, so it is better to connect the washing machine through a voltage stabilizer
When the voltage becomes either too high or too low, a control system called Volt Control simply turns off the washing mode to resume it immediately after the mains voltage has stabilized. This is not always convenient, so it is better to connect the washing machine through a voltage stabilizer.
The structure of a standard type machine: the diagram shows all the main parts of the body and rear part. The designs and operating principles of machines of different brands are similar (+)
After a brief introduction to the parameters of this brand, let’s move on to considering the main breakdowns.