What is retro wiring?
Essentially, this is a way of laying power cables in residential areas.
The characteristic features of this method are single-core wires twisted together, which are attached directly to the walls and ceiling using special rollers (insulators). It should be noted that in the time of our grandparents, wiring was installed everywhere in this way. These were nondescript wires and simple insulators. But who then thought about aesthetic appeal, the main thing is that it works. Nowadays, everything has changed dramatically: a variety of wires, insulators, and switches of various colors, shapes and sizes are manufactured. But due to its “novelty,” retro-style electrical wiring is now a symbol of luxury, since prices for components are still “biting.” Next we will take a closer look at these and other nuances.
Accessories for retro wiring.
Photo of retro wiring
3+
Read here! Types of wires: a detailed description of conductors and their purpose. 130 photos of wires and an overview of their features
Preparing for the installation of antique electrical wiring
The preparatory stage is an important part in the implementation of any repair. Before you start wiring, you need to purchase:
- cable of the required cross-section;
- overhead switches and sockets;
- distribution boxes.
Such electrification of the house is carried out only after finishing work on the house is completed. The wiring is mounted on wooden walls, on top of wallpaper or painted walls. The electrical equipment market offers lovers of retro and eco-style a wide variety of switches and sockets, wires with insulation of different colors. The price depends on the color. Gold wires will cost twice as much as brown wires.
Tips for choosing material
First you need to decide on the wires. There are two options for obtaining a cable:
- Budget. If the cost of arranging a power supply is limited, you can make the wires yourself. Take 2 cables, twist them with a drill and you get twisted wiring. The method, to put it mildly, is not very gentle, there is a high risk that you will spit on this idea. But it's cheap and cheerful.
- Classical. Find an online store and order the required material, having previously calculated the quantity. Preference should be given to those stores that can provide certificates of conformity. You don’t want to end up a fire victim due to poor-quality wires.
Now let's talk about insulators:
- Ceramic insulators are the most popular products. They are the most popular type of retro wiring fasteners because they are very reliable during operation and are also inexpensive compared to porcelain ones.
- Porcelain insulators. In principle, porcelain is a type of ceramic, only it is more transparent and durable. Therefore, when you see these two names on a store shelf, choose any, they are both great for open wiring.
As for the quantity, the calculation is made relative to the length of the wire. It is recommended to place insulators every 40–50 cm of cable. For example, you calculated that all wiring will require 100 m of wire. Divide the amount of cable by two and get 200 pcs. insulators.
The last point is to choose electrical installation products:
- Sockets. According to fire safety requirements, they must be overhead. In addition, it is advisable to install a backing under the sockets; it serves as a protective barrier from heating, as well as a decorative element.
- Switches. One main nuance when choosing switches for retro wiring is that they must be rotary or in the form of toggle switches. This very clearly emphasizes the style of the interior.
- Mounting boxes. There are no special requirements here, the main thing is to choose the appropriate shape and color.
Materials used for retro electrical wiring
Currently, domestic and foreign manufacturers of cable products and installation products produce a wide range of products in retro style. This is due to the demand for these materials and the high profitability (cost) of the latter. The most widely represented products in this segment on the domestic market are “RETRIKA”, “Salvador”, “Fontini”, “Bironi” and “Gusev”.
Wires (cables)
Modern decorative wires (cables), used to create a retro style in a wooden house, are made of copper with a PVC sheath of polyvinyl chloride and a braid of synthetic materials that do not support combustion.
2- and 3-core cables are available in various colors (white, black, brown, ivory, cappuccino, caramel, as well as gold and copper), with a cross-section of 0.75, 1.5 and 2.5 mm².
Wire in retro style for a wooden house.
How to make a twisted wire with your own hands?
In order to reduce the cost of purchasing components, since original wires are quite expensive, you can make a twisted wire yourself.
Single-core copper wires in flame-retardant insulation may be suitable for these purposes, such as:
- RGKM - stranded copper wire with two-layer silicone rubber insulation and fiberglass braid;
- BPVL - copper wire with PVC insulation and thread braiding filled with varnish.
When purchasing the above wires, it is necessary to take into account that during the twisting process the wire consumption increases. The increase is 25–30% of the linear length of the mounted section. It is not unimportant that these wires are produced in a wider range of conductor cross-sections, 4.0 and 6.0 mm², which allows you to connect electric stoves and other energy-intensive consumers in the same style across all sections of the electrical network.
Materials for retro wiring
For external installation of wires, a minimum set of materials is sufficient. You will need:
- Overhead sockets and switches.
- Cables.
- Distribution boxes.
- Insulators.
All elements must be designed in the same style and similar colors. To make it easier to choose materials, we will discuss all possible options.
Twisted cables
Wires for decorative electrical wiring are made of copper and synthetic materials. It is important that the outer sheath of twisted cables is not subject to combustion. The most reliable are PVC and technical silk treated with fire retardant.
| Section | Number of cores | Colors |
| 0.5 mm², 0.75 mm², 1.5 mm², 2.5 mm² | 2,3,4 | Brown, black, ivory, caramel, cappuccino, gold, white, copper |
The cross-section of the wires must be selected based on the lighting scenario and the number of household appliances. Cables of 1.5 mm² and 2.5 mm² are suitable for home use. To calculate accurate indicators, you need to know the total power of all electrical appliances.
A few cable requirements:
- For the kitchen, it is better to choose cables with a rubber sheath - the fabric braid will quickly become dirty and will look unpresentable.
- For outdoor installation, a twisted cable of 3 cores is suitable. The first conductor will perform the functions of a phase, the second - neutral, the third - protection.
- For sockets, a twisted wire with a cross-section of 2.5 mm² is suitable. In this case, one power line will be enough for 2-4 devices with a total power of up to 3 kW.
| Section | Power limit |
| 0.5-0.75 mm² | 2.9 kW |
| 1.5 mm² | 4.4 kW |
| 2.5 mm² | 6 kW |
The appearance and shade of the cable is at your discretion. In matters of aesthetics, everything depends on the style of the interior and the color scheme of the design.
To calculate the footage of wires, it is advisable to use a laser level. With its help it is easy to mark the space from point to point. You need to think about cable routing routes and calculate how much material is required.
Retro cable for open wiring
Sockets and switches in retro style: design and installation
Switches should also fit into the concept of retro interiors. For example, white plastic devices will look out of place in a vintage setting. It is better to give preference to products made of ceramics, metal, and porcelain. Switches decorated with gilded patterns look very impressive.
The sockets will be visible, so it is necessary to take a responsible approach to the choice of design. Elements should form a harmonious composition with other design objects and at the same time play the role of an accent.
Retro-style sockets are most often made of plastic or porcelain. There are stunning natural wood models on sale. Manufacturers also produce collections of ceramic devices with hand-painted and marbled patterns.
The size of the devices also matters. Bulky sockets and switches will spoil the impression of the design. Miniature elements in vintage wiring look much more interesting.
Original devices will look good on the wall only if you install them correctly. A few installation recommendations:
- The ideal level for placing the socket and switch is 90-110 cm from the floor.
- To install the sockets evenly, you need to mark the mounting points on the wall. In these places you need to drill shallow holes.
- Before installing the outlet, you must connect the electrical cable to it.
- To fix the product, you need to attach the flat part to the wall and secure it with clamps. Then you should install the outer part of the device and check the integrity of the structure.
Important! Before installing sockets, do not forget to turn off the power to the rooms.
Retro sockets for open wiring
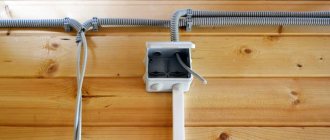
Distribution boxes
Distribution (soldering) boxes are designed for connecting cables. With the help of correctly selected installation elements, the number of wires can be optimized.
The design requirements for boxes are the same as for sockets and switches. The main thing is that they fit into the concept and look aesthetically pleasing.
Element dimensions vary depending on manufacturers and models. Average indicators: height - 35-60 mm, diameter - 70-90 mm.
Junction box for vintage wiring
Insulators
To fix the wires, you need overhead elements that separate the wire from the wall. Most often, designers use plastic or porcelain insulators. The first ones do not look so attractive, but they last a long time.
Porcelain products are highly fragile, but look truly vintage. If you choose them, try to be careful when installing.
A bold and unusual option is insulators stylized to look like cartridges. They are made from painted polymers, aluminum, brass or copper. Such products also act as a switch - the design includes a rotating mechanism.
There are insulators on sale in different colors and sizes. Choose an option based on the appearance and shade of the cables.
| Material | Form | Height | Diameter | Color |
| Metal, ceramics, porcelain | With a narrow top part - for a cable with 2 cores, with a wide top - for 3-core wires. | 18-24 mm | 18-22 mm | White, ivory, black, brown and other shades in stock. |
Ceramic insulators for vintage wiring
Advantages and disadvantages
Retro-style wiring in a wooden house attracts with the following advantages characteristic of open installation:
- looks very impressive and attracts attention with its unusual design and original appearance;
- has good maintainability; when wires are broken or destroyed, they are easily detected by a thorough visual inspection;
- you can easily and quickly eliminate faults in other electrical wiring elements that are not hidden in the thickness of the walls (in junction boxes).
The disadvantages of this type of gasket include the same openness, which in certain conditions turns out to be dangerous. If it is accidentally cut or broken, the phase wire may be exposed, creating a threat of electric shock to everyone around.
If parts of the conductors fail, it is not at all easy to find ones that are similar in color and texture (in this situation, you have to replace the entire wiring) - unnecessary labor costs and unjustified costs. Added to the disadvantages is the high cost of components.
conclusions
Country wiring is rightfully considered one of the original and beautiful types of solutions in a wooden house. A wide range of colors and a variety of components can create a cozy, ancient atmosphere in your home. To be convinced of this, look at the photo of finished retro wiring in wooden houses.
- Wire connector: instructions on how to make the connection yourself. Instructions for use of clamp, clamp and lugs
- Wire lugs: instructions on how to select and install a lug. Overview of all types, photos, instructions, diagrams
Heat shrink for wires: all types and characteristics. Detailed description of how to choose and use heat shrink
Installation rules
Before starting work, prepare the following tools:
- Pliers, wire cutters.
- Device for cutting and stripping wires.
- Roulette, level.
- Screwdriver Set.
- Drill, drill bits.
- Stepladder.
And now a little step-by-step instructions for installing retro wiring:
- First of all, we determine the location of lighting fixtures and sockets.
- Next, you need to draw a diagram for connecting all electrical installation products.
- We mark the walls where the cable will run. For greater accuracy, it would be a good idea to use a laser level.
- We install mounting boxes in the required places.
- We install sockets, switches, lighting fixtures.
- We fasten the insulators according to the markings using self-tapping screws. If the walls are concrete or brick, you will have to drill holes for the dowels. It should be taken into account that the rollers are installed at a distance of at least 5 cm from sockets, switches, and boxes.
- We lay the wiring by stringing it onto insulators. For a tighter fit, it is recommended to put on heat-shrinkable tubes and secure with ties. When turning the cable, maintain an angle of 45 degrees. To connect the wires in the wiring boxes, we use a terminal block, no twists!
- We connect all the devices and turn on the lights.
Basic rules for wiring installation
To install outdoor wiring in a retro style, you must adhere to the following requirements:
- The distance from the socket (switch) to the window or door slope must be at least 100 mm.
- The distance from the wiring line to the water supply and gas pipelines is at least 500 mm.
- The distance between installed insulators is 700-800 mm. The last insulator is installed at a distance of 500 mm or less from the socket or switch. If the installation is carried out in a wooden house made of timber, the distance between the insulators may be less than 500 mm.
- A laser level will help you position the insulators beautifully in a straight line.
- The wires in the junction boxes are connected by soldering. You can choose distribution boxes with terminals. Twisting of wires is not allowed.
- Sagging of cables between attachment points is also not allowed. The optimal distance from the wire to the wall is 10 mm.
In general, installation of a structure requires a significant amount of time and attention to detail.
The wiring can be top or bottom. There are no strict rules in this matter. The lower option helps to save a little on material consumption. However, the lower wiring, unlike the upper, is more susceptible to mechanical damage.
Creating a diagram and installing electrical wiring
Laying wiring in the house begins with drawing up a diagram of the placement of electrical circuit elements.
It is necessary to coordinate the plan with Gosenergonadzor - if there are no comments, the organization will provide permission to connect to the power grid within 5 days.
When creating a drawing, consider a number of nuances:
- The distribution board is mounted in the hallway, at a height of 1.5 m.
- SNiPs and PUE do not impose requirements for the location of sockets and switches - proceed based on the characteristics of the arrangement of furniture and household appliances.
- The wire line is laid along the top or bottom of the wall at a distance of 20 cm from the ceiling/floor, respectively. Ceiling installation is acceptable.
- The wires are laid strictly vertically or horizontally. The turns of the route are at right angles.
Based on the compiled and approved markings, components are calculated.
Laying lines across rooms
There are three ways to make open wiring indoors:
- Cable laying in channels: cable channels protect wires from physical damage, prevent the possibility of fire in the home during a short circuit, and are easy to install. Correctly selected channels are appropriate in a retro style (for example, products stylized as “wood”).
- Laying on rollers: the essence of the technology is to fix ceramic barrels on the walls that hold the line.
- Fastening with staples is a cheap, but decoratively unattractive option. It is assumed that the route will be laid with the cables secured with special brackets, which do not always fit into the interior.
At the points where the cores are connected and the lines are distributed to sockets and switches, branch boxes are installed. To connect lines of open retro wiring, vags, sizas, and sleeves are used. Simpler methods are allowed - welding, soldering or “twisting” wires.
After wiring the route, we begin installing sockets and switches. For retro wiring, special overhead sockets are suitable, which are not recessed into the wall, but are mounted on top.
Retro outdoor wiring methods
When installing open wiring, it is important to combine aesthetics and safety. The first thing you need to think about is how you will fix the cables to the walls. We offer three options:
- Fastening with staples: the most budget option, which is not suitable for all interior styles. The cables are fixed to the wall using metal or plastic elements. The staples do not have a variety of designs, so they do not add aesthetic appeal.
- Laying in channels: the safest option. The cables are laid in narrow grooves, which are designed to protect the wires from mechanical damage. You can choose metal channels with an artificially aged surface or parts stylized as wood.
- Roller gasket: the most effective fixation technology. The line of wires is held in place by miniature ceramic elements that look like barrels.
Important! Vintage wires can run on the ceiling, walls, along baseboards. In the third case, it is better to lay cables in channels.
If you choose a spacer on rollers, consider how many elements are needed for reliable fixation. Calculate at what distance to place insulators on retro wiring. The optimal pitch for installing “barrels” is 40-50 cm.
Retro cable with brackets in open wiring
Retro cable with rollers in open wiring
How to save on components for retro wiring?
Exposed retro wiring is not a cheap pleasure. Simple recommendations will help reduce the work budget without compromising the operational characteristics of the route.
The mixed type of installation not only saves money, but also allows you to connect more powerful devices. To do this, partially use copper wires in some places - mostly inaccessible to the eye. The line is hidden under the floor, baseboard or in ceilings, raising/lowering the joints of twisted and traditional cables using a junction box.
50% of the costs come from the purchase of special twisted cables. Decorative elements can be made independently from copper wire:
- Type RGKM - multi-core cable with a rubber sheath and fiberglass braid, withstands heating up to +180°C;
- Type BPVL - wires in a PVC sheath with a thread braid, available in different colors.
Shielding braid - brands and materials
Depending on the nature of the interference and the operating conditions of the cable, the metal shielding braid for the cable is available in various designs. Some of them:
• PML copper braiding, tinned with POS-40 tin-lead solder for temperate climates (PML UZ) and tin for tropical climates (PML T2);
• PMLOO made of copper wire tinned with tin;
• PMVLOS made of copper, silver-plated wire;
• PMLON made of nickel-plated copper wire;
• PBAMO made of bimetallic Al-Cu (aluminum-copper) wire coated with tin;
• PBAMS made of Al-Cu (aluminum-copper) bimetallic wire coated with silver;
• PBAMN made of Al-Cu (aluminum-copper) bimetallic wire with nickel coating.
When using braided cables, please note that:
• such protection requires more space in the housing compared to conventional wires;
• the braid must be connected to the body to create a shielding effect;
• installation of shielded wires is more difficult than unprotected ones.
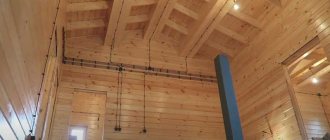
Antique electrical wiring in a wooden house
So, as was written in the article “Electrical wiring in a frame house from A to Z,” in wooden houses the best safety solution would be open wiring. If we are considering a house made of logs, then it will not be possible to apply the cable channel neatly along the walls and we need to look for another method. It is in this case that retro wiring installation is most in demand.
The wire manufacturer provides different colors. There is a whole field for creativity in the design of such premises. You can combine light twisted wire with dark mechanisms and vice versa.
Components necessary for laying antique wiring
What antique electrical wires exist:
- Power for powering sockets and lights, 2 and 3 wires;
- UTP for Internet sockets;
- Coaxial cable for TV sockets;
- Combined UTP and coaxial in one (very convenient - not available from all manufacturers).
For wire installation, there are plastic or ceramic insulators of different colors to choose from. The number of insulators can be calculated as 3.5 insulators per linear meter of wire.
Kit for electrical wiring in a wooden house
This value is derived from practice. So, to fasten a twisted wire, it is necessary to place insulators through a log or two. However, it is also necessary to install insulators at the junction box and the mechanism itself. If the house is made of timber, then the distance between adjacent insulators should be no more than 400-450 mm.
Also, to install antique wiring, you need to stock up on:
- Thin but durable nylon ties match the color of the wire or transparent, for fixing the twisted wire on the terminal insulators, as well as in the mechanisms themselves.
- WAGO 221 series terminals with the number of outputs 2, 3 and 5 will be required for switching in distribution boxes. Using the 222 series will be inconvenient due to its large size. NShVI lugs for crimping the ends of conductors for good contact.
- You will also need self-tapping screws: nickel-plated or galvanized, 45 mm long. Don't forget to take a bit with the appropriate shank for the screws.
Retro wiring in the interior
In general, to make open wiring look good, you have to put a lot of effort into it. After all, everything is in plain sight, all the flaws are obvious. If retro wiring is done in a wooden house, then each incorrectly screwed screw leaves a trace that is difficult to disguise. Therefore, before starting work, draw everything on the plan, transfer all the markings to the walls and only then start. If you are not sure whether you have placed the sockets/switches correctly, or whether they will look good in this particular place, try securing the cord under the ceiling (either with masking tape or with very thin nails). This way it will be more likely to imagine how everything will look together.
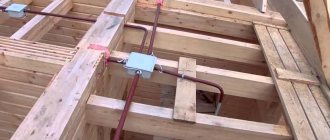
Combined option - with or without pipes
One more moment. If the wooden house is still “settling”, tighten the wires. If the log house has already settled or is made of laminated veneer lumber and shrinkage is not expected, it is better not to stretch the wires. They should not sag, but they cannot be too tight either. In general, good luck! And for inspiration, here are a few photos of how you can make retro wiring.
Photos of interiors
It is always better to look at several already “finished” premises. This makes it easier to understand what exactly you like and what you don’t, and to get a preliminary idea of how everything might look.
An example of wiring from below - the cable goes under the finished floor in a metal box, only twisted cords rise along the walls to the place where sockets and switches are installed. The color of the socket box can be contrasting with the wall, but it should also be present in other interior details
They also look good on wallpaper, so retro wiring can be done in the apartment, but the style must match…. This is an option with plastic wiring boxes and switches. Retro wiring can be done in pipes. They contain a regular cable
This is what retro pipe wiring looks like in the interior. How you can organize a double socket in a narrow partition between the windows. In the kitchen, retro-style wiring also looks quite organic
Collections of sockets/switches in retro style
Often, a specific item can inspire the idea of decorating an entire room. If we are talking about special electrical installation products in a retro style, then such a thing could even be a socket or switch. We will post some collections and interesting models from different manufacturers below. They are different in design, perhaps you will like something.
The most popular model of retro switches is the so-called butterfly. The Russian company Gusev produces painted porcelain sockets/switches. These are their electrics in white with brass elements
Another well-established company is Salvador. These are their interesting double sockets
The painting still looks good, but it requires the style to match
These porcelain switches are well known from Legrand. The style is completely different. There are others like that. They will be more combined with modern or retro style. And this is an option. It seems that it can even be included in the classics
Retro electrical wiring in a wooden house: pros and cons
Disadvantages of using retro wiring:
#1 - Due to the fact that the wires are laid openly and have a coating good enough to collect dirt, they become rubbed over time. Whether you like it or not, in places where there is constant contact with your hands (near switches), the wires will eventually take on a dirty tint.
From this point we can conclude that using light-colored wires is worse than dark ones. The chocolate color of the wiring on a light log looks much better than in color. And if the wire is completely white, I announced the price with a factor of 1.5 for installing a white wire. Just imagine that every ten minutes of installation work you need to go and wash your hands with soap. The gloves alone took three packs. The slightest dirt on your hands is literally rubbed into the wire and it is almost impossible to clean it to its original state. If this is not done, the wire will be worn out before commissioning.
#2 - Wires stretch over time. Even if you tighten the wire so that you can play it like a balalaika, it will loosen over time. This is especially evident when the house has not “settled” properly.
Pros and cons of retro wiring
The main advantage of vintage wiring is its aesthetic appeal. However, there are other reasons to choose this scheme:
- Easy access to wiring: in the event of a malfunction, repairs are easy.
- Versatility: the solution is suitable for any interior style.
- Easy installation: to lay wires, you do not need to open the wall cladding or install protective corrugations and boxes.
An open system also has its downsides. Let's highlight three main ones:
- High price: installing retro wiring throughout the house will not be cheap. To reduce your spending budget, you can run outdoor cables only where they will be visible.
- Inability to connect powerful devices: “antique” wiring serves more of a decorative function, and therefore has a small cross-section of cores.
- Probability of rapid contamination: dust accumulates in twisted cables, which spoils the appearance of the wires.
It is important to understand that even the slightest mistake in organizing vintage wiring will immediately catch your eye. Therefore, before starting work, weigh the pros and cons, prepare high-quality materials, and draw up a competent diagram.
Vintage wiring in the interior of the house
Advice! It is better to avoid installing external wiring if there are children in the house.
Savings on mixed installation type
When laying industrial wiring lines, it is possible to use a series connection scheme for loads (sockets and lighting fixtures) or their parallel connection. But for domestic conditions, a mixed scheme will be more convenient and economical, in which some of the lines are included in parallel groups, and then they are all connected in a serial chain.
Using a combined or mixed method of connecting individual lines allows you to save on the total length of wires and ensures the convenience of connecting sockets and switches. In addition, the wiring itself takes on a neat and strict appearance.
Metal braiding and its types
However, there are designs and situations where the use of such screens is impossible or impractical. In this case, a metal braid is used (shielding braid). It reduces the energy of electromagnetic waves by reflecting energy or absorbing energy by a conductive medium. The material from which it is made must provide the maximum possible protection and reduce interference generated by the electromagnetic field. The type of material in this case is selected depending on the nature of the interference field - magnetic or electrical.
Safety precautions
According to the instructions, the step-by-step wiring plan should take into account the safety of its operation and maintainability.
When choosing the type of wires and the conditions for their installation, you need to worry about the following:
- decorative conductors must have double insulation, which reliably protects people from electric shock;
- when wiring them through walls and ceilings, it is necessary to use sections of corrugated or metal pipes;
- the height should be sufficient so that children cannot reach the wires;
- at this level it is undesirable to locate equipment and objects that pose a danger to electrical wiring;
- It is unacceptable to carry out any work near it that is dangerous from the point of view of damaging the wires.
The provisions of the PUE also stipulate the operating conditions for electrical wiring inside a wooden house, which mainly concerns elevated temperatures and humidity. When laying wires in the bathroom, it is advisable to place them in a cable duct or corrugated pipe (this should be done even at the expense of decorativeness).