Video intercoms make you feel relatively safe, as they allow you to see in advance who exactly came to you. However, there are quite a few different models on the market, so it can be difficult for a beginner to figure out the optimal model for installation in a private home. This article contains a detailed description of the models and recommendations for choosing the best one.
How the device works
It is quite possible to connect an intercom with your own hands in a private house, since all models have a similar operating principle. The doors are opened using a special key or key fob, which must be attached to the reader. As for guests, in order for the door to open, they must dial the number of the required apartment on the keypad. When connecting an intercom in a private house, you do not need to dial the apartment number. In this case, there is only a call button.
The signal from the call unit is sent to the controller, and the reader or video camera transmits the broadcast to the monitor, which is located inside the house. Thus, the owner sees who has arrived and, by picking up the handset with the door opening button, can let the guest in.
Details on how to clean soot from a boiler at home: step-by-step instructions.
How to install water pipes in a private house with your own hands - details here.
Leningrad heating system: connection diagram, pros and cons. https://klimatlab.com/otoplenie/sistema/leningradskaya-skhema.html
When the device is in standby mode, the monitor is on and the lock is locked. By picking up the phone, you can conduct a dialogue with the guest. The lock opens only when you press the corresponding button.
Typical intercom connection diagrams
Below we present several typical intercom connection diagrams. But first, we note that to independently connect an access control system, you must have at least a little knowledge of electrical engineering. Blindly copying standard diagrams can lead to equipment damage.
Advice! Before installing any component, carefully read the instructions supplied by the manufacturer.
One of the options for connecting an audio intercom handset with a calling device and an electromechanical lock is as follows:
Note! In this variant, a normally open lock control contact is integrated into the speaking handset.
The output voltage and power of the power supply must correspond to the parameters of the lock.
The following figure shows a video intercom connection diagram in which the lock control contact is built into the calling panel.
To place the lock's power supply, space is required; a 220V cable must be laid to it. To get rid of these problems, instead of a power supply, they often install a BUZ, which was described above. The following figure shows a diagram with a lock control unit.
The BUZ has small dimensions, and many installers place the energy storage device inside the lock.
Attention! The above circuit will work correctly only if the supply voltage of the calling unit matches the supply voltage of the lock.
Finally, here is a diagram for connecting an intercom with an electronic key reader and an electromagnetic lock control controller.
Types of intercoms
There are two types of video intercoms:
- Analog.
- Digital.
In turn, IP intercoms for a private home can be
- wired,
- wireless.
In the latter case, the Wi-Fi signal is used. There are many requirements for technology and access point for the system to work stably.
A wireless intercom for a private home is ideal if there is no interference. Otherwise, the signal may be unstable, resulting in the system not working correctly.
To get the best picture, it is recommended to choose a digital street intercom.
Analogue models can handle basic tasks, but the image quality is not very good. There are also various interferences. To get the best picture even at a relatively long distance, it is recommended to choose a digital street intercom for a private home.
Main types and manufacturers
Based on their functionality, intercom systems can be divided into two main types:
- audio intercoms;
- video intercoms.
Audio intercoms allow you to identify a visitor by voice. Owners of video intercoms can make identification both by voice and visually. In addition, many intercom systems with video cameras can perform the function of a video recorder, recording video information on internal or external media. Oddly enough, the connection diagrams of the listed access control systems differ only slightly. The main difference in installing video intercoms is the need to transmit a video signal. To do this, you need to lay two additional wires between the calling device and the intercom.
It should be noted that intercom manufacturers offer devices in which communication between individual elements of the intercom system is carried out via radio or via the Internet. Such systems do not require laying long wires, but additional communication modules significantly increase the cost of the access control system.
What is included in the intercom system kit
It is most profitable to buy an intercom for a private home as a set, since there is incompatibility between different brands. Here are the main components that should be present in any system:
- monitor ;
- calling panel with a built-in video camera (sometimes an calling panel and a video surveillance camera connected to this system are installed);
- controlled electromagnetic lock ;
- cable, connectors, PW screws and more.
When using a wireless system, you will need equipment that supports a Wi-Fi signal and an access point. For an intercom in a private home, the price may vary, depending on the brand and the availability of additional functions. These include:
- face recognition , thanks to which the door will open automatically,
- license plate recognition for garage door opening,
- voice control and much more.
All these functions are available using professional software.
How to choose the right video intercom for an apartment, useful recommendations
It is worth clarifying the list of tasks to be solved.
Using electronics with a large screen only for opening doors is hardly advisable. The figure illustrates the expanded user options when connecting multiple cameras:
- The first one performs the typical functions of a video intercom for an apartment.
- The second can be installed in the entrance to control the area near the elevator and landing.
- The third will allow you to look after your own car in an off-street parking lot.
- The fourth is installed for video recording in the desired location in the apartment.
Make a list of personal needs. So, in some cases, a mobile video intercom receiver for an apartment is needed, which is installed promptly in a place convenient for the user.
Overview of the main functions of video intercoms with connection to an entrance intercom
It is easier to prepare a list of criteria after carefully studying well-equipped equipment. Below are the features of modern video intercom systems for apartments:
- A large, high-resolution color screen makes it easy to identify visitors. We must not forget that high-quality large images are convenient for working with menus and selecting settings.
- Some models are equipped with touch panels. This design simplifies the handling of equipment.
- A video intercom for IP category apartments can be connected not only to the call panel wirelessly. Such equipment is suitable for connection to other network components and smart home systems.
- Taking into account their own plans, they check the possibility of connecting: video cameras, additional monitors, several call units, security alarm sensors.
- It is necessary to make sure that the technology is suitable for a certain range of relative positions of individual components. At a minimum, it is necessary to match the distance to the call panel.
- For large real estate properties, the possibility of intercom will be convenient: communication through different handsets (video intercoms).
- Built-in storage units are used for control recording of audio and video materials. It will be useful to expand the basic capabilities using SD and other standard memory cards.
- Some models have a speakerphone function.
- Picture-in-Picture mode is used to simultaneously view images from multiple cameras.
The dimensions and aesthetic parameters of a video intercom for an apartment are selected taking into account personal preferences
Important! It is imperative to check the permissible operating temperature range and its compliance with the operating mode.
What to look for when choosing an intercom
Intercoms with video surveillance for a private home must be selected by characteristics, and not by price. The cost varies from 5 thousand rubles to several tens. The simplest one is analog, which only has the function of opening doors. The image quality is 420 TV lines. In terms of pixels, this is less than 0.1 megapixels. If you only need the door opening function, then it will do just fine. The design of an intercom in a private house will depend on where its components are planned to be placed. The farther they are from each other, the more money you will have to spend on cable.
If the camera is located high, then you should pay attention to IP models . They allow you to view the guest from a great distance. In addition, they have additional functions that are unlocked with the purchase of professional software. You shouldn’t chase megapixels: a 1-2 megapixel camera will be quite enough.
Intercoms with video surveillance for a private home must be selected by characteristics, and not by price.
Calling panels are also different:
- street,
- internal,
- anti-vandal.
If an intercom is attached to the gate of a private house, then it is better to buy an outdoor anti-vandal one . He has:
- water protection,
- dust protection,
- protection against hypothermia,
- it will be difficult to break.
To accurately select the optimal model, you should trust the professionals. It is better to describe the terms of reference to the installers and indicate the budget. They will select all the necessary equipment and offer the most affordable prices.
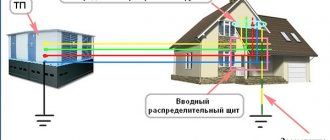
Connection in a private house
Installing an intercom in a private home is not a very simple task, but also not a particularly difficult task. If you have at least a little skill in working with electrical equipment, a minimum level of proficiency in construction equipment, everything will work out. An intercom for a private home is not a very complicated thing and connecting it is a little more complicated than connecting a regular electric bell.
This is an intercom with electric lock and remote control
Selection of wire and its cross-section
The intercom calling panel and lock are usually located on the gate, and the handset or control panel is in the house. They are connected using a cable, and the type of cable depends on the distance at which these devices are located from each other:
- up to 15 meters you can use any cable - twisted pair (preferably shielded), KSPV, SHVEV, KVK - core cross-section 0.5 mm²;
- from 15 to 50 m - KVK with a core cross-section of 0.75 mm²;
- from 50 m to 100 m, manufacturers do not guarantee the operation of video intercoms, but you can try using power cables with a core cross-section of 1.5 mm² or an RG-6 cable or coaxial cable with a core of at least 1.5 mm².
The choice of cable type depends on the distance between the gate and the installation location of the main unit (tube)
The number of wires in cables and cords depends on the type of intercom being connected. For those that transmit only speech, a two-wire cable is enough (if you conduct grounding separately), for video intercoms you need four wires (some models require five wires, but this is rare).
How food is supplied
A few words about how power can be supplied to all elements of the system. The intercom handset, or home intercom, is usually powered by a 220 V network and most models have a cord with a plug. That is, this part can simply be connected to the nearest outlet.
If you don’t like the option with hanging wires, lead the cable (power, cross-section 0.33 mm² or larger) from the panel to the installation site of the intercom handset. Then, having removed the back panel, remove the power cord, and connect the extended cable to the free terminals.
But there may be options regarding how power is supplied to the ringing device and the electric lock:
- Power comes from the tube. In this case, the main intercom unit has a built-in converter, which converts the 220 V mains voltage into 12 V and supplies it to the calling device. In this case, a two-pair cable and, better yet, a power cable are laid between these two devices.
If power to the ringing device is supplied from the indoor unit, a four-wire cable is required
- From an internal 12 V power source (a set of batteries or an accumulator). This option is better from the point of view of electrical safety, but you will have to constantly monitor so that the batteries do not run out. In cold weather they can fail very quickly. The power source itself can be located: inside the calling device;
- inside the castle.
There is also such an option
The option with batteries and rechargeable batteries looks more attractive. But at low temperatures, batteries literally “fly”. This problem is so urgent that somewhere nearby they make an insulated pit in which they hide a battery of considerable capacity, and wires are pulled from it to the calling panel.
How to lay connection cables
Installing an intercom in a private house is impossible without laying cables. Wireless devices have not yet been invented, although there are already models that can be controlled via a GPS set-top box. But now we will talk about installing a regular intercom in a private house - with only audio transmission or also with a video signal.
It is much more convenient if the cables along the area - from the house to the gate - are laid in advance. If not, the cable is usually pulled along the path, hidden in a corrugated sleeve and buried to a depth of about 50 cm. In general, there are certain rules for laying electrical cables underground, but in this case, it is not the power supply that carries the wires, but signal currents, and they are not dangerous to humans . The only danger is damaging the wires when digging up the area. If there is such a danger, place the intercom cable in a protective sleeve and place warning tape or something rigid on top to remind you that there is a cable underneath.
When installing an intercom in a private house, you have to run the wires underground and along poles
To ringing device
The calling device is usually placed on a pole next to the gate. It is ideal if during the laying of the pillars the possibility of pulling the cable is provided (the embedded pipe is laid) or the cable itself is laid. The second option is worse, since if the cable is damaged it will be difficult to replace. If not, it is better to route the cable not from above, but by drilling a through hole and inserting a pipe into it. Then we will stretch the wire through it, and mount the calling panel so that it covers the exit hole. Then installing an intercom in a private house will be the most reliable: the wires are more difficult to reach.
This is what it looks like, only the lock is placed from the inside
If for some reason it is not possible to make a through hole, you can try to open the seam in the stone pillars (deepen it), hide the cable there, and then cover it up again. A hole is made in metal poles much larger than the cable, ground until smooth, painted, painted (so as not to start rusting), and the cable is passed through the hole. The second hole is made at the level where the wire needs to be brought out. You can pull it through using a wire hook, but you must be careful not to damage the shell.
If all these methods are not suitable, you will have to pull the cable from above, through the top of the pole, to the installation site of the calling device. To at least somehow protect the wires, they use cable channels (if aesthetics are not so important, you can hide the wires in a metal pipe).
To the castle
Installing an intercom in a private house also involves installing an electric lock and connecting it to a control device (a calling device or the main unit, depending on the model).
The counter part of the lock is also placed on a post or on the frame of the gate, which is attached to this post. Sometimes you need to draw food to it, sometimes you don’t. It depends on the type of lock (electric ones are necessary, electro-mechanical ones are not). If power is needed, make it less noticeable to reduce the likelihood of vandalism or disconnection.
Installing an intercom in a private house: supplying power to the lock
Power is supplied to the second part of the lock from the hinge side. In this case, a flexible connection must be made at the top of the gate. To protect the cable, it is hidden in a corrugated sleeve and it is better if it is plastic (there is less chance that the edges will fray the insulation). When installing the cable, it is run along the second post to the very top of the gate, where they make a loop of such a height that even with the gate fully open, the cable is not stretched, but there is some slack.
The second option is to bring the cord to a certain height along the pole and secure a flexible connection there. This is a spring bent in the form of an arc. A cable is passed into this spring, and its second part is attached to the gate leaf. This way the cable is protected and does not fray.
Audio intercom connection diagrams
First, let's look at the simplest intercom - audio. There is a scheme in which the main node in the intercom is the calling device. A cable goes from it to the unit, which is installed in the house, as well as to the lock.
The simplest do-it-yourself intercom connection diagram
Most often, the installation of an intercom in a private home is implemented on devices in which the calling unit is powered by a separate 12 V power source and it also controls the lock. Then one two-wire signal cable runs from the home unit to the calling unit. A power cable (for example, VVG) is laid between the calling unit and the electric lock, since it supplies power from one device to another (12 V from batteries or accumulator). The minimum cross-section of this cable is 0.33 mm² and it is better if it is in a protective sheath.
Powered by a separate source
If the ringing device and electric lock are powered from a separate power supply (220 V to 12 V converter), the intercom connection diagram looks a little different. A two-pair signal cable is laid between the main unit and the calling panel (KVK 2-0.75 cable is selected in the figure). The phase goes to the electric lock through the calling panel. And power is supplied to it (it opens) only when a signal comes from the control panel. Pay attention to the cross-section of the wires - 1.5 mm² and this is a power cable (VVG is possible). At such a voltage, such a cross-section is redundant, but more is better than less.
Electrical diagram for connecting an audio intercom
If there is a battery instead of a converter, only the part that goes from the power supply to the 220 V network leaves the circuit. Everything else remains unchanged.
Powered by main unit
There are also models in which power to the lock and ringing device is supplied from the main unit. It contains a 220/12 V converter, and 12 V power is supplied to those devices that are located outside. In this case, the connection occurs according to a different scheme (in the figure below).
How to connect an intercom if power is supplied from the main unit
The last option is the most expensive in terms of cable consumption - you will have to run two separate lines from the main unit - one to the calling panel, the second to the lock. But this scheme is more reliable. If, for example, the cable is damaged or the calling panel fails, you will be able to open the gate from home by a mobile phone call, for example. The previous schemes do not provide such an opportunity. If something goes wrong, you will have to go to the gate and force it open.
Connecting a video intercom
When connecting a video intercom, only the number of conductors in the cable changes. There should be two more of them - a separate pair is allocated for video signal transmission. It’s even better if a second cable is installed for video transmission - coaxial.
Connection diagram for a video intercom for a private home
They can be laid at the same time, but coaxial bends worse. But it has less signal attenuation. You can also use twisted pair, but take not a regular one, but a shielded one, where each conductor and each pair has its own shield. This will improve the quality of the video signal at the reception: it will be possible to see with greater clarity who exactly visited you.
Sequence of work during installation
Everything happens standardly and in a certain sequence. To correctly install an intercom with a lock for a private home, you must adhere to this algorithm:
- installation of calling panel . To do this, you will need to select a location and disassemble the panel. Next, holes are drilled to which it will be attached. The wire is inserted from the reverse side, and all connections are placed in the mounting box so that moisture does not get on them. When the work is completed, you need to return the cover to its place.
- The tube installation takes place in the house. It is attached in the same way as the calling panel. Next to it there should be a 220V for the power plant.
- Connecting the power supply .
- Cable laying and sealing.
- Key programming .
- Checking the system for functionality.
If it is dark around the house at night, it is also recommended to install a floodlight so that guests can be seen at night.
If it is dark around the house at night, it is also recommended to install a floodlight so that guests can be seen at night. Most models allow recording to the built-in memory. To keep the archive longer, you can set motion detection recording. However, this function is not available in all video intercoms.
Design
There are various intercom models available in the market. The simplest are analog systems . The advantage of this solution is the relatively low installation cost. However, due to the large number of cables, they are especially recommended for installation in single-family houses , where there is usually one uniphone (earphone).
Their disadvantage is low comfort of use and interruption of operation when the phone is not installed correctly. This is why most interested in the idea of logging into a phone decide on a digital system. It consists of a central unit and microphones equipped with decoders that display the access code that opens the gate or door.
The digital system can be connected to the telephone system and monitoring. There are also mixed systems - analog-digital, in which uniphones are connected to a digital intercom. The door can be opened using a code or code card.
Radio controlled systems
The most convenient are radio-controlled systems . Their big advantage is the ability to open the door using a special remote control from any part of the house, the range is 400 m , it is possible to use several headphones to control the entrance.
Videophone is a special version of intercoms, additionally equipped with a camera. Apart from listening, a person can also monitor the caller. The camera is located in a cassette board, and a special monitor is installed in the uniphone. After pressing the button on the door station, the camera automatically turns on. An additional feature of the videophone is the ability to record images away from home.
Basic elements
video intercom calling panel
uniphone - telephone - it looks like a telephone, but does not have a dial; uniphone allows you to contact the person at the door or gate; has a button to open the electric lock;
intercom - it is installed outside the house at the entrance or fence; has the buttons or business cards needed to call the right person; There is a loudspeaker and microphone inside the cassette; you can insert the cassette by placing it in the wall or on the wall; it is usually made of aluminum, steel or brass;
power supply for the input telephone - it connects all elements of the system; supply voltage 12 V;
cassette with an electronic system - the amplifier is responsible for the appropriate voice volume, the acoustic generator activates the electromagnetic lock when the call button is pressed;
electric lock (electric drive) – placed in the door frame or gate;
wires – connecting elements of the intercom; ducts must be properly insulated and have an appropriate cross-section; telemechanical or telecommunications cables are most suitable for this purpose.
Prices for devices and installation
Today, pricing takes into account:
- what brand,
- how many years is the warranty,
- what functions are supported,
- what volume of production is needed.
Wholesalers are provided with more attractive terms of cooperation. You can buy an intercom for a private house with an electromechanical lock at a retail price of 3,000 rubles . Installation and configuration will cost, depending on the organization, from 1,500 rubles .
Basic requirements for a chimney for a gas boiler: norms and rules
Everything about connecting to the city water supply network in a private house: documentation, work, prices, sample documents.
Additionally you may need:
- professional software for connecting advanced functions,
- visor for calling panel,
- memory card,
- case adapter.
All this can be purchased from specialists when ordering installation of an intercom in a private house.
New features and capabilities of new products
The presence of real time, a calendar, and the “Hands Free” function connected in parallel with the control tube is no longer a novelty. Now considered more relevant:
- A large screen with a high-quality image received not only from the intercom camera, but also an additional one, camouflaged from an intruder somewhere on the roof of the house, away from the entrance, in order to see not only your own territory, but also the territory adjacent to the fence.
- Several options for opening doors - a wireless tablet with autonomous power supply, a base unit in the form of a handset that can be moved around the house.
- Glossy or matte finish of the monitor, its large size - the ability to obtain a sufficiently clear and high-quality image. For those who have elderly people or people with poor vision living in their home, the size of the monitor is sometimes of fundamental importance.
- Vandal-proof external panel, which provides reliable protection from damage by possible factors - dust, weather conditions, intruders, and infrared illumination, which allows you to see the face of someone standing at the calling panel at night.
After the listed advantages, you can think not about how to install the necessary device, but which one to choose. But here each owner may have his own criteria.