Despite the pursuit of modern technologies, in recent years some industries have returned to their roots. The most striking example is the construction sector: people much more often give preference to the construction of country wooden houses. This is facilitated by a number of reasons, ranging from lightness and efficiency to the environmental friendliness of the final product.
Wood is a natural anti-allergenic material. Thanks to the latest innovations, 100% natural substances are used in the construction of such buildings. Wood has its drawbacks, and the main one is the increased level of fire danger. Therefore, wiring in a wooden house must comply with all recommendations, installation and operation rules. And it doesn’t matter whether you lay it yourself or turn to professional specialists for help.
Advantages of hidden wiring
When installing electrical wiring, many people choose a hidden installation option that does not spoil the interior design of the room.
The advantages of the method are obvious:
- There are no cable channels on the walls that are conspicuous and interfere with wallpapering the surface.
- Low risk of fire if the rules of the Electrical Installation Regulations are strictly followed during the hidden installation process.
- Ease of cable replacement if it is laid in a corrugated pipe.
- Low risk of mechanical damage due to installation of the product in concrete, metal products or a plaster layer.
- Safety for the residents of the house, because the wires are hidden from view and access to them is limited.
- There are no difficulties when performing finishing work, because the cable is located inside the finishing.
- There are no negative environmental impacts.
These reasons are enough to give preference to hidden wiring when arranging an electrical network in a wooden house.
What not to do, installation rules according to the PUE
Some “specialists” take on the installation of hidden wiring without sufficient knowledge and, accordingly, without taking into account the requirements of the PUE.
A common mistake that is made during work is installing a wire on a wooden surface and then covering it with wood trim.
The calculation is made on the strength of the wire and its insulation. Such connivance can lead to a fire, because processes occur in wooden recesses that are impossible to predict.
Over the years, cable products are negatively affected by temperature changes, dust, sudden changes in humidity or damage to insulating materials.
Under increased loads, when electrical equipment is turned on in all rooms (heaters, TV, multicooker and other equipment), a large current flows through the wires. As a result, the risk of a short circuit between two adjacent wires increases.
If there is no reflective non-flammable surface near the cable, a wooden building may catch fire even though it is impregnated with a special fire-fighting compound. It is almost impossible to stop the fire.
When choosing a hidden wiring option in a wooden house, you need to take into account the complexity of the process and the importance of meeting the requirements of GOST R (50571.1-2009) and PUE-7.
If you have no experience, it is better not to undertake installation. Invite qualified specialists who know the norms of the mentioned documents and follow the rules. But you don’t need to stay on the sidelines either. Knowledge of the requirements of the PUE and GOST R helps to control the hired electricians.
Features of wire marking
Unfortunately, not all sellers, especially among young people, can clearly answer the buyer’s question about what kind of cable it is, what it is characterized by and what the specific application is. Knowing the definition of the abbreviation, you can independently understand whether the wire you like is suitable for a wooden house or not.
*By position, from left to right.
- 1st - the letter in this place shows what metal the vein is made of. If the letter A is in the first position, then it is aluminum. Copper is not indicated, so it is impossible to confuse it. “A” is not in the abbreviation, which means this wire is presumably suitable.
- 2nd – type (feature) of the wire. Mounting - M (if flexible stranded - MG), flat - P, installation - Sh or Pu.
- 3rd – insulation material. It makes no sense to list all the options. If we take into account the cost of products, then the optimal products for wiring are those whose third position in the abbreviation contains the letters B (or BP) - polyvinyl chloride, P - rubber or NR (the same, but non-flammable rubber goods).
Additional designations
- N – does not support the combustion process. Placed behind the letter indicating the material, in the form of a small letter. For example, VVGn.
- G – the same, but indicates that the insulation does not spread smoke. As a rule, wires are selected in which the braid meets both criteria. Designated VVGng.
- K – protective layer (armor) made of steel braid.
In principle, the information provided is quite enough to select a wire for laying intra-house lines in a wooden building. Those who want to study the issue of categorizing cable products in more depth can be recommended to refer to GOST No. 31947 of 2012 and PUE (7th edition). We described in this article what types of cable channels there are for electrical wiring.
Project preparation
When creating a project for hidden wiring, attention is paid to the fire safety of a wooden house. This is true even to the detriment of appearance deterioration.
The hidden wiring diagram should have a minimum of turns. In this case, contact with wood must be avoided. The cable must be laid in copper and steel pipes. In a PVC corrugation or metal hose, installation under asbestos or plaster is allowed, but according to PEU 7 this is prohibited.
Before starting work, it is necessary to develop a project and coordinate it with the local power supply company (District Electric Networks).
PTS service employees develop technical conditions that apply when performing work. First, the total power of electrical appliances is calculated, and then a wiring diagram is developed.
Algorithm of actions when creating a project:
- Development of a technical plan for a wooden house. The diagram indicates the locations of electrical sockets, lamps, switches and electrical appliances with a separate supply.
- The type of cable is selected for each electrical point. If switches with two buttons and “triple” sockets (with a ground tap) are used, a cable with three cores is connected to them.
- The hidden wiring diagram for a wooden house shows the locations for installing junction boxes. To reduce their number, one distribution box is used for two rooms.
- The power consumption of each receiver is indicated. If the device is equipped with an electric motor, the parameter is indicated taking into account the starting current of the motor.
- Light bulbs, sconces and other lighting equipment are brought into one group, and consumers of higher power into the second. For reliability, both branches are connected to their own circuit breaker with an individual rated current.
- The distance from the installation site of hidden wiring to window and door frames, as well as electrical points to the ceiling or floor is indicated. This information is useful and helps protect the wiring from damage during repairs. Electrical cable turns are carried out only at right angles.
After preparing the circuit, the power consumed by electrical appliances is calculated if they are switched on simultaneously.
The rated load current of the input circuit breaker (the one located at the entrance to the room) is also calculated here.
Fire alarm in a residential building
According to statistics, there are several times fewer fires caused by faulty electrical wiring in the United States than in our country. Although the total number of fires is 1000 people more.
Particularly sad comparisons are observed for deaths due to fires.
This situation may be due to our lack of regulatory requirements for the installation of fire protection systems and detectors in private homes.
If you are building or remodeling a home in America, you are required to install at least one smoke detector in each bedroom and kitchen.
And if your heating is autonomous and not electric, then there is one more carbon monoxide detector in each bedroom.
For any major repair they are required to install sensors connected to each other. That is, if one works, then the alarm signal should be transmitted to the others.
Think about it, how often do you see fire detectors in private homes in our country?
Inspectors mainly check the installation of smoke and fire detectors in public spaces with large crowds of people: dormitories, hospitals, clinics, sports facilities, offices, libraries.
In some regions, when supplying gas to a private house, it may be necessary to install some sensors in separate rooms. Otherwise, gas connection will not be allowed.
However, their further operation and inspection falls entirely on the owner. Many of their sensors run on 9V batteries, and after a year the batteries die. Few people pay attention to this in a timely manner.
In addition, such sensors without a full-fledged system are still a half-measure. When the buzzer is triggered, it will only be heard by the person directly in the room.
Main and input cables, circuit breaker
When choosing a cable for hidden wiring in a wooden house, you need to take into account that it comes in two types - general (runs through the building) and input (to the machine). Let's look at the features for each option.
Basic wiring
The common cable is selected taking into account the loads in the room. When choosing, you need to know the maximum power (current) of the electrical equipment.
So, when using cable products with copper conductors for a cross section of 1.5 mm. sq. rated current is 19 A (for voltage 220 V and 4.1 kV). With a cross section of 2.5 sq. mm. copper wiring can withstand 27 A (5.9 kW).
In rare cases, it may be necessary to install a 4-square wire. In this case, the rated current is 38 A and the power is 8.3 kW. When choosing a cross-section, the rated power of each electrical appliance is taken into account.
The most popular type of cable for hidden wiring is NYM (its features are described above). The advantages are density, ease of installation and the presence of additional insulation, which is important for wooden houses.
The downside is the fear of strong bends, which can lead to damage. When connecting to sockets, cable products with three cores are used, which protects against electric shock. Grounding is also necessary when using powerful floodlights on site.
House wiring diagram
According to current standards, when connecting electricity without a transformer, the power consumption for a private home should not exceed 15 kW. It is found by adding up the power of all electrical appliances that can be turned on at the same time. If the found figure is less than 15 kW, the input circuit breaker is set to 50 A. If the power is greater, another transformer is needed. Its parameters will be indicated to you in the project, since in this case you cannot do without it.
It is necessary to think over the wiring so that it is convenient to use and so that the same consumers are on the same machine
Where to install the input shield, requirements for the housing
Recently, representatives of energy supply organizations have been demanding that meters (and input machines, respectively) be installed on the street. This is done so that it is possible to control consumption even if the owners are not at home. But this requirement is not supported by anything, and, if you wish, you can install everything inside the house. But more often, in order not to argue with the inspectors, the requirements are fulfilled, and a machine and a meter are installed on the street.
Option for building a house power supply diagram
For outdoor installation, the circuit breaker (AZ) and the meter must be in a sealed housing, protected from dust, dirt and moisture. The protection class for installation must be at least IP-55. To make it easier to monitor readings, there should be a window in the door of the electric meter box. For installation inside a wooden house, the requirements are somewhat lower: IP-44, but the housing must be metal.
Organization of entry into the house
After the introductory circuit breaker, an electric meter is installed, then another RCD is installed - for an emergency shutdown of the power supply in the presence of a short circuit, and then the cable is connected to the electrical panel inside the house. The rating of the machine inside the house should be one step lower than that set outside. In this case, if there are problems, the machine in the house will work first and you will not have to climb the wall to the input machine installed there every time.
Electrical wiring diagram in a wooden house with a single-phase connection (220 V)
Single-pole circuit breakers are installed in the panel, to which wires are connected, diverging throughout the premises. They are mounted on DIN rails, their number depends on how many separate “branches” of power supply are required. To find out how many machines should be in your dashboard, count the number of required groups, adding two or three free machines “for development”. These will be the “branches”. Based on the quantity received, select the electrical panel according to its size.
We divide consumers into groups
When planning the electrical wiring diagram in a wooden house, all connection points are divided into separate groups (they are often called consumption groups). For example, all sockets on the ground floor are powered from one machine, a separate device is installed on the lighting fixtures in the house, and another one is installed on the street lighting. If some powerful electrical equipment will be used - a boiler, electric boiler, electric stove, etc. — it is advisable for them to conduct separate power supply branches and install personal automatic machines. Separate protection devices are also installed for power supply to outbuildings (if you do not want to draw separate inputs to them and install a separate meter, but only on the condition that the power of all electrical appliances does not exceed 15 kW).
You can imagine the wiring diagram in a wooden house in this form. This makes it easier to understand what devices and cables you will need. If you add the length of the cables, you can also calculate the footage of cables/wires
From a safety point of view, it is better to make as many separate power branches as possible. This will increase the number of machines and increase the cost of the project, but will reduce the number of potentially dangerous connection points. It is in the places where conductors tap out that problems most often arise: the contacts oxidize, heat up, and then begin to spark. Therefore, it is better to make the number of connections as small as possible.
An example of an electrical wiring diagram drawn on a plan in a wooden house
And, at the last stage, it is advisable to draw a diagram of the electrical distribution throughout the premises on the house plan. In this case, it is easier to draw consumer groups in different colors. This way you can more fully imagine what the electrical wiring diagram in a wooden house will look like, and it will be easier to do it yourself. For example, everything may look like the photo below.
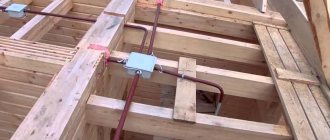
Installation of hidden wiring in a wooden house
Installation of hidden wiring can begin after purchasing the equipment. For the work you will need cable products, AV, switches, sockets and light bulbs (chandeliers).
Distribution boxes are also purchased, which are installed in strict accordance with the specified diagram. When using finishing material, the wires are laid in an armored sleeve.
Subtleties and rules of installation
Unlike external wiring, where it is routed using ceramic rollers or brackets, in the hidden version the cable is hidden in the walls, cable duct or baseboard.
Installation is carried out carefully, because any damage to the insulation is fraught with a short circuit and possible fire. When an arc occurs, the surrounding air heats up to a temperature of 5000 degrees Celsius (this is enough to ignite wood).
The use of plastic corrugations or pipes for installation is unacceptable, because the products do not withstand long-term use and burn out when exposed to high temperatures.
Special wood impregnation does not protect against fire. By the way, steel corrugation does not protect from 5000 degrees, because its walls are small in thickness and are not designed for such heating.
That is why, when installing concealed installations, you need to select equipment that can withstand the high temperatures that occur during a short circuit. If the arc encounters an obstacle on its way, it quickly fades.
A better solution is to make hidden wiring in a wooden house using steel (copper) pipes or ducts. Their peculiarity is the convenience of cutting pieces and the ability to combine using different adapters, soldering or welding equipment.
To increase resistance to rust, the surface of the pipes must be coated with special paint.
You can use copper pipes, which are corrosion-resistant and easy to bend, but they come at a high price.
Rules for installing hidden wiring in a wooden house:
- The cable cannot touch the wooden surface. It is necessary to ensure that every centimeter of wiring is in special protection (a metal pipe or box).
- To install the tube into the wall, you need to make a groove, holes for fastening, or cut out a recess for wiring. To carry out such work will require skill and perseverance.
- Vertical channels are drilled when installing the crowns of the log house. Horizontal laying is done after the walls are installed.
- To pull the cable, a conductor (thin wire) is laid inside the pipe.
- Places of installation and transitions between rooms are insulated using additional elements (asbestos, alabaster, sleeves, metal boxes, etc.)
- When attaching hidden wiring, you need to take into account the number of lines. If several cables pass in one armored sleeve, this requires greater thickness. Hiding such a product in a wooden house is a difficult task.
When creating hidden wiring, you need to remember the importance of the RCD. The device provides instant shutdown when leakage currents occur. For reliability, there must be several devices (for each group).
Selecting a wiring route
When choosing a place to lay a route in a wooden house, you need to take into account the requirements of the PUE. Think through everything in such a way that the number of turns and bends is minimal.
If difficulties arise with pulling the cable due to the characteristics of the building or communications in the walls, junction boxes made of steel or copper are installed at problem points.
Choosing a laying method
There are 2 ways to install electrical wiring:
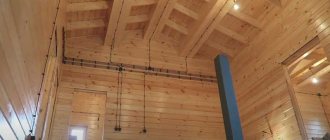
- interior. The cable is located in special metal corrugated pipes in a false plasterboard wall, behind a suspended ceiling. Internal wiring for a wooden house benefits from the fact that the usable area of the building and its aesthetic appearance are preserved; there is no need to look for material to mask the wires and protect them from mechanical damage. But this method (hidden wiring) also has its drawbacks: it is difficult to diagnose breakdowns inside the walls, dismantling individual sections is impossible;
- outer. It consists of laying wiring along baseboards, in cable ducts, and boxes. This method is simple and requires less time. You can monitor the wiring and troubleshoot problems in a timely manner. The wires are cooled, eliminating the possibility of overheating and fire. External electrical wiring also has disadvantages. The disadvantages of this method are that cable channels take up useful space and do not always fit into the interior of the house.
Open electrical wiring in a wooden house
For open wiring in the house, metal cable ducts are used.
The cable channel is used to protect electrical wiring from various damages and to disguise it.
Cable channel is a box of different sizes through which wires are laid. It has a rectangular shape. The lid is secured with clamps to prevent dust from entering. The cable channel is necessary in order to veil the locations of the wires.
The design not only gives a beautiful appearance to the room, but also performs a number of functions. It protects against exposure to chemicals, shock, touch, and water. The mounting box is safe for others because it does not conduct electricity. The cable channel for a wooden house must not support combustion and be marked “NG.”
In a log house, the cable can be secured using insulators. First, the dielectric rollers are fixed and the cable is attached to them. In cases where it is impossible to use cable ducts and insulators, the wiring is laid using staples.
You can disguise the cable in your home using retro wiring.
Hidden wiring
Installation of hidden wiring begins with drawing up a diagram of the location of the grooves.
Next, the route is marked. Draw straight lines of grooves using a building level, level, or plumb line. When installing hidden electrical wiring, the wall is drilled so as to hide it inside. Hidden electrical wiring does not spoil the appearance of the house and protects against electric shock.
Drilling is carried out in a straight line vertically or horizontally. Hidden wiring can be hidden in non-combustible floor insulation and in recesses between logs. The locations of sockets, switches, and sprayers are outlined. The tool that will be used to carry out the work is selected.
Metal pipes are being laid. The space for the cable inside the pipes should be less than half of the free space. You can lay the cable inside the pipes using pulling cables.
Electrical wiring test
After installing hidden wiring, it must be tested. This is especially important for wooden houses with a low level of fire resistance.
When checking, special instruments are used, and trained employees of electrical laboratories are invited to perform the work.
The range of events includes:
- visual inspection;
- grounding resistance measurement;
- AB check;
- phase-zero circuit test;
- checking protective devices;
- control of the chain between the ground electrode and the devices.
After completion of the work, a test report is drawn up and submitted. Carrying out such measures is mandatory, because they help to avoid accidents and prevent equipment breakdowns.
Electrical wiring testing
Electrical wiring testing is performed using accurate, certified specialized equipment, and should be carried out exclusively by specialists who can correctly process the data generated by the devices.
Testing is a mandatory step before launching a home electrical network Source kvlservices.be
The process of conducting verification tests includes the following manipulations:
- Visual control;
- Measuring work to identify conductor insulation resistance;
- Preventive grounding measurements;
- Checking the functionality of the automatic shutdown system;
- Identification of the zero phase of the electrical network;
- Control testing of protective equipment;
- Detecting breaks in the wiring connection to the grounding device.
After completing all the necessary work, specialists issue a document that contains data on the testing performed. This operation is an important element of wiring in a log house, as it allows you to prevent damage to property and protect the occupants of the building.
Useful tips
In conclusion, we present tips and results regarding the implementation of hidden wiring in wooden houses.
Basic points:
- For electrical wiring in a wooden house, it is better to use NYM - a cable with triple electrical insulation.
- The best circuit protection is provided by differential circuit breakers that protect the network from short circuits and leakage (RCD).
- Grounding junction boxes and metal pipes is a mandatory safety element.
- During installation, you need to take into account the shrinkage of the wooden house to avoid distortion and damage to the wires.
- The pipe connection must be as reliable as possible. Welding and soldering are used for joining.
- The best pipes are copper. Their advantages are resistance to corrosion and ease of bending.
- Plastic inserts are used at the ends of the pipes to protect the cable from damage.
- If lining or wooden wallpaper is used during installation, you can run pipes along the existing recesses.
- In a wooden house it is allowed to combine hidden and open wiring.
- Installation is done exclusively according to a scheme agreed upon with experts.
- The main attention is paid to fire protection, and only after that the aesthetic component.
- The optimal solution is to lay channels in existing recesses, window and door openings, under baseboards or ceiling cladding.
- When using corrugated pipes, it is necessary to cover the surface with plaster or asbestos gaskets.
- The pipes are joined together by threading or welding.
- Distribution boxes must be freely accessible.