Open wiring is the easiest way to lay electrical lines. This type differs from the hidden one in that the cables pass above the thickness of the building structure, and not inside. The process is less labor-intensive, as it allows you to do without gating the walls. It is difficult to find such wiring in multi-storey buildings, but the method is relevant for cottages, houses or premises in retro style.
What is vintage wiring
Retro wiring - installation of twisted cables using the open method. The wires are not hidden in the walls - they are in plain sight and fit perfectly into the interior design.
External installation of cables is a solution for owners of new wooden houses. The fact is that some types of buildings experience seasonal shrinkage. In this case, the internal wiring system may be damaged, and the repair will have to be redone. And it is easier to implement an open circuit by adjusting the degree of cable tension.
Vintage wiring is not only stylish, but also safe. You can immediately notice broken or damaged wires and quickly fix the problem.
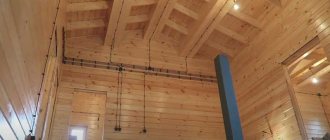
An example of retro wiring in a wooden house
Requirements for external wiring in the apartment
First of all, it is necessary to draw up an electrical diagram of lines and elements: sockets, switches and boxes.
When drawing up a project, you need to take into account the following points: If the system is not laid through pipes or protective panels, then special brackets are used, sold in specialized stores. They are necessary to prevent the wires from sagging under their own weight. The distance between horizontal type wiring brackets is every 30-40 cm, and for vertical ones - 60 cm.
Pros and cons of retro wiring
The main advantage of vintage wiring is its aesthetic appeal. However, there are other reasons to choose this scheme:
- Easy access to wiring: in the event of a malfunction, repairs are easy.
- Versatility: the solution is suitable for any interior style.
- Easy installation: to lay wires, you do not need to open the wall cladding or install protective corrugations and boxes.
An open system also has its downsides. Let's highlight three main ones:
- High price: installing retro wiring throughout the house will not be cheap. To reduce your spending budget, you can run outdoor cables only where they will be visible.
- Inability to connect powerful devices: “antique” wiring serves more of a decorative function, and therefore has a small cross-section of cores.
- Probability of rapid contamination: dust accumulates in twisted cables, which spoils the appearance of the wires.
It is important to understand that even the slightest mistake in organizing vintage wiring will immediately catch your eye. Therefore, before starting work, weigh the pros and cons, prepare high-quality materials, and draw up a competent diagram.
Vintage wiring in the interior of the house
Advice! It is better to avoid installing external wiring if there are children in the house.
Open wiring methods
Open installation can be performed using several methods. The choice depends on the type of room in which the installation is performed. In an office, you can use cable channels, but in designer-style living spaces, the wiring is usually hidden under baseboards or other decorative elements.
External wiring in cable channel
The use of cable channels provides several undeniable advantages:
Cable channels are placed on the walls and fixed using special glue or dowels. The specific method of fastening depends on the type of surface. The inside of the case is divided into several channels through which different wires can be routed. After laying the wiring, the devices are closed with a special cover.
Installation of external wiring in cable ducts
The channels are supplied with all the necessary plugs and corners. If something is missing, you can always buy it separately. These devices come in different colors, sizes and stylistic designs, so you can find options for both offices and residential premises.
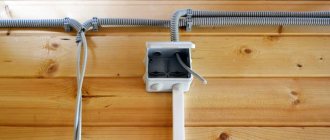
External wiring in pipes
Instead of cable channels, wires can be hidden in electrical pipes, which mainly perform protective and sometimes decorative functions. For example, they are often used when decorating rooms in Scandinavian or loft style. However, this method is more effective when organizing open wiring in a bathroom or other room with a high level of humidity. They provide complete tightness, which cannot be said about cable channels. It is also important to use sockets, junction boxes and switches equipped with additional moisture protection.
External wiring in copper pipes
External wiring with open wire
If you don’t want to hide the electrical cable in pipes or plastic boxes, pay attention to the design of the premises in a retro style. Stores have a variety of electrical and lighting products suitable for retro wiring. You can easily find vintage sockets, boxes, switches, cables with an outer (purely decorative) fabric sheath, and even porcelain insulators used to attach all this to the wall. This design of electrical wiring will look great in country, Provence and shabby chic interiors.
Wiring with an open cable in the interior of an apartment
Wiring through the baseboard
Another option without the use of ducts and pipes is to place the wiring under the baseboard. However, you will have to use a wider baseboard to ensure the presence of several channels. First, the base is installed along the perimeter of the floor. The wires are pulled along special guides made on the baseboard itself, after which they are hidden under the cover. Externally, the plinth is practically no different from the usual one, but you will have to place small plastic guides to sockets and switches. They are small cable channels.
Skirting cable channel with sockets
Materials for retro wiring
For external installation of wires, a minimum set of materials is sufficient. You will need:
- Overhead sockets and switches.
- Cables.
- Distribution boxes.
- Insulators.
All elements must be designed in the same style and similar colors. To make it easier to choose materials, we will discuss all possible options.
Twisted cables
Wires for decorative electrical wiring are made of copper and synthetic materials. It is important that the outer sheath of twisted cables is not subject to combustion. The most reliable are PVC and technical silk treated with fire retardant.
| Section | Number of cores | Colors |
| 0.5 mm², 0.75 mm², 1.5 mm², 2.5 mm² | 2,3,4 | Brown, black, ivory, caramel, cappuccino, gold, white, copper |
The cross-section of the wires must be selected based on the lighting scenario and the number of household appliances. Cables of 1.5 mm² and 2.5 mm² are suitable for home use. To calculate accurate indicators, you need to know the total power of all electrical appliances.
A few cable requirements:
- For the kitchen, it is better to choose cables with a rubber sheath - the fabric braid will quickly become dirty and will look unpresentable.
- For outdoor installation, a twisted cable of 3 cores is suitable. The first conductor will perform the functions of a phase, the second - neutral, the third - protection.
- For sockets, a twisted wire with a cross-section of 2.5 mm² is suitable. In this case, one power line will be enough for 2-4 devices with a total power of up to 3 kW.
| Section | Power limit |
| 0.5-0.75 mm² | 2.9 kW |
| 1.5 mm² | 4.4 kW |
| 2.5 mm² | 6 kW |
The appearance and shade of the cable is at your discretion. In matters of aesthetics, everything depends on the style of the interior and the color scheme of the design.
To calculate the footage of wires, it is advisable to use a laser level. With its help it is easy to mark the space from point to point. You need to think about cable routing routes and calculate how much material is required.
Retro cable for open wiring
Sockets and switches in retro style: design and installation
Switches should also fit into the concept of retro interiors. For example, white plastic devices will look out of place in a vintage setting. It is better to give preference to products made of ceramics, metal, and porcelain. Switches decorated with gilded patterns look very impressive.
The sockets will be visible, so it is necessary to take a responsible approach to the choice of design. Elements should form a harmonious composition with other design objects and at the same time play the role of an accent.
Retro-style sockets are most often made of plastic or porcelain. There are stunning natural wood models on sale. Manufacturers also produce collections of ceramic devices with hand-painted and marbled patterns.
The size of the devices also matters. Bulky sockets and switches will spoil the impression of the design. Miniature elements in vintage wiring look much more interesting.
Original devices will look good on the wall only if you install them correctly. A few installation recommendations:
- The ideal level for placing the socket and switch is 90-110 cm from the floor.
- To install the sockets evenly, you need to mark the mounting points on the wall. In these places you need to drill shallow holes.
- Before installing the outlet, you must connect the electrical cable to it.
- To fix the product, you need to attach the flat part to the wall and secure it with clamps. Then you should install the outer part of the device and check the integrity of the structure.
Important! Before installing sockets, do not forget to turn off the power to the rooms.
Retro sockets for open wiring
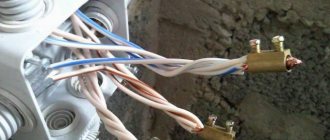
Distribution boxes
Distribution (soldering) boxes are designed for connecting cables. With the help of correctly selected installation elements, the number of wires can be optimized.
The design requirements for boxes are the same as for sockets and switches. The main thing is that they fit into the concept and look aesthetically pleasing.
Element dimensions vary depending on manufacturers and models. Average indicators: height - 35-60 mm, diameter - 70-90 mm.
Junction box for vintage wiring
Insulators
To fix the wires, you need overhead elements that separate the wire from the wall. Most often, designers use plastic or porcelain insulators. The first ones do not look so attractive, but they last a long time.
Porcelain products are highly fragile, but look truly vintage. If you choose them, try to be careful when installing.
A bold and unusual option is insulators stylized to look like cartridges. They are made from painted polymers, aluminum, brass or copper. Such products also act as a switch - the design includes a rotating mechanism.
There are insulators on sale in different colors and sizes. Choose an option based on the appearance and shade of the cables.
| Material | Form | Height | Diameter | Color |
| Metal, ceramics, porcelain | With a narrow top part - for a cable with 2 cores, with a wide top - for 3-core wires. | 18-24 mm | 18-22 mm | White, ivory, black, brown and other shades in stock. |
Ceramic insulators for vintage wiring
What is needed to install open wiring
How to choose a cable
The cable must be selected based on the upcoming electrical load.
For home electrical and lighting devices, a 2-3-core copper or aluminum cable with a cross-section of 2.5 mm will be sufficient. A household electric stove is connected with a cable with a cross-section of 4-6 mm, and the branch is connected to a separate 25A fuse in the junction box. When choosing between copper and aluminum cable, most people prefer copper because it:
Sockets
Sockets for open wiring are called overhead because they are attached to the wall in any desired place. Unlike submersible ones, their contacts are located inside and they are completely isolated.
As with submersible sockets, sockets with a grounding contact are suitable for grounded electrical networks.
If the socket does not complete the circuit and the power wire goes from it to the next one, then it is called a pass-through socket. They are installed with a boxless connection.
Switches
Sealed switches are not a purposeful design for open-type wiring. Often, having a hidden cable system, they install closed switches. This is done in places of high humidity to avoid short circuits and prevent emergency situations.
Installation is the same as for open wiring sockets - a couple of holes in the wall and the switch is securely held in the right place.
Retro outdoor wiring methods
When installing open wiring, it is important to combine aesthetics and safety. The first thing you need to think about is how you will fix the cables to the walls. We offer three options:
- Fastening with staples: the most budget option, which is not suitable for all interior styles. The cables are fixed to the wall using metal or plastic elements. The staples do not have a variety of designs, so they do not add aesthetic appeal.
- Laying in channels: the safest option. The cables are laid in narrow grooves, which are designed to protect the wires from mechanical damage. You can choose metal channels with an artificially aged surface or parts stylized as wood.
- Roller gasket: the most effective fixation technology. The line of wires is held in place by miniature ceramic elements that look like barrels.
Important! Vintage wires can run on the ceiling, walls, along baseboards. In the third case, it is better to lay cables in channels.
If you choose a spacer on rollers, consider how many elements are needed for reliable fixation. Calculate at what distance to place insulators on retro wiring. The optimal pitch for installing “barrels” is 40-50 cm.
Retro cable with brackets in open wiring
Retro cable with rollers in open wiring
Installation methods
There are several ways to lay open wires. When choosing, you need to take into account the type of room - cable channels are suitable for an office, while renovations in a designer style will require installation through a baseboard or decorative tubes.
External wiring in cable duct
The cable-duct method of laying wires is more often used, as they have important performance properties:
- non-toxic;
- temperature resistant;
- have a low price.
Attached to walls using dowels or glue (depending on the surface). Inside the cables there are channel separations for several wires. Cover the top with a lid. Plugs and corners of network elements are included in the kit or can be purchased separately. They are made in a variety of styles and colors, so they are suitable not only for offices, but will also fit well into any room design. The main thing is to choose the right type and color.
Open wire
One of the most common and oldest methods. Previously, this was done through a bent cambric, which was nailed to the surface with small nails. Now it has been replaced by plastic staples, which are sold with nails inside. The main thing is to choose the correct size of the bracket so as not to pinch the cable, breaking the insulating layer. The location is the same - every 10 cm. If several wires pass nearby, the distance between them should be at least 4-5 mm.
What kind of wiring does your home have?
Open
Closed
Wiring through the baseboard
A suitable way to maintain the appearance of a room. This type of wiring differs from a regular baseboard in the presence of several channels and the installation method.
The base is first attached to the wall around the perimeter of the floor. The necessary wires are pulled along special guides inside the baseboard and covered with a lid. Outwardly, it is no different from an ordinary construction plinth, not counting the plastic guides for sockets and switches, the same as in the version with cable channels.
Design and color options are selected directly by the buyer.
In the pipes
Modern industry allows wiring to be laid in different ways that meet fire safety requirements. Corrugated pipe is often used for this.
But the installation method in pipes is a labor-intensive process. The wire is attached to a rope, which is pulled inside the pipes, and after the end of the rope comes out, the cables are pulled.
The diameter of the pipe should be twice the diameter of the wires in the bundle. Fastening to surfaces is done using special clips. When dismantling, it will be enough to pull one end of the pipe. The corrugation itself is equipped with metal threads inside, which allows it to maintain its shape when bending.
In addition to corrugation, there are several other types of material for making pipes, but they are rare and in terms of parameters are much inferior to corrugated ones, even in weight. And the weight of the wiring is an important detail, so the lighter it is, the better.
Stylish wiring in retro and loft styles
With an emphasis on effectiveness and pronounced interior elements, they use the installation method through ceramic insulators and metal decorative pipes.
The very first wiring was laid in this way. In old village houses, open wiring is still installed. The fashion for them is coming back again. Two wires are intertwined with each other and stretched along the perimeter of the room, periodically bending around the ceramic insulators. For safety reasons, insulating rollers are mounted at a distance of 10 cm from each other, and the twisted wire is at least 1.5 cm from the surface.
This method should be resorted to if the design of the room is made in the same style or there is no other choice, because the method with ceramic insulators is the most unsafe of all.
In another case, decorative metal pipes are used, which are made in a variety of colors and styles. During installation you will have to spend more time than with a corrugated analogue. Metal tubes are attached to the surface through special rods. They are fastened together with couplings and 90 degree angles.
Basic mistakes when installing open electrical wiring
Electrical installation work always involves a certain risk and requires extreme care. We tell you what mistakes can ruin all your efforts:
- Saving on materials. Using low-quality cables and sockets increases the risk of fire. It is better to purchase products from trusted manufacturers who manufacture products taking into account all requirements and safety standards.
- Lack of scheme. Wiring cannot be installed by eye. To ensure a reliable system, you need to carefully consider all the nuances.
- Use of aluminum wires. Products made from this metal often overheat, which can lead to wiring problems. This is why experts recommend laying cables with a copper core.
- Incorrect wiring calculation. Add 15-20% to the number and cross-section of cables. This margin will avoid the need to twist the wires together.
- Connection of cables of different power in one box. Low and high voltage wires should be separated. If you break the rule, interruptions in the operation of home appliances will inevitably occur.
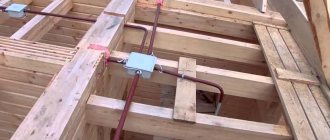
- Incorrect placement of distribution elements. The boxes must be mounted at least 20 cm below the ceiling. If they are placed higher, the risk of accidental damage during repair work will increase.
Important! Provide easy access to distribution boxes to quickly troubleshoot network problems if necessary.
Spectacular retro wiring in the interior of the house
Installation
The wires are connected in special boxes and distribution blocks. The piece that goes into the boxes should be bitten off with a small margin, 60-65 mm will be enough. If over time the contact deteriorates or burns, you can easily cut out the damaged cable and restore the connection. At the exits from the distribution boxes, at a distance of about 50 mm, the conductors are attached to the walls.
All sockets and switches are installed on a special substrate, the thickness of which should be 10 mm greater than the thickness of the walls of the product. If sockets or switches of old types are installed, then such a gasket can be cut out of wood or plastic yourself. First, a base is attached to the wall surface, and then the product is installed on it.
All rules and recommendations were compiled by highly qualified specialists and are aimed at ensuring the safe operation of the electrical network. If you decide to install open wiring yourself, then knowledge of these requirements is mandatory.
How to make a retro electrical wiring diagram
Creating a wiring diagram is a mandatory stage of work. On paper it is necessary to reflect the arrangement of all elements of the scenario: switches, sockets, distribution boxes, lighting fixtures.
In the figure, you need to mark the cable routing routes and indicate the locations of through passages. The more detailed the diagram, the easier it will be to carry out installation in the future.
Some use ready-made diagrams from the Internet. This guide can be used as a basis, but adjustments should be made depending on the specific layout.
Specifics of flat cable installation
If you don't like retro wiring, you can get by with a regular flat cable. But in order to install it in compliance with all safety measures, you must follow the installation technology.
How to make external wiring:
- You can use staples to secure the flat wire or nail it to the wall with small nails.
- To ensure safety, place an asbestos layer under the wire, the width of which should be slightly larger than the width of the wire.
- If you are going to lay several wires in parallel, maintain a distance of at least 3 mm between them.
- After securing the wires, you can install a masking box on top of them to match the wall trim.
- If you want to hide a flat wire in a cable duct, first draw up a detailed installation diagram to calculate what connecting elements and fittings will be required. You also need to determine the appropriate cross-section of the channel, depending on how many wires you plan to hide in it. It is not recommended to stuff the internal space to capacity - if one wire shorts and it catches fire, then everyone will suffer. It is best to buy a cable channel with delimiters and lay each wire in a separate groove.
- When laying wiring in corrugated pipes, keep in mind that if you need to replace a section of wire or retighten the entire system, you will have to dismantle all the wires in the pipes.
External wiring can be convenient and beautiful, but it still remains less secure than hidden wiring. No wonder they almost forgot about her for a while. When choosing this type of installation, keep in mind that it requires careful handling and proper maintenance. If there are small children in the house, you need to either carefully disguise the wires or lay them out of the reach of children.
Finally, we suggest watching a video about external wiring and methods of attaching it:
General rules and safety precautions when organizing antique wiring
Installing retro-style wiring yourself is a simple but painstaking task. To avoid trouble and injury, it is important to familiarize yourself with the safety rules. Pro Tips:
- Make branch wires only in junction boxes.
- Route the wires downwards from the junction box.
- Maintain spacing between switches and doorways. Ideally, the distance should exceed 10 cm.
- Place sockets and switches at a distance of at least 50 cm from the last insulator.
- For ease of installation, mark in advance the surfaces where the wires will pass.
- Make sure that decorative cables are double insulated. This will significantly reduce the risk of electric shock.
- Place the wires so that they are not accidentally damaged during repair work.
- Do not place objects near the wiring that could damage the cable.
Important! Study the recommendations of manufacturers of materials for retro wiring.
Open wiring in an apartment and house: requirements and installation features
Open wiring is the easiest way to lay electrical lines. This type differs from the hidden one in that the cables pass above the thickness of the building structure, and not inside. The process is less labor-intensive, as it allows you to do without gating the walls. It is difficult to find such wiring in multi-storey buildings, but the method is relevant for cottages, houses or premises in retro style.
How to install retro wiring in a house
Before starting installation, check the condition of the walls and ceiling. If there are any protrusions or sharp elements on the surfaces, be sure to remove them.
When installing, you need to pay attention to the material from which the walls are made. It is better to attach elements to wooden surfaces using screws. Dowels are suitable for brick and concrete walls.
Prepare the tools: screwdriver, screwdriver, pliers, ruler, fasteners, pencil for marking the walls. Don't forget about the wiring diagram - it should be in front of your eyes at all times.
Step-by-step algorithm for installing vintage wiring:
- Install insulators in the marked areas. It is not necessary to place them on the same line - you can change the direction at an angle of about 45 degrees.
- Place switches, sockets and junction boxes. When placing elements, strictly follow the wiring diagram.
- Stretch the wires, moving sequentially along the line where the insulators are placed.
- Pull the wires, check the resistance.
- Check how the switches work.
Wires should be installed only after they are connected to switches and sockets. If you do the opposite, it will be more difficult to calculate the required cable length and ensure optimal tension. To help novice electrical installers - detailed video instructions for installing vintage wiring.
Twisted wires must be secured with ties to the outer insulators. This will help create good tension and avoid sagging.
Important! Do not twist the wires together. Use special terminals to connect cables. An alternative option is soldering.
Vintage open wiring installation
Open wiring in the interior
There are several ways to organize external wiring in an apartment. You can use one method for the entire apartment, or you can combine it, using different options in different rooms.
External wiring in cable duct
A cable duct, or as it is also called, a cable duct, is a long plastic box with a lid that is attached to a wall or ceiling. All wiring is located inside it. Its width can be different, with several compartments for different groups of wires. At the market or in construction stores you can buy cable channels for every taste: white, gray, dark or light wood.
The cable channel, as a rule, ends with a socket, switch, lamp or switch box. In order to change the direction of the wire, special additional fittings are used: external and internal corners, adapters, plugs.
For classic interiors, you can use wide plastic skirting boards with cable channels. In this case, sockets are placed at the level of the baseboard or slightly higher. Wires to the lamps are hidden behind the ceiling plinths.
External wiring in pipes
The second way to organize external wiring is to lay the wires in special electrical pipes. Pipes can simultaneously serve as protection for wires and cables, and as a decorative element.
For example, in a loft or Scandinavian interior, this type of external wiring will look very cool.
Another place where outdoor wiring should be done in pipes is the bathroom. Due to the increased humidity, you will have to close the beautiful wires in sealed pipes and use waterproof sockets, switches and breaker boxes.
External wiring with open wire
A fashionable way to organize external wiring in an apartment is to do it in a retro style. Nowadays there are a lot of stores that sell all the necessary electrical appliances and accessories for retro wiring. There you can buy vintage sockets, junction boxes, switches, fabric-insulated wires and small porcelain insulators for attaching them to walls.
Such external retro wiring will fit very organically into apartments with country, Provence or shabby chic interiors.
Rules for installing open-type electrical wiring
Let's consider the basic requirements for open electrical wiring, which should be strictly followed. If they are neglected, then there is a high probability of an emergency situation, for example, a short circuit and fire.
The first thing to keep in mind is the prohibition on laying the line under pipelines that are prone to condensation. It is worth remembering that heat sources should not be located near the cables.
The location of the wiring determines the type of wire itself; it can be rigid, flexible or shielded. The connection of cable cores can only be carried out through special distribution boxes. The covers of the latter must be in an accessible area.
At high humidity levels, rubber gaskets installed in the cover of the junction box will improve the seal. It is imperative to check the integrity of the protective braiding of the wire along its entire length. If defects are found, it is better to replace the wire.
Some photos of exposed electrical wiring show that it is secured using special plastic brackets. Experts recommend using plastic fasteners of the appropriate size. The distance between the brackets is made in such a way that there is no sagging of the wiring during operation of the line.
It is necessary to install clamps near the connection points of wires with switches, sockets and other elements. When laying an unarmored cable horizontally, the distance between the fasteners should be no more than 40 cm; for armored, the distance increases to 75 cm.
When placed vertically, the interval between fastenings does not exceed a meter. There should be no more than 10 cm between the clamp and the electrical element. Only under the specified conditions is it possible to securely fasten the entire power line.
When it becomes necessary to bend the wire (when avoiding obstacles), the minimum bending radius should be 8 cm. In the case of crossing a non-electrical pipeline, the required interval should be 3 cm. When passing the cable through a wall, it is recommended to provide additional protection in the form of a piece of tube, the length of which is equal to width of the wall.
Installation features
If the ceilings in a house or apartment belong to the suspended class, then the wiring must be routed along the wall. When the number of wires is impressive, it is recommended to use special throughput channels. When installing distribution boxes, remember that access to them must be unobstructed, otherwise maintenance will be difficult.
In general, there are several main methods for installing electrical wiring: the already mentioned option with brackets, installation in corrugated pipes, the use of special elements (cable ducts, baseboards and electrical boxes).
Fastening with staples and corrugated pipes has some disadvantages. Firstly, the hardware option is not considered safe. Secondly, both methods do not give an aesthetic result. A cable channel in this regard will be a more attractive option.
Open electrical wiring in an apartment - types and types
According to the technique of execution, open wiring in an apartment can be divided into the following types:
Open electrical wiring in boxes
Open electrical wiring in boxes is allowed in all areas of the apartment if the wiring is done with electric cables. If wires are used for wiring, then wires cannot be laid in boxes in the bathroom and toilets. This is due to the humidity in these rooms and, as a result, safety precautions for electrical wiring.
In the kitchen, unlike the bathroom, you can lay boxes and make electrical wiring in them with wires.
Important! Use only special boxes for wiring, specifically for electrical wiring. They are made of non-flammable materials and are safe to use.
By the way, wide electrical boxes are divided into sections. This will allow you to separate power wiring and low-current wiring (telephone, antenna, computer) and thereby get rid of unnecessary electrical interference on low-current wiring.
Open wiring with clips
A clip is a special fastener for securing a cable to the surface of a wall or ceiling.
Metal clips for fastening the cable Clip with dowel-nail Clamps for the cable.
Open electrical wiring on clips is permitted and acceptable in all areas of the apartment. As a tip, if you are doing exposed clip-on wiring, use triple insulated rather than double insulated electrical cable. For example, the well-known NYM cable.
In the next photo you see a clip for attaching a corrugated pipe (electrical corrugation). This could also be an element of open wiring, only now in an electrical corrugation.
Clamp clip for fastening corrugated or plastic pipes
Exposed electrical wiring in baseboards
Skirting electrical wiring, in special electrical skirting boards, with access to laid wires or cables also refers to open electrical wiring.
- Skirting boards must be specially designed for electrical wiring, that is, made of non-flammable materials or flame retardant materials.
- Also, I advise you not to lay wires for electrical wiring and low-current wires for the telephone, computer and television antenna in the same bundle. There is a high probability of interference due to electromagnetic disturbances from electrical wires.
- There is enough space in the electric baseboard to separate electrical wiring from low-current wires.
Other types of open electrical wiring, for example, on porcelain rollers, are used only in wooden houses.
Expert opinion
It-Technology, Electrical power and electronics specialist
Ask questions to the “Specialist for modernization of energy generation systems”
Skirting boards with cable channels This is convenient in cases where the floor and walls are almost ready, and it is problematic to change anything on them with a unique, highly artistic coating. Ask, I'm in touch!