In ancient times, the bathhouse was visited only during the daytime, since it was quite inconvenient to wash by the light of a candle or kerosene lamp. Nowadays, you can take water procedures at absolutely any time of the day, since modern electric lighting will ensure a comfortable pastime in the bathhouse.
Unfortunately, the bathhouse does not have favorable conditions for the operation of electrical wiring. That is why the process of installing lighting in a bathhouse deserves special attention, because neglecting it can lead to fire or electric shock to those washing.
The most important thing in this matter is compliance with safety precautions during the installation of lighting in a Russian bathhouse. In addition, do not forget that the bathhouse is designed to allow a person to relax both mentally and physically. In this regard, it is not recommended to make the lighting too bright. It should be soft, diffused and slightly muted.
Methods for connecting electrical wiring to points
In order to correctly install all the light sources in the bathhouse, you need to know how to conduct electrical wiring to each of them.
There are two ways:
- Open;
- Hidden.
It is better to install electrical wiring inside the bathhouse using an open method, since it is safer and more convenient. In this case, the wiring lines are quite easy to view, and there are no difficulties during the replacement or repair process.
It is better to conduct hidden electrical wiring to lamps only in the steam room.
You should also follow some rules when wiring to lamps:
- The electrics in the bathhouse are mounted exclusively on the lower part of the wall;
- The electric wire to the lamp in the steam room is routed directly to the place of its installation;
- It is very important that all electrical appliances in the bathhouse are grounded. This can be done using a cable consisting of three cores. Two of these conductors are connected to phase and neutral, and the third is connected to the panel or fittings;
- All sockets in the bathhouse must be provided with an individual differential switch;
- The use of artificially connected wires in the steam room is not allowed, only solid wiring;
- The wires from each of the elements are connected only on the panel;
- The shield should be installed as far as possible from the steam room.
Information. The electrical wiring cable must be laid either strictly horizontally or strictly vertically.
Sockets, switches and other devices
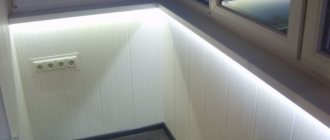
It is better not to install sockets and switches in a steam room. They should be placed in a rest room or dressing room. They should be installed at a height of 80 centimeters. The arrangement of sockets and switches must be reliably protected from moisture or splashes. Wiring in the bay should only take the shortest route.
After installation is complete, you will need to check the presence of insulation in the wires. The temperature in the steam room can reach one hundred degrees. That is why in this room it is better to limit the length of the wiring or eliminate it altogether.
https://youtube.com/watch?v=U5JbDSRJe0A
What network voltage to choose
It is very important to determine the optimal voltage for lighting in the bathhouse - 12 (V), 36 (V) or a household voltage of 220 (V).
To use household voltage in a bathhouse, certain requirements are established:
- Protection of electrical wiring lines using RCDs or differential circuit breakers;
- Providing power to the bathhouse according to a specific system called TN-C-S;
- Potential equalization system in the bathhouse.
If it is not possible to meet the above requirements, then you should consider the option of powering the bathhouse with a 12 (V) system.
Let's start with the fact that bathhouse lighting at 12 volts is the lowest and also the most safe voltage for human life and health.
It is usually used in areas with a high degree of danger, such as a bathhouse.
The danger of placing a bathhouse in high temperatures and high humidity is explained, because such conditions have a very adverse effect on high-voltage lamps.
When exposed to high temperatures, some lamps can even explode.
Important! Under the influence of high temperatures and without proper protection of the lamps, a lighting lamp can simply explode, thereby harming the health of people in the room.
Using lighting at 12 (V) will protect the bath room, since the worst thing that can happen is a short circuit. Electric shock and the possibility of fire are excluded.
However, such universal lighting also has its drawbacks. The fact is that the use of 12-volt lighting requires a transformer, which not only complicates the circuit, but also reduces its reliability.
Attention! It is very important to find the optimal location for the transformer, since it should not be exposed to high temperatures.
Elements of a lighting system for a bath
- Cable
. The optimal wire cross-section is calculated using the current strength table. It can be found by dividing the total power of all electrical appliances by the rated voltage of the network. - Automatic
. Necessary to prevent accidents during short circuits. The main technical indicator of the device is allowed up to 16A. - RCD
. Monitors the current strength of the phase and neutral wires. If a difference is detected, it immediately turns off the power supply. To prevent false signals, it is better to choose a 16mA residual current device. - Switch
. The product must have increased moisture and heat resistance. - Grounding
. Installation of a third wire is required to ensure complete safety.
- Incandescent lamp
. It is better to install several of them in the bathhouse of lower power to provide muted, diffused light. The permissible power of such devices in the steam room is 60 Watt. - Optical fiber
. The main advantages of such a system are resistance to aggressive environments and durability. They are usually installed along the perimeter of the ceiling or at different angles. It has recently become fashionable to install optical fibers under the shelf, providing a kind of seat lighting.
Please note that the use of mercury-based fluorescent lamps is strictly prohibited in the steam room. If damaged, they are very dangerous to human health.
How to do it in a steam room
The steam room is the smallest room in the bathhouse. Taking this into account, in most cases it is enough to place one lamp. However, in order not to be left in the dark when one lamp is faulty, it is better to install another spare one. Therefore, the optimal number of light sources in a steam room is two.
Lamps must be placed in special lighting lamps for baths. All adjacent wires must be carefully insulated.
It is recommended to place light sources in hard-to-reach places so as not to accidentally touch or damage them.
Under no circumstances should you place the lighting device next to heating elements!
Do not forget that air with a high moisture content can damage the device with damage to the wire or socket.
In this regard, it is recommended to conduct the wire in a box under a layer of vapor and waterproofing.
Let's look at it step by step - how to make light in a bathhouse in a steam room with your own hands:
- The sections of wires that will be in the steam room must be placed in a metal or corrugated pipe. Their number should be equal to the number of planned lamps;
- Next, you need to run the cables to the luminaire placement points. As mentioned earlier, the wiring in the steam room is mounted in a closed type, so you should take into account the lighting plan at the construction or renovation stage;
- It is necessary to fix the cartridges on the ends of the wires and insulate them;
- A cable is led from the distribution box to the switch, which is best placed outside the steam room;
- After this, the incandescent lamps are screwed in and placed in heat-resistant lamps;
- In order to protect yourself from burns, you should install a special wooden grill over the lamp.
Varieties
There is a wide range of lighting products on the market, but not every model is suitable for a bathhouse, since the difference in temperature and high humidity in the room are not suitable for every lighting device.
There are several main types of bath lamps, including waterproof, heat-resistant, LED, moisture-resistant, low-voltage, wireless, and so on. We need to talk about everything in order:
Incandescent lamps
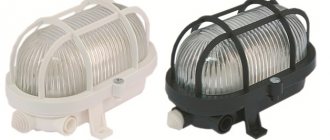
A good option for a steam room or washing room, provided several conditions are met: heat-resistant housing, moisture protection level of at least 5 (ip45/55/65), power does not exceed 60 W. Such a light bulb is inexpensive, and considering that the light in the bathhouse is not on every day, it will last quite a long time.
However, they are quite fragile, so the lamp for incandescent lamps must comply with all safety regulations: sealed and with protective grilles.
There are models with a safe voltage of 36 V with connection via a step-down transformer.
Fluorescent lamps
Despite their advantages - long service life, energy saving - they are not suitable for baths. Fluorescent light sources cannot : they do not work well at temperatures above 60⁰C. This is also a bad option for unheated bathhouses and for the waiting room: frosty air from the street will significantly shorten the service life. In addition, in winter, after freezing, they will take a long time to warm up and start up. In addition, due to the presence of mercury vapor in the composition, they are dangerous if the flask is damaged.
Halogen lamps
Suitable for steam rooms: not afraid of high temperatures, protected from splashes (lamp with internal bulb). Since the light in the bathhouse does not burn constantly, the short service life does not play a significant role. Moreover, halogen lights cost little.
Special halogen lamps are produced especially for baths: they are protected by special heat-resistant housings and have low power (15-35 W).
LED bulbs
Opinions differ about the use of these lamps in the steam room. LED light sources can be used in a sauna, but these lamps begin to physically degrade LEDs at a temperature of 65⁰C (on average). The intensity of the degradation process varies depending on the model.
LED lamps are perfect for any other sauna room. They are not afraid of moisture, heat up slightly during operation, last a long time, and are not afraid of low temperatures. Moreover, it is with their help that you can organize a low-voltage lighting system without any problems. Design possibilities are expanded by the use of LED strips.
Advantages of LED bath lighting
LEDs have a number of advantages that are clearly evident when lighting baths and saunas. Let's look at them in more detail:
- Electricity costs are minimal . LEDs are considered economical lighting elements. For this reason, many enterprises are switching to this type of lighting; it reduces electricity costs several times.
- Low voltage . This type of backlight operates at very low voltage. This feature adds to the safety of LEDs. If the element body is damaged, there will be no strong electric shock. And in conditions of high humidity this probability is very high.
- Protection from moisture . Some types of LEDs are impervious to moisture. To select exactly this type of element, pay attention to the marking with the degree of protection of the product. There are three types of LEDs that are not afraid of water: IP65 (there is a protective coating on the backlight board), IP67 and IP68 (full element protection is used).
- Works in water . Fully insulated LEDs can even be used underwater. These types of lighting elements are installed in swimming pools, which are often present in saunas and require lighting.
- Long-term operation . LED lamps are considered a durable type of lighting, with a service life of about 6 years.
Disadvantages of LED lighting
Despite the extensive set of positive qualities, LED backlighting has a significant disadvantage. It is precisely related to the conditions in which the lamps installed in the sauna are exposed. We are talking about the temperature regime in which the lamp operates. Under normal conditions, the optimal operating temperature for an LED ranges from -30 to +40 degrees. This is the normal mode of operation of the lamp with uniform and gentle wear.
Interesting: Impregnation for the inside of a bath - how to choose a stain, varieties
As soon as the ambient temperature begins to exceed the upper limit of the specified range or its value decreases, the wear of the LED occurs much more intensely. In extreme operating modes, malfunctions in the operation of the device, periodic flickering, and so on may occur. The selection of special equipment helps solve this problem. Specialized LEDs are manufactured to operate at high temperatures. To protect the device, the manufacturer coats it with a silicone-based protective substance. This LED operates without failure in high and low temperature conditions.
Fiber optic lighting for sauna
Expensive, but the most durable, safe option for steam rooms and washrooms. Withstands temperatures up to 220 ⁰С. In addition, due to the physical characteristics of light - lighting works thanks to light waves, and not electric ones - optical fiber is not afraid of water.
With the help of optical fiber, you can come up with many interesting interior solutions.
Example of fiber optic backlight
The essence of such lighting is that the light source (any, but more often LED) is placed not in the room itself, but outside it. Light rays from the lamp “enter” the room through special fiber optic light guides. These are usually glass flexible tubes.
Operating principle of fiber optic lighting
Threaded bits
For the convenience of clients, companies that specialize in lighting baths offer kits for fiber optic lighting. Their cost starts from 25,000 rubles, depending on the configuration.
Types of fiber optic lighting for baths
There are two types of fiber optic backlight:
- Lateral fiber installed before finishing work begins, it is somewhat reminiscent of spot lighting. To begin with, draw up a diagram of the location of the fibers and mark each such place with a dot. Then a tourniquet is connected to each and taken to the projector. The ends of the bundles are secured with tape, then holes are made in the designated places and the fiber is inserted into them. Then finishing work is carried out: the surface is sheathed and the fibers are cut to its level. After this, connect the harnesses to the projector.
- Fiber optic edge lighting is used when you need to create a soft and even glow. In this case, the bundles are installed much more simply: fibers are introduced into the sauna room, then they are mounted in interior items, and the ends of the bundles are brought out into the dressing room. The projector is also installed here.
Pros and cons of fiber optics
First, let's list the advantages of fiber optic bath lighting.
- High temperature resistance . The upper temperature threshold that the optical fiber can withstand and continue to function is 200 degrees. This allows you to install such lighting in absolutely any part of the sauna, including the top, where the temperature is especially high.
- Moisture protection . Fiber optics are considered the ideal choice for installing lighting in areas with high humidity. For example, fiber optic lighting is used to illuminate swimming pools.
- Light . Fiber optics allow you to get the softest and most even lighting. This feature allows the system to be used without additional diffusers.
- Compact sizes . Fiber optic lighting can be mounted anywhere, even in the back of a seat: in essence, it is just a cable with a luminous core.
- Safety . Fiber optics are one of the safest means of lighting. There is no electricity inside it, so even if the integrity of the element is damaged, you will not be shocked.
- Service life and efficiency . The lighting will last for several years, which is very convenient. Constant replacement of consumables is not required. Optical fiber also consumes minimal electricity.
- Space for imagination . The elasticity of the fiber optic cable and the availability of all kinds of accessories make this lighting ideal. Especially if you need to implement a bold design solution. With fiber optics, designers imitate natural phenomena and create other interesting effects.
The system has one drawback, and that is its high cost. The installation process is extremely simple, but the high cost of the elements does not allow us to recommend fiber-optic lighting to a wide range of readers.
Salt lamps
They will not only help illuminate the bathhouse, but will make the atmosphere in it healthier. Salt lamps destroy allergens, microorganisms, and saturate the air with healing vapors.
Salt lamps are made from Himalayan salt. A lampshade is made from salt into which a regular light bulb is screwed. Lampshades are made in different shapes, sizes, and colors. A variety of designs will allow you to decorate any bathhouse.
Caring for the lamp is easy: the main thing is to keep it clean. Keep in mind that in a steam room atmosphere, the lifespan of a salt lamp is reduced because the salt becomes soggy and crumbles in the humid atmosphere of the steam room. The price of such lamps varies greatly depending on the processing of the material. The average price for an untreated lamp weighing 2-3 kg is 700-900 rubles.
In the rest room
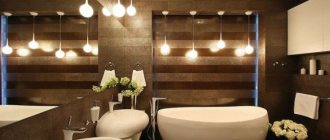
The relaxation room is the very place in the bathhouse where you can show your imagination in the process of arranging lighting.
There are no strict requirements for this room, so the number and type of lighting fixtures depends only on the taste of the owners.
It is best to place several light sources at different levels. The presence of overhead lighting, sconces, as well as illumination of some areas will provide the ability to choose the level of light.
You can give in to impulse and realize all your wildest fantasies regarding bath lighting. Here you can install colored lighting, lighting in the form of stars, or even create the feeling that you are in a planetarium.
Information. It is recommended to choose not too bright lighting for the rest room, since it is the very place where you can relax and unwind.
Why LED lamps are not the best choice
It was noted above that LED lamps are not the best choice for a steam room. This is due to the design of the lamps.
Firstly, LED consists of semiconductor crystals that emits light. Their physical properties are such that they cannot work at high temperatures (above 100⁰C). But already at 60⁰С, the degradation of semiconductors begins. Therefore, the LED lamp will work, but not for long.
Secondly, LEDs heat up during operation. Heat is removed from them convectively using a radiator. But the temperature in the steam room is extremely high - the heat cannot escape from the lamp. This is the second reason for the rapid deterioration
Considering its considerable cost, there is no point in installing them in a steam room. It is better to make do with other options for bath lamps.
In other rooms, LED lighting is acceptable.
How to make a fiber optic light
Each owner independently chooses the type of lighting for his bathhouse, but experts recommend choosing fiber optic lighting.
Lamps of this type can be used even without a wooden lampshade, as they do not dazzle the eyes and can also withstand temperatures up to 200 degrees.
Fiber optic lighting has proven itself to be the safest and most durable. It is very easy to install and also decorate for an exclusive interior.
Making a lamp for a bathhouse with your own hands is simple and inexpensive; for this you need to purchase:
- Wood;
- Glass with a minimum thickness of 4 mm;
- Plywood;
- Heat-resistant film;
- Aluminum tape;
- Glue.
First of all, templates of the main parts are cut out of plywood, and vertical strips, the edges of which are rounded, are cut out of wood. Next, the main parts are fastened to the strips and coated with glue. The fastening points are tightened with self-tapping screws.
The glass is cut out and wrapped with heat-resistant film.
After this, the planks are sawn, coated with glue and tightened with self-tapping screws.
You need to mark points on a couple of strips, then drill holes for the glass. Secure the glass also using strips.
Drill holes with a diameter of 5 mm in the getinax sheet.
On the back side of the panel you need to glue the LEDs using superglue. Aluminum tape serves as a reflector.
Next, a power supply is installed outside the steam room, from which a cable is routed to the lamp through the wall.
The lamp is attached to the walls of the bathhouse using self-tapping screws.
Approximate diagram
At the input you will have either 220 volts or 380. In the first case, if everything is done wisely three wires - phase, neutral and ground. In the second - five (three phases, zero and ground).
Let's consider a 220 V connection. A 25 A input circuit breaker an RCD is installed on the zero and phase wires , after which the zero wire is connected to the N bus. Then three circuit breakers - sequentially on the phase wire. Each group of consumers from the N and PE buses has its own wire, so that three wires go to the consumer - phase, neutral and ground. Below is a picture illustrating the above diagram.
ATTENTION! It is recommended to install an RCD in the bathhouse without exception. However, a differential machine is the same thing, but with more functionality.
The above diagram is very simple and does not consider options for connecting a transformer.
Connecting to 380 V is not much more complicated. Grounding is done at the input and an input circuit breaker . From the latter, three phase wires and zero are fed to the RCD, after which the zero is connected to the bus, and from there to all circuit breakers preceding consumer groups. phases is connected to each of the switches (the choice is distributed evenly).
There can be an arbitrary number of consumer groups, but usually there are three - a lighting group, a group of sockets and a power group (devices with high power). In a sauna, it is customary to separate the electric furnace into a separate group . In our case, a zero machine and a switch are specially installed for it.
Everything described is clearly shown in the following diagram:
IMPORTANT! Don't take these schemes as a general case, there simply isn't one. Focus on your ideas about safety - the number of machines and RCDs, the number and power of consumers, and what kind of grounding system is adopted in the area where your bathhouse is located depends on this.
If you want to make a circuit with a voltage of 12, 24, 36 volts, place the transformer in the lighting - it can be divided into a subgroup of 220 V consumers and a low voltage subgroup that will power the steam room (and, possibly, the washing room).
Wooden lamps
Very often, wooden grilles are used to decorate and protect the lamp.
They not only look very beautiful and harmonious in a wooden structure, but also protect careless bathhouse visitors from burns.
These lampshades look quite attractive. The light emanating from a lamp with a wooden grille is very soft and diffused.
Making a bathhouse lamp with your own hands from wood is very simple! The simplest wooden structure consists of an upper and lower base, as well as slats.
The shape of the frame is determined depending on the location where the lamp is planned to be placed. If the lamp is wall-mounted, then the frame is rectangular or round. If it is angular, then the part should be close to a triangular shape.
The planks are attached to the frame from the inside to avoid burns from the surface of the screws in the future.
How to conduct and supply electricity to a bathhouse?
The question of how to supply electricity to a bathhouse using an open air method remains difficult for many. As with the house, it is carried out to the bathhouse by air on a cable or underground in a trench - the recommended installation method is indicated in the project.
Along the walls of the bathhouse, wires are laid in pipes or on insulators. If the cable runs under a canopy, where moisture is prevented, it is mounted on special rollers.
The wires must be located at least 2.75 m from the ground. Laid outside in metal flexible hoses or pipes, they must be sealed with a cable harness or asbestos cord. To prevent the wires from being damaged by snow falling from the roof in winter, it is better to place them not in a horizontal, but in a vertical plane.
Before conducting electricity in the bathhouse, hooks with insulators at the ends are used to enter the building. If the walls of the bathhouse are made of logs, such devices will fit into the wood without difficulty. Porcelain funnels are installed in such a way that they are located on the same axis and are 10 cm apart from each other in wooden buildings and 5 cm in brick ones.
For a concrete bath, special brackets with hooks are used, which are fixed to a cement mortar filled with crushed stone.
For low baths, a pipe stand is used. This structure is introduced into the building through the wall and roof. At the same time, it is mounted in such a way that the distance from the pipe stand to the ground is 2 m, and to the roof at least a meter. The pipe stand is secured with clamps and screws, and on the roof with a brace made of steel wire. A grounding is made on the metal pipe stand; to do this, a bolt is welded to it not far from the input insulators.
Steel wire is placed in the pipe stand to help pull the wires inside. After pulling, the ends of the pipe are filled with bitumen, and the pipe itself is filled with Portland cement moisture-resistant putty. The gaps remaining after installing the pipe on the roof should be sealed with waterproofing mastic.