Eating food takes a fairly long period of the day, and its preparation takes even longer, so comfortable conditions in both one and the other process are the norm of our time.
If previously housewives made do with one lamp or chandelier in the center of the room, the variety of lighting fixtures today makes it possible to provide not only uniform lighting in the kitchen, but also decorate the room through lighting effects and decorative elements. Modern methods of installing and planning artificial lighting provide a number of nuances that should be taken into account when making lighting and kitchen equipment.
Basic rules and requirements
Electricity in the kitchen poses a particular danger due to its close proximity to water, gas supply and heating systems. Therefore, when planning lighting in the kitchen, it is important to follow a number of rules that will make work and pastime not only comfortable, but also safe.
Next, we will discuss the most current requirements when modeling light in a kitchen:
- Lighting fixtures should be selected in accordance with the interior design and the dimensions of the room - it would be inappropriate to install a contrasting fixture that would stand out sharply against the background of the kitchen furniture. There is also no point in installing a small chandelier in a large room.
- When developing several levels of lighting, each of them should not cast a shadow on the dining area, cooking area and other functional locations.
- Brightness, design and location must be selected in such a way that the light flux does not blind a person’s eyes.
- In the case of simultaneous use of several types of lighting in the kitchen space, it is necessary to correlate them in such a way that they complement each other and do not disrupt the harmony of the lighting design.
- When choosing the power of lighting fixtures for the kitchen, it is necessary to take into account the degree of light reflection of the walls. The lighter the material, the greater the percentage of luminous flux it will return, approximately the value is 80% for a light coating and 12% of light for a black one.
- For each working surface it is necessary to calculate the amount of illumination. Indicated in Lux on the lamp box or passport.
- The distance from water supply sources to live parts must be at least 60 cm.
- According to the requirements of clause 7.1.46 of the PUE, lighting devices with incandescent or fluorescent lamps must be equipped with devices that prevent the lamp elements from falling out when it is destroyed.
- According to clause 7.1.50, current-carrying elements are prohibited from being brought closer than 0.5 m to the gas pipeline and gas equipment.
The model and characteristics of lighting equipment for the kitchen are selected in accordance with the type of lighting. There are several main categories, which we will consider in more detail.
Which light bulbs and lamps to choose
To organize light in the kitchen, they combine several types of light bulbs that have different power, efficiency, and design.
The most common:
- Incandescent lamps, the big disadvantage of which is the high consumption of electrical energy, rapid heating, and dim light. The advantage is low price;
- LEDs consume 10 times less electricity, have different color temperatures, last a long time, do not go out during power surges, but cost a lot;
- Fluorescent lamps consume energy moderately, produce fairly bright light, but can react to electrical fluctuations;
- Halogen ones provide beautiful lighting, making up for the lack of sun in the kitchen, and have a large selection of shapes, which allows you to create an interesting design. Disadvantages - heating, the spectrum shifts towards cold shades;
- Energy-saving lamps save electrical energy and last a long time, but they contain mercury vapor.
Comparison of the main types of lamps
To organize lighting in the kitchen, different options and designs of lighting fixtures are used:
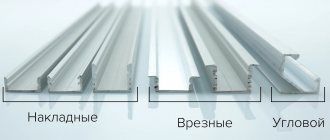
- Spots are compact lamps with beams of directional light. Movable or located on rails, which makes them easy to adjust. Installed on the ceiling, under cabinets, above the apron or on the wall;
- A chandelier is the most common solution for traditional kitchens. For low ceilings, choose a model that fits tightly to the surface; for high ceilings, a suspended model;
- LED strip lighting is used to organize local lighting in the kitchen. They are easy to install and give you the opportunity to choose a shade - warm or cold;
- From pendant lamps on a long wire, stylish compositions are created from several identical or simply similar shades. Provides bright, directional illumination;
- Spotlights are usually used for suspended ceilings. Help distribute light evenly throughout the kitchen.
Organization of general light
General light
General lighting devices are designed to fill the entire space of a room with light flux. Therefore, they must provide a good level of illumination and a pleasant light. In most cases, these are the familiar central chandeliers that set the general background. However, the location and method of their placement should be chosen in accordance with local conditions.
If the room has a rectangular or square shape, you can get by with one central lighting device. The place for its installation is chosen in the middle, but inexperienced installers make a huge mistake - attaching a pendant chandelier in the center of the ceiling, without taking into account the space for kitchen cabinets.
In this case, after placing the upper cabinets, the chandelier will shift and the principle of light flux distribution will radically change. Therefore, the correct option would be to pre-mark the ceiling surface on the plan for filling the kitchen space.
How to find out where to install general lighting
The figure above shows two examples of installing lighting fixtures with and without kitchen units. If it is already hanging on the wall, measurements can be taken in full-scale form; if you are planning to install them, you need to start from the plan diagram.
If the kitchen space is narrow and long, then one lamp may not be enough to provide light to distant corners. Therefore, in such a design it would be more expedient to replace one ceiling chandelier with several at once, suspended in a row.
Main lighting in a long kitchen
As in the previous version, the lighting area should be taken without taking into account kitchen furniture. If your kitchen is not only long, but also wide, chandeliers can be hung in two rows.
How to hang a lamp above a table - design methods
Single lamp above the table
To create an atmosphere of intimacy and comfort, we use a pendant hanging low over the dining table.
Two identical lamps
If the light spot from a single lamp does not completely cover the surface of the dining table, find a companion for it.
If the table is large and elongated, make a line of single pendants, clearly defining the distance between the lamps.
Thin pendants are suitable for this, as in the photo above.
Two identical at different levels
If you have a large table, one light above it may not be enough. Instead of increasing the number of arms in your chandelier, break away from the patterns!
The height of the pendants does not have to be the same: asymmetry will add dynamics to an overly calm interior of the dining area.
Two identical pendants, different colors
Group of thin pendants
In interiors of a brutal nature, such as a style direction such as loft, thin pendants in the form of a set of lamps or a solid chandelier are often found.
Different pendants from the same series form a group
Light track
An elongated lamp over a long rectangular table
Chandelier over the dining table
Sconce lamp
Geometric lamp, pendulum
Group of identical lamps
Organization of spot lighting
Spotlights
Most often, this type of lighting is implemented with spot LEDs, pendant units or spotlights. They are located above a specific location where you want to make an accent or highlight any decorative elements. The points can be used either individually or en masse; their number is limited only by the kitchen space and your personal wishes.
This lighting method is characterized by a convenient location, since spotlights do not take up much space, they fit well into any interior style. And in some situations they can be hidden in structural parts (stretch ceilings, in elements of kitchen cabinets). It is most advisable to use them for local lighting of functional areas.
Self-installation of kitchen lighting with LED strip
If you choose the type of lighting for the kitchen to install it yourself, then the most suitable option for this, as we have already said, is lighting with LED strips. Efficient, aesthetic and easiest to install.
What you need to prepare to work on arranging kitchen lighting:
- high-quality LED strips designed for a voltage of 12 W;
- electrical cable with a cross-section of 0.75 mm²;
- electrical plugs;
- staples for fixing the tape;
- soldering iron and everything necessary to work with it;
- transformers;
- construction double-sided tape;
- insulating tape;
- LED profile;
- sharp scissors;
- power supply 12 W;
- corner for making lighting.
Instructions for self-installation of LED backlighting using strips:
- Take measurements of the required length of the LED strip using a construction tape. After this, use scissors to cut the required length of tape from the roll and strip the outer contacts by about 1-1.5 cm.
- Carefully solder two pieces of cable to the stripped contacts. After soldering is completed, the contacts should be insulated; this can be done using regular electrical tape or a convenient heat-shrink tube.
- Place tape on a corner or profile, install and secure the LED strip on it, not forgetting to remove the protective film. A transformer should also be installed at a short distance from the LED backlight.
- Before installing the transformer, you must first remove the housing from it. Then you need to solder the bare ends of the LED strip wire to it from the low voltage side. On the other hand, you need to connect an electrical cable with a plug mounted on it to the transformer.
- Before installing the LED backlight, the surface on which it will be installed must be thoroughly cleaned and degreased, using, for example, an alcohol solution or an effective cleaning agent.
- A plastic box, in which excess wires will fit, is installed inside the cabinet, which has become a platform for installing the lighting. The wires are pulled through a hole made in the bottom wall of the cabinet. They are fixed in the box with electrical installation brackets.
- All backlight wires are laid to the place where the power supply will be mounted, for example, to the hood.
- The wires are connected in parallel: plus to plus, minus to minus.
- After connecting the backlight wires to the power supply, all that remains is to equip it with a switch, and the backlight will be ready for use.
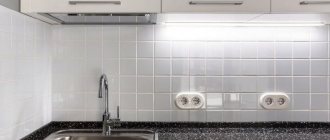
Organization of the work area
Lighting the work area
The work space should be understood as the food preparation area. If most housewives have a headset, this process is carried out on the countertop. But in each specific option, the location of local illumination is selected individually. Since not the entire tabletop is used during cooking, it is much more profitable to illuminate only a certain area or section the lighting devices to separate them into sections.
This type of lighting in the kitchen can be implemented with both conventional lamps and LED strips; the choice of model is made based on the parameters of the room and your wishes. The main requirement is that the light flux should fall directly in the center of the tabletop, and furniture and other structures should not limit its spread.
You can place devices to illuminate the work area:
- under wall cabinets - along the line of the apron, in such a situation the light flux is directed at an angle, for this you can use both pendant lamps on hinges and LED strips in a special box or without one;
- above them - in suspended ceilings; for this purpose, soffits are mounted in plasterboard;
- flush - provided by any suitable type of lighting fixture, which is placed on hanging cabinets.
The last two options should take into account the depth of the upper and lower cabinets. The principle of their installation is shown in the figure below.
Working area lighting principle
The stove or hob is usually illuminated by lamps built into the hood. But if they are not enough, additional devices that are resistant to high temperature and humidity can be installed.
Features of lighting a small kitchen
At first glance, it seems that in a modest-sized kitchen, one chandelier with an incandescent lamp is enough to illuminate the entire area. In fact, the brighter the room, the more spacious it seems. In addition, it is difficult to do without illumination of the work area: if during evening cooking, nothing except the chandelier illuminates the tabletop, then a shadow appears on it from a person or an unsuccessfully located refrigerator.
The photo shows a small kitchen with a hanging chandelier, LED strip in the work area and spotlights above the cabinets.
Often in a small kitchen, the role of general lighting is played by a pendant lamp above the dining group. But in this case, lighting the apron or cooking area is required.
A diode strip installed around the perimeter of the ceiling can serve as additional light: it will help to visually lift it. The most important thing is to fill a small kitchen as evenly as possible with diffused light that will not create shadows.
Dining area lighting
Lighting the dining area
The table, as a place for eating in the kitchen, must have good lighting, so the best option for lighting the dining area is a ceiling lamp or several located directly above its tabletop. Installing them on the side or at table level is highly not recommended, as their light will cast a shadow on those sitting at the table and significantly impair visibility.
In this location it is very important to maintain a comfortable glow temperature. Therefore, it is necessary to install lamps with warm or neutral light in the dining area. If a cold glow lamp is located above the table, then food and products will take on an unattractive appearance.
It is better to make the height from the chandelier to the table around 1.5 m; choose a lampshade from an opaque material with a diffusing effect. If the table is very large, then for lighting it is advisable to install several spotlights around the perimeter above the tabletop. If the table is very small and installed under the wall, you can use wall sconces to illuminate it in a classic interior.
General lighting
You cannot do without general light in the kitchen, but it is better to abandon a centralized light source in favor of several built-in or overhead lamps that will provide a more uniform light.
For maximum comfort, built-in and surface-mounted ceiling lamps should be equipped with a diffuser. However, such lamps, as a rule, do not have a rotating function, and therefore require careful and professional placement of light: the result cannot be corrected by simply redirecting the lamp.
As an alternative, you can use track or string lights (several shades on a rail or string system). Their advantage is that they can be moved and rotated as needed in a particular kitchen. Just rotating shades will also work.
If you're shining light on your upper kitchen cabinets to highlight their beauty, pay attention to the material they're made from. Illuminating glossy and mirrored facades without creating glare or causing discomfort to the eyes is not an easy task. Here's what experts think about this: “Light and gloss in the kitchen: what the experts say.” With matte and embossed surfaces everything is much simpler.
Decorative lighting in the kitchen
Decorative lighting
In most cases, the main task of decorative lighting is to create some visual effects to decorate the room. This type of lighting is used in a wide variety of places - it all depends on your own imagination. To implement decorative lighting, both classic lamps and LED lighting can be used.
The first option for decoration is ceiling structures, this includes all kinds of suspended and suspended ceilings, niches in them, film covering or hidden lighting. RGB tape looks very impressive when lighting the perimeter of a room; it can be used to create multi-colored lighting effects. If you have multi-level ceilings, you can organize multi-level lighting with individual control for each of them.
Ceiling lighting
The second option is to illuminate hanging cabinets from the inside. Cabinets with transparent or translucent doors are suitable for this purpose. This type of lighting in the kitchen not only creates an interesting effect, but also ensures good visibility inside the set. It should be noted that the level of illumination should be subdued and not blind the person opening the door.
Cabinet lighting from inside
The third option is to illuminate the bottom of the cabinets and other interior elements. It allows you to highlight the contour around the perimeter of the headset relative to the floor covering.
Cabinet outline lighting
Lighting options
Before carrying out repairs, you should think in advance about the location of lamps, switches and other equipment, since finishing work is carried out only after laying all current-carrying cables.
General lighting
First of all, it is worth providing the kitchen with one central or several light sources built into the ceiling. They are necessary for convenience when entering the kitchen, as well as when receiving guests and cleaning.
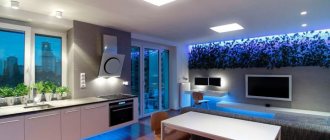
The photo shows a spacious kitchen-living room with ceiling lighting in the form of spotlights.
Lighting of functional areas of the kitchen
It is difficult to imagine a comfortable cooking work area immersed in twilight. It is also difficult to enjoy food or have intimate conversations at a table where it is difficult to see the plate or your interlocutor. It is for the comfort of household members and guests that every corner needs to be additionally illuminated.
Light for the kitchen in the work area
It is recommended to place lamps above the tabletop just below eye level. To wash dishes efficiently, it is desirable that light shines on the sink. It is not necessary to highlight the sink separately if it is installed in the center of the work surface.
The photo shows a kitchen where lamps are built under the cabinets and illuminate the work area.
There are situations that require constant standing at the stove. Then a small addition as a lamp above the stove will come in handy. Often this function is performed by a hood with a built-in light bulb.
Dining area lighting
Perhaps the most important detail, which instantly helps to make the atmosphere more comfortable, is the lighting of the kitchen table. It is the central piece of the kitchen-dining room, around which guests or family gather. It is important that the surface of the table or island is in a halo of light: in addition to creating comfort, this sets the mood for an open, friendly conversation.
The photo shows a blue kitchen, the dining area of which is also a working area. It is lit by two pendant lamps.
Light sources are also needed above the bar counter: their purpose is not only to illuminate, but also to zone the kitchen space. If the kitchen is connected to the living room, then the lamps should be located not only above the dining group of table and chairs, but also next to the seating area - armchairs or sofa.
Interior lighting for kitchen cabinets
The lighting of closed cabinets is purely utilitarian in nature: it does not in any way affect the perception of the kitchen as a whole, unlike the internal lighting of a set with transparent facades. You can equip cabinets or lower cabinets with lighting either at the stage of ordering furniture or independently using economical LED strips.
In the photo, the illuminated apron echoes the decorative lighting of cabinets with glass doors.
Decorative
Additional light can solve the most unexpected and interesting problems. Decorative lighting is aimed at creating a special mood, as well as to highlight the features of the interior.
In the photo there is a lamp with a phrase, converted especially for the kitchen from the anti-war slogan “Make love, not war.”
Decorative LED lighting can be located under the ceiling, on the border of the podium, or linearly on the wall as an accent. The set, illuminated from below, visually expands the space of a long narrow kitchen.
If the kitchen contains house plants that require additional lighting, it is also considered decorative.
The photo shows a non-standard decoration for the kitchen - a magnificent vertical garden.
The role of natural light
Since the cost of energy resources is quite high, no one neglects the opportunity to reduce their consumption. And using natural light coming from the window is the best opportunity.
The role of natural light
The main thing to consider is the size of the windows and their position relative to the cardinal points:
- with access to the north side - in this case, natural light will flow rather weakly, so it is very important not to interfere with it. It is advisable to use transparent curtains or blinds with the function of fully opening the window.
- with a southern location - here you will have an excess of lighting during the daytime, so you can use blinds, Roman blinds or roller blinds to control it.
- The eastern side is identical to the southern side, with the difference that the peak brightness will occur in the early morning, and during the day the light will be moderate.
- Windows facing west also require good sun protection, but only for the evening hours.
Note that if there is a tree in front of the window that blocks the horizon in summer, then the density of the curtains can be significantly reduced. Since in the summer, when solar radiation is most intense, the crown of the tree neutralizes most of the direct rays.
Light over the dining table
Ideally, dining furniture should be placed close to a window, skylight or terrace door, that is, in a place where natural light freely penetrates.
In addition, you need to organize diffused lighting directly above the table. It is worth considering the size of the dining area and table.
A luxurious pendant lamp with a diameter of more than 30 cm can be used in a kitchen with a high ceiling. A more universal size for a standard room is 22 cm. If the ceilings are low, take a closer look at recessed LED lamps, panel or spot.
Let's take a closer look at the basic lighting options for the dining area.
For a large kitchen
So, a universal option for a classic spacious kitchen-dining room is an antique chandelier, a luxurious dominant feature of the interior. It is better to place such a lamp not strictly in the center of the room, but in the center of the dining area.
Is your kitchen dining area designed for large groups? Above a spacious, elongated table, it is better to mount a row of identical lamps with adjustable suspensions, country-style lanterns, or a chandelier with cascading pendants.
Another exclusive and successful solution for a very spacious and elongated dining area is a billiard panel lamp. It illuminates the table flawlessly and combines with both high-tech and colonial style elements.
The length of such a “chandelier” should not exceed 2/3 of the size of the table.
For a small kitchen
Ice panels instead of a chandelier are a win-win option for fashionable minimalism. Especially in a low attic or narrow kitchen.
They can imitate a skylight and maintain a sense of natural light in the dining area.
The role of the dining area is played by a folding mobile tabletop ? In this case, you can use track lighting. The rail system itself takes up minimal space, and rotating spotlights can be directed to both the dining area and adjacent areas.
Universal options
- An overhead chandelier is the golden mean between luxury and modest minimalism. It may have a classic chic design but takes up minimal space.
Moreover, it is suitable for an original historical kitchen, “from the era” of art deco, antique, modern.
- Another ideal design find for a dining area of any size is a chandelier with an adjustable pendant.
Modern models of such chandeliers have a laconic design, in the form of a plate or cylinder.
A lamp like this can be lowered over the table when you need to create intimate light for a romantic dinner. Option from Ikea:
Illumination of cabinets, shelves and niches
Illumination of storage systems is a distinctive feature of innovative kitchens in high-tech or loft style.
The idea itself is non-standard, but it allows you to solve several typical problems at once:
- facilitates routine work;
- visually makes the kitchen larger and richer (if the storage system is open);
- complements the chosen style;
- light rays make branded exquisite dishes visible on the shelves.
About choosing light bulbs
You can use a wide variety of lamps to illuminate your kitchen, but their type will largely determine both the quality of perception of the objects around you and the cost of maintaining the lighting fixtures.
The most commonly used types of lamps are:
- incandescent lamps - is a classic option, they create a luminous flux in the range of 2000 - 3000K - the warmest range of glow, but also consume the most electricity;
- a halogen lamp operates in the range from 3000 to 4000K, its electricity consumption is comparable to an incandescent lamp;
- fluorescent light bulbs - use the range from 4000 to 6000K, but have a significantly lower level of energy consumption for lighting;
- LED lamps are characterized by fairly wide temperature limits - from 3000 to 7000K and minimal power consumption.
To create a comfortable atmosphere in functional rooms, you should choose lamp models with a temperature from 3000 to 5000K; the rest will create a cold, unnatural glow.
Colorful temperature
How to do it yourself?
Attaching the LED backlight is not difficult, the main thing is to have all the necessary tools and follow the instructions.
Tools and materials
The main thing that installation cannot do without is the LED strip itself. When choosing, pay attention to the following parameters:
- Color. LED strips glow in the RGB model. Diodes are white, red, blue, green. The remaining shades are obtained by including several basic shades at once. There are RGB strips - they are colored, or WRGB - with colored and white diodes. However, the most suitable for the kitchen are ordinary white ones, which in turn are divided into warm and cold.
- Flow. Brightness is measured in lumens - the more there are, the brighter it will be when the tape is turned on. This parameter depends on the type of LEDs and their number, as well as the density of the arrangement. There are 2 main types: SMD3528 (without RGB) and SMD5060 (5050). The first ones are smaller and are placed more often, the second ones are larger and placed less frequently. For backlighting, a standard double-density SMD5060 or SMD3528 tape is suitable.
- Protection. Let us remind you once again that for a long service life in the kitchen, models marked IP65, 67, 68 are required.
In addition to the tape with diodes, you will need a power supply (adapter), a switch, a wire for connecting with a reserve (section ~2.5 mm), a plug into a socket (or a cable pulled out of the wall), electrical tape, double-sided tape or other fastening. Tools you will need are scissors, a screwdriver, pliers, and a soldering iron.
Important! LEDs operate at a voltage of 12 watts, not 220, so you will need to install a transformer.
Step-by-step instruction
6 steps for successful LED strip installation:
- Cut to the required length. This should be done exclusively in the place indicated on the tape itself. Typically, orange marks are located through 3-4 LEDs, often scissors are drawn on them.
- Connect the cable and power supply. The safest way is to expose the contacts on the tape and solder the wire, but you can also use connectors.
- Isolate. A mandatory step for the kitchen to protect the connection from excess moisture. Use electrical tape or special tubes.
- Attach it in place according to the level. The method depends on the specific model; some aluminum profiles have an adhesive side. If not, use double-sided tape.
- Connect electricity. Insert the plug into the socket or connect the tape to the wire coming out of the wall, and turn it on.
- Complete installation. At this stage, you should attach the switch, secure and hide the adapter, and put a transparent or matte diffuser on the profile.
Important! Do not forget about safety precautions: carry out installation with the power off, observe polarity, insulate all exposed wires immediately.
Video
To understand the LED strip connection diagram in more detail, watch the video using a socket for an exhaust hood:
Useful tips and tricks
Before you start designing and installing lighting in the kitchen, it will be useful for you to familiarize yourself with the following recommendations:
- choose the lampshade material for pendant lamps based on practical considerations - they should be easy to clean from grease;
- It is better to select the color of the lamp for lighting in the kitchen to match the tone of the surface on which it is installed, so that it externally merges with the base;
- For a dining table, it is important to use a chandelier with an adjustable hanging height - this will allow you to create various lighting effects;
- if you don't always need lighting at full power, install dimmers or switches with a divider;
- installation of rotating lamp models will allow you to enhance lighting in different locations as needed;
- If the room is small, try to choose a comparable lamp so that it does not look bulky;
- Kitchen lighting in particularly dangerous areas is best done from 12V;
- When purchasing lighting devices and components for them, do not take the cheapest products, they may fail even before use.
Subtleties of lighting distribution by zones
So, let's look at the best ways to illuminate areas in the kitchen.
Worktops
Without lighting, the area under the wall cabinets remains in dense shadow. But this is where the most dangerous and critical zone is located - the work zone!
- Chopping greens or disassembling chicken, stuffing fish, peering in vain into the twilight is, to put it mildly, inconvenient.
- In poor lighting, colors fade, and you need to make an effort to see the real color of the product, identify a rotten spot on an apple, or see a missing lint on a piece of meat.
- When washing a pan or plate, it is not surprising to miss an area and not see burnt food residues.
- It is difficult to see the shade, shape and degree of readiness of a dish if the light falls from behind.
And there is also a considerable risk of slashing your fingers with a sharpened knife. Therefore, lighting is needed, running along the lower edge of hanging cabinets, or built into the joint between the kitchen apron and the upper tier of the set.
Modern models of kitchen sets are prudently equipped with built-in lighting. Depending on the design and cost, these could be:
- LED strips;
- overhead and spotlights;
- rotating spots;
- luminous panels;
- edging around the entire perimeter of the cabinets;
- futuristic products of the most fantastic kind.
Also, many models of hoods are sold with built-in lighting, which provides directed light flows onto the hob.
If the initial design project does not provide for lamps, you need to install them yourself, choosing products that are suitable in style and power. Ceiling lamps, track systems, spots, and wall sconces will help illuminate the outer part of the worktop. They are installed on painted, plasterboard and suspended ceilings, strictly along the facade of the upper tier of cabinets. Attach to the outer top edge of cabinets, to the kitchen apron.
Cooking on a well-lit work site is a pleasure! All details are visible, random errors are excluded, and there is no unnecessary tension.
Bar counter
The Western fashion for bar counters in the kitchen has reached the vast expanses of Russia. More and more property owners are choosing to replace boring dining tables with this simple and elegant interior solution. Or they use it as an interesting decorative element, a kind of space divider. To highlight all the advantages of the stand, to allow it to shine in all its splendor, appropriate lighting is necessary. What options can you use?
- The leading positions in popularity are occupied by lamps on long pendants, chains or rods. Depending on the dimensions of the stand, use 2-3 large lamps or 3-5 small ones with elegant shades. The lower edge of the lampshades must be at a height of at least 75 cm from the surface of the rack. Such lighting allows the bar counter to stand out from the general background in the form of a magnificent, thoughtful accent.
- Built-in spotlights are also in demand. Usually they are mounted on the lower surface of the upper tier of the bar counter, in the amount of 4-10 pieces. Place along the counter, in one row, or in two rows along the edges. Such racks are additionally equipped with rods and various interesting devices for placing wine glasses, pots with edible herbs and decorative flowers.
If the surface will be used as a worktop, it is necessary to take care of spot, directional lighting. For what? Suspension systems do not concentrate the light flux in a specific direction. On the contrary, they provide the softest, most diffused light possible. In order to highlight a specific area of the bar counter, choose the following options:
- spots with the ability to adjust the direction of light flows;
- height-adjustable lamps;
- built-in and overhead point devices.
Dinner Zone
The main purpose of the dining group is to create maximum comfort for all family members. Therefore, they approach its lighting in a completely different way. Here the main emphasis is not on practicality, but on beauty and unusual design. What can you use to create the desired visual effect?
- An unusual handmade chandelier with a luxurious, avant-garde or intricate shade. Its size is chosen based on the total area of the site. So, a too large, bulky lighting fixture will look awkward over a tiny, elegant table. A beautiful, but miniature chandelier will get lost against the backdrop of a spacious dining table for a dozen people. The intensity of illumination is also varied arbitrarily. It all depends on the area over which you want to spread the effect of the lamp. You can use chandeliers with adjustable power, or install a double switch: on all lamps and some of them.
- Quite often, owners use an original design technique: they group three small pendant lamps above the tabletop into a small isosceles triangle. At the same time, the height of the lampshades above the table is adjustable. If it does not exceed 45 cm, the effect of an intimate, slightly shaded space for a romantic dinner or a quiet family celebration is achieved. And, raised to the ceiling, lighting fixtures illuminate everything around with diffused light, close to daylight.
- If the ceilings in the kitchen are low, select overhead ceiling lights. Unlike chandeliers and pendant systems with long rods, they are more compact and do not “eat up” precious vertical centimeters. Depending on the practical need and the chosen style, the product can have one or several shades, made in a strict or fantasy design.
Wall sconces occupy a special place. They look great above a small wall or corner table. They create an intimate, cozy atmosphere that invites you to relax and unwind, to throw away the problems of the outside world. And the variety of shapes, colors and textures allows you to choose products that blend harmoniously with the rest of the decor, but do not blindly copy other lighting fixtures in the kitchen.
Central lighting
Do you need a central chandelier or a row of lamps in a modern kitchen with its multi-level lighting? If all the necessary zones are already equipped with lighting? There is no clear answer to this question, according to experienced designers. It all depends on various little things and nuances.
- Is there not enough natural light in the room? Are the walls decorated with wood panels in a wenge or bog oak shade, or covered with dark wallpaper? Have you chosen a kitchen set in rich dark colors? In all these cases, good overhead light is vital. Otherwise, the kitchen will turn into a gloomy crypt that you won’t even want to go into.
- For a tiny kitchen, lighting installed in functional areas is quite sufficient: light circles overlap each other in excess. If necessary, you can install several spotlights on the ceiling.
- Is the kitchen decorated in white, light colors? Does it have a lot of sparkling surfaces, gloss and mirrors? This means that too much intense lighting is simply not necessary; it will interfere, causing noticeable discomfort. Reflected light from several lamps will be quite enough.
- A spacious room requires high-quality overhead light. Here opinions differ. Some people prefer to equip small lamps around the perimeter, choosing models that suit the design, from classic to modern track systems and laconic light panels. And some make do with one large chandelier in the center of the room.
In this case, you need to know one important rule: lamps are installed not in the geometric center (or along the perimeter) of the room, but in the visual one! That is, when calculating the installation points, it is necessary to take into account the kitchen unit, stepping back from the wall to the appropriate width. If an “G” or “U”-shaped set is installed, then the calculated perimeter is narrowed, respectively, taking into account the depth of the cabinets on two or three walls.
If the ceilings are not particularly high, and in addition the owners decided to decorate them with multi-level plasterboard structures, then it is better to choose ceiling models as central lamps. They provide diffused light that is comfortable for the eyes, and are extremely easy to install. Even with very low ceilings, there is no risk of knocking the product over with your head or a careless wave of your hand. And thousands of design options offered to consumers make it easy to choose the ideal model for the desired interior design.