Site fencing is a mandatory element that performs several functions at once. In order for the fence to cope with its tasks and be as effective as possible, you need not only to carefully select the design and its installation, but also take care of other aspects. One of these nuances is the lighting of the fence. A fence is a fence installed around the perimeter of a site, which should protect households from the environment. Thanks to lighting, the fence will not only be attractive, but also a clearly visible barrier at night.
What problems does fence lighting solve?
Fence lighting solves a number of important problems.
- Functional lighting. The equipment illuminates areas of areas that are used at night. Lanterns are often placed at driveway and garage gates, gates, outbuildings, garden paths, etc.
- Object security. Lanterns provide illumination of the area at night, facilitate the correct operation of video cameras and have a psychological effect on intruders.
- Design. In this case, lighting technology performs decorative functions. These include complementing and highlighting various architectural elements, illuminating garden plants, creating contrasts and accents on landscape details.
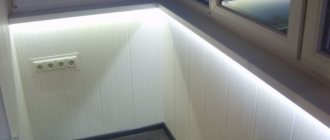
Photo #1: Lighting on fence posts
Ventilated high fences
An equally popular solution when installing fences is high ventilated (viewable) fences that have gaps between sections. Such barriers include:
- Wooden and metal picket fences.
- Forged fence.
- Fencing made of lattice or mesh.
- Fence-blinds.
In this case, you can buy less powerful lamps to illuminate the fence. The reasons for this are as follows:
- A lamp installed inside the yard will partially illuminate the area outside the territory.
- There is no need to install the lamps on the sections themselves; it is enough to fix them on the inner surface of the supports.
- Ground-mounted lamps powered by solar energy can be used as decorative lighting.
Preparatory stage No. 1. Selection of lamps
Various equipment is used to organize street lighting. Let's talk about the most popular options.
Note! The main criterion for choosing devices for street lighting is the class of protection against dust and moisture. It is this that determines the possibility of using lanterns outdoors. Buy lighting equipment with protection classes IP67 and IP68.
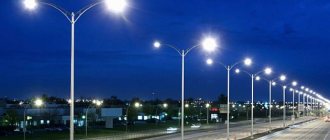
Powerful pole lights
They are most often found and are used to organize functional lighting and for security purposes. Manufacturers produce models of various designs. Lanterns with spherical shades are in greatest demand. They perfectly complement the straight forms of brick and stone supports, harmonizing the space.
Photo No. 2: spherical lamp on a fence post
There is a wide range of such flashlights on the market; you can easily select the models that are most suitable in design, brightness and color of the glow. The equipment does not require serious maintenance. The lamps will only need to be periodically cleaned of dirt and dust.
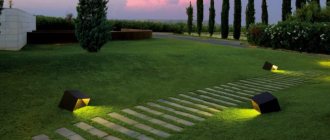
Fence spotlights
They are compact lanterns that are usually mounted in poles or sections of fences. The equipment has low power. Areas of application for spot models: additional lighting, highlighting architectural forms, texturing and landscape design.
Photo No. 3: spot lighting of the fence
Photo No. 4: spot lighting of the garden path
Spotlights
Floodlights are mounted on fence posts and sections, as well as at their bases. If lighting serves a decorative function, small lanterns usually “look” at the fence.
Photo No. 5: spotlights used for decorative lighting of the fence
If lighting of the area is required, powerful spotlights are installed near the fences or on them so that the rays of light capture the area adjacent to the house as much as possible.
Photo No. 6: combined fence lighting (spherical lights + ground spotlights)
Wall lanterns
They are usually installed on posts or sections of fences. Used if you need to illuminate the area on only one side of the fence.
Photo No. 7: wall lanterns on the fence
Ground powerful lights
Such devices are used to illuminate large areas and, as a rule, are installed near fence posts.
Image #1: Ground Lantern for Fence Lighting
Note! You can buy forged lanterns of this type from us. 5 interesting models are available for order.
Ground decorative lamps and bollards
They are installed for additional decorative lighting of fences, garden paths, plants, etc. Brightness is medium.
Photo No. 8: decorative lighting of the fence with ground lamps
Selection of luminaires depending on the operating principle
To organize lighting for the fences of country houses, three types of lamps are used.
Table No. 1: types of lanterns for lighting fences, advantages and disadvantages of equipment
| Types of lamps | Advantages | Flaws |
| Autonomous | Easy to install. Low cost of installation work | The need to frequently buy new batteries and replace them. Low power. Designed for decorative lighting only |
| Solar powered | Easy to install. Low cost of installation work. At night, the lighting equipment turns on automatically | Low lighting power. Designed for decorative lighting only |
| Powered from a household network | High brightness lighting. Possibility to turn on at any time. Possibility of building automation systems. Ease of use | The need to purchase connecting cables and means to protect them. Difficult to install. Increased energy costs |
If you need good lighting of the area, only the third type of lighting equipment is suitable.
Choosing lamps for lanterns
Lanterns designed to illuminate fences are equipped with lamps of various types. We will sort them by cost and tell you about the advantages and disadvantages.
- Incandescent lamps.
They are as cheap as possible, but they fail faster than all analogues. Service life is about 1000 hours. Organizing lighting for the fence of a country house with the installation of incandescent lamps does not require the installation of additional equipment. Image #2: Incandescent lamp - Halogen. They cost 2–3 times more than incandescent lamps, but they shine much brighter and last twice as long (2000 hours). Installation does not require installation of additional equipment.
Image #3: Spotlight with halogen lamp - Metal halide. They cost even more, have excellent light and last an average of 18 months. The use of metal halide lamps requires the installation of a ballast.
Image #4: Metal halide lampNote! Flashlights with metal halide lamps become very hot. It is not recommended to place equipment near trees and plants. Stems and leaves will become deformed.
- Luminescent. The brightness is the same as the two previous analogues. Average service life is 2 years. The use of fluorescent lamps also requires the installation of a ballast.
Image #5: Fluorescent lampsNote! Fluorescent lamps will not work at air temperatures below +5 °C.
- LED bulbs. They are more expensive than analogues, but are best suited for organizing street lighting of fences. They shine brightly, consume little power and last more than 50,000 hours. This more than compensates for the high cost.
Photo No. 9: LED wall lampNote! Organization of lighting of fences using lamps with LED lamps requires the installation of transformers.
So, you have chosen the most suitable lighting equipment. Go ahead.
Types of lamps
You can buy flashlights with built-in light sources (matrix with LEDs) or an empty base to which stand-alone lamps are connected. There are a huge number of different lamps, each with its own disadvantages and advantages:
- A filament lamp is one of the cheapest products with minimal durability compared to its analogues. The service life is about 1000 hours, and you do not need additional equipment for installation.
- Halogen. The cost is 2 or 3 times higher compared to an incandescent lamp. It is characterized by increased brightness and durability (about 2000 hours). No additional equipment is required for installation.
- Metal halogen. More advanced products, the average service life of which reaches one and a half years. To use them, lighting systems must be equipped with a ballast. Such products heat up quickly, so they should not be installed near trees and plants, otherwise the latter will wither.
- Fluorescent Lamp. The brightness is comparable to the second and third options, but the service life is longer - about two years. The use of such a lamp requires a ballast. Operation at air temperatures less than +5 degrees is prohibited.
- LED lamp. The most expensive, but versatile product. The best option for organizing outdoor or indoor lighting. It emits bright light, consumes minimal power, and lasts over 50,000 hours, which makes up for the hefty price tag. When connecting LEDs, you will need step-down transformers.
Preparatory stage No. 2. Project development, measurements and calculations
- Make a drawing. This is how fence lighting is usually done.
Image No. 6: general principle of organizing fence lighting - When designing your layout, carefully consider where fixtures and accessories will be placed.
- Take measurements. Transfer the obtained data to the diagram.
- Do the calculations. Calculate how many lamps, cables and materials will be needed to protect them.
When developing a diagram, take into account a number of important features of underground cable routing.
- The minimum depth for laying connecting lines is 70 mm.
- Cables should be located at a distance of 1.5 m from large trees and at a distance of 0.75 m from bushes.
Image No. 7: Requirements for underground cable laying - It is necessary to retreat at least 0.6 m from the foundation of the fence. In this case, the likelihood of damage to connecting lines placed in the ground due to ground movements will be reduced to a minimum level.
- Avoid crossing other cables whenever possible. If this cannot be done, learn the following: one of the lines must be at least 0.15 m higher or lower than the other.
Norms and requirements
In relation to artificial lighting, it is important to comply with a number of requirements. Some regulations are purely technical, while others ensure your safety.
- In accordance with clause 6.3.1 of the PUE, lamps of any type can be used as fence lighting devices, with the exception of security lighting, for which it is prohibited to use discharge-type lamps.
- According to clause 6.3.6 of the PUE, lighting structures can be installed at any height from the ground level. But lighting devices located in pits and niches must be equipped with a drainage system.
- When the height of garden fence lights is below 2.5 m, in accordance with clause 6.1.15 of the PUE, lighting installations must have a degree of dust and moisture resistance of at least IP54.
- In accordance with clause 6.6.8 of the PUE, all devices for lighting the fence must have a reliable and stable fixation after their installation.
- The installation location on the garden plot must be chosen in such a way as to ensure free and safe access during maintenance in accordance with clause 6.6.1 of the PUE .
- Suspended lighting options must have an overhang length of no more than 1.5 m in accordance with clause 6.6.4 of the PUE , otherwise it is necessary to provide additional fastening to prevent swinging.
However, when connecting fence lighting devices, it is important to take into account not only the established standards, but also the functions that will be assigned to the outdoor lighting.
Preparatory stage No. 3. Purchase of equipment, necessary tools and materials
Order lamps, cables, electrical tape, corrugated boxes at any specialized store. Here are the average prices:
- PVS cable (double insulation) - 27 rub./meter;
- electrical tape - about 80 rubles. for a 25-meter skein;
- corrugated pipes - 25 rub./meter.
Also make sure you have the necessary tools. To organize fence lighting you will need:
- screwdriver;
- good tester;
- drill;
- pliers or wire cutters;
- knife.
Note! For laying cables you will also need sifted sand.
Purpose
Illuminating a fence is not just an element of landscape design or decorative design of an estate. In addition to aesthetic functions, it performs important practical tasks. An illuminated fence provides visual information about all events occurring in the perimeter area of the site.
Uniqueness of the landscape Decorative function Comfort in the dark Social signal
In addition, the lighting is a signal for intruders, warning about the presence of people in the house and the impossibility of hidden penetration. An equally important function is safety - you can walk near an illuminated fence without the risk of tripping and getting injured with various consequences.
An important feature of the backlight is the ability to implement any backlight implementation options. All functions of the system will be preserved regardless of the appearance or method of placement of the luminaires. This makes it possible to show your imagination and create an attractive and original lighting design.
How to make fence perimeter lighting with your own hands
To make fence lighting with your own hands, proceed according to the following scheme.
Stage 1. Marking and digging a trench
Make markings from the distribution panel to the fence, near the fence and on its posts. Dig trenches (20–30 cm wide) to the depth indicated above. If there are other cables in the ground, be careful.
Remove all foreign objects (tree roots, sticks, branches, stones, stele, etc.) from the trenches, pour clean sand into them (layer thickness - 10 cm) and lightly compact the surface.
Note! The bottom of the trench should be relatively flat, without sudden changes! If they are present, the cables may be damaged during soil shrinkage.
Stage 2. Electrical wiring for outdoor lighting. Laying cables in trenches
Place the cable in the corrugated box and begin installation.
Note! The cable should lie in waves. Do not allow tension under any circumstances.
Image No. 8: Correct laying of the cable in the trench
After cutting and laying all the cables, proceed to backfilling the trenches. When working in each of them, proceed as follows:
- Be sure to inspect the cable and check for damage using a tester.
- If everything is in order, fill the trench with sifted sand (layer thickness - 10 cm).
- Lightly compact the surface (you can just use your feet).
- Fill the trench with a 20-centimeter layer of earth dug out when digging it.
- Place special warning tape or plastic film. This way you will avoid problems due to cable damage when performing excavation work on the site.
Photo No. 10: warning tape - Fill the trench completely. You don’t have to compact the soil - the soil will settle on its own.
Stage 3. Connecting street lighting to the installed utility network
Install lights. When connecting each lamp:
- strip the ends of the cables;
- twist the phase wires with the central contacts of the lamp;
- insulate connections with electrical tape;
- make sure the insulation is tight;
- check the zero-phase resistance and grounding using a tester.
After completing this work, the laid cable can be connected to the switches and the main electrical network of the country house.
Stage 4. Installation of an automatic outdoor lighting control system
Installing an automatic fence lighting control system involves installing a photocell that closes and opens the circuit. After connecting and setting it up, the lighting equipment will begin to work automatically.
Note! Photocells do not distinguish natural light from artificial light. Install the sensor in a place where it will only receive daylight.
Choosing lighting depending on the type of fence
The first thing you should pay attention to when planning the installation of lighting is the type of fence.
High solid
Typically, a solid fence reaches over 2 m in height and has no cracks or gaps. It is made from different materials:
- concrete;
- metal;
- brick;
- corrugated sheeting;
- tree.
Lighting for this type of fence involves the use of lamps with directional light or round lamps on supporting legs. In the first case, you can direct the light flux to the desired areas on both sides, in the second, you can evenly distribute the light with a more moderate brightness.
Top lighting of a solid fence.
If the installation of lighting is done for decorative purposes, soffits or unobtrusive spotlights are placed at the bottom of a high fence, and then the light is directed onto the surface. This way you can achieve interesting patterns. But only a fence with an aluminum or steel surface is suitable for this.
Ventilated solid
The main difference between this type and the previous one is the holes and gaps between the sections. Through such a fence one can see the territory of the dacha and, conversely, the street. The manufacturing materials are similar. The same type includes fencing-blinds, which open and close when needed.
The advantage of a ventilated fence over a solid one is lower energy consumption. After all, light comes through the cracks both from street lamps and from household lamps.
Such fences are best illuminated using spotlights or spots mounted directly into the ground. They will not only fulfill their direct task, but will also allow you to create a beautiful decor for your backyard area. Lamps on poles will not provide this opportunity. In fencing-blinds, special contact pads - lamellas - are installed on the sections. If there is a brightness control option, this will create the desired balance between natural and artificial light.
Illuminated fence-blinds.
Low
This type includes picket fences and fences made of poles. With such a fence, 2 lanterns on high posts near the gate and gate will provide good illumination of the driveway. Small lamps that are attached to the top of the supporting structures will help make the fence visually taller. The main thing is that they have sufficient resistance to mechanical stress. An alternative method is to install spotlights with directional light on the yard side.
Video clip with original light ideas for fences and railings.
Results of the work and useful tips
If you do everything correctly, your fence lighting will work reliably for many years. You will only have to periodically clean the lamps and change the bulbs in them.
Please note the following important points.
- If you are just planning to order a turnkey fence for a country house, think about organizing lighting before installing the fence. In this case, you can integrate lighting equipment into fence posts and sections the way you want and hide the cable routes as much as possible.
- Organizing fence lighting is a very labor-intensive and complex job. If you are afraid that you will not be able to cope, use the services of professionals. This way you will receive a guarantee for the installed structure.
Principles of organizing street lighting
Before you begin installing street lighting, you must understand exactly what you will need.
All equipment can be divided into 3 large groups:
- Lamps for street lighting. For this purpose, only special devices that are designed to operate in different climatic conditions are suitable. Their main characteristics are tightness and lack of moisture throughput. This group also includes motion sensors, which will react as you move around the area and the light will turn on in those areas where it is necessary.
- Control equipment. Such devices will be needed in order to automate the system and spend a minimum of time on its maintenance, but at the same time obtain high-quality lighting in the dark. Plus, standard switches are added to this to allow you to independently regulate the intensity of the lighting.
- Conductors and cables. This group includes wires, pipes, terminals, ties and other parts, without which it is impossible to create a single power supply circuit to all devices.
Safety precautions when carrying out electrical installation work
When carrying out electrical installation work, strictly follow the following safety regulations.
- It is strictly forbidden to work with connecting cables and live devices.
- Take care to protect the electrical network from unauthorized switching on.
- Wear protective gloves and rubberized shoes.
- Tool handles must be insulated.
- Constantly check cables and devices with a tester.
Following these simple rules will help you avoid electric shock.
Device from which manufacturer to choose?
Today, models from the following manufacturers are widely used:
- GALAD – lamps from Nichia (Japanese manufacturer of LED street and home lamps). Provides a warranty on all models for less than three years. The company sells more than 800 types of lamps with different types of mounting.
- Svetotronika is a domestic company. Lamps of all types have high protection against electric shock. Modular models are very popular. They are convenient to fold and place at different angles.
- Viled is a leading domestic manufacturer of LED lamps. The company's product range includes more than 1,500 thousand models. Viled specializes in lighting equipment for municipal municipalities. The lamps are equipped with anti-vandal protection.
- LuxON - the company produces powerful street lights for highways and large technical areas. All equipment is easy to assemble. The company produces more than 900 models of lamps.
- Wolta produces LED panels and street lights, including solar-powered ones. It has dealers in all major cities of Russia. All products have a three-year warranty.
Features and functions of LED backlight
LED lamps can be said to have eclipsed traditional lamps and surpassed them in a number of characteristics:
- they are more economical;
- their service life is significantly longer;
- they are durable and compact;
- their temperature is lower;
- their brightness is easy to adjust;
- they do not require special color filters;
- Finally, LED lamps can serve as an excellent interior component.
It is not surprising that LED lighting is rapidly replacing other types, and new houses are being built either with the expectation that they will be equipped with LED lighting, or with already built-in LED lamps.
However, “flexible neon,” as such lighting is sometimes called “popularly,” has not only a colorful and elegant role; in the interior it performs various functions:
LED lamps and strips illuminate steps, openings and corridors, making them more visible, for example, at dusk; contour lighting zones the room, divides it into parts; by highlighting niches, moldings, cornices and mirrors, they visually add volume to the room; with the help of LEDs, decorative accessories are highlighted, focusing attention on the necessary items; Thanks to LED cords and strips, you can realize a huge number of artistic ideas and make the interior unique.
Types of LED lamps
The electrical goods market offers various options for lamps with LEDs, classified according to many criteria.
Depending on the functional load, LED street lighting devices can be divided into 3 categories.
- Spotlights provide spot light to illuminate a limited area, such as the front entrance.
Street spotlight
- LED street lamps are one of the most common types of lighting devices used in private areas around the house, as well as on roads. Its distinctive ability is the presence of reflectors that allow it to scatter and/or direct a beam of light.
- Decorative elements are more often used to decorate buildings and in advertising. They can glow in different shades. Examples of such illuminators are duralight and duraflex.
LED lamps for street lighting differ from each other in the installation method.
- Ceiling-mounted outdoor LED luminaires are mounted on horizontal surfaces. The fastening element can be screws or a special base. They are used, for example, at construction sites, for illuminating entrances, or for decorative lighting design of various architectural objects.
- Floor-standing options are mounted on any horizontal surface. The simplest option is earth or asphalt. Such lamps can be of a floor lamp or lantern type. Floor lighting also includes a spotlight.
- Wall lamps are attached to the wall using screws or a built-in box. They may have lampshades.
- Console LED lamps are the most common option. Based on the name, it is clear that such lamps are mounted at an angle to a vertical support on a special mount called a console.
The latter option copes well with the darkness, well covering a large area near the house or road with light. This explains its leading position in comparison with other types of outdoor LED lamps. The main thing is to choose the right product in terms of power and workmanship.