Theory
The principle of transmitting an image from any medium to a vertical surface is based on the laws of optics. When various carriers interact with the light flux, the rays are refracted, the spectrum changes, and is subsequently displayed on the screen.
A homemade projector can be implemented in different ways. In practice, there are several image transmission technologies that are implemented in all kinds of filmoscopes, sliders and projectors. The most popular design solutions are:
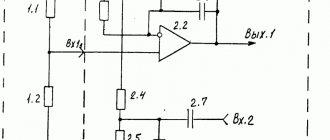
- Slide projector – is based on the passage of a light flux through a transparent medium. The figure below shows a diagram of such a device,
Rice. 1: schematic diagram of an overhead projector
where from the light source 2 the flow is directed by the reflector 1 to the slide 4 located in the focusing lens 3. The modified spectrum extends to the optical amplifier 6 and is transmitted to the screen 7.
- Epiprojectors – work by reflecting the light flux from opaque objects.
Rice. 2: schematic diagram of the epiprojector
The figure above shows the principle of operation of a reflective type projector, in which a light source 1 transmits a flux that is reflected by mirrors 2 and falls on an image 3. The modified light flux moves through the lens to a reflector, which transmits the image to the screen.
- Film projectors - transmit video information from moving film slides when a light flux passes through them.
- DLP projectors – broadcast video information by reflecting the light flux from a special chip. The flow itself is formed by a color logical matrix. Such devices provide high image clarity and color accuracy.
Rice. 3: Schematic diagram of DLP projector - LCD projectors - realize image transmission by passing light through a transparent LCD panel. Unlike DLP technology, LCD projectors produce bright, vibrant and rich colors.
Today, digital multimedia projectors can easily compete in photo and video quality with the best HD TVs. Therefore, home projectors can be used as a personal cinema for family movie viewing or as a means of displaying visual materials at conferences and lectures. Alas, it is almost impossible to recreate a digital multimedia device with your own hands, since it is necessary to synchronize the operation of mechanical, optical and digital elements. But anyone can implement a classic projector using digital equipment.
Blackview Max 1
- Processor : MediaTek Helio P23 8-core, 2.3 GHz
- Operating system : Android 8.1
- Screen : 6.01 inches, resolution 2160×1080
- Memory (RAM / built-in): 6/64 GB
- Battery : 4680 mAh
Price: from 25,990 rubles
The brainchild of the Chinese company Blackview is one of the few full-fledged smartphones with a built-in projector, which went on sale back in 2022. Max 1 was not famous for its compactness - it is a rather massive and large gadget. It's not just the projector that determines the thickness of the case. The device was equipped with a powerful battery, which came in handy, because the projector consumes energy at an impressive rate.
Judging by the reviews, the projection quality can be assessed as good and consistent with that declared by the manufacturer. When projected, the image is obtained in HD format. The optimal distance is 2 meters to the projection point - in this case you get the equivalent of a 70-inch TV. If you move further away, the image size will naturally increase, but the contrast will drop significantly.
We caution those who believe that Blackview Max 1 is capable of becoming a standard solution for a conference room. A smartphone, alas, cannot compete with stationary devices. But when you need to present a project urgently and there is no time to fiddle with wires, this gadget will be indispensable.
Smartphone based
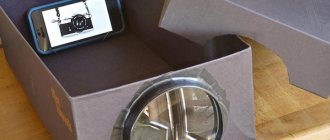
Mobile phones are used not only for long-distance communication, but also for exchanging video data. That is why the idea of making a projector from a pocket gadget arose. Theoretically, the process of obtaining an image consists of converting a graphic signal from the display through an optical lens to any surface. To do this, you need to make a case that completely darkens the surrounding space, and mounting devices for both the lens and the mobile device.
It's quite easy to pick up a magnifying glass or magnifying glass. The main thing is that its overall dimensions are commensurate with the size of the phone screen. You can use the front wall of the case to fix the magnifying glass. To secure the phone vertically, you can use a cardboard box or cardboard ribs in which the mobile phone will not wobble. The easiest way to make a housing is from a cardboard box, since it is easy to cut a hole in it with the required parameters without special equipment.
For work you will need tape, glue, a stationery knife, pencil, ruler and compass.
The process of making a projector from a smartphone is as follows:
- Choose one of the walls of the box so that the distance from it to the opposite one is greatest. This will provide a wider range for customizing display options.
- Mark the middle on the selected wall, around which cut a hole for a magnifying glass.
Rice. 4: make a hole for the magnifying glass - Attach a magnifying glass to the side of the box. To do this, you can use either tape or good glue; it is important that they do not get into the lumen of the lens, otherwise it may ruin the image from the projector.
Rice. 5: Attach the magnifying glass - Make a holder for your mobile phone; it is important that during installation it does not cover the display and fits inside the box.
Rice. 6: Make a holder - To adjust the image experimentally, select the most optimal distance from the mobile to the magnifying glass.
Rice. 7: choose the distance - Make a hole for the mobile charging cord to lead it out of the box.
The projector from your smartphone is ready, you can start broadcasting, but first install a special application that will rotate the image 180°. In some phone models, it is enough to disable auto-rotate screen and install the gadget upside down. It is better to organize viewing in a well-darkened room to increase the clarity and brightness of the picture.
In addition, a holographic projector can be made from a mobile phone and polymer plates (Fig. 8). But the cost of such a homemade product will amount to a considerable penny, with a relatively low image quality, so it can compete with the above-described sample only in the originality of the picture.
Rice. 8: Example of a holographic projector
I bought a Fresnel lens and built a simple projector for my child.
Today we will make a cheap, but very interesting and simple homemade projector. The children will be delighted!
We made this simple projector so that the neighbor's child would stop distracting us from working on the site :) He is delighted, we are delighted - and your children will be delighted too!
We will need
- Any box
- any phone
- Round Fresnel lens (costs only 50-60 rubles, at the end I will show you where you can find it)
Collect
The assembly process itself will not take much time!
You place the lens against the side of the box, outline it, and carefully cut out a hole. Make sure it is centered and offset downwards as the center of the hole should be aligned with the Vertu phone's camera.
Now insert the lens. If it is poorly secured, you can secure it with masking tape or adhesive tape:
Everything is almost ready. Now comes the hardest part - focusing. It all depends on the lens you have, the size of your phone's display, and the distance from the wall. Therefore, through trial and error, we find the optimal position and place the phone there:
Now find the optimal position in relation to the wall, and you're done! You can put the cartoon on your phone and go about your business. The image became
27 inches (i.e. more than half a meter diagonally!)
Of course, the image is not of very high quality and cannot be compared with a regular projector, but the neighbor’s child literally fell in love with the technology itself: to him it looks like magic! Now this is his favorite toy :)
In addition, if you make such a craft with your child, it will be an excellent educational activity. Imagine being told as a child that you could make a filmstrip projector with your own hands? I would be happy!
The lens can be found here and I've posted more photos of the effect in the comments.
If you decide to make a projector yourself, you will need to prepare the following tools:
Tablet or laptop based
This projector has higher image quality due to its larger screen. There are both more “humane” methods of execution, in which digital devices remain intact, and methods for which you need to remove the graphics matrix to broadcast the image.
To make a projector from a laptop, you will need a cardboard box large enough so that its end side is comparable to the monitor, and its length is at least 50cm. The magnifying glass should be quite large; a Fresnel lens will do the job well; it is also important to use a lens from a device for reading full-page books. To assemble the projector you will need to do the following:
- Cut a hole on the end surface of the box for a magnifying glass.
Rice. 9: Cut a hole for the glass
Its dimensions are made slightly smaller than the lens so that it can be secured to the edges.
- Use electrical tape, tape, or silicone sealant to secure the lens in the hole.
Rice. 10: Fix the lens
It is important to ensure a tight fit between the glass and the cardboard to prevent light from entering the projector from the outside.
- Make a hole in the opposite wall for a laptop monitor.
Rice. 11: Make a hole for the monitor
When installing the latter, the edge of the cardboard should overlap so that light, again, does not penetrate inside the projector.
- Place the laptop upside down so that the keyboard is on the lid of the box. Based on the principle of optical reversal of an image using a lens.
Rice. 12: install laptop
The simplest laptop projector is ready, just plug it into a power outlet and you can enjoy broadcasting your favorite movie. Using the same principle, you can use a tablet to assemble a projector.
Original solutions
Similar to a smartphone-based device, you can make a homemade 3D projector with your own hands or build a homemade laser projector for displaying holograms from improvised means, for example, from CD boxes, only these options are more labor-intensive, and the cost will be from 8 to 15 thousand rubles.
For a 3D device you will need a special size plastic pyramid, the dimensions of which can be found on the Internet. For example, this option: height 45 mm, the cut-out entrance hole is a small square 10x10 mm, and the lower part is 60x60 mm. Then you place this original design on your smartphone exactly in the middle of the screen and turn on the previously selected video clip.
Before making a projector with your own hands, you need to clearly define the purpose of its use, this will depend on the type of project you choose.
- If you want to surprise not only the younger members of the family, but also the older generation, make a holographic projector. If you have a mobile phone, download various YouTube videos to your smartphone and play magical holograms.
- You can create an original design based on your mobile phone and turn on cartoons in the children's room at any time.
- When you really want to watch exciting films like in a cinema, but you do not have the financial capacity for this in the family budget, then make a projector according to the second option - surprise your home with a cinema in your apartment.
To make a home theater out of a smartphone, you can do it even simpler: buy a ready-made box with a lens for a smartphone. This miracle of technology is sold on Aliexpress, a review is presented in the video below.
The distance between the optics is selected by trial and error, tips:
Projector from slide viewer
Making a projector from a ready-made unit greatly simplifies the task, since you no longer need to make any adjustments in terms of optical effects. These settings are made at the factory and the slide viewer perfectly displays graphic objects from paper or other A4 format media. Your only task is to choose the most suitable photo-video signal translator. In this example, we will look at making a projector from a working tablet monitor that fits the size of the diascope.
To do this you will need to do the following:
- Disconnect the matrix from the gadget; a tablet that you no longer use is perfect.
Rice. 13: remove the LCD matrix
When dismantling the matrix, be extremely careful not to damage the fragile element.
- Along with the LCD panel, remove the electronic board of the tablet, as it will be used to connect to the PC for data transfer.
- Place the matrix on the glass with a gap of about 5mm between them.
Rice. 14: Install the LCD panel on the glass
The distance is necessary for ventilation, since a powerful stream of light will also cause excessive heating of the surface.
- Install a fan opposite the gap; in this case, a cooler is used.
Rice. 15: Install the fan
Due to its low weight, it is attached using double-sided construction tape.
The projector is ready - just connect both devices to the network and launch the desired video material through the computer. With this projector you will get fairly high image quality, which, as a rule, depends little on the distance to the screen. It should be noted that smaller devices for viewing slides that will be comparable to the screen of a smartphone can be found on sale.
How to connect Android to a projector - wireless application
First of all, check if your projector has a dedicated smartphone app that you can use to control the device. This is the simplest and most affordable option. Brand name projectors come with apps that allow you to connect to them via Wi-Fi or Bluetooth and project your smartphone screen. If you can't find the program in the Play Market or App Store, go to the website of the projector company or look in the device manual.
Ways to improve picture quality
To increase the image clarity from a homemade projector, you need to perform the following simple measures:
- Set the monitor to maximum brightness and contrast - this will improve the quality of the picture.
- Eliminate any cracks or gaps in the projector cabinet that could allow excess light to enter.
- Paint the inside walls of your homemade projector black. If possible, it is better to cover it with black velvet fabric to minimize the reflection of light from the walls.
Rice. 16: Paint the walls black
In addition, external factors also affect the quality of the projector’s broadcast. So, in order for the picture to be well perceived, the windows should be covered with curtains during daylight hours, and at night all lighting sources should simply be turned off. Remember, the shorter the distance to the screen, the higher the image quality on it. The screen itself also matters - it is preferable to have a smooth, monochromatic surface in calm colors.
Wi-Fi controlled option
The picture below shows how to assemble an LED projector with your own hands at home and what you will need for this.
The body is created as described above. Let us illustrate further: