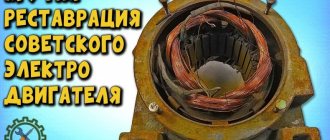
High-quality, timely repair of the electric motor rotor will maximize its service life, minimizing the likelihood of breakdowns. The structural complexity of this equipment requires special attention to professional repair. Below we will consider how to repair and rewind an electric motor rotor, briefly outlining the features of the services offered, while recalling the types of electrical installations.
Electric motor rotor repair - key steps
Qualified performance of rotary electric repairs. the engine will provide factory efficiency, restoring the original functionality of the device. To achieve impeccable quality, our craftsmen strictly observe all the details of technological operations in accordance with the technical instructions of the manufacturer of a specific model of installation. Only experienced specialists can repair the electric motor rotor, guaranteeing no breakdowns and a long uninterrupted operating period while observing the operating rules.
Regardless of the type of service chosen, rewinding an electric motor rotor involves the following operations:
- dismantling and dismantling of electrical installations;
- removal of old windings and failed mechanisms;
- restoration of insulating layers, windings, lamellas and other parts;
- replacement of bearings followed by painting of the housing;
- electrical assembly engine;
- visual assessment of winding quality;
- final diagnostics of the device.
It is worth understanding that the exact list of stages depends on the degree of damage and customer requirements. We offer a full range of repair services, including, in addition to motor rewinding and motor rotor repair, restoration of explosion-proof models after complex emergency situations.
How to determine if an angle grinder's armature is faulty
Signs of a broken armature angle grinder are: increased sparking of the brushes on the motor commutator, vibration of the motor at low speeds, rotation of the working shaft in different directions. If such symptoms are present, you should stop using the tool - this is dangerous. Suspicions can be easily verified using simple tests.
Visual inspection from outside
Troubleshooting should begin with a visual inspection of the angle grinder:
- Carry out a general inspection of the instrument.
- Pay attention to the integrity of the power cord and the presence of voltage in the outlet.
- Using a voltage indicator, make sure that current is flowing to the motor commutator and the start button.
Inspection of the device from the inside
If everything is in order with the power supply, but the angle grinder does not work, you will have to open the case to gain access to the motor. As a rule, disassembly is not difficult. But you need to follow simple rules that will help you avoid troubles during reassembly:
- Be sure to disconnect the device from the mains before disassembling.
- Remove the working disk and protective cover from the spindle.
- Open the case in a well-lit place, on a clean table surface.
- Remember the location of all parts and assemblies before disassembling. It is recommended to sketch or photograph the internal structure of the device.
- Place screws and fastening screws in a separate place so that they do not get lost.
It is best to inspect the engine under bright lighting so that all small parts are clearly visible. The armature should rotate freely around its axis; properly functioning bearings should not make any sound during operation. There should be no traces of melted wiring on the armature, the circuit windings should be intact, without breaks. You can smell the rotor. When there is an interturn short circuit, the insulating varnish burns and emits a persistent specific odor. But such a diagnosis requires some experience.
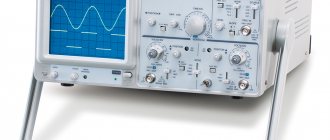
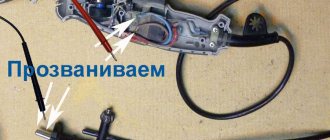
Continuity testing of circuits with a tester
If a visual inspection does not give clear results, it is recommended to continue the examination using a multimeter. Having set the mode switch to the ohmmeter position (200 Ohm range), you need to “ring” two adjacent armature lamellas with two probes. If the resistance on all turns is the same, this means that the windings are working properly. If on some pairs the tester shows a different resistance or an open circuit, there is a malfunction in this coil.
Types of repair services
- Current repair of the electric rotor. engine inspection is carried out in order to eliminate various malfunctions by replacing or restoring (if possible) damaged elements.
- Technical - involves a routine check of the functionality of electrical equipment. If necessary, the electric rotor is rewinded. engine, as well as restoration of failed components.
- Urgent - performed in emergency cases and as quickly as possible. The cost of rewinding the electric motor rotor in this case is higher due to unscheduled work. Major - involves the complete restoration of the electric motor rotor with a detailed check of each structural element. This approach ensures maximum efficiency and functionality during long-term operation.
How to check the condition of the brushes
When installing new carbon brushes, it is recommended to grind them in for a better fit to the commutator surface.
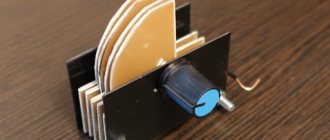
It is best to adjust carbon brushes using a homemade grinder. The lap is a shaft on which sandpaper is attached. The easiest way is to make the shaft from wood with a diameter equal to the diameter of the commutator, turning the workpiece on a lathe. A metal rod is inserted tightly along the axis inside the shaft. The device is attached to the chuck of an electric drill, the drill is turned on, and the brushes are brought to a rotating emery wheel.
The adjustment should be carried out carefully, periodically applying the brushes to the rotor commutator to check their clearance.
Having ground the brushes to the commutator, it is recommended to check the correct fastening of the brush holders before installation. When factory installed, the brush holders are set to neutral, which minimizes sparking on the commutator. If there are no factory marks, then the installation of the brush holders is adjusted by moving the brush holder in the direction opposite to the rotation of the rotor until a minimum spark is formed.
The brushes should not dangle in the brush holder, but should be pressed tightly against the commutator lamellas. The pressing force is regulated by springs in the brush holder.
Sparking faulty collector
An increase in sparking on the rotor commutator may appear due to a short circuit of the armature, a break in the armature coils, or a short circuit of the windings to the armature body. All these faults can be eliminated only with a major overhaul of the rotor.
Types and features of serviced electric motors
- Crane electric machines are used in the design of lifting equipment and cranes. They are distinguished by a closed explosion-proof housing at high frequencies and magnetic fluxes, which ensures maximum overload capacity. By type of power supply, installations can be either AC or DC.
- Traction high-voltage electric motors are adapted to harsh operating conditions at extreme conditions. Powerful units are designed to drive vehicles and industrial equipment. Despite the massive design, the stages of repairing the rotor of an electric motor of this type are similar to those for repairing other versions of machines.
- Elevator installations are used to drive winches and elevators. The line of these machines is distinguished by a large list of modifications, including brushless versions, as well as synchronous and asynchronous models. Rewinding of the rotor of an electric motor of this type can be carried out at the site of operation of the equipment. Rotary motors can be either three-phase or single-phase.
Approximate prices for rewinding an electric motor rotor are indicated in the price list. To find out the cost of the service taking into account the type of model, frequency, kW, nature of the breakdown and discount, contact the company manager. Call right now and get impeccable results in a short time!
How to properly sand the surface of the commutator
Before you begin to modify the manifold of the Makita 2470 rotary hammer, you must balance the rotor.
Option for measuring the runout of the commutator relative to the rotor
At home, grinding the manifold of a Makita 2450 or 2470 rotary hammer is best done with sandpaper attached to a wooden block already on a balanced rotor.
The end of the rotor shaft is secured in the drill chuck through soft copper or aluminum foil. A drill with a rotor is securely fastened in a vice or homemade device.
While rotating the rotor, try to center it in the drill chuck.
Installing the rotor into the chuck
Electric motor rotor repair prices
| Power, kWt) | Rotation speed, rpm | |||
| 3000 | 1500 | 1000 | 750 | |
| Up to 1.5 | 2740 | 2806 | 3417 | 4057 |
| 2.2 | 3090 | 3245 | 4154 | 4897 |
| 3 | 3642 | 3901 | 4973 | 5179 |
| 4 | 5012 | 4652 | 5413 | 6804 |
| 5.5 | 5296 | 5301 | 5978 | 7511 |
| 7.5 | 6630 | 6919 | 7312 | 11021 |
| 11 | 8139 | 8147 | 9937 | 13182 |
| 15 | 12088 | 12049 | 11737 | 14803 |
| 18,5 | 13001 | 13345 | 15217 | 24450 |
| 22 | 15057 | 15805 | 23408 | 25522 |
| 30 | 17648 | 18202 | 25857 | 29275 |
| 37 | 23803 | 25949 | 30677 | 40080 |
| 45 | 29055 | 28737 | 38389 | 48070 |
| 55 | 34546 | 32811 | 41481 | 60759 |
| 75 | 44670 | 48812 | 64472 | 82899 |
| 90 | 47893 | 51078 | 78166 | 99898 |
| 110 | 67202 | 73052 | 95759 | 122517 |
| 132 | 80848 | 87962 | 114110 | 147423 |
| 160 | 98012 | 106439 | 138740 | 179116 |
| 200 | 123101 | 132548 | 173924 | ———- |
| 250 | 154120 | 167435 | ———- | ——— |
| 320 | 237156 | ————— | ———- | ———— |
| kW | 3000 rpm | 1500 rpm | 1000 rpm | 750 rpm |
COEFFICIENTS USED IN THE CALCULATION:
- Single-phase - 1.5;
- Foreign production -1.5;
- Explosion-proof – 1.3;
- Urgent – 1.5;
- Two-speed – 1.5; Two-speed with independent windings – 2.
- Old model type AO, A, VAO -1.5
In what cases can you save an anchor and restore it yourself?
If damage to the armature is determined with guaranteed accuracy, the part must be removed from the electric motor. Disassembling the motor must be done with special care, after removing the brushes and disconnecting the power terminals. The rotor is removed along with the support bearings and the motor cooling impeller; they form a single whole with it.
If most of the wiring in the armature is damaged and the balancing is disrupted as a result of overheating, it is better to replace it entirely. An imbalance is indicated by increased vibration and an uneven hum when the mechanism operates.
How to rewind an anchor - step-by-step instructions
If the balancing of the armature is not disturbed, and the problem is only in damaged windings, then such an armature can be restored independently by rewinding the coils. Rewinding a rotor at home requires a lot of patience and accuracy.
The technician must have skills in working with a soldering iron and instruments for diagnosing electrical circuits. If you are unsure of your abilities, it is better to take the engine to a workshop for repairs or replace the entire armature yourself.
To rewind the anchor yourself you will need:
- wire for a new winding. A copper core with a diameter exactly matching the old conductor is used;
- dielectric paper for insulating the winding from the core;
- varnish for filling coils;
- soldering iron with tin-lead solder and rosin.
Before rewinding, it is important to count the number of turns of wire in the winding and wind the same amount of new conductor onto the coils.
The rewinding process consists of the following steps:
- Dismantling old windings. They must be carefully removed without damaging the metal body of the armature. If any burrs or damage are found on the body, they must be smoothed out with a file or sanded with emery. Sometimes, to completely clean the body of slag, craftsmen prefer to burn it with a torch.
- Preparing the collector for connecting a new wire. There is no need to remove the manifold. You should inspect the lamellas and measure the resistance of the contacts in relation to the housing with a megger or multimeter. It should be no more than 0.25 MOhm.
- Removing old wiring on the manifold. Carefully remove the remaining wires and cut grooves in the contacts. In the future, the ends of the coil wires will be inserted into the grooves.
- Installation of sleeves for anchors. The sleeves are made of dielectric material 0.3 mm thick, for example, electrical cardboard. Cut a certain number of sleeves and insert them into the grooves of the cleaned anchor.
- Rewinding reels. The end of the new conductor is soldered to the end of the lamella and wound in successive circular movements, counterclockwise. This laying is called “laying to the right.” Winding Repeat for all coils. Near the collector, tie the wires together with a thick thread of cotton fabric (it is prohibited to use nylon, as it melts when heated).
- Checking the winding quality. After laying all the windings, check with a multimeter for the absence of interturn short circuits and possible breaks.
- Finishing processing. Treat the finished coil with varnish or epoxy resin to secure the winding. In factory conditions, the impregnation is dried in special ovens. You can do this at home in the oven. As an option, use quick-drying varnishes for impregnation, applying the coating in several layers.