The general decline in prices for LEDs and matrices based on them determines the widespread use of LED spotlights, and the universal nature of these lamps expands the scope of their application - local areas, parking lots, decorative lighting, and so on.
Schemes for connecting an LED spotlight to a 220 V network are not very complicated - a minimal set of tools and a little electrical installation skills are sufficient factors for independently connecting the spotlight to the network.
Step-by-step instructions for connecting an LED spotlight
LED lighting products are distinguished by their versatility, durability, reliability, versatility and efficiency.
They became a real breakthrough in the field of lighting technology. LED spotlights can be used for indoor and outdoor lighting.
By following the step-by-step instructions, you can connect and install the lighting device yourself.
Connection diagram
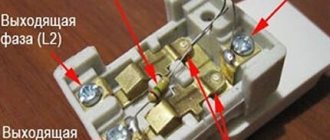
The floodlight for connecting the network has an input coupling for the cable and a terminal socket with three wires - phase, neutral, ground. Before connecting the wires correctly, you need to check their markings. Conductors are letter or color coded.
Phase wire (L) is red or brown, zero (N) is blue or black. Wires are pulled through the hole in the housing. It is necessary to connect plus to plus (phase wires), minus to minus (neutral wires) and ground.
If a sensor is provided in the LED spotlight connection diagram, two wires, plus and minus, are connected to it.
Necessary equipment and materials
To connect the spotlight you will need:
- side cutters;
- knife for stripping wire insulation;
- soldering iron;
- insulating tape;
- screwdriver;
- screwdriver;
- wires.
Since the power of the LED spotlight is low, you can choose a thin wire of 1 - 1.5 sq. mm. For powerful devices, it is better to take a wire with a cross-section of 2 sq. mm.
Important! The wire must be selected from the same material as on the spotlight
Step by step procedure
First of all, if you purchased an inexpensive device from a little-known manufacturer, it is advisable to disassemble it and inspect it. There should be no visible damage, unconnected wires, or lack of insulation.
Basic steps for installing an LED spotlight:
- removing the terminal block fastening;
- stripping the ends of wires;
- input of network electrical wires;
- connecting power wires;
- securing the cover;
- installing an LED spotlight on a bracket;
- installation of the assembled structure on the desired site.
The connected wires must be stripped of 2-4 cm of insulation.
Connection procedure with and without grounding
Before connecting the spotlight, be sure to read the instructions. If the polarity is not indicated, it can be ignored when connecting to the network. To install the spotlight, a flexible copper conductor that is resistant to high temperatures is used.
It is not always necessary to connect the insulating wire. For example, if the supply wire has a two-core design. Then the ground can be insulated and hidden in the device.
To ensure trouble-free operation, step-down transformers are additionally used.
Features of connecting an LED spotlight with a motion sensor
Models with a motion sensor are very popular. They work when moving near the sensor, so there is additional energy savings.
The motion sensor is an ultrasonic module with a relay. When movement occurs in the visual range, the relay closes, power is supplied and the lighting device turns on.
Additionally, you can set the time in the sensor after which the power will turn off if there is no movement within the range. You can also mount a classic switch in parallel if the sensor fails.
Main conclusions
LED spotlights are reliable devices for creating outdoor and indoor lighting.
They can be equipped with both minimal functionality and additional options that simplify work.
You can connect the spotlight yourself by following the instructions. In order to connect it to the network you need a minimum set of tools.
PreviousNext
Necessary equipment and materials
To connect the spotlight you will need:
- side cutters;
- knife for stripping wire insulation;
- soldering iron;
- insulating tape;
- screwdriver;
- screwdriver;
- wires.
Since the power of the LED spotlight is low, you can choose a thin wire of 1 - 1.5 sq. mm. For powerful devices, it is better to take a wire with a cross-section of 2 sq. mm.
Important! The wire must be selected from the same material as on the spotlight.
Installation recommendations
When connecting the spotlight, it is advisable to use a cable with standard core insulation colors and follow the connection order.
Cable for connecting a single-phase load with a grounding conductor.
- the red wire is connected to the phase terminal (L);
- blue – to zero (N);
- yellow-green – to ground (PE).
This order must be observed both on the side of the power source and on the consumer side (luminaire). Of course, for electric current, the color of the core does not matter, and if the connection is not made correctly by coloring the insulation, nothing will happen - the spotlight will work just as well. But compliance with the rules speaks about the professionalism of the installer. And in the future, if repairs or reconnection are necessary, it will be easier for another technician to understand the circuit.
If the wiring runs along the street, in order to ensure anti-vandalism, it makes sense to lay it in pipes. In this case, you need to understand that the conditions for heat removal will be worse than in the version with an open gasket. If, according to calculations, it turns out that the load power is close to the upper limit for the selected cross-section, then the diameter of the wire must be increased by at least one step. In this case, it is even more correct to clarify the parameters of the conductors in the PUE.
Installation of electrical wiring in a metal pipe.
How can you adjust the detector?
In modern motion sensors (MS), you can adjust the sensitivity, illumination, delay time for turning off the light and installation angle.
All these parameters, when properly configured, can save up to 50% of energy, which is a very significant figure. However, it should be immediately noted that not all motion sensors have three controls. In older models, you can adjust only two parameters - delay time and sensitivity, or delay time and light level, as in the photo below:
Now we will look separately at how to set up a motion sensor on a spotlight or other type of lamp.
Three-wire motion sensor connection diagram
Three terminal sensors are typically used in IR sensor type designs. A fairly common manufacturer of inexpensive infrared motion sensors is IEK. You can find good products on Aliexpress without any problems.
More expensive products are made according to a similar principle; the connection diagram for a lamp with a sensor is similar for a sensor model from any manufacturer. Devices must have a degree of protection IP44 against penetration of solid objects greater than 1 mm and drops of moisture. If the motion sensor needs to be moved outside the house, then installation is only possible under a canopy.
If you want to protect the device from rain and snow, look for a model with IP65 dust and moisture protection and a temperature rating for your climate. Most IR sensors can only operate down to minus 20 degrees Celsius.
To connect a three-wire IR motion sensor, a full phase and zero are started. For correct placement you will need the same basic 4 elements:
- Circuit breaker (which is in the switchboard).
- Distribution box (in which the main installation).
- Sensor (a wire from the junction box is connected to it).
- Lamp (second wire from the junction box).
The sensor is connected with three wires to the factory in the distribution box of three cables:
- There are three wires from the machine: L (phase), N (working zero), protective zero or ground (PE).
- There are three wires per lamp if the body of the lighting fixture is made of metal.
- Three wires per sensor.
How to connect a motion sensor to a light bulb using three wires is discussed in detail in the diagram.
The zeros (N) are collected at one point (as in the case of the previous diagram). The ground from the circuit breaker is also connected to the luminaire ground (zero drive or PE). The motion sensor with three terminals is now supplied with phase-zero:
- Two input ones are for 220V power supply, usually labeled as L (phase) and N (zero).
- One output is designated by the letter A.
Installation
To install a three-wire motion sensor:
- Unscrew the two screws in the housing. The terminals are located under the back cover.
- Some models are already led out of the housing by three wires of different colors. By color you can determine what it means: ground (A) red, zero (N) blue, phase (L) brown. But if the cover opens without much effort, it is recommended to verify the correctness of certain markings in person by looking at the inscriptions next to the terminals.
- A simplified diagram of connecting a motion sensor to a light bulb looks like this:
- A little clarity in this picture.
- You can do without a junction box for connecting wires and run all the wires directly into the sensor box, if the inside is spacious enough and has its own terminal block. Phase-zero was supplied from one cable, and phase-zero was removed from the other.
- The result is a simplified, but the same three-wire circuit, only without a junction box.
Setting and adjusting sensitivity
After successfully connecting a lamp with a motion sensor, you need to set its parameters correctly:
- On the back of the case, find the main controls. LUX with the positions of the month and the sun is responsible for triggering depending on the illumination. Do you need the sensor to turn on in a room with a window only when it is cloudy or the sun goes down? Turn the regulator towards the moon.
- Use the second regulator to set the shutdown time. The delay can be set from a few seconds to 5-10 minutes.
- The rotation angle of the entire sphere allows you to adjust the detection of animals.
Advantages and nuances of use
To prevent the sensor from reacting to animals, do not turn the sensor head down towards the floor. Position it so that it captures the movements at the level of the head (shoulders) of all residents of the house. Typically, animal capture does not occur at this level.
If you need the sensor to temporarily not work, then point its head at the ceiling. Therefore, motion capture is not possible. The sensor's motion capture depends on the angle of inclination. In reality, the maximum distance reaches 9 meters. But according to the passport it may be higher.
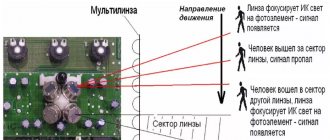
The sensor uses infrared rays for detection. If you move from beam to beam, the device notices activity and reacts. When you walk directly into the beam, the sensitivity of the sensor is minimal and the device may not immediately respond to you.
For this reason, motion sensors are installed not directly above the doorway, but slightly to the side. For example, in the corner of the room.
Flaws
The disadvantage of the three-wire circuit for connecting the motion sensor to the lamp is that the light does not turn on forcibly. If the sensor malfunctions for some reason, problems will begin with its correct operation. To avoid this, it is recommended to add a switch to the circuit.
How to connect a floodlight with a motion sensor - detailed instructions
How does a spotlight with a motion sensor work?
A spotlight with a motion sensor is no longer something new in our everyday life. It can often be observed in courtyards when lighting a gate or path to a house, when lighting streets, tunnels or arches of houses, as well as in other places at night that do not require constant lighting. In addition to the street, it can also be used in homes, for example, in corridors, toilets and other rooms where you find it appropriate. This very convenient device helps solve several problems at once:
- illumination of space, which can be organized only where necessary;
- energy savings that we get by using light only when necessary;
- protection from uninvited guests who will be scared away by a suddenly turning on light, or at least by turning on the light you will be notified of their presence.
You can consult on this site - https://anrj-led.ru/catalog/svetodiodnye-prozhektory/ - about choosing a particular LED floodlight with a motion sensor to solve your particular problem, as well as read user reviews.
Design of a lamp with a motion sensor
The design of this device includes a lamp with a lamp (incandescent, halogen or LED), to which an infrared motion sensor is attached. It is also equipped with a bracket for fastening (the kit usually includes dowels and screws). Connecting a floodlight with a motion sensor The purchased spotlight should come with instructions for connecting it, but if you don’t find it, don’t despair, because connecting this device is quite simple:
- To connect to the electrical network, use a 2- or 3-wire wire (depending on the presence of grounding in the house) SHVVP or PVA with a minimum cross-section of 0.5 mm sq for an LED flashlight (halogen, depending on the power of the lamp, may require a larger wire cross-section, which will significantly increase the cost of its connection budget). The wire to the selected connection point must be laid in a corrugated pipe, which is attached to the wall of the house.
- Attach the lamp mounting bracket to the selected location.
- Unscrew the cover of the terminal block (contact box) of the device, pass the cable through a special hole, secure it with a clamp and connect the contacts in accordance with their colors: blue or black - zero (0 or N), brown or red - phase (L or F), and yellow -green – grounding, if present. Tighten the clamping bolts of the contacts and cable fasteners. Close the terminal box and tighten the bolts in its cover.
Below is the connection diagram:
Connection diagram
4. Attach the device to the bracket and use the side bolts of the spotlight to adjust its tilt angle.
Setting up a motion sensor
There are 3 controls on the sensor panel that will help you adjust the operation of the spotlight: Sens (Sensitivity) - actually regulates the size of objects and the degree of their movement to which the device will respond: HIGH - high, i.e. the light will turn on when branches move from the wind or a cat runs by, LOW – low sensitivity, i.e. the device will only respond to the movement of large objects, such as people. In various models, this regulator can be discrete and have only two extreme positions, or it can be adjusted smoothly. Time – adjusts the time during which the lamp will be on (usually has a range of 5 seconds - 15 minutes). Repeated activation of the sensor while the flashlight is on causes a new countdown. Lux (Light) or DeyLight (Daylight) – sets the degree of daylight at which the flashlight will start to turn on. Those. With this regulator, you can limit the light on only at night, or allow it to turn on while driving around the clock.
Effective area of a floodlight with a motion sensor
Various motion sensors are characterized by the degree of area coverage, more precisely, by the viewing angle and radius (range) of action (you can obtain this information in the technical specifications of the device). By turning the sensor vertically and horizontally, you can adjust which area of the territory it will monitor.
The most progressive in many respects are spotlights with LED lamps: they are very economical, safe, with minimal heating, have high efficiency, and light up instantly. According to statistics, LED spotlights can save up to 85% compared to halogen counterparts.
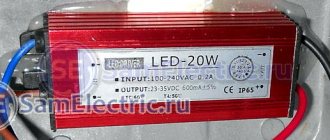
Diagram of connecting the driver to the LEDs
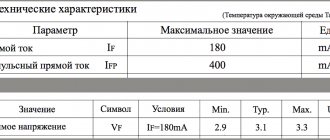
Connecting the driver to the LEDs is simple, anyone can do it. All markings are applied to its body. You apply input voltage to the input wires (INPUT), and connect a line of LEDs to the output wires (OUTPUT). The only thing is that it is necessary to maintain polarity, and I will dwell on this in more detail.
Input Polarity (INPUT)
If the voltage supplying the driver is constant, then the pin marked with the “+” sign must be connected to the positive pole of the power source
If the voltage is alternating, then pay attention to the markings of the input wires. The following options are possible:
- Marking “L” and “N”: a phase must be applied to the “L” terminal (located using an indicator screwdriver), and a zero must be applied to the “N” terminal.
- Marking “~”, “AC” or absent: polarity does not need to be observed.
Output polarity (OUTPUT)
Polarity is always observed here! The positive wire is connected to the anode of the first LED, the negative wire to the cathode of the last. The LEDs themselves are connected to each other: the anode of the next one to the cathode of the previous one.
Diagram of connecting the driver to a garland of three LEDs connected in series
If you have a lot of LEDs (say, 12 pieces), then they will have to be divided into several identical groups, and these groups will have to be connected in parallel. Please note that the total power consumed by the luminaire will be the sum of the powers of all groups, and the operating voltage will correspond to the voltage of one group.
With this connection method, the currents of all four groups of LEDs are added
Precautions and Tools
Any work with electricity is potentially dangerous, therefore, despite the fact that almost anyone can handle the installation, it is extremely necessary to follow safety precautions and personal safety precautions. Let's talk about the basic rules and recommendations:
- A mandatory requirement is dry hands. It is impossible to install, dismantle, or repair street lighting in damp conditions.
- Be sure to disconnect the circuit from the power source;
- Do not use devices that have a low degree of protection against moisture and dust outdoors;
- Tool handles must be insulated;
- Before starting installation, do not forget to measure the voltage using an indicator screwdriver; deviation from 220 Volts is allowed no more than 10%;
- Do not use chemicals near the LED device;
- If you detect problems with the device, the spotlight begins to flicker or dimly light, disconnect it from the power source;
- Don’t forget about maintenance: the spotlight needs to be wiped down periodically.
And a few more tips:
- When using an LED element as a street lamp, pay attention to the strength of the housing - the spotlight must be protected;
- If you are using an LED light to illuminate the area around your home, hang it under the roof for additional protection from precipitation;
- If there are problems, give up the idea of repairing the devices yourself. Manufacturers strictly prohibit disassembling the device and repairing it yourself; moreover, this leads to refusal of warranty service;
- It is also prohibited to operate the spotlight without protective grounding;
- We do not recommend looking directly at the switched on spotlight at close range;
- Do not install the spotlight with the glass facing up.
Note! It is very important that the installation of the spotlight is carried out correctly, that is, the integrity of the insulation is maintained. The wiring should work correctly. If everything is done according to the rules, in compliance with recommendations and safety precautions, and all elements work correctly, then this will only increase the life of the device. With proper use, it can last up to 15 years.
If you notice condensation on the inside of the LED spotlight, the waterproofing of the device is most likely damaged. It is necessary to remove the front part of the device and check the seal - it may be worn out. Dry the device, reassemble it, and then you can connect it to power.
For installation you will need the following materials:
- Wires - choose them from the same material as the spotlight;
- Insulation – safe to use special terminal clamps;
- Side cutters;
- Shurkvert;
- Soldering iron;
- Screwdriver.
If you have this simple set in stock, you can start working.
Electrical connection
To connect most lighting devices to a single-phase 220 V network, they are equipped with three terminals:
- phase (denoted by L);
- neutral conductor (N);
- grounding conductor ().
Obviously, the connection must be made using an electrical network with TNS neutral mode. The peculiarity of this mode is that it consists of phase conductors, neutral (N) and protective (PE). In this case, the connection diagram for an LED spotlight with three wires is simple - phase conductor to phase, neutral to neutral, grounding to PE. The same applies to the TNC-S system. In it, the neutral and protective conductors are separated at a certain point, usually at the entrance to the building. But many networks are made according to the outdated TNC scheme, where the neutral and protective conductors are combined.
In accordance with the rules, in these networks it is necessary to use lighting devices that do not require grounding. Such devices include devices with the following protection class:
- 0 – protection is provided by one layer of insulation, the least safe option;
- II – devices with double or reinforced insulation are noticeably more expensive;
- III - devices powered by ultra-low safe voltage (below 50 V AC), they are beyond the scope of this article.
Important! The protection class of an electrical appliance can be determined by its passport, technical specifications or markings:
- 0 – not marked;
- I – grounding symbol or the very presence of a grounding terminal;
- II – double insulation icon;
- III – Class III protection badge.
In class II devices, safety is ensured by the presence of protective grounding, and their use in a TNC network without grounding is contrary to the rules and can lead to dire consequences if the main insulation is broken and voltage appears on the luminaire body. It is also contrary to the PUE to connect the grounding terminal to the working neutral conductor (N, PEN).
At his own peril and risk, an electrician can connect a device of protection class II without connecting to the protective ground. And the spotlight will even work. But he must remember that the consequences will be on his conscience. He may even have to answer to the law.
Safety precautions and operating rules
When doing any work with electrical installations, the main rule must be observed - all actions must be performed with the power turned off. The absence of voltage must be checked with a pointer directly at the place of work. The electric tool must be in good working order and have no damage to the insulation. Even better, even at home, use protective equipment against electric shock - dielectric gloves, carpets, galoshes. There are never too many security measures.
During operation, it is also necessary to monitor the integrity of the insulation of wiring and switching equipment. In case of any damage, the lighting device must be taken out of service until the fault is eliminated.
How to connect an LED spotlight: electrician answers and recommendations
LED spotlights, which appeared on the market not so long ago, are rapidly replacing other types of lighting devices. At the moment, LED lighting is recognized as the most economical and has advanced operating capabilities. The process of installing an LED flashlight will take a considerable period of time, and all that remains is to understand how to connect the LED spotlight.
In our article, we suggest that you familiarize yourself with the list of important aspects regarding connecting the device
This operation requires some electrical knowledge, so it is very important to carefully follow each step
We connect the LED spotlight with our own hands
The connection diagram for a floodlight based on LEDs will vary depending on the elements of the circuit, for example, if you need to additionally install a motion or light sensor. The process of installing a light source of this type is not particularly difficult.
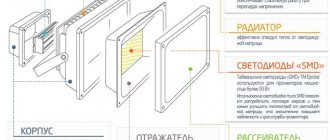
Design features
The design of such a lighting device includes several elements: LED lamps, a bracket, a control unit consisting of a sealed housing, a controller and a battery or board, which is used in stationary models.
Reliable operation of the device is ensured by a controller that regulates the LED spotlight using time relays and automatic switches that perform a protective function.
Such light sources are controlled in two ways: manually through switching devices, automatically due to the presence of a control unit that responds to changes in light intensity or to the movement of an object within its range.
The LED spotlight provides glow due to design features that recreate the process of recombination of electrons and holes located in the region of the pn junction. The basis of the operation of such light sources is the contact of semiconductors characterized by different types of conductivity.
Spotlight connection diagram
To insert the power cable into the terminal box, you need to open it by removing the fastening connection. To ensure the tightness of all connections, a gland is provided through which the power cable is routed.
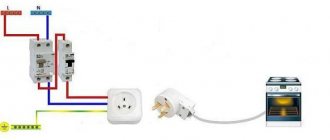
The connection diagram for a 220 V network is as follows:
If you need to connect an automatic control unit in the form of a motion sensor, use this option:
For normal operation of the lighting system, it is necessary to configure the motion sensor in three directions: sensitivity level, photosensitivity and operating time regulator.
Stage-by-stage execution of work
The spotlight can be located in an accessible area, however, most often, to ensure safety, such lighting devices are installed at a sufficient height. Therefore, it is recommended that all connections be made before the device is mounted on the bracket.
Basic actions:
- Removing the terminal box fastening;
- Inserting the power cable into the gland and then connecting it to the terminal block;
- The box lid is closed;
- The spotlight is mounted on a bracket;
- The entire structure is installed in the area where the lighting device is planned to be used.
The bracket can be installed at any angle, for which the side screws of the fastenings are loosened in order to be able to adjust the direction of the light.
The process of connecting to the power grid
Connecting the spotlight to the network requires creating safe working conditions. To do this, there must be no phase on the connected cable.
The structure is hermetically closed after all elements of the circuit have been connected.
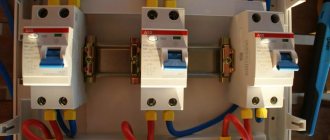
It is important to connect the three-wire wire correctly, for which you can follow the generally accepted colors: “zero” - blue or black wire; “earth” is almost always yellow-green; “phase” is the red or brown color of the wire. Installation of the spotlight and connection to the 220 V network is carried out using a circuit breaker
A sufficient level of safety can be provided by a machine characterized by such a parameter as a protection current that exceeds the power value of the light source several times
Installation of the spotlight and connection to the 220 V network is carried out using an automatic switch. A sufficient level of safety can be provided by a machine characterized by such a parameter as a protection current that exceeds the power of the light source several times.
Thus, it is quite possible to install and connect the spotlight to the electrical network yourself, if the contractor follows the safety recommendations. A lighting device of this type is installed on a bracket, and with the help of not fully tightened bolted connections it is possible to change the direction of the light beam.
The light source housing is hermetically sealed after installing the cable; in addition, it must be grounded. For this, a separate grounding conductor or a power cable conductor is used. Since such lighting devices are most often installed outdoors, it is necessary to ensure that the spotlight has a sufficient degree of protection (minimum IP54).
(9 3.89 out of 5) Loading...
How to choose a floodlight for your home or garden
- Spotlight locations
- What lamps do spotlights work with?
- What shade of spotlight should you choose?
- Determining the required power of the spotlights
- Materials from which spotlights are made
- Optimal conditions for floodlight operation
- Are additional spotlight functions needed?
- What to remember when choosing a spotlight
An installed floodlight can often be seen in suburban areas near the house.
It is turned on as soon as evening comes. And it illuminates the area well. Floodlights are also installed in large rooms, such as art galleries or gyms. At first, spotlights were used mainly on stages, protected objects, and in shop windows. However, at present, such a lighting device is affordable for any summer resident. And floodlights are being purchased quite intensively. After all, even the most powerful light bulb is not capable of what a spotlight is capable of. Let's say it provides the area with bright light.
IMPORTANT! The power of the lamp, as well as its type, must be chosen depending on what the goal is. And you need to choose a spotlight when you understand the types of devices and their characteristics.
Spotlight locations
Depending on where you plan to install the spotlight, outdoors or indoors, models are often fixed to the ground or floor. In both cases, you will need a bracket with three holes. It is screwed to the base of the spotlight with fasteners. These are screws. Therefore, it is already possible to fix the device on any surface.
Anyone who wants the spotlight to shine from above or directly should purchase a model on a tripod. It has three legs. They are stable if the surface is flat. The tripod can be purchased separately.
At a height, the spotlight must be mounted using a console. It looks like a small bar with a couple of holes. There is a tube coming from it. It is to this that the spotlight needs to be attached. The bar itself is attached to a surface, which can be a wall.
IMPORTANT! The arc, as a rule, serves to secure spotlights on the street. This is how they are mounted on special lighting masts in stadiums. Spotlights are placed in small holes, and then an arc is installed on top.
What lamps do spotlights work with?
Halogen lamps are very similar to incandescent lamps. The only difference is that they have an inert gas inside. They are used to illuminate squares, billboards, end walls of objects, exhibition and shopping halls. Halogen spotlights become decorative lighting for bridges and monuments. The color of such a lamp is almost the same as that of the sun.
A sodium floodlight requires a gas discharge lamp to operate. Inside the flask there is sodium vapor. As a rule, floodlights of this type are used for roads. A yellow light emanates from them, easily visible in the fog.
IMPORTANT! To operate metal halide floodlights, you will also need gas-discharge lamps. Only they must be supplemented with an ignition unit. Then the light becomes brighter. These models are installed in concert and shopping halls, exhibition galleries. There are many other rooms that need good lighting. The color of the lamp is cold.
LED spotlights operate on a matrix with LED diodes. These models are smaller. They are more durable compared to others. They consume less energy, which cannot be said about halogen lamps.
The advantage of LED floodlights, first of all, is that they save electricity. At the same time, their light intensity is the same. Let's say a 500 W halogen lamp is the equivalent of a 50 W LED lamp.
Compared to the spotlight of the previous generation, an LED floodlight is a technically more complex device. Purchasing an LED lamp should be seen as an investment for many years to come. And it should pay for itself with work over a period of 10 thousand to 100 thousand hours.
IMPORTANT! It must be admitted that now this type of lighting is the most modern, economical and durable. LED spotlights are good for illuminating shop windows, halls, building facades and architectural monuments. The color of LED floodlights varies. It depends on how intense the glow of each element of the device is.
What shade of spotlight should you choose?
Higher temperatures produce a paler shade of light. Spotlights with a temperature of 3700-4300 K emit warm light. From models with an indicator of 4500-5500 - neutral. From models with 6000 K and above - cold.
Cold blue light. It is best used for large areas. If a light has a high warm light value, it has a yellow tint. The neutral color is reminiscent of daytime, and therefore it makes sense to use it for apartments and houses.
To illuminate the workplace, a color temperature not exceeding 5000 K is required.
IMPORTANT! There are also spotlights that use RGB technology. This means that they are capable of glowing in multiple colors. These models are suitable for making decorative lighting of monuments, buildings and landscapes.
Determining the required power of the spotlights
Much depends on the height at which the spotlight is attached: the higher the device is, the more powerful it should be. The higher the spotlight is, the larger the dispersion area and the lower the intensity of the glow.
IMPORTANT! Let's say, when the spotlight is at a height of 2-6 meters, then an LED model with a power of 10-50 W is quite suitable. A halogen product needs to be 5-6 times more powerful. If the floodlight in a stadium or parking lot is at a height of 6-25 meters, then it needs an LED model with a power of up to 300 W.
Materials from which spotlights are made
As a rule, aluminum and steel are used to make floodlights. Stainless steel does not deteriorate from precipitation. She is not afraid of corrosion. And therefore, spotlights made from it are suitable for installation outdoors.
IMPORTANT! Stainless steel is heavy. And therefore, it is better to place large models on the floor or on the ground. Spotlights made from ordinary steel are just as heavy. They are afraid of corrosion. And therefore they need to be located indoors.
Stages of work execution
Work on installing and connecting diode spotlights is divided into three stages: searching for an installation site, preparing tools and materials, and direct connection.
Location determination
Here you need to move “from the end”: determine the area that should be illuminated by the spotlight, and then select the location for its installation so that the luminous flux falls on the desired area. Ideally, you need to make a diagram or draw a sketch. Make sure there are power sources nearby or route the wiring
It is important that the existing brackets are securely attached to the wall or selected object
Spotlights can be attached to the ceiling, supports, walls, and the main condition is the presence of a smooth surface for installation. The installation height depends on the dimensions and power of the product, the illuminated area, etc. It is recommended to mount small floodlights to a maximum height of no more than 16 m. Remember that these are multifunctional devices that allow you to easily set a specific angle of inclination.
Equipment and materials for connecting to the electrical network
During the work process you will need:
- side cutters;
- a stationery knife or a special tool for stripping wires;
- soldering iron with all accessories;
- insulating tape;
- screwdriver.
Connecting an LED spotlight with and without grounding
Read the instructions carefully. If it does not indicate anything about polarity, then you can ignore it when connecting to the network. To connect the spotlight, use flexible copper or any other conductor that is resistant to high temperatures (up to 160 degrees Celsius). There is not always a need for grounding, so you can simply insulate the yellow-green wire well and hide it in the back of the device.
Connecting a device to a particular network depends on the modification. These can be devices operating from a 220 V AC network, or equipment operating from 24 V DC sources. In the latter case, a regular household current rectifier can be used.
Before installation, inspect the body of the spotlight and make sure there are no visible mechanical damages. Free the terminal block by removing the cover to gain access to the terminals and ground connections. Unscrew the stuffing box and de-energize the room by turning off the power supply from the common distribution panel.
When replacing the spotlight with a new one, you need to throw away the old one, having first removed all the wires from it. It is advisable to select devices for which an identical mounting structure is suitable. Install the cover on an empty space - this element will protect the wires from water ingress.
Place the spotlight, attach the screws and bolts, remove the wires from the box and connect them to the required ones in accordance with the electrical diagram. Using a soldering iron, ensure secure fastening and good contact on the wires. Insulate, hide the connections inside the terminal box and replace the cover by tightening the bolts. Special latches can also be used for these purposes.
Tighten the screws on the floodlight to firmly attach it to the installation location. Apply power and make sure the light fixture is functioning.
How to properly install an outdoor floodlight
The choice of a spotlight is determined by its purpose - to concentrate light in the desired direction.
Previously, floodlights used short-lived means - incandescent lamps and an arc discharge between carbon rods. Modern floodlights use halogen, metal halide, sodium, induction and LED lamps, which have an incomparably longer service life and reliability.
Halogen spotlights reproduce colors well, are inexpensive, and can be dimmed, but they get very hot and therefore require special care during installation (free air convection) and do not tolerate dirt on the glass. Do not touch the heated spotlight. Contaminants are removed by wiping with alcohol.
Metal halide floodlights use gas-discharge mercury lamps with the addition of iodides of certain metals, which have high luminous efficiency and increased service life. The light has a cold tint. They are ideal for illuminating large spaces.
Sodium floodlights shine with a warm yellow light. Their color rendering is poor, but they are very economical and have a long service life.
Induction spotlights are a new energy-saving solution in outdoor lighting. They are powerful, reliable and very durable, because the mercury vapor in them is separated from the induction winding by glass. Good color rendering is ensured by phosphors. In terms of light output they compete with LEDs. Just like LEDs, they allow multiple instantaneous switching on, which is completely inaccessible to other gas-discharge light sources.
LED spotlights are most promising for outdoor lighting, various dynamic special effects, advertising, landscape and architectural lighting (especially for ice figures). Such spotlights do not heat up much.
Based on the characteristics of the optical system, spotlights are divided into circularly symmetrical, narrowly symmetrical (for illuminating buildings, sculptures, etc.), “oblique light” and “flood light” (widely symmetrical).
When installing a spotlight, the main thing is to create mounting points, connect it correctly to the network and ensure safe operation. First of all, you need to make sure that the spotlight has the required security class. The IP44 version (splash protection) allows installation under a canopy, but not outdoors. It is better to choose IP55 or IP65 (protection against jets of water).
The spotlight can be installed on supports, on the ceiling, walls and floor, at a sufficient distance from flammable surfaces and materials. For powerful floodlights, it is recommended to use protective sheets made of tin or asbestos.
It is recommended to first remove the spotlight's mounting bracket and secure it in place, ensuring that the spotlight can be rotated to the desired position. Typically, two attachment points are used - one at the center of rotation, the second to fix the angle of rotation. When installing the spotlight on a pin, it is convenient to use a U-shaped bracket for attaching television antennas. Then you should lay a wire of a suitable cross-section in double insulation to the selected installation location, using a protective corrugation.
Installation recommendations
When connecting the spotlight, it is advisable to use a cable with standard core insulation colors and follow the connection order.
Cable for connecting a single-phase load with a grounding conductor.
- the red wire is connected to the phase terminal (L);
- blue – to zero (N);
- yellow-green – to ground (PE).
This order must be observed both on the side of the power source and on the consumer side (luminaire). Of course, for electric current, the color of the core does not matter, and if the connection is not made correctly by coloring the insulation, nothing will happen - the spotlight will work just as well. But compliance with the rules speaks about the professionalism of the installer. And in the future, if repairs or reconnection are necessary, it will be easier for another technician to understand the circuit.
If the wiring runs along the street, in order to ensure anti-vandalism, it makes sense to lay it in pipes. In this case, you need to understand that the conditions for heat removal will be worse than in the version with an open gasket. If, according to calculations, it turns out that the load power is close to the upper limit for the selected cross-section, then the diameter of the wire must be increased by at least one step. In this case, it is even more correct to clarify the parameters of the conductors in the PUE.
Installation of electrical wiring in a metal pipe.
Scope of use
LED spotlights are used if you need to illuminate a large area. Lamps are industrial, street and decorative.
Industrial ones are used in large enterprises, warehouses, and equipment bases. Street lamps can illuminate stadiums and courtyards, playgrounds, and highways. Decorative spotlights are used for artistic lighting of architectural structures, bridges, and monuments.
Floodlights can also be divided according to their luminous range. Long-range devices produce a narrow beam of light; they are used for illumination from a long distance. A wide beam is formed by flood devices, which are used to illuminate courtyards and stadiums. Illumination of facades and monuments is carried out by accent devices.
Modern LED lighting devices may contain controllers that regulate the brightness of the backlight, the rhythm of shade changes, and operating time. Devices with diodes can produce multi-colored lighting.
The main advantage of diode spotlights is their long service life. It can reach 15 years.
Such devices are economical, as they are energy-saving, environmentally friendly due to the absence of harmful substances in the composition. The spotlights are easy to install and configure; they do not have harmful pulsations or stroboscopic effects.
The disadvantage of LED products is their high cost. Towards the end of its work, the illumination decreases, so manufacturers indicate the effective service life on the packaging.
Wireless motion sensors
For autonomous operation without connection to the electrical network, wireless DDs are used. They can be powered by solar panels, batteries or batteries. The service life without recharging is from 6 to 12 months. Depending on the price category, various settings are possible.
So, cheap wireless models are installed only indoors. Because they have a weak degree of protection from external factors. There is no pet immunity detector. Signal transmission range up to 100 meters.
But expensive copies are mounted not only indoors, but also outdoors. Work under any climatic conditions. Adverse weather conditions such as rain, snow or direct sunlight will not affect the performance of the sensor in any way. There is also a setting to ignore objects weighing up to 40 kilograms (pets). In addition, a mixed operating mode can be used.
There are curtain type models. They trace a narrow limited area. Often used near doors or windows to prevent unauthorized persons from entering the premises.
The principle of operation is to transmit a radio signal at a certain frequency to the receiver. Thanks to the protected radio signal, the possibility of interference from other frequencies is eliminated. If there is direct visibility between the control unit and the motion sensor, then the signal transmission distance can reach 500 meters.
Wireless motion sensor
The alarm unit has a built-in GSM module with a SIM card. When the DD is triggered, a signal is transmitted to the unit, then an SMS message is sent to the phone, the number of which is previously entered into the device’s memory. Thus, you can secure any room or, for example, your garage, located far from home.
To summarize, we can highlight several rules, following which it will be easy and simple to set up a motion sensor with your own hands:
- Remove as much as possible all lighting fixtures that may affect the correct operation of the DD.
- Do not place heating devices, including air conditioners, near them. Because any motion sensors are sensitive to the movement of air flows.
- Install the device so that no large objects obscure its view. This way you can increase the working area of the device.
How does a spotlight work?
An LED spotlight (in everyday life the incorrect name diode is used - it is at least unprofessional to use such a term) is simple. Like a regular incandescent lamp, it contains:
- frame;
- light-emitting element (single powerful LED or matrix of several less powerful devices);
- terminal for connecting the power cable (terminal block, connector);
- glass covering the compartment with LEDs (diffuser).
LED lamp device.
Unlike its predecessor with the “Ilyich bulb”, the LED spotlight contains one more part - the driver. For powerful spotlights, it is made in the form of an electronic circuit that stabilizes the current through the light-emitting element. For small lamps, a resistor can be used as a driver. Since the emission of LEDs does not depend on the degree of heating, they are installed on a heat sink to extend their service life.
A little about the design features
Structurally, the LED spotlight is designed in a metal case, inside of which there is an LED matrix and a power supply (driver). In powerful models, the power supply is placed outside, and the LED matrix is connected to a cooling radiator. In low-power LED spotlights, the housing of the lighting fixture is used as a radiator.
To connect the LED spotlight to the network, you will need a set of screwdrivers and a cable through which the supply voltage is supplied. The choice of wire cross-section depends on the power of the lighting device, which determines the current strength of the supplied cable. Since LED spotlights have relatively low power, a standard wire with a cross-section of 1.5 mm² is sufficient with a large margin if you need to connect a lighting device with a power of up to 200 W.
Separately, it is worth noting that electrical safety standards require the use of flexible power cables with a multi-core design of internal conductors to connect street floodlights. An example of such a solution is the NYM cable.