Electricity is a serious and dangerous matter, but many jobs do not require high qualifications and can be done independently without the involvement of specialists. For example, you can connect an electric stove with only a vague understanding of electricity. Especially if the outlet is already installed. All that remains is to install a plug on the cord and connect it correctly to the connectors of the stove. The situation is worse if it is necessary to pull the line from the shield, but even here you can cope without help. Just remember that all work is carried out with the power supply turned off.
Connection diagram and methods
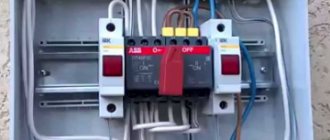
Electric household stoves are powerful equipment; the current they consume is about 40-50 A. This means that the electric stove must be connected to a dedicated power line. It must be powered directly from the apartment or house panel. Power is supplied through an RCD and a circuit breaker. The stove itself can be connected via a socket and plug (special power ones) and a terminal box. Also, the line from the machine can be directly connected to the input terminals on the rear wall.
Electric stove connection diagram
A more reliable connection is directly to the input terminals of the plate. In this case, there is a minimum number of contact points, which increases reliability. But this method is not entirely convenient: you can only turn off the power automatically. About the same problem occurs when using a terminal box, the only difference being that there are more connection points.
The most commonly used connection is a socket and plug. It's more convenient and familiar. Since the equipment is powerful, they use not ordinary household devices, but special ones, which are also called power devices - for their ability to withstand significant current loads.
Please note that when connecting powerful electrical equipment, grounding is required. Without it, you will be denied warranty repairs, and its absence is life-threatening, so it’s better not to take risks.
Electrical parameters and ratings of circuit breakers
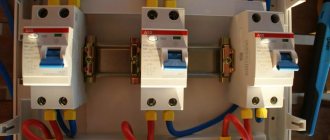
As we found out, there should be separate RCDs and a circuit breaker in the electrical panel. Through them the phase is supplied to the socket. This pair can be replaced with a difavtomat. These are the same two devices, but in one case. The negative is taken from the common bus, passes through the RCD, and the grounding is taken from the corresponding bus.
The rating of the machine is selected based on the maximum current consumption. This data is in the electric stove's passport and is usually in the range of 40-50 A. In this range, the ratings come in large increments - 40 A, 50 A, 63 A. It is better to choose the nearest larger one - this way there is less chance of a false shutdown when operating at full power . That is, if the declared maximum current consumption is 42-43 A, still take a 50 A machine.
Electric stove connection diagram
On the other hand, you may never turn on all the burners and oven, and even at full power, and more powerful machines are significantly more expensive. It's up to you to choose.
The rating of the RCD is taken one step higher than that of the machine. If you decide to install a 50 A machine, then the RCD is required at 63 A, the leakage current is 30 mA.
Electrical panel design
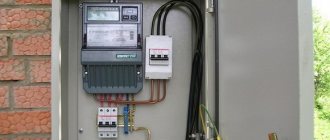
Before distributing the load across phases in a private house, take care of the correct “contents” of the electrical panel to which the voltage comes from the support. In this situation, it should have the following devices:
- Automatic switch (automatic).
- Three-phase electricity meter.
- Automatic switches or RCDs (residual current devices), to which each phase is supplied (separately). The common zero is connected to the zero bus.
- The protective grounding conductor is connected to the common grounding bus.
One of the options for connecting an electrical panel Source cdn.elec.ru
Wire and its parameters
In recent years, when laying electrical wiring and connecting household appliances, copper conductors are most often used. Although they cost much more, they are more convenient to work with, and besides, copper requires a much smaller core diameter than when using aluminum conductors.
The conductor cross-section is selected depending on the type of network - 220 V or 380 V, the type of wiring (open/closed) as well as the current consumption or power of the equipment. Typically, copper conductors with a core of 4 mm (for line lengths up to 12 m) or 6 mm are used.
Conductor cross-section selection table
When choosing the type of cable to lay from the panel to the outlet, it is better to choose single-core conductors. Although they are more rigid, they are more reliable. To connect the stove itself (to which you will need to connect the power plug), you can choose a flexible stranded wire: a single-core wire in this case will be too inconvenient.
Methods for obtaining 380 Volts from 220
Let's look at the main ways to convert 220 volts into full three-phase current, 380 V:
- using an electronic voltage converter;
- by using a transformer;
- using three phases;
- using a three-phase motor as a generator;
- using a capacitor circuit.
Voltage transformer
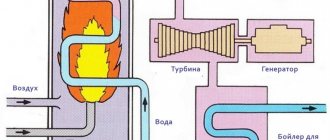
The easiest and most reliable way to convert 220 V to 380 is to buy an electronic voltage converter. (see Fig. 2). This device is often called an inverter. The gadget is easy to operate and generates high-quality three-phase current. True, the power of inverters is not very large, but, as a rule, it is enough for most three-phase household appliances.
Rice. 2. Voltage converter
The converter is also good because it has a built-in overload and short circuit protection function. This means that the electric motor will not overheat and will not fail as a result of a short circuit.
High quality current is achieved thanks to the operating principle of the device. The inverter first rectifies single-phase alternating current and then generates three-phase voltage at a given frequency and with a standard phase shift. In this case, the number of phases can be more than 3 (with a corresponding shift angle).
Using a transformer
Using a step-up transformer, you can get any voltage, including 380 V. However, if you are interested in three-phase voltage, then you need a special three-phase transformer. converting single-phase current into three-phase. Such transformers are commercially available.
The transformer windings are connected in star or delta. Single-phase network voltage is supplied to two primary windings directly, and to the third through a capacitor. In this case, the capacitor capacity is selected at the rate of 7 μF for every 100 W of power.
Please note that the rated voltage of the capacitor should not be lower than 400 V. Such a device cannot be turned on without a load.
Although we will obtain the necessary 380 V in this way, there will still be a decrease in the power of the electric motor (if you plan to connect it to a transformer). Accordingly, the engine efficiency will also drop.
Using 3 phases
If you live in an apartment building, then 3 phases are already connected to it, which, in order to optimally distribute the loads, are separated into individual apartments. On each floor there are distribution boards, from where you can bring the missing two phases into the apartment. But this will require permission.
If you wish, you can obtain permission from the energy supply company or coordinate with Energonadzor the installation of three-phase power in your apartment. In this case, you will need to install a three-phase electricity meter.
Using an electric motor
You probably know that the rotor of a conventional three-phase motor, after starting, continues to rotate after one phase is disconnected. It turns out that there is an EMF between the terminal of the disconnected winding and the activated terminals.
The phase shift between the stator windings depends only on their location. In a three-phase motor, these coils are located at an angle of 120º, which means they provide the same phase shift angle. This circumstance suggests that an asynchronous three-phase motor can be used to obtain 380 volts from a conventional single-phase network. A simple diagram for connecting an electric motor is shown in Figure 3. The capacitor in the diagram is needed only to start the engine. Once launched, you can disable it. We take the capacitor type MBGO, MBGP, MBGT or K42-4, the operating voltage of which must be at least 600 V. You can use the capacitor K42-19, with an operating voltage of at least 250 V.
For an example of connecting a phase-shifting capacitor, see Fig. 3.
Rice. 3. Connecting the starting capacitor
We select the parameters of the capacitor depending on the power of the motor. Note that the parameters of the phase-shifting capacitor do not affect the quality of the generated current. We connect the load to the stator windings according to the diagram shown in Fig. 4.
Rice. 4. Three-phase current from an electric motor
The rotor rotation speed is almost independent of the single-phase network voltage, so it can be considered constant. This means that the frequency of three-phase current at rated loads will not change.
It should be borne in mind that the power of a three-phase motor operating from a single-phase network decreases. Accordingly, the rated power of a three-phase load will be approximately one third lower than that stated in the electric motor’s passport.
Electric motor as generator
Another way to get 380 from 220 V is to create a motor-generator system. As a motor, you can take any electric motor operating from a 220 V network, and as a generator, you can take a modified three-phase asynchronous motor (see Fig. 5 for the installation diagram).
Let us immediately note that the effectiveness of such an installation is questionable, but it is possible to obtain the required voltage of 380 V in this way. In this circuit, it is necessary to ensure such a rotor speed that the generator produces current with a frequency of 50 Hz. To do this, it is necessary to rotate the shaft at an angular speed of 1500 rpm.
Rice. 5. Three-phase motor as generator
At home, you can use a single-phase motor from a washing machine or other household appliances as a drive. It is only important to ensure the required angular speed of rotation of the rotor.
Since the rotation of the shaft of electric motors operating, for example, in a washing machine is about 12 - 20 thousand rpm, it is necessary to use pulleys whose diameters have a ratio of 1 to 10. That is, to ensure rotation of the generator rotor at a speed of 1500 rpm min. you can take a pulley that is already mounted on an electric motor from a straightening machine, and put a pulley with a diameter 10 times larger on the shaft of a three-phase motor.
How to connect an electric stove to a 220 V network
All the above diagrams were specifically for a single-phase 220 V network. To connect, you will need a three-wire cable, a three-pin power socket and a plug with a rated current of at least 32 A. Let’s say right away that connecting equipment from different brands is fundamentally no different. It doesn’t matter which stove you purchased - Electrolux, Gorenje, Bosh, Beko. Doesn't matter. The only difference is the different design of the covers that cover the terminal box on the housing and different methods of fastening it. Everything else is the same.
Connecting the cable to the electric stove
First, the cable selected for connection must be connected to the electric stove. On the rear panel, usually at the bottom left there is a terminal block to which the conductors are routed.
The terminal block to which the electrical cord must be connected
Nearby are connection diagrams for different networks.
Schematic illustration of connections for different networks
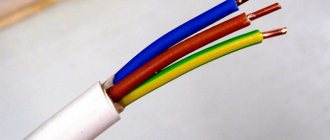
With a 220 V network, the diagram is on the far right. On the plate, contacts 1,2,3 should be connected by one jumper - this will be the phase (red or brown conductors), the second - contacts 4 and 5 - this is neutral or zero (blue or blue), the sixth contact is ground (green or yellow -green). Electrical plates usually come from the store with jumpers already installed, but it doesn’t hurt to check.
Connecting the cable to the electric stove
It is more correct and reliable to crimp the conductors with contact plates, and then connect them. This connection is more reliable, but often the conductors are simply twisted around the clamping screw and then tightened. In any case, it is better to follow the color coding - this way there is less chance of making a mistake.
How to select capacitors for a three-phase motor using it in a 220V network.
The first thing you need to know is that the capacitors must be non-polar, that is, not electrolytic. It is best to use containers of the brand ― MBGO. They were successfully used in the USSR and in our time. They perfectly withstand voltage, current surges and the damaging effects of the environment.
They also have mounting eyes that help you easily place them at any point on the device’s body. Unfortunately, getting them now is problematic, but there are many other modern capacitors that are no worse than the first ones. The main thing is that, as mentioned above, their operating voltage is not less than 400V.
Calculation of capacitors. Working capacitor capacity.
In order not to resort to long formulas and torture your brain, there is a simple way to calculate a capacitor for a 380V motor. For every 100 W (0.1 kW) 7 µF is taken. For example, if the motor is 1 kW, then we calculate it like this: 7 * 10 = 70 µF. It is extremely difficult to find such a capacity in one jar, and it is also expensive. Therefore, most often the containers are connected in parallel, gaining the required capacity.
Starting capacitor capacity.
This value is taken at the rate of 2-3 times greater than the capacity of the working capacitor. It should be taken into account that this capacity is taken in total with the working capacity, that is, for a 1 kW motor, the working capacity is equal to 70 μF, multiply it by 2 or 3, and get the required value. This is 70-140 µF of additional capacitance - starting. At the moment of switching on, it is connected to the working one and the total is 140-210 µF.
Features of the selection of capacitors.
Capacitors, both working and starting, can be selected using the method from smallest to largest. Having thus selected the average capacity, you can gradually add and monitor the operating mode of the engine so that it does not overheat and has enough power on the shaft. Also, the starting capacitor is selected by adding until it starts smoothly without delays.
In addition to the above type of capacitor - MBGO, you can use the type - MBGCh, MBGP, KGB and the like.
Connection to a three-phase 380 V network
In this case, an automatic machine and an RCD for a three-phase network are purchased; the wires must be five-core (the cross-section is determined using the same table, only the value must be looked at in the 380 V column). The plug and socket must also have five contacts.
The connection process itself will not differ in anything, only in the number of wires. The difference will be when connecting the wire to the output terminals of the electric stove. Only one jumper will be installed - on pins 5 and 6. All others are connected with separate conductors.
Connection diagram for an electric stove to a three-phase network
It is also necessary to monitor the position of “ground” and “neutral” (or they also say “zero”). The color matching of the conductors on the phases is not critical, but it is more convenient if they also match.
Electricity is a serious and dangerous matter, but many jobs do not require high qualifications and can be done independently without the involvement of specialists. For example, you can connect an electric stove with only a vague understanding of electricity. Especially if the outlet is already installed. All that remains is to install a plug on the cord and connect it correctly to the connectors of the stove. The situation is worse if it is necessary to pull the line from the shield, but even here you can cope without help. Just remember that all work is carried out with the power supply turned off.
Connection diagram and methods
Electric household stoves are powerful equipment; the current they consume is about 40-50 A. This means that the electric stove must be connected to a dedicated power line. It must be powered directly from the apartment or house panel. Power is supplied through an RCD and a circuit breaker. The stove itself can be connected via a socket and plug (special power ones) and a terminal box. Also, the line from the machine can be directly connected to the input terminals on the rear wall.
Electric stove connection diagram
A more reliable connection is directly to the input terminals of the plate. In this case, there is a minimum number of contact points, which increases reliability. But this method is not entirely convenient: you can only turn off the power automatically. About the same problem occurs when using a terminal box, the only difference being that there are more connection points.
The most commonly used connection is a socket and plug. It's more convenient and familiar. Since the equipment is powerful, they use not ordinary household devices, but special ones, which are also called power devices - for their ability to withstand significant current loads.
Please note that when connecting powerful electrical equipment, grounding is required. Without it, you will be denied warranty repairs, and its absence is life-threatening, so it’s better not to take risks.
Electrical parameters and ratings of circuit breakers
As we found out, there should be separate RCDs and a circuit breaker in the electrical panel. Through them the phase is supplied to the socket. This pair can be replaced with a difavtomat. These are the same two devices, but in one case. The negative is taken from the common bus, passes through the RCD, and the grounding is taken from the corresponding bus.
The rating of the machine is selected based on the maximum current consumption. This data is in the electric stove's passport and is usually in the range of 40-50 A. In this range, the ratings come in large increments - 40 A, 50 A, 63 A. It is better to choose the nearest larger one - this way there is less chance of a false shutdown when operating at full power . That is, if the declared maximum current consumption is 42-43 A, still take a 50 A machine.
Electric stove connection diagram
How to choose a capacitor
There are several nuances that relate to the number of connected capacitors.
- If the power of the electric motor does not exceed 1.5 kW, then one working capacitor can be installed in the circuit.
- If the engine immediately runs under load upon start-up or its power exceeds 1.5 kW, then two capacitors will have to be installed in the circuit: a working capacitor and a starting capacitor. Both elements are inserted into the circuit in parallel. In this case, the latter will only work when the engine starts, after which it automatically turns off.
Essentially, the electric motor connection circuit is powered by the “Start” button and the power off switch. To start the engine, you need to press the “Start” button and hold it until the engine is completely turned on. This can be controlled even by ear.
Wire and its parameters
In recent years, when laying electrical wiring and connecting household appliances, copper conductors are most often used. Although they cost much more, they are more convenient to work with, and besides, copper requires a much smaller core diameter than when using aluminum conductors.
The conductor cross-section is selected depending on the type of network - 220 V or 380 V, the type of wiring (open/closed) as well as the current consumption or power of the equipment. Typically, copper conductors with a core of 4 mm (for line lengths up to 12 m) or 6 mm are used.
Conductor cross-section selection table
When choosing the type of cable to lay from the panel to the outlet, it is better to choose single-core conductors. Although they are more rigid, they are more reliable. To connect the stove itself (to which you will need to connect the power plug), you can choose a flexible stranded wire: a single-core wire in this case will be too inconvenient.
Methods for obtaining 380 Volts from 220
Let's look at the main ways to convert 220 volts into full three-phase current, 380 V:
- using an electronic voltage converter;
- by using a transformer;
- using three phases;
- using a three-phase motor as a generator;
- using a capacitor circuit.
Voltage transformer
The easiest and most reliable way to convert 220 V to 380 is to buy an electronic voltage converter. (see Fig. 2). This device is often called an inverter. The gadget is easy to operate and generates high-quality three-phase current. True, the power of inverters is not very large, but, as a rule, it is enough for most three-phase household appliances.
Rice. 2. Voltage converter
The converter is also good because it has a built-in overload and short circuit protection function. This means that the electric motor will not overheat and will not fail as a result of a short circuit.
High quality current is achieved thanks to the operating principle of the device. The inverter first rectifies single-phase alternating current and then generates three-phase voltage at a given frequency and with a standard phase shift. In this case, the number of phases can be more than 3 (with a corresponding shift angle).
Using a transformer
Using a step-up transformer, you can get any voltage, including 380 V. However, if you are interested in three-phase voltage, then you need a special three-phase transformer. converting single-phase current into three-phase. Such transformers are commercially available.
The transformer windings are connected in star or delta. Single-phase network voltage is supplied to two primary windings directly, and to the third through a capacitor. In this case, the capacitor capacity is selected at the rate of 7 μF for every 100 W of power.
Please note that the rated voltage of the capacitor should not be lower than 400 V. Such a device cannot be turned on without a load.
Although we will obtain the necessary 380 V in this way, there will still be a decrease in the power of the electric motor (if you plan to connect it to a transformer). Accordingly, the engine efficiency will also drop.
Using 3 phases
If you live in an apartment building, then 3 phases are already connected to it, which, in order to optimally distribute the loads, are separated into individual apartments. On each floor there are distribution boards, from where you can bring the missing two phases into the apartment. But this will require permission.
If you wish, you can obtain permission from the energy supply company or coordinate with Energonadzor the installation of three-phase power in your apartment. In this case, you will need to install a three-phase electricity meter.
Using an electric motor
You probably know that the rotor of a conventional three-phase motor, after starting, continues to rotate after one phase is disconnected. It turns out that there is an EMF between the terminal of the disconnected winding and the activated terminals.
The phase shift between the stator windings depends only on their location. In a three-phase motor, these coils are located at an angle of 120º, which means they provide the same phase shift angle. This circumstance suggests that an asynchronous three-phase motor can be used to obtain 380 volts from a conventional single-phase network. A simple diagram for connecting an electric motor is shown in Figure 3. The capacitor in the diagram is needed only to start the engine. Once launched, you can disable it. We take the capacitor type MBGO, MBGP, MBGT or K42-4, the operating voltage of which must be at least 600 V. You can use the capacitor K42-19, with an operating voltage of at least 250 V.
For an example of connecting a phase-shifting capacitor, see Fig. 3.
Rice. 3. Connecting the starting capacitor
We select the parameters of the capacitor depending on the power of the motor. Note that the parameters of the phase-shifting capacitor do not affect the quality of the generated current. We connect the load to the stator windings according to the diagram shown in Fig. 4.
Rice. 4. Three-phase current from an electric motor
The rotor rotation speed is almost independent of the single-phase network voltage, so it can be considered constant. This means that the frequency of three-phase current at rated loads will not change.
It should be borne in mind that the power of a three-phase motor operating from a single-phase network decreases. Accordingly, the rated power of a three-phase load will be approximately one third lower than that stated in the electric motor’s passport.
Electric motor as generator
Another way to get 380 from 220 V is to create a motor-generator system. As a motor, you can take any electric motor operating from a 220 V network, and as a generator, you can take a modified three-phase asynchronous motor (see Fig. 5 for the installation diagram).
Let us immediately note that the effectiveness of such an installation is questionable, but it is possible to obtain the required voltage of 380 V in this way. In this circuit, it is necessary to ensure such a rotor speed that the generator produces current with a frequency of 50 Hz. To do this, it is necessary to rotate the shaft at an angular speed of 1500 rpm.
Rice. 5. Three-phase motor as generator
At home, you can use a single-phase motor from a washing machine or other household appliances as a drive. It is only important to ensure the required angular speed of rotation of the rotor.
Since the rotation of the shaft of electric motors operating, for example, in a washing machine is about 12 - 20 thousand rpm, it is necessary to use pulleys whose diameters have a ratio of 1 to 10. That is, to ensure rotation of the generator rotor at a speed of 1500 rpm min. you can take a pulley that is already mounted on an electric motor from a straightening machine, and put a pulley with a diameter 10 times larger on the shaft of a three-phase motor.
How to connect an electric stove to a 220 V network
All the above diagrams were specifically for a single-phase 220 V network. To connect, you will need a three-wire cable, a three-pin power socket and a plug with a rated current of at least 32 A. Let’s say right away that connecting equipment from different brands is fundamentally no different. It doesn’t matter which stove you purchased - Electrolux, Gorenje, Bosh, Beko. Doesn't matter. The only difference is the different design of the covers that cover the terminal box on the housing and different methods of fastening it. Everything else is the same.
Connecting the cable to the electric stove
First, the cable selected for connection must be connected to the electric stove. On the rear panel, usually at the bottom left there is a terminal block to which the conductors are routed.
The terminal block to which the electrical cord must be connected
Nearby are connection diagrams for different networks.
Schematic illustration of connections for different networks
With a 220 V network, the diagram is on the far right. On the plate, contacts 1,2,3 should be connected by one jumper - this will be the phase (red or brown conductors), the second - contacts 4 and 5 - this is neutral or zero (blue or blue), the sixth contact is ground (green or yellow -green). Electrical plates usually come from the store with jumpers already installed, but it doesn’t hurt to check.
Connecting the cable to the electric stove
It is more correct and reliable to crimp the conductors with contact plates, and then connect them. This connection is more reliable, but often the conductors are simply twisted around the clamping screw and then tightened. In any case, it is better to follow the color coding - this way there is less chance of making a mistake.
It is better to terminate the conductors with contact plates
Plug installation
Next, a plug is connected to the cable. The power plug is collapsible. Unscrew the two mounting screws and remove the cover with contacts. The fixing bar holding the cable is also removed. The protective insulation is removed from the edge of the flexible cable (about 5-6 cm), the conductors are straightened, their ends are also stripped of insulation by about 1.5-2 cm. The cut end of the cable is inserted into the plug body.
This is what the plug for connecting an electric stove looks like
The clamping screws on the contacts are loosened, the conductors, if they are multi-core, are twisted into a bundle. These flagella are twisted around the contacts and tightened with clamping screws.
The distribution of conductors matters and they must be connected carefully. The top contact of the plug is usually labeled - the “ground” wire (green) is connected here. When connecting a socket, you need to apply ground to a similar connector.
Connecting the wire to the electric stove
The other two contacts are “phase” and “zero”. Where to apply which one is not important, but when connecting the socket, the “phase” must fall on the “phase”, the “zero” must fall on the “zero”. Otherwise there will be a short circuit. So before turning it on, be sure to double-check that the wires (phase and neutral) are screwed in correctly.
How to determine the phase in an installed socket
If you already had an electric stove before, and there is a socket, you need to find in it where the grounding, phase and neutral are located and connect the wires in the plug accordingly. The easiest way to determine this is to use a voltage indicator in the form of a screwdriver. It works simply - install the indicator in the place of the expected phase, and look at the LED mounted in the housing. If it lights up, then there is voltage and this is a phase. If there is no voltage, the LED does not light up, and this is zero.
The ground is even easier to determine: is the contact at the top or bottom.
Connection diagram for a 3-phase motor in a 220V network connected by a star.
As you can see, the 220V voltage is distributed over two series-connected windings, where each is designed for such a voltage. Therefore, the power is lost almost twice, but such an engine can be used in many low-power devices.
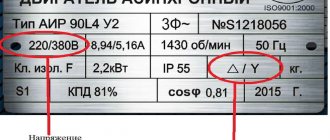
The maximum power of a 380V motor in a 220V network can only be achieved using a delta connection. In addition to minimal power losses, the engine speed also remains unchanged. Here, each winding is used for its own operating voltage, hence the power. The connection diagram for such an electric motor is shown in Figure 1.
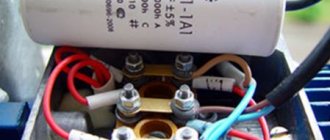
Fig. 2 shows a terminal with a 6-pin terminal for delta connection. The three resulting outputs are supplied with: phase, zero and one terminal of the capacitor. The direction of rotation of the electric motor depends on where the second terminal of the capacitor is connected - phase or zero.
In the photo: an electric motor with only working capacitors and no capacitors for starting.
If there is an initial load on the shaft, it is necessary to use capacitors for starting. They are connected in parallel with the workers using a button or switch at the time of switching on. As soon as the engine reaches maximum speed, the starting tanks should be disconnected from the workers. If it is a button, we simply release it, and if it is a switch, then we turn it off. Then the engine uses only working capacitors. Such a connection is shown in the photo.
Connection to a three-phase 380 V network
In this case, an automatic machine and an RCD for a three-phase network are purchased; the wires must be five-core (the cross-section is determined using the same table, only the value must be looked at in the 380 V column). The plug and socket must also have five contacts.
The connection process itself will not differ in anything, only in the number of wires. The difference will be when connecting the wire to the output terminals of the electric stove. Only one jumper will be installed - on pins 5 and 6. All others are connected with separate conductors.
Connection diagram for an electric stove to a three-phase network
It is also necessary to monitor the position of “ground” and “neutral” (or they also say “zero”). The color matching of the conductors on the phases is not critical, but it is more convenient if they also match.
Let's first consider how a three-phase motor is connected to a 380V network.
Three-phase motors come with either three terminals - for connection to a star only - or with six connections, with the ability to select a circuit - star or delta. The classic scheme can be seen in the figure. Here in the picture on the left there is a star connection. The photo on the right shows how it looks on a real engine frame.
It can be seen that for this it is necessary to install special jumpers on the required pins. These jumpers come with the motor. In the case where there are only 3 terminals, the star connection is already made inside the motor housing. In this case, it is simply impossible to change the winding connection diagram.
How to connect an electric stove to a 220 Volt outlet
An electric stove using a 220 Volt network can be easily connected to almost any apartment and private house. Also, given the very high consumption of electricity, all modern electric stoves and hobs have the ability to connect not only to a 220 Volt network, but also to a 360 Volt network. And most often, a single-phase connection is used. This is the standard circuit that usually comes with the kit, already assembled.
Diagram of the distribution of wires in the electric stove plug
The first three contacts (L1 L2 L3) are connected together (with a jumper, for example), and a phase is connected to them. We connect zero to pins 4 and 5, respectively. The last 6th contact, as you probably already guessed, is connected to grounding.
Typically, the contacts and wires are always colored the same. The standard colors are phase (+) red, black or brown, zero blue, and ground yellow-green, but it’s better, just in case, to look at the instructions and make sure the connection is correct.
It happens that there are not 3, but 5 wires. In this case, the pairs are zero and phase, and the one is ground.
When connecting an electric stove to a single-phase network, you don’t have to worry about mixing up the phase and neutral connections, nothing bad will happen and everything will work. However, DO NOT CONFUSE the phase with the grounding - it will constantly knock out “plugs”, and in the worst case, you can burn the machine or panel.
It is for this purpose that the grounding wire and contact are located separately, so as not to be confused, and the design of the socket with grounding allows you to insert the plug in only one position.
Let's take a closer look at the most common sockets used to connect electric stoves.
- RS 32 socket, usually Russian or Ukrainian production. The grounding contact is located on top and is turned 90 degrees relative to phase and zero, so that it cannot be plugged in differently. As in the photo - phase (brown wires) to the right contact, zero (with a blue stripe) to the left, although as I already said, if you switch places, it’s okay.
- Socket for electric stove, made in Belarus. The contacts are located at an angle, which also eliminates the possibility of incorrect connection. The ground, as usual with domestic manufacturers, is the top contact.
- Legrand socket2P+E, 32A. A beautiful, reliable outlet, perfect for a good repair (although whoever looks at it is behind the stove). It differs from ours and the CIS in that the grounding contact is at the bottom of the socket and has a rectangular shape, while the phase and neutral are round.
380V sockets
Before we talk about ways to connect 380V sockets, let's look at their modifications and features. As an example, we will have an IEK 380 V socket, the model range of which allows us to consider all possible connection options
Types of 380V electrical outlets
First, let's look at the types of 380V sockets. Indeed, depending on the modification, their connection method also changes. Therefore, let's determine what types of sockets exist.
A variety of 380V socket models
- Before proceeding directly to the consideration of sockets, let's remember the school physics course. As you all should remember, our country uses a three-phase 380V network. Three-phase - this means that we have three phase wires.
Differences between phase and line voltages
- The voltage between each of these wires and ground is 220V. This is called phase voltage. In most cases, this is what is supplied to our houses and apartments. For this, one of the three phase wires and a neutral wire are used (see Grounding and neutral wire: how to distinguish).
Phase and line voltage
- But the voltage between the phase wires is 380V. And this voltage is called linear. In this case, a voltage of 380V is obtained when measured between any two phase wires. That is, we can get a 380V network using not all three, but only two phase wires.
- This two-phase connection is often used in various electrical installations. At home, you can find this type of connection in electric stoves, as well as in some other electrical installations.
- According to the PUE standards, a three-phase electrical network up to 1000V can be four or five wires. That is, to the three phase conductors we will add one or two more. What kind of conductors are these?
Number of wires for three-phase and single-phase networks
- First of all, this is a neutral conductor, which is necessary if the electrical installation has circuits operating at a voltage of 220V. Usually this is starting equipment or protection circuits. Although it is quite possible that in your electrical installation this is the operating voltage. The neutral conductor according to clause 1.1.29 of the PUE is designated by the symbol “N”.
- In addition, for almost any 380V network, the instructions provide for a protective grounding conductor. It is necessary to protect a person from touch stress. That is, if the insulation in your device leaks and it shorts to the housing, the grounding conductor will create a safe potential on the housing. Such a conductor is designated as “PE”.
| Socket 380V 2P+PE | Based on the above, there are several types of 380V outlets. The first type is a 2P+PE socket. It has two phase or as they are also called power contacts, as well as one grounding contact. |
| Socket 380 3P+PE | The next possible option is a 3P+PE socket. It has three power contacts and one grounding contact. |
| Another option offered on the market is the 3P+N socket and plug. It is no different from a 3P+PE socket and is actually this socket. This is where the sellers make a mistake, positioning it incorrectly. |
| The last possible option is a 380 V electrical socket 3P+PE+N. This type of socket has three contacts for connecting three phase conductors, one contact for connecting a grounding conductor and one contact for connecting a neutral wire. |
Features of 380V sockets
Considering the types of sockets, it should be noted that they differ from the usual 220V sockets not only visually. There are a lot of differences here that are also worth paying attention to.
Types of 380V sockets
So:
- First of all, this is blocking the plug and socket from an asymmetrical connection. The fact is that for 380V sockets it is very important that the phase contact of the plug is connected to the phase contact of the socket. The same applies to neutral and grounding conductors. Otherwise, a short circuit may occur.
- In order to eliminate the possibility of such an asymmetrical connection, manufacturers place the contacts at a special angle, of different sizes and with a special guide. This virtually eliminates the possibility of incorrect activation.
The photo shows the norms for the location of contacts and locking devices
- Another feature of such sockets is the presence of a lock from turning on under load. The fact is that the loads of 25, 63, 125A for which these sockets are designed are quite significant. And the socket does not have arc-extinguishing elements to turn off such currents. As a result of trying to remove a plug and socket under load, you can not only burn them completely, but also get very dangerous electrical and thermal burns.
380V socket with electrical interlock
Therefore, manufacturers equip sockets with mechanical or electrical interlocking. Since electrical interlocking is quite complicated in design and connection, and the price of such an outlet will be an order of magnitude higher, mechanical interlocking is preferably used.
Mechanical locking also comes in several types. But the market often offers sockets with simple manual locking.
It blocks the plug and socket from accidental loss of contact, and also requires a certain action from the person before removing the plug. This action is supposed to make the person remember to turn off electrical equipment before unplugging it.