A very convenient and useful thing in the household is a spotlight with LED lamps. It can be very compact and at the same time emit a good bright light that can easily illuminate the entire area of your yard and will help you easily move around the yard in the dark. In this case, the LED spotlight can be either stationary and installed at one point, or portable. But due to the nature of its design, the system may malfunction and work a little incorrectly.
One of the most common problems that appear with LED floodlights is the blinking of the bulb when turned on or even off. In this article we will help you solve this problem.
Operating principle of LED spotlight
Floodlight with LEDs – an LED device for illuminating an area, a powerful light source. Inside its plastic or iron body there is a lamp that sends light forward. There are reflectors around that direct the lighting to the desired area. They are able to concentrate light in a special way, as intended by the design, and as a result it turns out bright and saturated.
A diode spotlight also consists of a semiconductor and two electrodes - an anode and a cathode. After applying voltage, the semiconductor heats up, which emits light. For high-quality operation of the system, the incoming current passes through a rectifier and driver, which stabilize the electrical wave and regulate its magnitude. The circuit contains a power supply that requires 12 volts for operation.
Conclusion
In conclusion, we emphasize that when the spotlight turns on independently, you need to do the following:
- check the device connection;
- change the type of switch;
- If the spotlight works with a motion sensor, check it for compatibility with the LED device.
Experts pay attention to the fact that the reason for this phenomenon may be the low cost of lighting devices; they do not guarantee long-term operation. When doing repairs, you need to be able to handle a soldering iron, electrical measuring instruments, read connection diagrams and a circuit diagram of the device.
Signs of blinking
When buying the cheapest spotlight, you cannot be sure of its uninterrupted operation. Such products usually have poor soldering of parts, all elements are of poor quality, and current parameters are not sufficiently adjusted.
Imported LED devices are sometimes made without taking into account the specifics of power fluctuations, which can also cause breakdowns. The most common complaint from users is the blinking of the lamp; this often happens not only when it is on, but also when it is off. There can be a lot of reasons.
Spotlight flashes due to motion sensor
Why does lighting equipment that has a motion sensor blink? First of all, it is worth checking the operation of the sensor itself; often the reason is hidden in it. If the luminous flux flickers when supplied, the main reasons are as follows:
- Violation of sensor settings. Flashing is often observed due to an incorrectly set timer, which helps maintain the system in working order during the specified period. You should reconfigure the timer and then test the device.
- Faulty contacts, “floating” contact. This is observed when the sensor operates normally, but the signal does not pass through to the spotlight itself. You should check the correctness of all connections in the system, tighten wires and contacts, and evaluate the reliability of terminals and screws.
- Low voltage. When the sensor is constantly under insufficient voltage, it passes to the spotlight, but cannot turn on the device fully. This does not cause full inclusion, but flickering.
- Sensor failure or initial malfunction. If the product is still under warranty, you will have to return it to the store. Otherwise, you should take the motion sensor to a workshop; you cannot repair it yourself.
The reason for blinking is weather conditions
If it is frosty outside, the LED spotlight may light up in an abnormal mode - blink. This often happens even with high-quality products from popular manufacturers. The reason is “frostbite” of any component of the lamp start-up, that is, icing of the elements. Some models begin to blink already at -10 degrees, although the technical parameters indicate the possibility of working at -50...+50 degrees.
Typically, this temperature regime is noted for other elements, but not for the LED itself. The trigger mechanism in the LED spotlight cannot cope with low temperatures, the controller or capacitor freezes. The issue can be resolved this way: periodically bring the spotlight into the house during the day, and then put it in its proper place at night.
The spotlight flashes when turned on
When the device starts to blink when turned on, the reason is most often due to damage to the starting LED capacitor. After replacing it, the system starts working properly. Flickering can also be associated with poor contact or broken wires. In such a situation, check the cables and eliminate the fault.
The spotlight flashes when turned off
This happens when a backlit mechanism is used to turn it on and off. Due to the backlight, a small amount of current flows to the LED spotlight. This causes a flickering effect. If you want to eliminate this phenomenon, you will have to connect the backlight directly or place an incandescent lamp in the path of the current. The latter will draw electricity onto itself.
Spotlight mode
Expensive floodlight models have various additional functions. One of the popular ones is the glow mode, and blinking can be the result of its accidental activation. You should completely turn off the device, then turn it on, assessing whether this phenomenon has disappeared or not.
Another reason is the design feature of the spotlight, where one button activates several functions. This usually happens when the manufacturer decides to save on materials. When pressed twice, the strobe mode is activated - repeating fast light pulses.
Lighting in the switch
To design lighting in a cottage or private house, backlit switches are often purchased, which are designed to ensure the operation of the spotlight. It is the switch that provokes the blinking effect of the spotlight. The main reason is this: the LED does not completely break the circuit, and the insulated wires act as both a conductor, a capacitor, and an AC rectifier. Thus, a low-power LED is not able to ensure efficient operation of the circuit. It is enough to start the lamp, but it is not enough for long-term operation.
It's easy to rectify the situation. You need to disconnect the switch LED from the power supply. You can also replace the backlit switch with a regular one, which in the off position will completely break the electrical circuit. Another option is to introduce a 0.1-0.5 µF capacitor or a 50 kOhm resistor with a power of 2 W into the circuit. They are located in the switch socket.
Reasons for flickering of an LED lighting device when turned on
The main reason why LED equipment may flicker is the poor quality of the LED matrix. Ripple in the output voltage of even a classic power supply circuit is inevitable. In high-quality diodes, the luminescence saturation in the established voltage range is almost identical, due to which any ripple is prevented.
In the case of a low-quality matrix, even if the voltage drops by 0.5, a change in the brightness of the light flux already occurs. In some cases, this situation can be corrected by installing a capacitor with a larger capacity. But such a lighting source is not recommended for living rooms.
Recommendation! When detecting the blinking of an LED chandelier, you should not ignore this phenomenon. This can lead to vision problems over time. You should definitely take the time to fix the problem, and if possible, return the low-quality light bulb to the seller.
Reasons for flashing spotlights
To repair the device, you need to accurately determine the cause of the flickering light. It may be related to wiring, malfunction of semiconductors and other components of the device.
Wiring irregularities
Often the cause of flickering is a simple device connection error. When connecting wires, the master may confuse phase and zero. In some situations, the equipment does not work at all, in other cases it begins to blink. Solving the problem is not difficult - you just need to swap the wires.
Infrequent flickering with unequal frequency means a violation of contacts with the cable connection. A high-power LED floodlight is very different from a regular lamp. If there is no tight contact at the junction of the wires, the resistance begins to increase. The wire heats up, and the resulting scale impairs the contact.
From the area of connection to the network to the point where electricity passes to the matrix power driver, intermediate currents appear. This can happen in the junction box, motion sensor, connectors on the power supply, or switch. You will have to check all the elements until the problem is fixed. Next, the wire is stripped and the contact density is restored by soldering.
Presence of semiconductor devices in the circuit
When a switch with a diode backlight or an infrared motion sensor is installed in front of the lamp, light pulsates at a high frequency (up to 25 times/second). This is caused by a change in current strength in the circuit by the passage of a half-wave of alternating voltage. You can fix the problem by turning off the switch backlight LED. Another repair option would be to replace the motion sensor from infrared to ultrasonic, inductive.
Irregularities in the floodlight power circuit
Failures in the device’s power supply system occur frequently, mainly in cheap models. To correct such problems, you need to know the basics of radio engineering or take the device to a repair shop.
Rectifier (diode) bridge
The cheapest LED floodlights often use a single-bridge AC rectifier. It is very different from a conventional two-bridge circuit in quality - it gives a high voltage ripple amplitude. Even installing a smoothing capacitor does not eliminate the ripple, which causes the light to flicker. The solution is to buy high-quality devices with a “classic” two-bridge circuit.
Smoothing capacitor
Installing a transformer will reduce the voltage amplitude to 12 volts, and the polarity of the negative half-wave will change. Installing a smoothing capacitor will allow you to increase the ripple amplitude to 10-15%, which will not be perceived by the human eye. If the capacity of the smoothing capacitor is insufficient, the amplitude will remain above 15% and will appear as a blinking light.
LED installation errors
With a low-quality assembly of the matrix, which is made up of many LED elements, the contact pad often turns out to be poorly soldered. If one of the contacts is broken, the connection of the group of diodes becomes unstable. This provokes blinking. The solution is to re-solder the diodes or submit the device for repair.
Current limiting capacitor
When the spotlight turns on normally, but operates unevenly and blinks, there is a possibility of a breakdown of the current-limiting capacitor. Unscrupulous manufacturers often want to achieve high brightness not through the power of the device, but by connecting a current-limiting capacitor that is not suitable for the driver. You should replace the part with one that has an operating voltage of 400 volts, and the flickering will disappear.
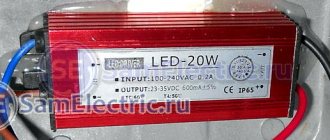
power unit
Sometimes lighting equipment works well after purchase, but after a few months it begins to flicker. This usually happens when there is a problem with the power supply. The service life of the blocks is up to a year. Towards its end, various light defects begin to appear, after which the element breaks completely. You can buy a suitable power supply (take your old one with you, the store will select one suitable according to the parameters). Also, in many cases, a block from a scanner or printer is suitable. You need to check the technical specifications yourself and replace the part.
Driver
Low-power spotlights are often equipped not with a full-fledged power supply, but with an LED driver. The equipment cannot be powered directly from a 220-volt network; it needs alternating current, so you cannot do without a driver. The latter adjusts the output current, after which a voltage of 12 volts is supplied to the LED. When the driver fails, a flickering effect is noticeable. If it is unevenly heated or cooled, the light bulb takes a long time to start when turned on; at first, only individual diodes light up. The blinking is present even after turning off.
To replace the driver, you need to disassemble the spotlight, find out the markings and characteristics of the element. You can buy it at an electronics store. Experienced specialists solder such drivers themselves.
Matrix burnout
Such a breakdown is considered serious, since the LED itself fails. The burnt matrix must be uninstalled by first unscrewing the 4 fastening screws and unsoldering the capacitors. Then you should buy new diodes, apply a layer of thermal paste on them, solder the conductive parts, and screw the matrix. Its shape remains original, as do the fastening screws. If the latter are made in the form of cones, they are likely to damage the matrix.
Do-it-yourself 220 V LED lamp repair: step-by-step instructions
The driver that causes failure in 80% of cases is not necessarily built into the light bulb. The light source can consist only of LEDs, and the stabilizing device will be built into the lamp or chandelier. However, the remaining 20% should not be discounted. It is necessary to check all parts before starting to repair the ice lamps.
Read also: How to properly use a propane cutter for cutting
In the case of a separate driver, everything is simpler. We change the lamp, and if it lights up, then the problem is there; if not, the stabilizer is to blame. With the built-in driver the situation is more complicated.
| Photo example | Action to be performed |
| The first question is how to disassemble an LED light bulb. This is easy to do. The radiator should be turned counterclockwise. | |
| We extract the driver. We won’t dwell on checking the LEDs - it’s simple, but it’s worth “tinkering” with the electronics. | |
| Problem areas are visible here even visually, but it’s worth ringing the diode bridge and the microcircuit. It is clear that the driver has experienced a sharp voltage surge. | |
| You cannot work with SMD components with a soldering iron - there is a danger of overheating the printed circuit board and the element itself, which means you will have to use a hair dryer and a soldering station. Not every master has such devices, and therefore below the step-by-step instructions we will reveal one secret on how to get around this problem using improvised means. | |
| Having soldered the diode bridge and the microcircuit, we coat the contacts with a special paste and warm them up. This will help you later put small parts in place and solder them neatly. | |
| We start with the microcircuit. Such parts can be purchased for 50÷70 rubles/10 pcs in a Chinese online store. Having glued the microcircuit onto the paste, hold it and solder it. | |
| Now the diode bridge. It looks like this and can be purchased on the same sites. | |
| We carefully solder the finished driver to the base first. The wiring in it is very short, and in order not to dismantle the base rolled onto the plastic case, they need to be extended. | |
| The other side of the driver is soldered to a printed circuit board with LEDs. It is important not to confuse the polarity here. The poles are marked on the printed circuit board and driver. | |
| It remains to check the functionality. We supplied power with the lamp disassembled. If you have no experience in electrical work, you should not do this - there is a danger of electric shock or short circuit. |
DIY LED lamp repair: we work without a soldering station
Now the promised secret. To repair LED lamps with a conventional soldering iron, you need a piece of single-core copper wire, with a cross-section of 4 mm², and a length of 10÷15 cm. We wind it around the soldering iron tip in a tight spiral so that the tip lengthens by 4÷5 cm, and sharpen the end of the copper wire under an “awl” or "spatula". The temperature will depend on the length. It is convenient if the multimeter has a thermometer function. For LED SMD components that are used in LED lamps, a temperature of 240÷260°C is required.
You can put a jumper here - quickly, but not for long
How to disassemble an LED lamp sealed with sealant
Some devices are not so easy to disassemble. When you try to turn the top, nothing happens? Then a solvent will come in handy. We draw it into a syringe and carefully pass it through the needle along the seam. Leave for 5 minutes, then repeat the operation. Usually 2–3 procedures are enough. Gently swing the upper part by turning left and right. After removing the cover, clean off the old sealant and degrease the surfaces. If you plan to use the lamp in a dry room, there is no need to apply new sealant.
When can a device be repaired - expediency
The price of a quality spotlight is usually high. An experienced technician can disassemble almost any device, even a sealed one, which means it can be repaired. But we must take into account the cost of spare parts and the complexity of repairs.
The power supply most often fails, because only the LED crystals themselves are durable in the device. Finding the perfect block is not easy. Here it is important to take into account all parameters for power and voltage, otherwise there will be consequences for the remaining elements of the device. If the power supply costs more than the spotlight itself, repairs are not advisable. In other cases, you can try to repair the spotlight, having previously calculated the costs.
In order for lighting equipment to work properly for many years, it is better not to use it for too long. It’s not worth leaving it on all night, which wastes a lot of potential. During installation, you must carefully check all connections for bad contacts - this will cause voltage surges. These rules will help make the work of the spotlight long and uninterrupted.