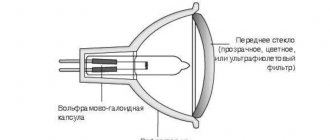
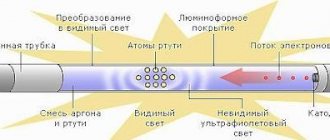
Halogen lamps are increasingly used every day in decorating various shopping malls and shop windows. The bright colors and richness of the image rendering make them increasingly popular. Their service life is much longer than that of conventional lamps. At the same time, they can work for a long time without switching off. Halogen lamps use filaments, but the glow process is different in comparison with incandescent lamps due to the filling of the cylinder with a special composition. Such light bulbs are used in various lamps, chandeliers, kitchen furniture and come in 220 and 12 volt. A power supply for halogen lamps with a voltage of 12 volts is necessary, because if they are connected directly to the electrical network, a short circuit will occur.
Specifications
The voltage of halogen lamps is not only 220 and 12 volts. On sale you can find 24 and even 6 volt light bulbs. The power can also be different - 5, 10, 20 watts. Halogen lamps from 220 V are connected directly to the network. Those that operate on 12 V require special devices that convert current from the network to 12 volts - so-called transformers or special power supplies.
Twelve volt halogens work very well. Previously, in the 90s, a large 50 Hz transformer was used, which ensured the operation of only one halogen lamp. Modern lighting uses pulsed high-frequency converters. They are very small in size, but can pull 2 - 3 lamps at the same time.
On the modern market there are both expensive and cheap power supplies. As a percentage of expensive ones, about 5% are sold, and much more cheap ones. Although, in principle, high cost is not a guarantee of reliability. Cool converters, unfortunately, do not use high-quality parts, but only use clever circuit “bells and whistles” that contribute to the normal operation of the power supply, at least during the warranty period. As soon as it runs out, the device burns out.
How to change a halogen light bulb in a suspended ceiling?
If you decide to replace halogen lamps with LED lamps, we suggest that you read the step-by-step instructions for this process:
- Be sure to turn off the power to the room. The power supply is turned off from the distribution panel in the vestibule/entrance.
- Replace the internal mechanism - a block (transformer) that will not only reduce, but also stabilize the voltage.
- Remove the socket from the lamp.
- Install the LED product with the appropriate socket.
- If necessary, insulate the wiring. Make sure to secure the chandelier tightly.
Classification
Transformers are electromagnetic and electronic (pulse). Electromagnetic ones are affordable, reliable, and can be made with your own hands if desired. They also have their disadvantages - decent weight, large overall dimensions, increased temperature during prolonged operation. And voltage drops significantly shorten the life of halogen lamps.
Electronic transformers weigh much less, they have a stable output voltage, they do not heat up much, they can have short-circuit protection and soft start, which increases the life of the lamp.
Is it worth changing
Such changes in the electronic circuit of the chandelier will require a lot of effort, considerable time and financial costs. However, there are a lot of benefits that can be gained from this.
The service life of a halogen lamp is approximately 4000 hours, LED devices - 25-30 thousand hours. Add to this the significant energy savings that are achieved by reducing the power consumed by the chandelier while maintaining the nominal glow intensity. If five 40 W halogen lamps were installed, then the total load was 200 W. In the case of LED products, the load will be 7.5-10 W. Thus, such a replacement is completely rational and justified. In order to save money, LED equipment is used in powerful floodlights installed in stadiums.
Transformers for halogen lamps
The analysis will be carried out using the example of a power supply. The output of this transformer is no less than 5 amperes. For such a small box the value is amazing. The case is made in a hermetically sealed manner, with the absence of any kind of ventilation. This is probably why some copies of such power supplies melt from high temperatures.
The converter circuit in the first version is very simple. The set of all the details is so minimal that it is unlikely that anything can be thrown out of it. When enumerating we see:
- diode bridge;
- RC circuit with a dinistor to start the generator;
- generator assembled on a half-bridge circuit;
- transformer that reduces the input voltage;
- low resistance resistor that serves as a fuse.
With a large voltage drop, such a converter will “die” 100%, taking the entire “blow” upon itself. Everything is made from a fairly cheap set of parts. Only there are no complaints about the transformers, because they are made to last.
The second option looks very weak and unfinished. Resistors R5 and R6 are inserted into the emitter circuits to limit the current. At the same time, the blocking of transistors in the event of a sharp increase in current is not thought out at all (it simply does not exist!). The electrical circuit (in the diagram it is red in the diagram) raises doubts.
produces halogen lamps with power up to 60 watts. The output current of the power supply is 5 amperes. This is a bit much for such a light bulb.
When removing the cover, pay special attention to the dimensions of the radiator. For a 5 amp output they are very small.
Replacement procedure
1.
Turn off the power to the lamp, then remove the protective glass or shade to gain access to the lamp. Be sure to let the lamp cool down.
2.
Grab the bulb with your hand and lightly press the lamp with one end of the base into the socket, while pulling the other (released) end of the base towards you. Thus, one end of the base, and behind it the entire lamp, should come out of the socket.
3.
Buy a lamp of the required size, power and voltage from the store. Remember that a halogen lamp should not be touched with your hands, so install the new light bulb in place using a clean cloth, glove or piece of non-slip polyethylene.
Typically, this type of light bulb is sold packaged in polyethylene, which can be used to hold the lamp during installation. Just remember to remove it after installation.
4.
Insert one (either) end of the light bulb into the socket and, pressing lightly on it, insert the other end of the light bulb into the opposite part of the socket so that the light bulb is securely fixed between the clamps of the socket.
If you see that the light bulb is not installed tightly and is dangling between the clamping contacts of the socket, then you need to remove the light bulb and bend the clamps or socket mount so that the light bulb “fits tightly” in the socket. If the clamping contacts of the cartridge are severely burnt and cannot be adjusted, it will be necessary to replace the cartridge.
5.
Turn on the lamp. If everything works fine, install the protective glass or lampshade in its rightful place.
If you wish, you can find out how to replace fluorescent lamps by reading about it in the corresponding article.
For greater clarity, you can watch this short video on how to replace burnt out halogen light bulbs. The video will open in a separate window.
Press the ↓↓↓ button
and share with your friends if you find this article useful!
Source: razumnaekonomia.blogspot.com
Calculation of transformer power for lamps and connection diagram
Various transformers are sold today, so there are certain rules for selecting the required power. You should not take a transformer that is too powerful. It will work practically idle. Lack of power will lead to overheating and further failure of the device.
You can calculate the power of the transformer yourself. The problem is rather mathematical and is within the capabilities of every novice electrician. For example, it is necessary to install 8 halogen spot lights with a voltage of 12 V and a power of 20 watts. The total power will be 160 watts. We take approximately a 10% margin and purchase a power of 200 watts.
Scheme No. 1 looks something like this: there is a single-key switch on line 220, with the orange and blue wires connected to the transformer input (primary terminals).
On the 12 volt line, all lamps are connected to a transformer (to the secondary terminals). The connecting copper wires must have the same cross-section, otherwise the brightness of the light bulbs will be different.
Another condition: the wire connecting the transformer to the halogen lamps must be at least 1.5 meters long, preferably 3. If you make it too short, it will start to heat up and the brightness of the lamps will decrease.
Scheme No. 2 – for connecting halogen lamps. Here you can do things differently. Break, for example, six lamps into two parts. For each, install a step-down transformer. The correctness of this choice is due to the fact that if one of the power supplies breaks down, the second part of the lamps will still continue to work. The power of one group is 105 watts. With a small safety factor, we find that you need to purchase two 150-watt transformers.
Advice! Power each step-down transformer with its own wires and connect them in a junction box. Leave the connection points freely accessible.
Rules for choosing step-down equipment
When choosing a transformer for halogen light sources, you need to take into account many factors. It’s worth starting with two important characteristics: the output voltage of the device and its rated power. The first must strictly correspond to the operating voltage of the lamps connected to the device. The second determines the total power of the light sources with which the transformer will work.
There is always a marking on the transformer body, by studying which you can obtain complete information about the device
To accurately determine the required rated power, it is advisable to make a simple calculation. To do this, you need to add up the powers of all light sources that will be connected to the step-down device. To the resulting value, add 20% of the “reserve” necessary for the correct operation of the device.
Let's illustrate with a specific example. To illuminate the living room, it is planned to install three groups of halogen lamps: seven pieces in each. These are point devices with a voltage of 12 V and a power of 30 W. Three transformers will be required for each group. Let's choose the right one. Let's start by calculating the rated power.
Let's calculate and find that the total power of the group is 210 W. Taking into account the required headroom, we get 241 W. Thus, for each group you will need a transformer, the output voltage of which is 12 V, the rated power of the device is 240 W.
Both electromagnetic and pulsed devices fit these characteristics
When choosing the latter, you need to pay special attention to the rated power. It must be presented as two digits
The first indicates the minimum operating power. You need to know that the total power of the lamps must be greater than this value, otherwise the device will not work.
And a small note from experts regarding the choice of power. They warn that the power of the transformer, which is indicated in the technical documentation, is the maximum. That is, in normal condition it will produce somewhere around 25-30% less. Therefore, the so-called “reserve” of power is necessary. Because if you force the device to work at its limit, it will not last long.
For long-term operation of halogen lamps, it is very important to correctly select the power of the step-down transformer. At the same time, it must have some “reserve” so that the device does not operate at the limit of its capabilities. Another important nuance concerns the size of the selected transformer and its location.
The more powerful the device, the more massive it is. This is especially true for electromagnetic units. It is advisable to immediately find a suitable place for its installation. If there are several lamps, users often prefer to divide them into groups and install a separate transformer for each
Another important nuance concerns the size of the selected transformer and its location. The more powerful the device, the more massive it is. This is especially true for electromagnetic units. It is advisable to immediately find a suitable place for its installation. If there are several lamps, users often prefer to divide them into groups and install a separate transformer for each.
This is explained very simply. Firstly, if the step-down device fails, the remaining lighting groups will work normally. Secondly, each of the transformers installed in such groups will have less power than the common one that would need to be installed for all lamps. Consequently, its cost will be noticeably lower.
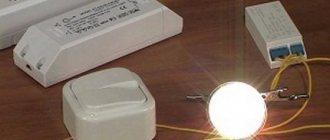
Do-it-yourself power supply modification
To operate halogen lamps, pulsed current sources with high-frequency voltage conversion began to be used. During home production and setup, expensive transistors quite often burn out. Since the supply voltage in the primary circuits reaches 300 volts, very high requirements are placed on insulation. All these difficulties can be completely avoided by using a ready-made electronic transformer. It is used to power 12-volt halogen backlights (in stores), which are powered from a standard electrical outlet.
There is a certain opinion that getting a homemade switching power supply is a simple matter. You can only add a rectifier bridge, a smoothing capacitor and a voltage stabilizer. In reality, everything is much more complicated. If you connect an LED to the rectifier, then only one ignition can be detected when turned on. If you turn the converter off and on again, another flash will occur. In order for a constant glow to appear, it is necessary to connect an additional load to the rectifier, which, taking away useful power, would convert it into heat.
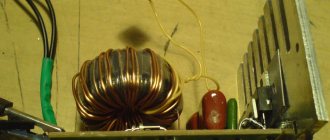
One of the options for self-manufacturing a switching power supply
The described power supply can be made from an electronic transformer with a power of 105 W. In practice, this transformer resembles a compact pulse voltage converter. For assembly, you will additionally need a matching transformer T1, a mains filter, a rectifier bridge VD1-VD4, and an output choke L2.
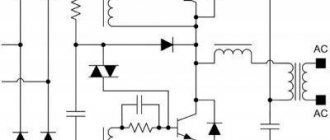
Bipolar power supply circuit
Such a device operates stably for a long time with a low-frequency amplifier with a power of 2x20 watts. At 220 V and a current of 0.1 A, the output voltage will be 25 V; when the current increases to 2 amperes, the voltage drops to 20 volts, which is considered normal operation.
The current, bypassing the switch and fuses FU1 and FU2, goes to a filter that protects the circuit from interference from the pulse converter. The middle of capacitors C1 and C2 is connected to the shielding casing of the power supply. Then the current is supplied to input U1, from where a reduced voltage is supplied from the output terminals to the matching transformer T1. The alternating voltage from the other (secondary winding) rectifies the diode bridge and smoothes the L2C4C5 filter.
Self-assembly
Transformer T1 is manufactured independently. The number of turns on the secondary winding affects the output voltage. The transformer itself is made on a K30x18x7 ring magnetic core made of M2000NM ferrite. The primary winding consists of a PEV-2 wire with a diameter of 0.8 mm, folded in half. The secondary winding consists of 22 turns of PEV-2 wire, folded in half. By connecting the end of the first half-winding to the beginning of the second, we obtain the midpoint of the secondary winding. We also make the throttle ourselves. It is wound on the same ferrite ring, both windings contain 20 turns.
Rectifier diodes are located on a radiator with an area of at least 50 sq.cm. Please note that diodes whose anodes are connected to the negative output are insulated from the heat sink with mica spacers.
Smoothing capacitors C4 and C5 consist of three K50-46 connected in parallel with a capacity of 2200 μF each. This method is used to reduce the overall inductance of electrolytic capacitors.
It would be better to install a surge filter at the input of the power supply, but it is possible to work without it. For a line filter choke, you can use a DF of 50 Hz.
All parts of the power supply are mounted on a board made of insulating material. The resulting structure is placed in a shielding casing made of thin sheet brass or tinned sheet. Don't forget to drill holes in it for air ventilation.
A correctly assembled power supply does not require adjustment and starts working immediately. But just in case, you can check its performance by connecting a resistor with a resistance of 240 Ohms and a dissipation power of 3 W to the output.
Replacement procedure
1.
Turn off the power supply.
2.
Remove the lampshade or protective glass and remove the burnt out light bulb. Depending on the design of the luminaire and the type of lamp, various options are possible.
Open Bulb Light Bulbs
usually hidden under various lampshades (a common option is built-in backlights in furniture cabinets).
To replace such a light bulb, remove the protective shade by prying it around the perimeter with a thin screwdriver or knife, and then simply pull the bulb bulb, pulling it out of the socket.
Light bulbs with reflector and protective glass
Most often used in lamps built into suspended / suspended ceilings. In order to remove the lamp from the lamp, in most cases it is enough to remove the spacer spring or ring that secures the lamp in the lamp body.
Recommendations for using a transformer
Step-down transformers for halogen lamps generate a very large amount of heat during operation. Therefore, several requirements must be met:
- Do not connect the power supply without load.
- Place the unit on a non-flammable surface.
- The distance from the block to the light bulb is at least 20 centimeters.
- For better ventilation, install the transformer in a niche with a volume of at least 15 liters.
A power supply is required for halogen lamps operating on 12 volts. It is a kind of transformer that lowers the input 220 V to the required values.
Useful tips
When connecting halogen lamps, you need to follow these useful tips:
- Often luminaires are manufactured with non-standard wire markings. This is taken into account when connecting phase and zero. Incorrect connection will cause problems.
- When installing luminaires via a dimmer, special LED lamps must also be used.
- The wiring must be grounded.
- The output wire should not be longer than 2 meters, otherwise there will be a loss of current and the lamps will shine much dimmer.
- The transformer should not overheat; for this purpose, it should be installed no closer than 20 centimeters from the lighting device itself.
- When the transformer is located in a small cavity, the load should be reduced to 75 percent.
- Installation of spotlights is done after the surfaces are completely finished.
- You can install halogen spotlights yourself, following the installation rules.
- If the lamp is square, then first the circle is cut out with a crown, and then the corners are trimmed (for plastic, plasterboard suspended ceilings).
- When installing in a bathroom, you must use a 12 V transformer. This voltage will not harm a person.
We recommend watching the video instructions:
How to change a halogen light bulb
A suspended ceiling in an apartment is already a common thing for us, rather than an exception. And just imagine, the craftsmen made you a brand new slatted metal ceiling. He was living his life, providing light in the house, when suddenly he took a light bulb and burned it out. Just think, a light bulb - what nonsense! How many times have we changed them? Only now I noticed that we actually changed the ordinary electric lamps on our chandeliers and sconces a hundred times, but how to change a halogen light bulb on a suspended ceiling - many here have little experience, and some have never changed them at all. The same applies to small light bulbs on specific lamps with narrow shades where a hand cannot fit.