Installing a socket in a concrete wall is a difficult and responsible job that requires maximum attention and certain knowledge. You need to take safety precautions especially seriously.
Installation of sockets, depending on the method of laying the wires, can be external or internal. The external type of installation is almost never used today due to its unaesthetic appearance and reduced level of safety. The external method involves placing the wiring directly on the surface. In some situations, external wiring is disguised in some kind of protective frame.
Classification of sockets by installation type
In total, it is customary to distinguish two main types of these devices:
1. Overhead models.
Mounted directly on the wall surface. They also received the name “external” due to the installation method. The devices themselves can be easily combined with any type of surface. Transferring products from one place to another will also not be difficult if necessary.
2. Built-in.
During installation, the use of so-called landing nests is assumed. It is not difficult to place an internal outlet in a concrete structure.
The second type raises the most questions among masters. Planting nests are also called socket boxes. The standard depth of the socket box is 45 mm, but there is also a recessed version of 60 mm. It is recommended to use it if you plan to connect wires inside the structure. Then the sockets on the surface do not deteriorate.
Installation of sockets
It is important to know how to connect the outlet correctly. Before installation, you need to remove 10 mm of insulation from the edges of the wire
Make sure that the machine is turned off during work.
There are two options for correctly connecting the outlet:
- Hidden installation of electrical wiring;
- Open installation of electrical wiring.
For any method of installing sockets of any type, you should know how each wire is designated:
- L – phase;
- N – zero;
- PE – grounding.
It is also important to know that the wires are designated:
- Red wire – phase;
- Blue wire – zero;
- Yellow (can be green or another color) – grounding.
Each wire must be connected to its own socket, that is, red to phase, blue to zero, and ground to ground.
Preparatory work
The process begins with the preparation of the materials themselves, the basic tools. You need to understand exactly in which areas the sockets are installed. The installation locations of the devices are marked on the diagram, which is prepared in advance. The same applies to lines with wires and switches. Without this, an internal outlet cannot be placed in a concrete wall.
30-40 centimeters from the floor is the standard height of sockets when it comes to residential buildings. In other cases, the parameter is selected individually, depending on the characteristics and purpose of the room itself.
Additional rules must be observed when laying out the wires for the socket:
· Distance from the ceiling – at least 15-20 centimeters.
· Wires diverge only along horizontal and vertical planes. Diagonal laying is prohibited according to current regulations. The same applies to creating twists between different parts, zigzags.
· 35 centimeters – minimum distance between grooves and pipeline. With a hidden type of installation - including.
Preparation stage
Before you begin installing sockets in concrete, you need to decide on the installation location, as well as prepare the tools and materials that will be needed during the work. When installing sockets in residential premises, it is worth remembering two main factors:
- Installation of sockets in living rooms (living room, bedroom) is carried out at a distance of 30–40 cm from the floor.
- When installing in other rooms (kitchen, bathroom), you should rely only on personal preferences. That is, where it will be convenient and practical, put it there.
When laying electrical wiring, you need to remember some rules:
- The wires are installed at a distance of about 15–20 cm from the ceiling.
- Wire laying is carried out only in a horizontal or vertical position. Under no circumstances is laying diagonally or otherwise allowed.
- The groove for laying the wire (groove) must be at a distance of at least 35 centimeters from the gas pipeline pipe.
Before starting work, you need to prepare a workplace, as well as tools that will be useful during installation.
- Marker, chalk, pencil, or anything to mark the outlet hole in the concrete.
- Ruler of any size.
- A level of any type, which is useful for installing several sockets in one place.
- Drill with installed bit for concrete surfaces. If there is no special crown, you can simply use a drill. In some cases, with certain skills, a grinder is used. It is important to remember that the drill or bit can become very hot during operation and must be cooled down regularly.
- Hammer with chisel. This tool is necessary to give the groove the correct shape.
- Socket box. This item is a frame that gives the mount greater rigidity.
- Putty of any kind, for example, gypsum or cement. You will also need a spatula, which will be placed in the socket box.
- Standard set of tools: knife or cutter, flat-head and Phillips screwdriver, pliers.
After mastering some rules and preparing the instrument, we proceed to the next step.
Marking
An axial center is marked on the concrete wall to place the wires. A pencil and tape measure will do the job. A certain distance between different mechanisms is needed in case adjacent sockets or entire blocks of devices are later installed. 7.1 centimeters is the recommended interval. This is the average distance for socket boxes, center-to-center.
You need to draw two axes in the center - one horizontal, the other vertical. Installation of structures will be as smooth as possible only with sufficient length of the lines. Replacing the socket box in this case is also not a hassle.
Completion of work
When the wiring is already firmly positioned in the contacts and securely screwed in, the socket itself is inserted into the socket box. The wires are laid so that they are parallel to the back wall, after which the entire structure is pushed into the hole.
Fixation of the internal mechanism is carried out thanks to the spacer legs. In order for them to move apart and fix the entire structure, you need to tighten the bolts located on the front part in a clockwise direction. To loosen the mechanism, the bolts are rotated counterclockwise. If the legs interfere with the installation of the structure, then they can be slightly tightened with a regular rubber band or thread.
The final step is to install the socket face. They come in a wide variety of types, but they all have holes for fastening, located in the center. Just install the outer frame and tighten 1-2 bolts. After all the above steps, turn on the electricity at the site and check that the outlet is working correctly.
Installing sockets in concrete is possible on your own, but to do this you need to have at least basic skills and follow safety precautions.
Making holes
Holes in the wall are created in three ways:
· Using a grinder or angle grinder.
· Impact drill, hammer drill or pobedit drill.
· Special crowns for working on concrete. They will also help those who are interested in installing a triple socket.
First option (crown for concrete)
This method is one of the most popular and is widely used in practice. A concrete crown is placed on a hammer drill; this is a special device for making holes. It will be useful for those who are interested in how to embed a socket into a concrete wall.
The cutting element of the tool is a part supplemented with diamond coating. They are also allowed to do the work using pobedit nozzles. When creating devices, only materials of increased strength are used, allowing them to destroy any surface. The result is an even cut with a round shape. A drill on a concrete wall is placed in the inner part of the nozzle. Centering the cutting element is the main purpose of the drill itself. Everyone can figure out how to seal holes.
The dimensions of the drill itself must be large compared to the dimensions of the socket box for installation.
The work order is described as follows:
1. The drill is placed at a given point.
2. The beginning of immersion of the crown into the material.
3. The remaining concrete after completing the cut is hollowed out.
4. For this stage, indispensable assistants are a hammer and a chisel.
Second option (drill, hammer drill, pobedit drill)
A pobedite drill is suitable if the previous tools are not at hand. It is recommended to use hammer drills to make holes. An impact drill also copes with such operations without problems. But under such circumstances the process becomes more complicated. It’s not that easy to work on a wall with your own hands.
The circle is drilled based on the line created in advance. Step is the minimum possible indicator. Immersion at depth is easier to control using electrical tape tied to the drill. Using a hammer and chisel, the finishing touches are completed. How to fix a socket in the walls is an easy and understandable question.
Third option (Bulgarian)
With round holes, an angle grinder cannot be called the most suitable option. It does a better job of creating square shapes. But you can choose this option if there are no other devices. This is one of the answers to the question of how to make a rosette in a concrete wall.
The main thing is to choose a special type of disc designed for concrete work. Draw the shape of a square, not a circle. 4 cuts are made along the marked lines in the wall. Their dimensions are larger than the dimensions of the socket box. A hammer and chisel are used to get rid of the remaining building material. Installing a triple socket involves the same rules.
Connect wiring
Connecting wires to terminals is one of the important points when installing a new outlet. The procedure will look like this:
● you need to make sure that the line is de-energized before starting this work. To do this, move the circuit breaker to the off position, or turn off the power supply to the wires in another way available to you; ● make sure there is no phase using the indicator; ● networks can have two wires (standard option), or they can have three wires immediately laid in the wall. The third wire is grounding. It must be secured to the grounding terminal in the socket, which is designed for a 2K+3 connection. In this case, you cannot confuse the contacts with each other. If you have doubts, it is better to check all the wires again with an indicator. As a rule, and according to standards, it is required to install a yellow-green cable to ground; ● at the ends of the wires coming out of the wall, you use a knife to remove a piece of insulating material, approximately 1.5 centimeters long; ● bend the bare wire into a ring shape if we are talking about a single-core wire. If the wire is stranded, then the contacts can be made in the form of the Latin letter “V”; ● pass the bare part of the wires to the corresponding contacts; ● fasten them tightly to the contacts and clamp them using a screw connection.
After securing the wires, you push the mechanism into the depth so that it allows free placement of the remaining wiring. If there are too many of these remnants, gently pushing them inside the lines where they lie often helps. The mechanism itself must be secured to spacer tabs, which are tightened until tightly secured using screws. In modern sockets, fastening the mechanism directly with screws to the socket itself is increasingly used.
As a result, you should have the socket mechanism installed with fixation to the socket box. In this case, the wires are fixed in the corresponding terminals.
Some manufacturers of electrical installation products use special clamps instead of screw terminal connections for contacts. Such clamps tightly press the wires to the contacts, ensuring good conductivity. The main advantage of the clamping method is that it increases the speed of installation of the socket. In terms of functionality, both clamps and screw fastening perform equally well.
Holes and size of socket box: customization
After making the holes, you need to check whether the socket boxes are suitable for them. Initially, the holes have a larger diameter compared to devices. Therefore, choosing the correct width is not difficult. Adjusting the desired depth is part of the work that requires additional effort. Otherwise, it is impossible to fully understand how to install a socket box in the wall.
The ideal option is depth, when the socket itself in the concrete wall goes deep into the niche, 5 millimeters. But it is recommended to make a small reserve - taking into account the possible use of fixing materials inside the holes. Usually this is a solution of gypsum or alabaster. The bend of the wire going to the device also takes up a certain space.
Trimming the edges makes the job easier. This is easy to do with a knife.
Adjusting the depth will result in both the outer skirt and the socket box being hidden inside the hole. Then the device is mounted in the same plane with the wall. Otherwise, gaps of 1-2 millimeters appear.
How to install a light switch
The first thing you need to do is turn off the breaker. Some people believe that it is safe to turn off only the meter on which you install the switch, but we strongly recommend that you keep the main power supply switch turned off.
Turn off the machine
Then, use a voltage tester on each wire to make sure there is no electricity and everything is safe. We emphasize that it is better to check this several times before touching the electrical wires.
Wiring
This description of the work is for those who are interested in how to install a socket box in concrete. You can't do without wires:
· Checking insulation and cable cores for various defects.
· Removing the cover from the distribution box.
· A cable is placed inside the box, its different ends. They enter it from one side, and from the other they go to the landing box. It is better to route the cable with an additional margin, then it will be easier to work in the future. Usually it is 10-15 centimeters.
· A groove intended for the wire is prepared at the top. There should be no obstacles on the side of the wire, the movement of the socket box inside the niche should be free. The device is equipped with a special slot on the reverse side, with the help of which installation is completed.
· A corrugated pipe is laid inside the grooves, inside of which there is a cable.
· Additional fixation is provided with alabaster mortar. 250 millimeters is the step that is recommended to be followed.
· Defects are easily covered with putty-type solutions. How to cover the socket boxes in this or that case is up to the owner to decide.
Gypsum can also be a good fixing compound. Both construction and medical varieties are used. The base is poured into a container when the solution is just starting to be prepared. After this, add water, a small amount. The density of the solution should be medium.
After a couple of minutes, working with the composition becomes more difficult, so you need to use it quickly. After 5 minutes the compounds become completely unusable. Let's look further at how to install a socket box in a concrete wall.
Wall marking process
A critical stage that determines the quality of installation of sockets and their connection. In order to implement it, it is necessary to place sockets in the place where the socket boxes are installed; the number of sockets placed depends on how many sockets will be present in the block.
Grooving
This process is not as difficult as it sounds. It includes creating nests for socket boxes. In this case, you need to have a hammer drill with the required attachment.
If you are going to place a block of sockets in a wall made of concrete or brick, then it is vital for you to drill the circles with a crown and then knock out the core with a chisel.
Installation of socket boxes
It is also not the most difficult step in installing sockets, since today the market offers plastic cups created for this procedure that connect to each other. So even the most ignorant person can handle it.
If the installation of socket boxes takes place in a concrete or brick building, then you need to cover the glasses with gypsum mortar.
Electrical connection
After waiting until the substance has hardened, you need to start turning on the internal block of sockets to the 220V network. Several European sockets can be connected to one electrical line, but keep in mind that this is done only when you know that you will not connect, say, an electric stove.
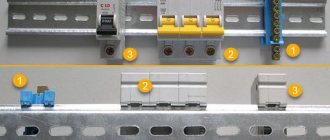
And now to the point, to install and connect the socket blocks you need to insert the input wires coming from the distribution box into the very first socket box: phase, neutral and grounding. Next, in order to connect other sockets, make jumpers.
Preparation and installation of socket boxes
The electricity supply must be turned off before starting work. The box and the hole are tried on against each other. The socket box should be flush with the surface, there should be no obstacles to this. If there are unnecessary elements, they are cut off and removed.
The bottom of the hole is cleaned of any traces of dirt and dust. After this, they prime the surface. Under such circumstances, the adhesion of the fixing composition and the wall will be optimal. You will have to wait a while for the primer to dry.
The further procedure for the work is as follows:
1. Plastic elements are squeezed out of the box. Then the cable runs through here.
2. Treatment of the walls and bottom of the recess with a solution for specialized purposes. This is also required for the outer part of the socket box in a concrete wall.
3. Installation of the device, block in the solution. It is important to align the edge of the socket box on top and the wall with each other.
4. Use a building level to check how horizontal the mounting lugs are.
5. The box is removed from excess solution. This rule also applies to a triple rosette in any surface.
Structural adapters are used when connecting when a whole block with sockets is mounted.
Installing an outdoor outlet
Installing an outdoor outlet
A device of this type is installed mainly in rooms with external wiring or those made of flammable materials (for example, wood). Of course, such devices significantly worsen the aesthetics of the room, but safety is still more important than aesthetics.
Installing an outdoor outlet
An important advantage of open sockets is that all elements will be visible, and the problem area, if necessary, is quite easy to detect. For example, if the contact is poor, the housing will melt or change color.
External socket
Now - directly to the installation process.
Step 1. The power supply is turned off.
Step 2. The case is disassembled - the fasteners are unscrewed and the top panel is removed.
Step 3. The base of the socket is screwed to the wall with screws.
Step 4. The contacts for the wires are loosened so that the latter can enter to a depth of 0.5-1 cm.
Step 5. The wires are stripped and bent in the form of a spring - this will eliminate sharp bends during installation. Then the ends of the wires are placed into the contacts, after which the mounting bolts are tightened.
How to connect wires to an open wiring outlet
Step 6. The panel is screwed on and the entire socket is assembled.
Features of installing a double socket box
To connect socket boxes into a concrete wall, use special connectors. Such designs are also called butterflies. The connectors are placed to connect the butterflies on the sides. Thanks to this, you can connect both 2 socket boxes and a much larger number.
The work is carried out in the following order:
· First make the markings. It is necessary to count the distance from the floor to one or another element. The strip is strictly horizontal, with a certain height. Then installing a socket box in a concrete wall will not be difficult.
· The socket boxes are applied to the strip, already connected by a butterfly. The central parts of each device must be marked on the strip.
· Create holes using one of the methods described earlier.
· Connecting grooves are created between the holes. A suitable tool for this is a grinder.
· Immersion of the wire inside one of the holes.
· After this, work proceeds as usual. It’s easy to figure out how to install a socket box in a concrete structure.
Types and characteristics of socket boxes
Modern sockets, both in appearance and in the installation method, differ significantly from those installed in Soviet-era houses.
If previously they were simply embedded in the wall without the possibility of replacement, today installing them and, if necessary, changing the socket is not particularly difficult.
And all this thanks to the socket box, which, in fact, is a box that securely holds the socket in its depths and at the same time ensures its fire safety.
Socket boxes come in different shapes and sizes, differ in materials of manufacture and installation method, so before you buy, you need to understand their types.
A socket box is a mounting device designed for reliable fastening of electrical installation products of hidden wiring. Regardless of whether the installation of a single or a group of socket boxes is carried out, the walls are chipped before their installation. When buried in a brick or concrete wall, these mounting boxes or glasses are secured with alabaster. The socket box is fastened to partitions and false walls made of plasterboard using adjustable spacer legs. Almost all building materials and slab options used in rough wall cladding are suitable for installing socket boxes in them. In the line of products for hidden wiring, you can find options for arranging log and timber buildings. Socket boxes are used to install single switches, power points and socket blocks. During operation, it is easier to tighten the “loose” mechanism in the socket box. With its use, installation is carried out faster and more accurately.
Selecting a socket box based on wall material
The main selection criterion is the material of the walls into which the socket boxes will be installed.
On this basis, there is the following classification of boxes:
- structures intended for installation in walls made of solid materials: concrete, reinforced concrete, aerated concrete, brick;
- glasses for walls made of composite materials: plasterboard, plastic boards, chipboard, plywood and others.
In the first case, the socket box is a round glass without any additional elements. It is fixed to the wall using mortar.
There are mounting holes in its walls or bottom for electrical wiring. When installing a socket box, it is enough to remove the jumpers and push out the plug.
Socket boxes with side docking units allow you to quickly and easily install two or more sockets at once
To install several sockets located nearby, you can use glasses, on the side of which there is a fastening mechanism. The socket boxes are connected to each other using special grooves and combined into blocks.
Drywall boxes contain special plastic or metal clamping tabs designed to secure elements into hollow walls. The clamps are attached to screws, which rotate to adjust their position.
When the screw is turned, the foot rises or lowers. Clockwise rotation brings the clamping element closer to the wall and secures the glass in the drywall.
What shapes are the products produced in?
Round socket boxes have become most widespread. It is very easy for them to make a hole in the wall using a variety of tools.
Round glasses can be used both for mounting a single socket or switch, and they can be combined into groups, connecting to each other using docking units.
Square boxes, although not used as often, have certain advantages. Their volume is much larger, so you can hide a lot of wires in them.
They are often used to install elements of the “smart home” system. There are single and group square-shaped socket boxes designed to install up to five sockets.
There are also oval boxes on sale, which, like square ones, have a large internal space. They are convenient because you can immediately connect a double socket to them. All the products described above are mounted in walls and used for hidden wiring.
There is another type of mounting boxes that stand somewhat apart - plastic linings or, in other words, multiboxes, designed for open installation on the baseboard. They are designed for one or more outlets and are usually square in shape.
This type of installation of plastic overlays can only be used on dismountable plastic skirting boards
External socket boxes have two modifications - designs with installation to the middle of the baseboard or to the floor. Since multiboxes are mounted on top of the baseboard, their distinctive feature is their aesthetic appeal and original design.
Installation box size
An important parameter of socket boxes is their dimensions, which are selected based on specific installation conditions. The fork dimensions are 60-70 mm in diameter and 25-80 mm in depth.
Standard designs have external dimensions of 45 x 68 mm, but it must be taken into account that the internal depth in this case will be 40 and the diameter 65 mm.
When installing several round socket boxes in a group, one of them, which has an increased depth, can, in addition to its main purpose, serve as a distribution box
Glasses of increased sizes, the depth of which is about 80 mm, are advisable to use when there is no distribution box in the electrical wiring, and its functions are performed by the electrical outlet itself. As for square products, as a rule, they have a size of 70x70 or 60x60 mm.
Material for making mounting boxes
The most popular are socket boxes made of non-flammable plastic. They can be installed in concrete walls and structures made of composite materials.
There are also metal boxes, which were used everywhere in the past, but today they have almost been replaced by plastic products.
Metal socket boxes are usually installed when installing electrical wiring in wooden houses. They are made of galvanized or non-ferrous metal and cannot be welded, so the connection to a metal pipe is made by soldering.
For safety reasons and fire prevention, when installing electrical wiring in wooden houses, it is necessary to use metal socket boxes.
Basic rules for installing socket boxes
Before installing the socket box, you must select the location for its installation. But since the socket is a source of increased danger, its placement in some rooms is subject to special requirements specified in the “Rules for Electrical Installations” (PUE).
According to the PUE:
- there must be a distance of at least 50 cm from the electrical outlet to the pipe through which the gas passes;
- sockets in the bathroom can be installed at a distance of at least 60 cm from the source of splashes (sink, shower, bath);
- It is recommended to install switches on the side where the door handle is located, and the distance from the device to the floor should be up to 100 cm;
- You cannot install sockets in saunas, baths, or rooms where laundry is done.
There are no special rules for other premises. Sockets should be placed in such a way that their use is convenient for all family members.
It is also necessary to follow safety requirements and install devices taking into account the location of electrical appliances in the house so that their cords reach the outlets without the use of extension cords.
Before installing socket boxes, you should also study information about the nuances of installing an outlet for a washing machine or an outlet for an electric stove.
Electrical connection
Only two or three wires are required to connect. The main thing is to avoid mistakes during this stage. Installing an outlet block into a concrete wall requires additional supervision.
First you need to make sure that there is no electricity flowing through the wiring. Turning off the circuit breaker is a simple task that only takes a minute or two. For checking, special indicator screwdrivers are often used. Thanks to this stage, further work is greatly simplified.
The so-called wire stripping also becomes an obligatory part. 1.5-2 centimeters are removed from the ends of the veins. The piece that turns out to be bare is bent into a ring shape. For multi-core products, the structure is divided into two parts. Then the ends of the wires take on the shape of the letter V. The installation of socket boxes in the structure is simplified.
The core is slightly flattened with pliers. The result is an increased contact area between the wires and the terminal.
Connecting wires also has features that must be taken into account.
· The socket is equipped with only two terminals of current-carrying contacts. The third is for grounding.
· All parts are clamped with special bolts, which means there is not enough space to insert larger wires.
· The yellow-green wire usually goes to the ground pin. This rule is easy to follow if the coloring of the material is initially organized correctly.
· Blue – to zero, the rest – for phase.
· Grounding is connected only to the contact that is intended for it.
· The phase with zero is connected to the remaining components. Then the order in which the work is done practically does not matter. In any case, it is easy to understand how to install a socket box in the walls.
A cable or star is a way to connect a block with sockets. If a cable is used, wires from the previous one go to the contacts of one socket. After this, move on to the next component.
The second diagram with an asterisk is slightly different from the previous one. From each outlet, the wires are collected at a “common collection point.” After this, everything is connected in order. Connecting grounding with a loop is prohibited, according to current regulations. Only phase and neutral can be connected in this way. The “earth” must be brought down with the help of a star. After this, the installation of socket boxes in the wall is almost complete.
Installing an outdoor outlet
Sockets for external installation differ in that they have a certain degree of protection against humidity and water getting inside. Such sockets come with a cover that covers the socket, and the electrical installation of the sockets occurs in the same way as when installed indoors.
The wire core must be intact when inserted into the terminal, otherwise it may affect operation.
You should always check the wires with an indicator, since there is always a possibility that the machines may not work correctly. It is best to turn off the input circuit breaker for your apartment or house while the outlet is being installed.
When there are small children, you need to use sockets with a lid.
Always insulate exposed wires with terminals or electrical tape.
The installation of sockets in a wooden house must be carried out with complete insulation of the wires, using a metal hose.
Without previous experience, it is better to entrust the installation of sockets to an electrician, since any errors in electrical wiring can be very expensive.
Finishing
Finishing work begins only after the fixing material has completely dried. Otherwise, there is a high risk that the mounted device will move to the side. We have already figured out how to install a socket in a concrete wall.
The working surface is finished as follows:
1. Irregularities, chips and holes - any noticeable defects - are treated with special primers. It is recommended to properly level the surface around the socket boxes in the concrete wall again.
2. Puttying of the surface begins after the previous layer has dried. The surface is sanded when the putty is dry. The main thing is that the resulting base is as smooth as possible.
3. Apply another layer of primer and wait until it dries. Then the rosettes on the surface look more attractive.
Beginning of work
Let's consider how to install and secure this electrical installation product for hidden wiring in a concrete wall.
Installation of any electrical installation products, as well as the electrical wiring itself, is recommended to be carried out during daylight hours. It happens that work needs to be done in a room where there is no natural light. In this case, it is necessary to provide the workplace with artificial lighting from a backup source, such as an electric flashlight, a rechargeable battery with a portable light source, or a portable lamp, which must be connected to a different lighting group than the one in which the socket must be mounted.
It is important to prepare the workplace as much as possible for installing an electrical outlet in a concrete wall. To do this, you need to have on hand a set of tools, including: a set of screwdrivers with different slots (flat, Phillips) and indicator, pliers, side cutters, a knife, a hammer, a chisel, a spatula, a hammer drill with a set of accessories (drills, blades), a crown concrete, angle grinder (grinder) to create grooves (if necessary)
Next, we prepare devices for marking and consumables for wall treatment, and protective equipment. You will need a tape measure, a pencil, a plaster or alabaster mixture, a primer, and, of course, the socket itself and the socket box.
So, the preparatory stage is completed.
DIY installation
Installation of any model (be it single, double or triple) of an external outlet is not difficult and consists of the following operations.
- Remove the decorative cover. To do this, unscrew the screw located between the terminals. If it is not there, it means the design is latched. They must be separated by finding them yourself or using the accompanying documentation.
- If the wall is brick or concrete, and the part with the terminals is ceramic, it is recommended to first attach a wooden base to the location of the outlet. To do this, it is enough to drill one hole and fill it with plastic or wooden material for strong adhesion to the screw. After this, the base is secured with a self-tapping screw so that the force exerted by the fastener is significant and the base does not rotate around the axis of the screw.
- Then the installed socket part is applied to it. If it is plastic, a base for a concrete or brick wall is not necessary. But for a wooden wall it is recommended to install a base made of fireproof material.
- Using a marker or pencil, mark the holes for self-tapping screws on the surface of the wall or additional “under-socket” base. Then holes are drilled for self-tapping screws, depending on what is located between the wall and the outlet. Holes for dowels must be drilled in a wall made of brick or concrete.
- The part with the terminals is mounted on the wall.
- After this, the cores of the previously stripped electrical wires (de-energized!) are inserted into the terminals and secured in them.
- All that remains is to put on the decorative cover, and the job is done. You can supply electricity and use it.
The above installation description points apply to our most commonly used socket models. If a special model is being installed, the process will look different. But in general, the differences are insignificant.
Prepare for installation
Before you start work, it is worth determining the place where you will place the outlet group. If this place is the kitchen, then the socket should be placed just above the countertop, thereby ensuring that the cord from any kitchen equipment will successfully reach the socket.
If you plan to place sockets in the living room, it is best to do this behind the TV, which will hide all the wires.
Speaking of the bathroom, it must be taken into account that the sockets must be located at least 0.6 meters from the bathroom and be waterproof.
Connection options
When connecting a unit of one group, you must use the loop method. This means connecting each group member to a common power supply line. The daisy chain is designed for a load of no more than 16 amperes.
The combined connection method using a parallel circuit is the most common, especially in European countries. In the countries of the former USSR, this type of connection is most often used when supplying electricity through separate lines to large consumers.
With a parallel connection, several cables extend from the distribution box, the first of which goes as a cable and supplies electricity to 4 of the 5 sockets of the five-slot unit. Another cable is connected to the fifth socket, which is designed for connecting more powerful equipment.
The advantage of the combined type of connection is the redistribution of risks: each outlet does not depend on the operation of nearby circuit components. However, there are also disadvantages, such as the high cost of purchasing a cable and the complexity of installation work.
Both loop and combined methods are used to form open and closed systems. The first method requires the formation of a channel in the wall where the lines and sockets for connectors will be located.
What kind of lighting do you prefer?
Built-in Chandelier
The combined method involves stretching the PE conductor along the wall. Plastic channels make the system safer and give it an aesthetic appearance.
Most channels are equipped with partitions for laying wires, the condition of which can be easily checked using removable covers.
Installation Tips
When choosing an installation method, you need to start from the material from which the wall is made. If the walls are brick or concrete, then you will have to use chipping. In other cases, the wiring can be left open.
Before starting work, it is necessary to de-energize the area where it will be carried out. In older houses, where there is no automation, to turn off the electricity, you should unscrew the plugs.
To carry out the work you will need the following equipment:
When choosing a block, you should pay attention to its quality. In order to carry out installation, you will need the following tools .
When choosing a crown, it is also necessary to take into account the working material. Depending on this, you should choose the most suitable nozzle, the choice of which is quite large today.