Design
All sockets have a protective housing, contacts and terminals for connecting wiring. Modern double models are equipped with several distribution strips and a plug connector. This socket is mounted in one box.
Two separate mechanisms covered by a single strip are not considered a double socket. As part of the structure, you can often find a grounding contact. It protects against the appearance of increased electrical potential on the housing.
Double and triple sockets made from ordinary
The meaning of this connection is that the phase and neutral wires are connected from the distribution box to one of the sockets, and the third is connected from its terminals with the next wire, and so on. In essence, these are not double, but double (triple) sockets, which are connected into a separate block, which is still powered from one wire.
A series of sockets connected in this way can be easily repaired - if any part of it fails, then only the broken part will have to be replaced.
The wire connecting the blocks of sockets is selected with the same cross-section as the one that comes to the first of them. If there is no such thing, then without any problems you can take wires with a conductor of a larger cross-section, but in no case vice versa - with a load greater than gentle, the wire connected to such contacts will soon begin to heat up and oxidize. Socket blocks are generally installed in places where the use of a large number of powerful devices is not expected, although if the supply and connecting wires are of sufficient cross-section and the contacts of the sockets are well clamped, then they will easily withstand the operation of the heater in tandem with several other devices.
There is one more nuance when installing socket boxes - they can be installed one at a time, or you can find a whole block that is immediately inserted into the holes drilled in the wall. Otherwise, everything is done in the same way as with a regular outlet.
A detailed story about connecting the socket block in this video:
Main types
There are several main varieties. In the photo of the double socket you can see the design features of each model.
All types of double sockets can be divided according to the following criteria:
Mechanical protection. There are open and closed models. The closed type of sockets is a design in which the openings for connecting an electrical device are securely closed. This feature increases the safety of the outlet, especially in a home where small children live.
There are models with an overhead cover. An open socket is not additionally protected by anything. To close the holes, special devices are required if there is a child in the house. The cost of such models is usually lower than with protection.
Availability of grounding. Most models contain grounding contacts, but there are varieties without them. This design feature does not affect the functionality of the product, but the double socket with grounding is safer than its analogues. It is important not only to purchase, but also to connect these contacts correctly.
Design features. Sockets may vary in design. There are overhead and built-in modifications. The main differences are in the installation and dimensions of the product. Hidden sockets look neater, but the external type is easier to install and connect.
Housing tightness. There are sockets that are marked IP-45 and IP-55. Such products are highly durable, and the body is reliably protected from dust and moisture. The higher the level of protection, the better. This product can be installed outdoors and in production.
Additional functions. A double socket can contain special devices. For example, a timer is programmed to turn the power supply on and off. Backlit keys will allow you to find the socket in the dark. An RCD can also be built into the device.
TV OUTLETS IN THE HALL
Electrical socket – 1 pc.
TV socket – 1 pc.
Internet socket – 1 pc.
Multimedia socket - 1 pc.
If additional equipment will be connected to the TV, a DVD player, a computer, a game console, an audio receiver, a home theater, etc. The composition of TV sockets and their location will be slightly different.
Most often, the presence of additional equipment also means a place to install it next to the TV, namely various consoles, cabinets, cabinets, etc. Therefore, all additional electrical outlets are made there, and one behind the TV is enough.
We must make a TV socket and an Internet socket (RJ45), according to the same scheme as described above and for the same reasons.
Multimedia socket is a fairly broad concept, not everything is so simple here, I’ll try to explain.
The main task facing us is to connect the TV with other devices, and depending on the specific equipment, completely different interfaces can be used, with different cables, connectors, plugs, etc.
Recently, almost all multimedia devices have an HDMI (High Definition Multimedia Interface) interface in their arsenal. To connect, you use HDMI cables that are already familiar to everyone; with their help, you can connect almost any modern audio and video devices to your TV, and TVs themselves always have several HDMI connectors.
Therefore, it is best to make a multimedia outlet behind the TV with an HDMI interface. In this case, the cable from it must go to the installation site of additional multimedia equipment. Most often, you simply buy a standard HDMI cable of the required length in a store and lay it from the TV to the equipment, or preferably two.
The main disadvantage or weak point when choosing exactly this type and number of sockets for a TV is this multimedia socket. It may happen that your equipment does not have an HDMI connector, or the HDMI cable laid during repairs fails, because it may have to be periodically plugged into various devices, as needed.
To avoid all these problems, it is necessary, instead of a specific multimedia outlet, to make a channel to the location of the equipment at the repair stage. As a channel, you can use, for example, a plumbing sewer pipe with a diameter of 32 mm, a similar corrugated pipe or a 30x20 cable channel.
It is better if such a channel goes directly into the socket box, and then you can install a cable outlet there. This option will allow you to lay any required communications to the TV at any time, while all the wires will be hidden.
What a cable outlet is, what it looks like and what it is used for, you can read HERE.
In the place where all other equipment is installed, usually under the TV, a block is made of several electrical sockets, at least four pieces; in addition, at least one or two Internet sockets are installed, twisted pairs from which are laid to the router and one post is occupied by a cable outlet connected with the same channel behind the TV in the wall.
In order to save some money on specialized sockets and space in the socket block, I advise you not to install separate TV and Internet sockets, but simply run the required cables into one socket box (in this case, the antenna cable is coaxial and the Internet cable is twisted pair ) and install the cable outlet. Make the cables with a margin of length; subsequently, appropriate plugs are put on their ends, which are connected directly to the TV.
Thus, we avoid the need to buy additional connecting wires, get rid of unnecessary connections that negatively affect the quality and reliability of the contact, we have to make fewer socket boxes in the wall and buy fewer specialized, usually expensive, wiring devices such as TV, audio, hdmi- and internet outlets.
In order to correctly choose the height of installation of sockets for a TV on the wall, be sure to read THIS material, in which we calculated the most optimal distance from the floor to the sockets behind the TV, and in addition, we derived a formula by which you can independently calculate this value for each specific case.
Characteristics
The technical characteristics of this product include: voltage, power, current and frequency of alternating current. Most sockets are designed for 220-240 V. In industry, three-phase models designed for 380 V are more often installed.
The current for household appliances should not exceed 16 A, and the maximum permissible power is 3.5 kW.
It is allowed to increase the current to 32 A only in three-phase products. The current frequency, according to international standards, is acceptable within the range of 50-60 Hz.
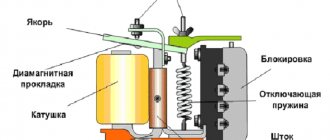
Connecting a double switch and socket
The unit that controls the operation of the socket and two-key switch is mounted in front of the entrance door to the bathroom or toilet. Thanks to the device, the user can turn on the lights in two rooms. First, five wires are laid from the power supply panel. Two of them - zero and grounding - go to the outlet. The phase is connected to the socket and supplied to the switch through a jumper. Two phase conductors from the switch go to lighting devices. The zero going to the socket is connected in the distribution block to the zero going to the lighting sockets.
Sometimes you have to change the order in which the buttons are turned on. To do this, you need to swap the two wires that go after the break on the switch switching contacts to the lamps. To illuminate one room, a one-button switch and four wires are used.
How to connect a double external socket?
The distribution cable is laid openly or closed in the walls. For installation of external devices, wiring is performed in an open manner. It can be corrugated, in boxes, or simply lie on the wall, fixed with clips. The work takes place in several stages: 1. The power supply at the electrical panel is de-energized. After that, using a voltage indicator, the absence of voltage on the devices themselves is checked. 2. The top panel of the slot opens to provide access to the tabs holding the panel in place. 3. By pressing the fasteners, the upper part of the device is separated from the support. 4. The device is disassembled. It consists of a housing, a panel with a cover, and sockets.
Materials
When choosing materials, manufacturers take into account their resistance to fire. The socket body is predominantly made of heat-resistant plastic. The terminals and contacts are made of low resistance metal. Such alloys are reliable, can withstand high temperatures and are not susceptible to corrosion.
Copper, brass and bronze contacts are the most common options. The bases for attaching the contacts inside the socket are made of plastic or ceramic.
The material protects the terminals from overheating and is an insulator. Ceramic pads are more reliable.
Installation and connection
Installation of a current-discharging device with two sockets can be carried out in place of a former single socket that burned out due to improper use (its body melted, contacts burned out under increased load) or in a new location. The connection begins by inserting the wire onto the contact terminals located on the ceramic base of the socket box. We first clean the ends of the cores from the shell with a sharp knife to 10 mm.
We insert the wires either into special niches for contacts with screws, or wrap them around the mounting bolts below the washers. Press carefully.
We carefully insert the connected socket box into the box, making sure that the wires do not intersect or touch each other after installation. By rotating the screws on the sides, we push the core apart (it will rest with its “legs” against the walls), ensuring that the ceramic base sits firmly and does not wobble. We put the frame on, screw the lid on top of it, carefully turning the screws until they stop. We don't put much effort - the case may break, it is very fragile.
Double sockets with grounding are connected so that the current-carrying core does not touch the neutral
You need to pay attention to the matching color of the wire and the connected contact. Green always goes to ground (neutral)
It is not permissible to throw black, red or brown on it, which are traditionally phase and current-carrying.
There is an option for connecting double single sockets in a parallel circuit with a personal socket for each socket. The advisability of such installation is that the device will not burn out when both down conductors are activated simultaneously. But even in this case, you need to be careful and monitor the power of connected devices and equipment.
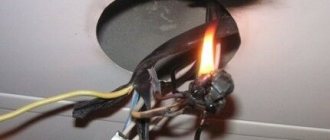
To prevent the case from melting, the insulation from burning, and the contacts from melting, it is necessary to prevent an increased current load - above sixteen amperes.
The connection of double sockets and their subsequent use does not cause any difficulties when you do it without voltage and carefully clamp the current-carrying contacts.
Installation features
There are special features when connecting a computer double socket. The product contains two terminals and one outlet for wires. For this reason, it would be more rational to use a parallel connection.
The total current must not exceed 16 A. The connection cable must have the same cross-section and material as the main wiring. These parameters apply to the power outlet for computer equipment.
There are also double sockets for connecting to the Internet with an RJ-45 connector. Usually these two types are not combined into one design, because there will be interference.
Positive and negative sides
Advantages:
- Compactness – the number of sockets from one socket box doubles;
- Price – the cost of a double socket is one and a half times less than two single sockets;
- Installation speed – installation of a double socket is twice as fast as installation of two single sockets.
Flaws:
- Low capacity - a double socket will not be able to power two powerful devices at the same time
- The price is lower only if we are talking about cheap Chinese sockets. If you buy a Legrand or ABB socket, then the cost of a double will be approximately the same as two singles
- Falls out of the socket. The socket box experiences double load with the lever in the center, so over time the fastenings of the double socket mechanism weaken and it falls out. Usually at the most inopportune moment, along with a bunch of exposed wires.
When planning a major renovation, it is much more correct and reliable to provide the required number of sockets in each room and on each wall than to come up with it “as you go.” But this is not always possible, and not everyone will redo all the wiring in order to add one electrical point.
Installation instructions
Installing a double socket can be done by yourself. It is important to observe safety precautions during work. Tools you will need: a screwdriver, insulating tape, pliers, a knife and a hammer drill.
Main installation steps:
Preparation. First you need to turn off the power supply automatically. If there is a single socket, it must be removed. The first step is to unscrew the screws, remove the top cover and disconnect the contacts. If the box is not deformed and fits in size, then there is no need to remove it.
When installing a new outlet, the power is not turned off first. Before starting installation, it is necessary to prepare the wall for wiring and electrical outlets. The box is fixed with screws and mortar for reliability.
Connection. First of all, you need to “open” the cable with a knife at a distance of 1 cm from the base for ease of connection. All wires are different in color. It is necessary to determine grounding, phase and zero among them.
Next, the terminals are loosened and the wires are connected. The contacts must be securely secured with bolts. At this stage, it is better to trust a professional who knows exactly how to connect a double socket.
Installation. After connecting, it is important to carefully lay all the wires so as not to damage the insulation or create a short circuit. Next, the socket is deepened into the box, fixed and closed with a decorative cover.
Installing a new outlet yourself
Connecting a double socket requires connecting 2 structural elements to a single line. The first loop contains 6 wires, the 2nd loop contains 3 main wires. As a result, the first one receives the current and transmits it to the second one.
Schematically, the installation of a new outlet looks like this:
- Before installing the product, the ends of the wires are cut using wire cutters, after shortening them by 1 cm, the insulation is stripped;
- The stranded wire is tightly twisted;
- The internal structure is installed tightly and evenly in the socket box, pressed against the wall;
- The product is screwed on and fixed.
Important! Incorrect wiring connections may result in a short circuit. If you lack experience, energy and time, it is better to use the help of professionals.
Selection of quality products
Preference should be given to sockets with copper contacts, a ceramic pad and a body made of heat-resistant plastic.
A double socket with a cover will be the optimal solution for a family with children and animals. The cover will protect the child and at the same time, hermetically seal the contacts from dust and dirt. It is recommended to select models with grounding, provided that there is a grounding wire in the room.
Connecting the socket to a two-wire network.
Let's consider the option when you have a two-wire electrical network (without grounding) and have a single socket installed that you want to replace with a double one.
Any socket consists of a decorative cover
and
the working part
, which are connected to each other by a screw connection. Before installing the socket, both of these parts are separated from each other. If you do not do this, then you will not be able to install and connect the working part.
The decorative cover is made of plastic and, depending on the design of the socket, is attached to the working part with one or two screws. The screws are unscrewed with a screwdriver and both parts will freely separate from each other.
Now you need to dismantle the old socket, but before dismantling it you need to turn off the power
.
If it is not possible to turn off the voltage from this outlet, then we are de-energizing the entire room, apartment or house. And only after checking that there is no voltage on the contacts of the socket, we begin to dismantle it
.
First of all, unscrew the screws securing the decorative cover. After removing the cover, the working part of the socket remains in the wall, and in order to pull it out, it is necessary to loosen the fastening with which the socket is rigidly held in the socket box. To do this, unscrew the two side screws
located on the left and right sides of the working part.
The side screws are part of the fastening and serve to secure the socket in the socket box. When twisted, they put pressure on the spacer legs
, which move apart to the sides and rest against the side walls of the socket box, rigidly holding the socket. And to relieve the pressure on the spacer legs, these screws are unscrewed.
The side screws are unscrewed one by one. First, one screw is unscrewed a few turns, then the second. In this case, the working part is held with your fingers. When the fastening is loosened, the working part can be freely pulled out of the socket.
Now all that remains is to disconnect the wires from the terminal clamps of the old socket and start connecting the new one.
Depending on the design of the socket, the terminal clamps may be located on the side, in front or behind the base of the working part. In my case, the holes for entering the wire strands are located at the back of the base, and the screw that clamps them is located on the side.
Advice
. Before installing the socket, re-cut the ends of the wire. Bite off the ends that went into the terminal connections, and then again remove about 1 cm of insulation from them. Thus, we get ends free of all oxides and, naturally, a clean and reliable contact connection. If the wire is multi-core, then twist the wires with pliers into a tight twist.
Now all work on connecting a new outlet is carried out in the reverse order: the power wires are connected, the working part is fixed in the socket box and finally the decorative cover is installed. However, there are several nuances that you may not be aware of.
1
.
Location of phase and neutral wires in the socket
.
It does not matter which terminal (right or left) to supply phase or zero. It is desirable that the location of the phase and neutral conductors in all sockets of the house coincide. The same location is convenient for servicing the home electrical network and searching for possible faults.
2
.
Installation of the working part of the socket
.
When the working part is recessed into the socket box, it is first aligned horizontally. Then it is pressed tightly against the wall and the side screws are tightened until the spacer legs rest tightly against the side walls of the socket and fix the working part.
The side screws are tightened alternately: first, for example, the left screw is tightened several turns, and then the right screw. While tightening the side screws, hold the working part from the sides so that it does not get squeezed out of the socket box.
3
.
Wire length
.
If the socket is installed at a new point, then before connecting, check the length of the wire, which should be no more than 15 - 20 cm. If the wire is left longer, then there is a possibility that the socket will not fit into the socket box.
4
.
Location of the wire in the socket box
.
When installing a socket in a socket box, the wire is laid first (it is rolled into a ring or folded into an accordion), and then the working part is inserted, which presses the wire to the bottom of the socket box. Be careful not to let the wire get into the area of the spacer tabs
.
If this is allowed, the paws will either crush the wire or break the insulation. In both cases, we get a short circuit
and a non-functional outlet or line.
Photo of double socket
When can you install overhead sockets?
Surface-mounted sockets
To make a choice and select the right devices, you need to understand what the main differences between surface-mounted (external) type devices and internal ones are. The most significant points:
- For the first type of sockets, all the key parts are located inside the plastic case.
- Overhead models do not require surface scoring.
- External devices do not require an additional niche or socket box.
When developing the initial plan, such access points are usually not provided if it is possible to make built-in, less noticeable devices. The disadvantage is the significant “bulge” relative to the wall. However, in some cases, an external outlet is the only option:
- The finishing work has been completed, but there is a need for an access point to the power grid in a new location.
- The coating does not require gating: tiles, tiles, panels.
- The thickness of the walls makes it impossible to hide devices and wires.
Users and professionals note some disadvantages during operation. For example, rapid wear and loss of the original appearance of equipment. If damaged, you can get an electric shock - all key elements are outside.
Recommendations for location and use
Overhead socket in the country
An outdoor socket is considered an excellent option for private residential buildings and outbuildings: barn, garage, greenhouses, outdoor kitchen, other open areas). For such structures it makes no sense to lay a separate cable and conduct electrical wiring. Devices and wires are attached to small nails.
When installing an external grounded outlet, it is necessary to take into account the traffic flow of the room. The device should not be secured near door frames; it is advisable to “cover” it with furniture: for example, behind a desk or dining table - access and additional protection.
Socket selection
Surface-mounted corner socket
Before purchasing, you need to find out the voltage and current values in the existing network. An important point is the method of fixing the cables. Screw-type ones are more durable, keyboard ones weaken quickly. Device categories:
- single – size height/width up to 7/5 cm, one plug;
- corner;
- double – connectors for two plugs;
- sockets with additional protection: curtains that automatically close entrances;
- decorative models - thin, of different shapes, colors, materials.
Double sockets with grounding are selected in accordance with the conditions of use and the performance of the electrical network.