The concrete base of vertical fences in buildings is a durable material that cannot be processed with traditional hand tools. With the advent of hammer drills in everyday use, the problem of installing socket boxes on concrete was successfully solved. The electrical industry supplies the market with a wide range of cups for mounting switches and sockets. You need to understand why they are produced in different types and sizes. After reading the article to the end, you can independently select and install the desired design of the socket box (PR).
Types of polymer glasses Source dvoroz.ru
Types and sizes of PR
Planting containers for electrical fittings are produced in a wide range of models and modifications. It is difficult for an inexperienced consumer to understand this variety. The sizes and types of socket boxes are designed for different installation conditions. PR is made of durable and non-flammable plastic - PVC and polypropylene. These materials have high dielectric properties and can be processed with cutting tools. Plasticity allows you to make products of complex geometry and different colors.
Kinds
There are 4 types of plastic boxes based on their shape:
- round;
- oval;
- rectangular;
- block.
Cylindrical housings are mainly used to secure the fittings of switches and point sockets in them. Oval boxes are an elongated ellipse. Several points of connection to the electrical network are placed in them at once. Rectangular PRs are used to place low-voltage fittings in them for connecting contact connectors for television, radio and high-tech equipment.
Block socket boxes Source sdvor.pro
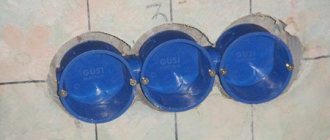
A separate group of socket boxes are made up of block elements. Basically, these are round boxes that have side projections that fit into each other of two boxes. This feature allows you to connect socket boxes together into blocks of any number of elements. This solution eliminates the need for multi-connector extension cords.
Dimensions
Plastic glasses around the perimeter of the opening have a side. It is needed to rest against the wall surface. PRs are characterized by external and internal diameters. The outer size of the socket box (along the side) can be 68 - 71 mm. The internal diameter ranges from 60 – 66 mm. For different manufacturers, the dimensions of concrete socket boxes may vary slightly. However, all of them are designed for standard fittings of sockets and switches. The standard dimensions of the landing box are 60x45 mm, where the first number is the internal diameter, and the second numbers indicate the depth of the glass.
Dimensions of a standard socket Source kopos.ua
Inside the box, at an equal distance from each other, there are 2 or 4 longitudinal thickenings into which small self-tapping screws are screwed. After installing the socket box into the concrete wall, the heads of the screws are threaded through the holes in the terminal pad. The screws are tightened until they stop, fixing the reinforcement inside the glass.
Along with the standard height of 45 mm, the industry produces socket boxes with a depth of 60 to 80 mm. Recessed glasses are used as dispensing boxes. This makes it possible to place a large number of connecting components of the electrical network in one container.
A group of point (single) PRs is mounted on the basis that the distance between their centers will be equal to 71 mm. For block glasses, the length of the connecting elements is 5–6 mm.
How to install a socket box in a concrete wall
Concrete base is one of the strongest bases for wall fencing. Vertical panels are reinforced concrete slabs. If a layer of plaster (2 - 3 cm) allows you to hide the wires in its mass, then to install a seat for the socket box you will need to drill into concrete. And for this you will need a special tool.
Installation of socket boxes in concrete Source prom.st
You should not trust advice on how to fix a socket box in a concrete wall using a drill and a drill bit with a Pobedit tip, or, even worse, do the work with a chisel and hammer. This can be recommended by those people who have never done it themselves. “Stubborn” concrete can only be done with a hammer drill.
Tool
Making an opening in a concrete wall for one seat without the help of a hammer drill can take a whole day of labor-intensive and dusty work. A universal power tool, equipped with a crown or a special drill, can handle small and deep holes quite easily in perforation mode. Any inhabitant of a home can easily master the control of a rotary hammer. If there is no instrument in use, then it is rented.
Hammer Source cmp24.ru
You can make many holes with a drill and knock out the concrete with a chisel, but it is best to do this with a crown with diamond attachments or pobedit teeth. They are equipped with drills that center the entrance of the cutting attachment into the concrete mass. If further passage of the hammer drill is hindered by the reinforcement of a reinforced concrete wall, then it can be cut with an old used crown.
A level will be needed to indicate the horizontal line of a group of sockets. To apply the markings you will need a pencil and a ruler.
Crown for concrete Source static-eu.insales.ru
Step-by-step instructions on how to install a socket box in a concrete wall with your own hands
- Marking.
- Drilling.
- Preparing socket boxes.
- Installation PR.
- Connection and installation of fittings.
Marking
Determining the location of switches and sockets is regulated by the Rules for the Installation of Electrical Equipment (PUE). Sockets in residential premises must be placed at a distance of at least 30 cm from the floor. For switches, this size is a minimum of 90 cm. Transfer boxes should not be closer to window and door openings than 10 cm. Connection points to the electrical network are located at a distance of at least 50 cm from gas pipes.
Marking of socket boxes on the wall is done after installing hidden wiring. The seat center points are combined into one line. It is drawn with a pencil or marker under the level. If single socket boxes are installed, the distance between the points will be 71 mm. If the glasses are combined into one block, then you need to add the length of the interblock elements, that is, the distance between the centers will be 71 mm + 6 mm = 77 mm. This is not dogma. It is better to check the dimensions yourself with a ruler.
Marking of switches, sockets and transfer boxes Source chebo.biz
Center distance of socket boxes. Notes from an amateur.
Start the discussion here:
I purchased Schneider Electric socket boxes. The distance between centers is less than 71mm. If you assemble 5 socket boxes into one line, the distance between the outermost centers should be 284 mm. The actual distance is 281.5. 3.5mm is missing. As if to hell with them. But, when installing 5 mechanisms under a 5-post frame, the assembly of 5 socket boxes bent into an arc (assembled on the table), since the metal frame on which the mechanisms are installed has a size of 71mm. Those. The mechanisms just don't fit. We are still trying to install it. We place the mechanisms tightly, without any gap between them. At the same time, the entire assembly of socket boxes begins to bend in an arc by about 3 mm. If you try to align the “arc,” a cracking sound begins in the area of the connecting tunnels. It turns out that if you wall up an assembly of 5 socket boxes, it will not be possible to install 5 sockets in it normally. Because when installing covers, if the central screw is screwed into the middle socket absolutely freely, next to it it is more or less normal, then in the outer sockets the screws become at an angle and when they engage the thread, a decent tension force is felt. How to get out of the situation?
I decided to check socket boxes from different manufacturers. I bought different installation boxes. Here's what happened:
For testing we use:
- five-post frame and Turkish mechanisms
- socket boxes for brick walls Schneider Electric, Hegel and Gusi Electric
- Hegel socket boxes for hollow walls.
We assemble blocks from 5 socket boxes. In order to measure the distance between centers, it is not at all necessary to look for these centers. It is enough to measure the distance between identical elements (holes, logos, inscriptions) of adjacent socket boxes. It should be 71 mm. Accordingly, in our assemblies the maximum distance that can be measured is 284 mm. We will build on this.
We take Schneider Electric first; Schneider Electric produces socket boxes in two sizes. Depth 45 mm and 60 mm. We take socket boxes with a depth of 45mm.
We assemble, measure the distance, we get 281.5. We install the mechanisms, secure them in the socket boxes with screws on the right and left. I’ll make a reservation right away - it’s better not to use the fasteners that come with the kit; when tightened, the screws displace the mechanism. No photo, description: “... the mechanisms are placed tightly, with absolutely no gap between them. You can even say that there is not enough space. And at the same time, the entire assembly bends in an arc by about 3mm. If you try to align the “arc,” a cracking sound begins in the area of the connecting tunnels. When installing covers, if the screw is screwed into the central socket absolutely freely, next to it it is more or less normal, then in the outer sockets the screws become at an angle and when they engage the thread, a decent force is felt.”
On the advice of one of the forum participants, we do the following: on the outer mechanisms we rearrange the fastening screws: remove them from the left and right and put them on top and bottom.
The situation is improving somewhat, but in the outer sockets the screws are still screwed in tightly... We rearrange the screws on two more sockets, leaving only the central one untouched.
Well, finally all the screws are screwed into the sockets properly. But you need to pay attention to the following: when fastening from above and below, the outer mechanisms have practically no room to move to the sides and they always strive to rotate around their center. But with some experience everything becomes normal, and this makes me happy... The advice to put screws on top and bottom is very practical and helped a lot.
We finish the assembly and apply a ruler.
There is a slight bend in the entire assembly: 1-1.5 mm. Those. There is still a slight tension. Naturally, this bend will not exist on the wall.
Impressions: Good single product. It is not advisable to install blocks of more than 3 sockets + Pros: Good, solid plastic. The socket boxes are easy to assemble, the assembly is rigid and even. The plugs are easily broken off by hand. There are no burrs left. The standard depth (45mm) is sufficient for free placement of wires. There is a 60mm socket box for connection without junction boxes. -Disadvantages: 1. The most significant: the center distance is less than 71mm. 2.Mounting screws. 3. Lack of possibility to connect socket boxes with additional tunnels.
The following socket boxes are from Hegel. Four socket boxes are 40 mm deep and one recessed is 60 mm.
I would like to immediately draw your attention to the fact that a 60mm deep socket box does not have the ability to secure mechanisms at the top and bottom. Only right and left...
We measure. Distance 283mm.
1mm is missing.
We assemble and install the mechanisms. We screw it on the right and left.
The mechanisms become tight, with virtually no gap. Everything is clear, smooth, beautiful. We install the frame and socket covers. We tighten the screw into the central socket and... the screws do not go freely into the outer sockets. Again in tension. What the... We look at the holes of the outermost sockets - they do not match by about 1 mm. As an example, the rightmost socket.
In general, incomprehensible nonsense - 1mm was missing, and the two sockets did not match. And each one is 1mm.
We measure the 5-post frame “Makel”. Should be 284 mm.
But in reality - 285mm. Oops. So it came running. With 1mm sockets and 1mm frame. In short, we take it and twist everything again. Only now we don’t touch the 60mm socket box, since it doesn’t have mounting holes for vertical mounting. In general, after all the experiments, everything worked out for me when I rearranged the fasteners on the central one and the two adjacent ones. And again, I found it difficult to clearly orient all the mechanisms. All mechanisms that fasten at the top and bottom are slightly rotated around their own center. You can see it in the photo.
We install the frame and covers - the screws fit well. Rotate the assembly, apply a ruler
There is a slight bend in the entire structure - about 1 mm.
Impressions: The socket boxes are easy to assemble, the assembly is smooth, with a slight play in the tunnel area (I consider this more an advantage than a disadvantage). The shallow depth is cause for concern; it may be difficult to lay the wires inside the socket box when using sockets with a grounding contact. + Pros: Center distance is almost 71mm. Good, solid plastic. . Mounting screws can be used. There is a 60mm socket box for connection without junction boxes. -Disadvantages: The standard depth is too small (40mm). A socket box with a depth of 60mm does not have the ability to attach mechanisms from above and below. There is no possibility to connect socket boxes with additional tunnels.
The following assembly of socket boxes, made by Hegel for hollow walls. All socket boxes are 45mm deep. But Hegel produces socket boxes in other sizes. 60 mm deep is also available
The socket boxes can be connected to each other by a tunnel sold separately:
Although I don't think this should be done in hollow walls. It is enough to simply drill holes through 71 mm and install without a connector. Well, since I bought it, we’ll test it with the connector. We measure:
We get 283.5mm
We install the mechanisms, fasten them on the right and left.
The mechanisms are installed without problems, with small gaps.
We install the frame and socket covers. Everything becomes perfect. We attach a ruler to the assembly
Everything is absolutely smooth.
Impressions: The most pleasant. + Pros: Center distance is 71mm. Good, solid plastic. The assembly is smooth and easy to assemble. Mounting screws can be used. -Cons: No
…to be continued
Video description
This video clearly shows the design of the socket boxes:
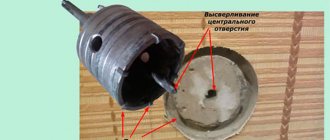
The dimensions of the standard crown coincide with the external dimensions of the socket boxes for concrete. Therefore, when drilling, the crown is completely recessed into the wall. At the end of the work, a concrete cylinder with a hole in the middle remains in the hole. It is easily knocked out with a chisel installed in the hammer drill in jackhammer mode.
If there is no crown, proceed as follows:
- The socket box is leaned with its bottom against the central marking point and the body of the box is outlined with a pencil;
- I lean the socket box against the drill and mark the height of the glass with insulating tape;
- inside the marking contour, drill the maximum number of holes in perforation mode, recessing the drill to the insulating mark;
- knock out the opening with a chisel in the same way as in the previous case.
Drilling out a seat for a socket box Source electrikmaster.ru
See also: Catalog of companies that specialize in electrical work and installation of utility networks.
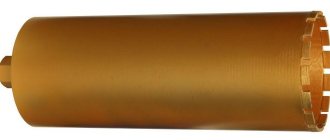
Carbide bit for concrete and brick
The drill bit for socket boxes has brazed teeth made of hard pobedite alloy, asymmetrically located along the perimeter of the cutting edge. They help the equipment move confidently in brick and concrete. The central part with the SDS-Plus or SDS-Max adapter is designed for fastening the crown in the hammer drill chuck. The carbide-tipped centering drill helps to accurately guide the bit.
Safety.
Drilling holes for socket boxes is a noisy and dusty process. Use a mask, goggles and headphones when working. Be prepared for the fact that the bit may jam or collide with the reinforcement, so hold the hammer firmly.
To make it easier to work with a crown, you can first make 10-12 holes around the perimeter and in the center of the future cavity with an 8 mm drill to the depth of the socket box. After this, the crown will quickly and easily enter the thickness of the wall. Then, using a spatula chisel, we carefully knock out the concrete core, and you can begin installing the socket box.
Video description
This video shows the installation of socket boxes:
Preparing socket boxes
Before installation, the side window is broken out in the box. Wires are pulled through the resulting opening to a length of about 10 cm. The ends of the wires are stripped and crimped with a terminal block. Contact elements are necessary for stranded conductors. Shaggy twists often lead to a short circuit and, even worse, can cause a fire in the wiring.
Perforated openings in the glass are located on four sides on the side of the PR. This is done so that you can pull the wire into the box from any direction without creating unnecessary twisting of the wiring.
PR installation
- The hole in the concrete is cleaned of dust and moistened with water to increase the adhesion of the concrete surface of the nest.
- Gypsum or alabaster is diluted with water in a ratio of 1:2.
- The solution is applied with a spatula in a circle inside the hole.
- The box with the stretched wire is inserted into the seat.
- The squeezed out solution is removed.
Removing excess solution Source www.sibelektrika.ru
Connection and installation of fittings
After the alabaster hardens, the following actions are performed:
- the stripped ends of the wires or terminals are secured to the switch block or socket;
- Usually the terminals are secured with screws and washers.
- There are fittings with self-clamping fasteners. The ends of the wires are inserted into the holes, and spring-loaded bars clamp them;
- the wire is laid on the bottom of the socket box and the fittings are inserted;
- The pad pad with the holes is put on the PR screws and turned until it is level. The screws are tightened with a screwdriver;
- the side screws of the block are tightened until the sliding legs reach maximum contact with the surface of the glass;
- The switch keys are inserted into the sockets of the block. Then the front frame is attached. The front panel of the socket is screwed to the block with a screw.
Fastening the socket fittings in the socket box Source sense-life.com
Removing the old socket
Quite often, before installing a socket in a socket box, it is necessary to dismantle the old electrical point. First, all wires connected to it are disconnected from the power supply. It is enough to turn off the machine in the electrical panel. It is recommended that all work be planned and done during the daytime, especially during a complete power outage.
Before starting work, you need to buy a new socket and socket box. The dismantling itself is carried out using a screwdriver and pliers. The absence of current is checked by an indicator.
Features of installing PR in other wall bases
It should be noted that installing socket boxes in brickwork is no different from installing a PR in a concrete wall. Brick can be easily cut with a pobedit or diamond crown. But the installation of polymer glasses in plasterboard, ceramic tiles, and hollow panels has its own characteristics.
Drywall
The facing material is quite thin gypsum panels. To install sockets and switches, specially designed plastic cups are used. The socket boxes for drywall have external side screw clamps. The outer edge of the socket rests against the surface of the drywall. By tightening the screws, they lift the tabs along the threads, which with their teeth rest against the lining from the inside.
Drywall socket box Source electroua.com.ua
Holes in gypsum panels can be cut with a utility cutter or knife. To get a perfectly even round opening, use a drill with a special bit. It is also used to cut holes in plastic false panels of wall fences. The dimensions of socket boxes for drywall are the same as for glasses for concrete.
Drywall crown Source www.stocklots24.com.tr
Ceramic tile
A diamond bit is used to cut holes in ceramic tile walls. Before starting work, make a template with holes from plywood. It is glued to the tile with double-sided tape. During drilling, the crown is watered. Otherwise, the tile may overheat and it will crack. It is also not recommended to use an attachment with a central drill. It can cause the ceramic to crack.
The resulting openings in the ceramic tiles and the base of the wall are filled around the perimeter with alabaster or gypsum mortar. The socket boxes are inserted into the seats, having previously pulled the wires through the holes in the boxes.
Drilling holes in ceramic tiles with a diamond core Source www.1shop.lv
Hollow panels
For a group of block socket boxes, a rectangular opening is cut with a grinder, a block is inserted into it and coated on all sides with alabaster mortar. You can use a trick. If the bottom of the PR reaches the opposite surface of the void, then a hole is drilled in it and a dowel is inserted. The socket box is secured by screwing a self-tapping screw into the dowel through a hole in the bottom. If the depth of the hole is large, then you can place a wooden spacer.
What to do if the socket box falls out of the wall
The reason for this may be improper fastening of the PR in the socket. If this happens and the socket box is undamaged, proceed as follows:
- remove the front panel of the socket, switch keys and frame;
- unscrew the screws of the spacer legs and the pad pad;
- the fittings are removed from the socket box;
- the seat is cleaned of dust and alabaster residues;
- the nest is coated with a primer using a brush;
- the hole is filled with alabaster or gypsum mortar;
- The installation of the box is repeated.
Rules for installing socket boxes
- A correctly installed socket box should not protrude or be too recessed into the wall, that is, it should be built flush with the finished wall. A finished wall is considered to be a wall that has already been prepared for painting. We will consider cases when it is planned to lay tiles or some other false panels on the wall below.
- Socket boxes must be installed strictly level, even if there is only one socket box, it must be set level to avoid difficulties in the further installation of sockets or switches.
- A correctly installed socket box should hold very tightly in the socket.