Material for fixing socket boxes to the wall.
Hello, masters.
Tell me the optimal material (price-quality ratio) for quick and reliable fixation of socket boxes in drilled holes (diamond bit, walls - concrete and brick). Share your personal experience. Thanks in advance. KRASS with a green ring at the spout in a tube for a gun for plastic and tiles
It is advisable to buy socket boxes that are tightly fixed to each other (with a latch), this is very convenient if you are installing a block, two or more, but to secure it, the most convenient way is to buy some rotbunt, mix a thick mixture, and smear the socket box, after 10-20 minutes the solution will set in 40 minutes. It will dry and stick tightly to the wall.
For me, the most optimal material is Rotband; it takes about 15-20 minutes to adjust the sub-assemblies in the wall. Disadvantages of alabaster - instant fixation, about 1 minute.
I support the above options with rotband; first remove dust and prime with primer or water.
I have been working with alabaster for 40 years and I don’t think about switching to other materials. It sets in 4 minutes. During this time I have time to level the socket block. The main thing is to mix it correctly. The concentration should be like that of very thick sour cream; if it is thinner, it will be worse. You need to knead as much as is required for one block of socket boxes. First, freeze the socket panels to a level, and then you can putty them for finishing. A little training and everything will work out, especially since the material is cheap. And one more subtlety - you need to freeze it from the ends and where there are no holes for wires. If you attach a block with tucked wires, they will push it out of the solution and interfere
I support! Alabaster is the ideal material. Mine is even cleaner: it sets in 2.5 minutes. When you have experience, managing to set up a block of up to 5 socket boxes is not a particular problem.
I join the fans of Rotband. Sometimes (in its absence) I use any gypsum plaster (Prospectors, Osnovit, etc.). Alabaster is bad not only because it sets quickly, but it is also low-plasticity and fragile. If you fix the socket box under the socket only on alabaster, then if you frequently pull the plug out of the socket, the latter may fall out along with the socket box. I additionally attach it with a 6 mm plastic dowel with a washer and a screw in the center of the socket box. My socket boxes do not fall out even if I pull the plug from the socket every day without holding the socket cover. I first remove dust and moisten the hole with water. I fix it in the center after the Rotband has dried. If I install a group of socket boxes, for example 4 pieces, then additionally for temporary fixation I put pebbles in the voids on Rotband. It turns out something like a monolith. Then I coat the top with Rotband (with a spatula - I have 3 of them).
On my own behalf I would like to add about alabaster. Since I’m not a pro and I don’t know how to work very quickly, I just dilute it with milk.)))) The survivability time increases by a factor of two, if not more.
You can also add either PVA, or a little Fugen or Rotband to the alabaster. Depending on the amount of additive, the setting time increases. Milk can be produced by a fungus. It's organic.
Vlad, you're scaring me again. Should I now go sniff the sockets for a suspicious smell?)))))
Believe, it’s warm now, everything dries quickly enough, so most likely everything will be fine. But for the future, do not add milk to the plaster.))) As a last resort, use a primer.
Damn, I’ve been doing this for 20 years))) I didn’t even think about fungus. I won’t do it anymore, we still have a little rodband, we’ll cover it up with it.
How to install socket boxes evenly in concrete
Socket boxes are required in almost all places where electrical appliances are installed. The final appearance of the installed sockets, switches and other installation products depends on how smoothly one or more socket boxes are installed. Of course, the evenness of the installation of the socket box does not 100% decide the final result - a socket or switch can be perfectly screwed even into a crookedly “grown” socket box. However, this does not mean that you can be irresponsible about “smearing” round installation boxes
(this is the official name for socket boxes).
A crookedly installed socket box can cause a lot of suffering during the final installation of installation products. Therefore, smooth installation of installation boxes is strongly recommended.
By the way, socket boxes do not always have a round shape - there are square installation boxes designed for four modules, two in a row. And in general, there are rectangular models that, according to their purpose, replace several single socket boxes in a row. However, the most common are the round ones, so we will focus on them.
At first glance, installing a socket box in a concrete wall seems simple. In principle, this is true; anyone can “smear” the installation box. The only point that many people have difficulty with is the evenness of installation, especially of several combined socket boxes.
The method that I want to describe is far from new. These few additional operations will allow you to efficiently install several socket boxes in a row in any walls - concrete, brick, aerated concrete.
The first stage is marking
, you need to mark the horizontal and vertical axes of each socket. When installing several boxes in a row, you need to maintain the correct distance between them so that future outlet or other modules are installed correctly. The optimal distance between axes (centers) is considered to be 71 mm, however, there are products whose connecting elements contain a distance of 70-72 mm. When installing 2-3 socket boxes, this does not matter much, but for 5 boxes in a row, every millimeter is important.
Before installing 5 points in a row (vertical or horizontal), you should clarify the specific size of the installed electric points of a particular series. The best way is to assemble the socket boxes on the table in a row using connectors (usually included with the boxes) and screw all 5 sockets (or switches). Then you will know whether the axle size is correct or not. Often, 5 socket boxes in a row may not correspond to the size of five sockets. If there is no opportunity to try on the sockets, a distance of 71 mm is maintained between the axes.
Related article: How to stick photo wallpaper on a wall with wallpaper
If the outer width of the box is 70 mm. (with a front border) - such socket boxes can be installed without problems with a distance between the axes of 71 mm. If the width is 72 mm, then it will be difficult to “narrow” the axes of the boxes. For 2-3 modules in a row, you can maintain a distance of 72 mm, but for 5 in a row it is better to choose other products.
So, the axes are marked - socket boxes can be mounted in both vertical and horizontal rows. But some series of rosettes are not designed to form vertical rows (rare, but it happens), so you need to clarify this point.
The second stage is the selection of holes
for installation. In concrete, this can be done with a diamond bit for a high-speed drill or grinder. An easier way is to drill holes in a circle with a small drill and knock out the middle with a hammer drill. The optimal hole diameter is 75 mm. - then any socket box will fit in freely and there will be a gap for putty. The depth of the hole is about 50-60 mm, the box must fit completely into the wall. A cleanly installed socket box should be flush with the final putty of the walls or slightly recessed relative to the plane of the wall.
For brick, plaster and other softer walls (relative to concrete), a hammer drill bit is suitable. This crown can also drill concrete walls, but then its service life is greatly shortened. In brick walls it is drilled with impact, in foam concrete and plaster - in drilling mode without impact.
When the hole is made, a socket box (or a group of socket boxes) is fitted into it; if everything fits in without problems, it is swept and primed.
The next stage is creating a pattern
. Many installation boxes are equipped with connecting elements for combining into groups. Connectors can be structurally part of the socket box or equipped with a separate part. In our installation method, connectors are completely unimportant, they may not exist at all. The role of a reference template that maintains the required distances between the mounting screws is played by a homemade pattern.
Any piece of profile, for example PN27X28, is suitable for making patterns. Holes for the fastening screws of each socket box are marked and drilled in the profile, so that there is a distance of 71 mm between the left screws of the first and second boxes (and all subsequent ones). Well, the distance between the screws in one box is 60 mm.
The pattern profile must be longer than the entire group of socket boxes so that there is room to attach to the wall. For this, holes are also drilled in the profile. Next, all the boxes are screwed into the pattern from the flat side; for this, screws are used that come with the socket boxes.
The assembled structure is tried on in a pre-prepared recess. Nothing should prevent the profile from fitting tightly to the plane of the wall.
Well, the final operation is smearing
. A wide range of materials is suitable for fixing socket boxes in concrete, aerated concrete and brick. This can be a gypsum mixture: alabaster, thick fugen, rotband or goldband and others. Cement mixtures, including tile adhesive, are also quite suitable. The most important thing is that thanks to the template, the putty does not need to set quickly.
The putty is filled into the prepared hole and the socket boxes are pressed in from above. It is necessary to press until the plane of the template profile fits snugly against the plane of the wall. The pattern is aligned to the horizontal axis of the group of socket boxes (or to the vertical axis when forming a vertical row) and, after drilling holes, it is fixed to the wall. All excess putty that has come out from under the boxes is removed with a small spatula. Putty will also definitely get inside the socket boxes - it can be removed without problems after removing the template.
When applying it, it is important to ensure that not a single socket sticks out from the plane of the wall. If some boxes fell a little deeper than the plane of the wall (which is unlikely), it’s okay.
After the putty mixture has set, the template-pattern is unscrewed, and the remaining sagging is cleaned off with a spatula. Installation completed!
For those who love “reliable reliability”, we can recommend additional reinforcement of the fastening using self-tapping screws. A hole is drilled in the wall right through the bottom of the socket box and a self-tapping screw with a plastic dowel is screwed in. In walls made of foam concrete and aerated concrete, there is no need for preliminary drilling - the self-tapping screw is screwed in just as it is. It is convenient to use self-tapping screws with a press washer.
Whatever one may say, the putty mixture usually gives some shrinkage, so the place where it is put in requires finishing putty. Therefore, the best solution for electrical installation would be to install it before finishing the walls with putty.
Tip: Mounting screws get lost all the time when it comes to final installation of outlets and switches. Therefore, it is recommended to tighten the screws in place immediately after removing the template. And so that they do not interfere with the finishing puttying, the screws are tightened deeper than the plane of the wall.
Installation of a socket box in a concrete base
If you have already decided where your sockets will be located, you can begin installation work, which consists of several stages.
Before installing the socket box in concrete, markings are made, then a hole is made in the wall and a gypsum solution is prepared.
To install the socket box, we drill a hole in the wall. For brick and concrete we select a crown for concrete, for plasterboard - for wood
We use a chisel to destroy the material within the drilled hole. We carefully refine it with a chisel
Let's try the socket box to the installation site. It should fit freely into the hole so that the outer edge is flush with the wall
Carefully, using a sharp construction knife, break out the plugs of the holes through which the wires will be fed
Using a brush with medium-hard bristles, clean the hole from dust formed during drilling and apply primer
We apply plaster mortar or alabaster into the hole, prepared only in the volume necessary for fastening the box, distribute the composition evenly and quickly
We install the socket box in the recess with the solution added to it. We align its position, focusing on the plane of the wall and the mounting fixtures of the glass
We remove the excess compound squeezed out of the hole during installation of the socket box in a workshop, at the same time leveling the solution around
Marking the wall
The sequence of marking work is as follows:
- Using a tape measure, measure the distance from the floor to the intended installation location of the socket box;
- if the floor covering has not yet been laid, then you need to add another 5 cm;
- using a building level, draw two lines: horizontal and vertical with an intersection point at the place where the box will be installed;
- Place the glass against the wall and trace it with a pencil.
If two or more socket boxes are to be installed, then first draw a horizontal line using a building level. It should be located at the distance from the floor where the sockets will be placed.
Find the center of the first box and draw a vertical line through it. Then set aside exactly 71 mm and draw the second vertical. The center of the second glass will be located in this place. The marking of the following socket boxes is done in the same way.
When installing several socket boxes, it is necessary to make very clear markings and correctly determine the horizontal line so that all boxes are on the same level
Punching a hole in concrete
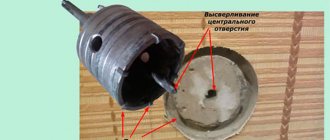
There are several ways to make holes in a brick or concrete wall. The simplest of them is using a concrete crown with pobedit teeth, which, when cutting into the wall, makes a circle of the required size.
In the center of the crown there is a drill bit made of pobedit for making a central hole.
Since standard socket boxes have an outer diameter of 67-68 mm, a crown with a diameter of 70 mm is suitable for the job. The nozzle is put on a hammer drill or drill, placed on the marked line and a hole is made.
Then the nozzle is pulled out, and the entire remaining layer of concrete is knocked out of the hole with a chisel and hammer.
The hole should be 4-5 mm deeper than the height of the socket box; for this, the crown must be completely recessed into the wall
If you don’t have a concrete crown, you can make a hole with a drill with a Pobedit drill bit. First, a central hole is drilled to the entire depth of the nozzle, and then holes are made along the circumference line with the same drill.
The more of them, the easier it will be to hollow out a hole of the required diameter and depth with a chisel and hammer or hammer drill.
Another way is to make a square hole using a grinder with a diamond blade attachment. First, the central lines are cut, and then along the entire perimeter of the socket box. The process, as always, is completed with a chisel and hammer.
Installing the box into the wall
After the hole is made, you need to clean it well and insert a socket into it for fitting. It should fit freely in width, and in depth there should be a margin of approximately 5 mm for the solution.
If everything worked out as it should, then now you need to make a passage from the top or bottom of the hole (depending on the location of the electrical wiring in the room) for laying the wire.
From the hole made with a drill (in soft walls with a chisel or chisel), a groove is laid along which the electrical wire will run
The socket box also needs to be prepared. We turn it over with the bottom side where the slots for the wires are and cut one of them with a knife. We run the wire there and insert the box into the wall to check.
To secure the glass, prepare a solution from plaster or alabaster, which should have the consistency of sour cream. It is worth considering that the solution made from these materials hardens very quickly, and you have no more than three to four minutes to complete the process of installing the socket box. After five minutes the mixture will no longer be suitable.
Two minutes before placing the box in the wall, the hole is moistened with water. After the liquid is absorbed, a layer of gypsum is applied to its walls with a spatula. A wire is threaded into the glass, its back part is also smeared with the solution, and the socket box is inserted into the hole.
Adjust the position of the box so that its edge is flush with the wall and the screws are horizontal.
To completely fix the glass, a solution is also placed in all cracks and gaps, and then the wall around the socket is coated with gypsum mixture
Combining several socket boxes
How the marking of two or more electrical outlets is carried out was described above. Holes are made using the same methods as for a single box. The only difference is the need to connect the holes together. This can be done using a chisel or angle grinder.
Before installation work, the socket boxes must be joined to each other using a side fastening element. Installation into the wall is carried out similarly to the installation of a single glass.
An important point that you must pay attention to when attaching a block of boxes is the strict alignment of the socket boxes horizontally while fixing them in the wall with gypsum mortar. It is necessary to carry out this part of the installation only using a building level.
The figure clearly shows all the stages of work on installing several socket boxes in a concrete wall
How to install socket boxes before plaster
In general, it is easier to install using finished plaster, but install the socket boxes before plastering
no one forbids it. Another thing is that it is a little more complicated.
In order to properly position the installation boxes before plastering, it is necessary to have already installed plaster beacons. When substituting the rule for beacons, you need to control that the socket boxes do not protrude from the plane of the future plastered wall. It’s best to even deepen the boxes a little relative to the rule by 1-2 mm, then you probably won’t have any problems with pulling the plaster mortar through with the rule.
The smearing algorithm is practically no different from the one described above, the only difference is that the template is not attached to the wall tightly, but taking into account future layers. By controlling the plane using the beacon rule, a template bar is set. Some wedges are inserted between the template and the wall. After the fastening solution has set, the fastening screws are removed or sunk deeper, the protruding wires are neatly rolled up in the sockets themselves.
Installation of boxes for non-modular devices
Such situations are rare, but can bring a lot of difficulties if they are not taken into account. If non-modular sockets or switches (which do not fit into a common frame) are installed in one row, then a minimum distance must be maintained between them. Otherwise, further installation will be impossible!
Related article: The best way to decorate the walls in the garage
As an example of such a scheme, you can take a cheap thermostat for an electric heated floor - this product is not modular and does not fit into a common frame with other sockets. Of course, there are thermostats suitable for general frames, but they are more expensive and are tied to a certain collection of installation electrics. Therefore, if you use a device without a common frame, it is imperative to maintain the distance!
So, the vast majority of sockets, switches, thermostats and others, in their finished form, have a width of 86 mm. Accordingly, between boxes for non-modular sockets there must be a minimum distance (along the axes) of 86 mm. But this is if it’s “grinding in” and not exactly, what if the switch turns out to be wider? Therefore, it is better to make the minimum distance between the axes of the installation boxes 90 mm. or more.
Well, the article has come to an end. It is more than enough for installing socket boxes in concrete and other materials.
Function and types of socket boxes
The main function of socket boxes is to securely fix sockets and switches on the wall when using hidden wiring. And this is also where all the wires and their supply are located.
However, when installing sockets and switches, you need to know in what cases and which socket box is best to use. The fact is that there are several types of the latter:
- For concrete and brick walls.
- For drywall.
- For wooden walls.
The choice is made based on the wall material. So, if the building has a concrete or brick wall, then it is recommended to buy socket boxes specifically for this type of wall. In order to install a socket box of this type, it is necessary to make a hole in the wall , slightly larger in diameter than the glass itself. Moreover, it will be fixed inside with a solution. Such modifications are suitable not only for brick or concrete surfaces, but also foam concrete, expanded clay or aerated concrete.
As for the installation of socket boxes in plasterboard walls, here the glass is selected with special fixing tabs that will securely fix the product.
For wooden walls, according to safety regulations, it is necessary to install either overhead wiring and other components, or install an iron socket box in a pre-drilled recess, where the latter is secured with any fastening fittings.
How to remove a hole from an electrical point in a plasterboard wall
Drywall is often installed to create an additional internal partition inside the house, and when sockets or switches are removed, an empty hole is left. There are easy ways to eliminate it.
Application of gypsum boards
Holes in a plasterboard wall are sealed using a piece cut from the same material, in accordance with the size of the defect. The workpiece is simply inserted into the hole, then puttyed and left to dry for 12 hours.
When finished, simply paint the area in the desired shade. At this stage, it is advisable to re-paint the entire wall so that there is no visible stain after the hole is repaired.
Repairing a hole in a plasterboard wall after removing an outlet or switch Source build-experts.ru
Reinforced mesh
For a small hole in a gypsum board wall, a regular reinforced mesh is suitable. It is simply inserted into the hole, and, if necessary, also placed on top. Then seal it with putty and leave to harden.
Afterwards the surface is leveled and painted or any other type of finishing is used.
Preparation before work
Of course, to install a socket box into a wall, you need to have some tools and prepare the installation site itself. By and large, preparation means assessing the wall and selecting a suitable socket box or socket boxes if you need to install an entire block with several sockets.
The installation location is marked, and in a situation with a block, you must not forget about the center distance. As a result, the place itself is ready, and all that remains is to select the necessary tool:
- Pencil or marker with a ruler.
- Hammer.
- A drill for concrete, if you need to install a socket in a concrete wall, brick, block, and so on.
- Hammer.
- Chisel.
- Crown for concrete.
- Grinder with a disc for concrete.
- Assembly knife.
- Alabaster or other putty solution.
When the tool is prepared, you can continue installing the socket boxes. And here it is important what surface is used.
Main types of socket boxes
The socket is securely fixed thanks to the presence of a socket box; modern types allow you to replace them at any time if you want to change the model to a more suitable one for the style of the room, or if it is damaged. The socket box can be called a socket box.
On sale you can find various types of boxes that are suitable for different walls, so in order to choose the right one for a concrete wall, you must first understand the range of these devices.
Based on the type of surface on which it is planned to mount the socket box, two types can be distinguished:
- for basic structures with a hard surface. Such as brick, reinforced concrete, concrete walls and others;
- for certain types of finishing materials such as plasterboard, panel, plywood and others. Which can also serve as partitions in a house where installation of socket boxes is carried out frequently.
For hard walls, the boxes look like round cups; they are fixed using a special composition. Passages are left in them, which serve as a place for wiring. There are cups that have fasteners on the sides that are necessary for connection with other socket boxes, if several sockets are installed side by side. With this element they can be easily mounted side by side.
For hard walls, the boxes look like round cups; they are fixed using a special composition.
For thin structures, parts with special fasteners are used to ensure fastening to finishing materials; they are subsequently twisted, the force of the fastener determines their evenness and direction, and is a regulator.
For thin structures, parts with special fasteners are used to ensure fastening to finishing materials.
Boxes also differ in shape, the most common are round, they are more common to install, in addition you can find square and oval types.
The second two types are distinguished by their large volume; these types, like the first, are intended for wiring that is hidden. They are mounted inside the wall so that they are not visible under the outlet itself.
It should be noted that there are also “open” socket boxes that are attached directly to the baseboards.
Skirting boards for such boxes can only be plastic and removable.
The most common are round, they are more common to install.
By size, we can distinguish standard ones and deeper ones, which are used to replace the junction box.
Based on the material used, we can distinguish between metal and plastic. Metal products were popular in the past, but now products made from non-flammable plastic are often used.
Metal socket boxes are usually used in wooden houses. How to secure a metal socket box to a wooden wall, you need to use soldering, because they cannot be welded.
The use of metal socket boxes in wooden houses is associated with compliance with safety regulations during installation work.
Nowadays, products made from non-flammable plastic are often used.
Installation in concrete
Concrete or brick are understandably particularly difficult to work with. However, there are several ways to install socket boxes in such walls.
The simplest and neatest of them is to use a crown to create holes. It looks like a cut pipe with teeth made of especially durable material. As a rule, there are crowns of different diameters, so it is worth considering which one is needed in a particular situation. The standard size of the socket box is 67 mm, therefore, the crown is needed a little larger, that is, 70 millimeters. Next, a hole is carefully drilled in the wall according to the markings. Moreover, the crown should enter the wall almost entirely.
Now the hammer drill with the crown can be put aside and take up the hammer and chisel. The inner part is knocked out quite easily, after which it is carefully brought to perfect condition. And if the hole drilled with a crown is ideal in diameter, then the depth is not always the same. Therefore, it is necessary to take the socket box and, inserting it into the hole, check whether it fits. It should fit almost completely into the wall and even with a margin of a few millimeters. If the depth is not enough, then you will have to make the hole a little more.
Now a cable is passed through the side holes of the socket box, and the glass itself is inserted as much as possible into the prepared hole. Moreover, in some cases it is even recommended to cut off the front edge so that the product fits completely into the wall, since otherwise it is very possible that the socket or switch will not be in close contact with the wall surface.
The glass is fixed to the wall using a solution of alabaster or plaster. Although any other can be suitable, but in this case you will have to wait a long time until it dries.
Before fastening, the prepared hole must be moistened with water, then put a little solution inside. Next, not forgetting to pass the wire, insert the socket box and recess it well into the hole. It is worth paying attention here to ensure that it does not go beyond the surface. Now you can put the solution into the remaining side voids and carefully level it with a spatula. After the solution has dried, everything will be ready to install the socket in the socket box.
Related article: How to properly attach plastic panels to the wall
Is it possible to make socket boxes in load-bearing walls?
According to the rules, it is allowed to install socket boxes in a load-bearing wall. It is allowed to create small holes in the load-bearing wall. Since the socket goes only a short distance deep, this process should not create problems with the structure of the house; of course, the main thing is not to make too large holes.
It is worth remembering to be careful, because the supporting structure is responsible for ensuring that the house stands stable, and this is the safety of the residents themselves.
According to the rules, it is allowed to install socket boxes in a load-bearing wall.
The article looked at how to install socket boxes in a brick wall and in a concrete one, the process is completely doable with your own hands, it is not as complicated as it might seem at first. The main thing is to do everything step by step, do not neglect marking and prepare the necessary tools. Thanks to a wide range of socket boxes, they are convenient to install on any surface.
Installation in drywall
In the case of drywall, the situation is much simpler. After all, drywall itself as a material is much easier to process. All you need in terms of tools is a screwdriver, a knife and a spatula. Although it is much easier to make a straight hole using the same crown and drill.
The socket box for plasterboard has special spacer legs, with the help of which reliable fixation occurs. Then all that remains is to treat the seat with putty. This will not only give a more aesthetic appearance, but will also ensure reliable fixation of the product.
Features of installing PR in other wall bases
It should be noted that installing socket boxes in brickwork is no different from installing a PR in a concrete wall. Brick can be easily cut with a pobedit or diamond crown. But the installation of polymer glasses in plasterboard, ceramic tiles, and hollow panels has its own characteristics.
Drywall
The facing material is quite thin gypsum panels. To install sockets and switches, specially designed plastic cups are used. The socket boxes for drywall have external side screw clamps. The outer edge of the socket rests against the surface of the drywall. By tightening the screws, they lift the tabs along the threads, which with their teeth rest against the lining from the inside.
Drywall socket box Source electroua.com.ua
Holes in gypsum panels can be cut with a utility cutter or knife. To get a perfectly even round opening, use a drill with a special bit. It is also used to cut holes in plastic false panels of wall fences. The dimensions of socket boxes for drywall are the same as for glasses for concrete.
Drywall crown Source www.stocklots24.com.tr
Working with a wooden wall
By and large, installing socket boxes in a wooden wall is not much different from installing them in concrete or brick. The only difference is in the box itself, since it requires the use of metal products. For the rest, a hole is also drilled and then adjusted to fit the glass. Fastening is done with screws. Also, do not forget that wiring on wooden surfaces requires compliance with the PUE.
Alternative Hole Creation Methods
It can often happen that you simply don’t have a crown at hand, and buying it may not be very rational. In this case, you can make a hole for the socket box in other ways.
So, a grinder with a disc for concrete is perfect for these purposes. With its help, a rectangular niche is cut out according to the markings, which, after installing the glass, is filled with plaster or alabaster, and then carefully plastered.
Another, rather ancient method is to gouge out a hole using a chisel or spatula installed in a hammer drill. The process is extremely complex and energy-intensive, but the result obtained is quite satisfactory.
Tools and materials
Tools and materials for sealing grooves
Before starting construction work, you need to make sure that you have all the necessary working arsenal, including building materials, at hand. To properly seal trenches you will need:
- Reservoir for mixing the solution.
- Several metal spatulas 10-15 cm wide and about 120 cm.
- A brush that is sized to fit the groove.
- Construction plaster or alabaster, designed for reliable fixation of wiring.
If the room is characterized by high humidity, it is additionally recommended to purchase gypsum plaster.
Some nuances
Despite the simplicity of installing the box, there are some nuances that are better to know:
- If the wall is not treated and will be covered with plaster or tiles in the process, then this should also be taken into account. Otherwise, the socket box will be recessed too deeply into the wall. To do this, it is good to know how thick the plaster or tile will be. If there is no such information, then it is recommended to make a preliminary reserve of 5-7 mm or even make a hole after finishing.
- When buying a box for an outlet, it is better to immediately purchase the outlet or switch itself. There are two nuances here: firstly, this way you can be sure that the socket itself will fit in size, and secondly, that there will be enough space for cable storage.
- It is preferable to leave a cable margin of 20 centimeters, but not less than 10, since during operation it is often necessary to remove the ends of the wires in order to strip new ones. Thus, the cable length may not be enough, which will lead to forced extension, and various kinds of twisting and soldering are extremely undesirable.
- When preparing the mixture for putty, it would be useful to pay attention to the thickness of the consistency. After all, if you make a solution that is too liquid, it will simply pour out from everywhere, including into the body of the box itself. A solution that is too thick will be extremely difficult to smear into all the holes; moreover, the plaster in this state will harden very quickly, which may prevent smearing at all.
- To ensure that the resulting socket or switch fits snugly against the wall, it is recommended to trim the front edge of the glass, which will allow it to be recessed deeper into the wall. Although in some cases this is not required.
Installing socket boxes in any type of wall is not something special or complicated. Even a beginner can do this kind of work without risk. And of high quality. The main thing is desire and knowledge of some nuances.
How to repair a hole in the wall from an old socket
As a rule, not all people are satisfied with the location of outlets in their home. For this reason, there is a need to dismantle the sockets. However, there is a small problem with this case. The fact is that some people simply don’t know how to seal the through hole that will remain in the wall after removing the socket. This will be discussed in this article.
The procedure for sealing a hole from an outlet is very simple to perform. Therefore, even an untrained person who has never made repairs in his home can cope with this matter. This process requires compliance with some rules:
1) First of all, turn off the power to the outlet. To do this, you need to turn off the electricity in the entire house using the switch located in the panel. Failure to comply with this requirement may cost a person his life.
2) After completing the first step, you need to remove the socket from the wall. Next, carefully insulate all the wires that stick out from the hole. In some cases, the contacts can simply be cut to the base. Then you should pull out the plastic base in which the socket was located.
3) Next, place the wire contacts in different directions from each other. This is necessary so that they cannot touch each other later.
4) Then fill the inside of the hole with mounting foam.
5) In a few hours it will be possible to putty the socket box. At this point, the dismantling procedure is considered completed. In addition, it meets all safety requirements. As a rule, putty is one of the best materials used to seal holes in the wall. However, after paying a little extra, the through hole can be sealed with plaster.
Using the same scheme, you can seal the hole from the switch.
Simple and affordable means of eliminating holes
Before finishing the hole, you need to think about how to fill the space from the cut out socket box. For this purpose, non-flammable and electrically conductive material is often used. It could be:
- fiberglass;
- mineral veil;
- electrical cardboard;
- fluoroplastic
You should not immediately seal the resulting hole with raw cement mortar if there is an electric point installed on the opposite side (for example, neighbors have an electric point), as this can be life-threatening. First of all, fill the gap with dry material.
Hole in the wall after dismantling the socket Source fotokonkurs.ru
Polyurethane foam
Polyurethane foam has always been considered a universal remedy and a good sealant. It does an excellent job of filling holes from electrical outlet housings (sockets, switches, distribution boxes). To hide a hole, perform the following sequence of actions:
- First of all, turn off the voltage. Afterwards, the wires that went to the outlet are insulated. If possible, they are completely removed or de-energized in the distribution box.
- Then they clean the edges of the hole so that they are as smooth as possible, then blow out small pieces of plaster and dust from the hole with a compressor. Check the perfection of the work performed.
- Take a spray bottle with water (any old container of glass cleaner will do) and spray the inside of the hole. Just do it lightly so that the water doesn’t drip down the walls.
- Next, take a container with polyurethane foam, shake it and completely fill it with the composition. Just act carefully, because the foam swells very quickly and may turn out to be unnecessary.
- After the polyurethane sealant has completely dried, cut off its excess so that there is a small depression in the socket of about 3-5 mm. This will be required for finishing sealing.
Closing a hole in the wall from an outlet with finishing putty Source kraski-net.ru
How to remove a socket from a hole in the wall
As practice shows, solving this problem is quite simple. First remove the outer cover. It is enough to unscrew one screw, thanks to which the cover is pressed to the surface of the socket. Then you need to unscrew the two screws that hold the wires in the socket. Once the above requirements are met, you can safely remove the device from the wall.
After reading this article, anyone will be able to familiarize themselves with the rules for dismantling electrical outlets. In addition, using the above information, it will be possible to seal the hole where the socket was previously located.
Video description
How to cover up holes in the wall. How to properly seal holes in concrete.
A method for eliminating large holes from a set of sockets and wires
If there are large diameter holes left in the wall and, in addition, there are empty grooves, these defects are repaired as follows:
- remove dust and debris;
- treated with a regular primer;
- if the hole is large, crushed stone or brick is placed in it;
- dilute one part of cement with three parts of sand with water;
- then the holes are sealed with a spatula and left to dry for 12 hours;
- then the final leveling and puttying of the wall is performed until it is perfectly smooth.
At the puttying stage, they try to finish the entire wall completely before the actual cladding.
Comprehensive sealing of holes in the wall after cleaning sockets Source sibelektrika.ru