To facilitate and speed up routine household processes, people turn to the help of household appliances. Units for fast, high-quality drying of washed clothes are as necessary at home today as washing machines. Such devices can thoroughly dry a large volume of wet things in a short period of time.
And now, when the clothes dryer has been purchased and delivered to the address, all that remains is to install it in the right place and connect it correctly, so that subsequently the equipment works smoothly and perfectly performs the functions assigned to it. To carry out these activities, it is not necessary to contact specialized companies; you can do this on your own, since connecting the dryer is not a labor-intensive process. You just need to follow the sequence of actions.
Types of dryers
These machines are divided into several types:
- Drying cabinet.
- Drum drying.
The drying cabinet is quite difficult to use. Washed items will need to be hung by hand in a specially designated place. Excess moisture is removed using fans that supply warm air to the drying chamber. Electric or air heaters are used for heating. There is no point in connecting such a dryer to the sewer. All you have to do is use the spin mode and then transfer the items to the drying cabinet.
The design of the drum dryer, as well as the principle of its operation, resembles a drying cabinet. The difference is the presence of a special drum that speeds up drying. Thanks to rotation, hot air penetrates the fabric much faster. In addition, after using the drum machine, the need for ironing is reduced.
Such a device uses special programs that provide rotation mode, so things stop wrinkling. The drum dryer does not require a sewer connection. It is needed only if it is not possible to load wrung out items and manually drain unnecessary water from the tank.
Myth 9. Drying spoils items made from delicate fabrics.
In the new Candy models, drying is implemented using a heat pump, that is, a lower temperature is used than in condensing machines. This in turn does not wear things out, as already stated. Also, let's not forget about special drying modes, for example, the mode for wool - they are designed specifically for delicate fabrics.
In addition, modern washer-dryers are equipped with a steam mode, which not only saves electricity, but also helps to carefully wash delicate fabrics: steam treatment resembles boiling in its effect, but colored fibers retain their color. By the way, steam also disinfects clothes quite well, which is very important for children's clothes or things for people with allergies.
Drying types
Drying things can be done in different ways. They are divided into several technological groups, which are used in various drying ovens.
Condenser
The air heats up together with the water. Then it condenses using special elements mounted inside the device. Condensate accumulates in special tanks. This liquid no longer touches things. It is removed manually or through a connected sewer.
Important! The collected condensate is not suitable for watering indoor plants, as it may contain harmful substances left over from the washing powder.
Ventilation
Thanks to the heated air, the “humidity” is quickly removed from the car. In principle, this is the simplest type of drying. But for this you need to have good ventilation near the device. Otherwise, the surrounding area will be filled with excess moisture.
The industry also produces models equipped with additional parts. Infrared lamps are installed in the drying cabinet for disinfecting laundry. Thanks to the air ionizer, things become safe for human health. The listed elements are considered secondary. They only make the dryer more comfortable.
Installation methods
There are three common ways to install drying devices.
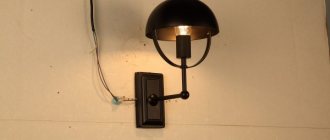
Mounting bracket
To place the dryer on top of the washing machine, you can use special mounting brackets, which are often supplied with the device. If they were not included in the kit, you will have to purchase such parts separately.
The fasteners are installed on top of the washer body so that the dryer can be attached to them. Without mounting fasteners, you should not install the device on top of the washing machine, since without reliable fixation the product may tip over due to operating vibration. Also, such fasteners are installed to additionally protect the surface of the dryer from scratches and other damage.
Reiki
Some people do not want to use mounting fasteners and therefore try to secure products in other ways. Often, strong wooden slats are used for this, which are attached to the surface of the wall. Then a dryer is attached to the installed slats, installed on top of the washing machine.
It is necessary to attach the slats to the wall very carefully and securely so that the structure does not become detached and fall.
Niche
There are times when it is not possible to place a dryer on top of a washing machine and you have to look for other methods of fastening. The most common is the use of a special niche, which is installed on the floor surface. You can purchase it or make it yourself. To make a high-quality niche, you can use high-strength plasterboard. When installing the device in a niche, you must remember that vibration occurs during its operation. Therefore, the distance between the wall and the structure should be 3-4 centimeters.
Dryer connection technology
You can do this work yourself, but only if you have experience in performing such operations.
Note! Before connecting the dryer to an existing sewer or connecting the power supply, carefully consider the installation method.
A professional master will do this work quickly and efficiently with a certain guarantee. To prevent the machine from breaking down in the future, the technician will advise you on how best to operate the machine and what operations can lead to breakdown.
Of course, calling a specialist guarantees good work, but will require additional financial expenses. Do-it-yourself installation is possible if you are familiar with construction and plumbing work. To connect the dryer to the sewer, use a special drainage system. To supply power, a socket is mounted next to the device (you can use a carrier).
How to connect
There are certain features of connecting a dryer that need to be dealt with in advance.
Ventilation
Some people think that connecting a dryer to the vent is difficult, but this is not true. On one side of the dryer there is a special hole through which it is connected to the ventilation system. To secure the connecting corrugation, special clamps are used, which are supplied with the device.
The second side of the corrugation can be brought out into a vent in a window or into an opening in the central ventilation system
You must connect such a tube very carefully so that it does not bend by 80-90 degrees, as this will make it work worse
Sewerage
Condenser dryer models must be connected to a sewer system into which excess liquid will drain. Most of these devices have holes through which they are connected to the sewer. To connect the dryer and the sewer system, a regular hose is used, which can be led into the toilet, sink or separate drain.
Electricity
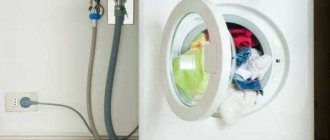
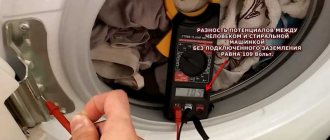
The last communication to which you need to connect the dryer is the electrical network. To connect it to a power source, you need to select a separate line on the distribution box. You can also use a free outlet. However, to connect such powerful equipment, you must use sockets that are equipped with separate grounding. However, experts do not recommend connecting a washer and dryer to the same double outlet at the same time.
Tools required for connection
To connect the dryer, you must have:
- Knife. Useful for cutting drainage to the appropriate length. Sometimes this part is included in the device kit. If it is missing, it can be purchased separately by cutting it to the required length. When purchasing, be sure to check the quality of the drainage pipe. Bends, cracks and tears are not allowed.
- Clamps for fixing drainage. Not included with the cabinet. They can be purchased at a specialized hardware store. These parts are made of a metal strap that can be tightened using a locking mechanism.
- Screwdriver. A necessary tool for working with clamps. She tightens the drainage clamp, creating a tight connection.
Such a small set of tools is enough to install and connect the dryer yourself.
Ways to place dryers
There are different ways to install dryers. In apartments, cottages, and country houses, the following placements are chosen:
- they install appliances under the countertop in the kitchen;
- placed vertically on the washing machine;
- installed in a closet or a special plasterboard niche on a shelf;
- next to the washing machine, i.e. in a horizontal line.
In small apartments or in the country, the dryer is usually installed on top of the washing machine.
Do I need to connect to a sewer?
When developing drying units, engineers and technologists decided to create machines that have the possibility of such a connection. However, each owner decides for himself whether to make such a connection or do without it. If there is no connection to the sewer, you will have to constantly monitor the level of the water container (if available). The liquid is drained manually.
Connecting the sewerage system to the dryer is done to make it more comfortable to use. Now you won’t need to think about the moisture present in wet laundry; it will all be removed through the sewer. Of course, if there is an opportunity to connect a sewer, be sure to take advantage of it.
Household appliances Dryer
Common mistakes when installing a dryer
Errors during installation of the product can lead to deformation of its parts. Avoiding possible errors that occur during installation will help to properly prepare the product for work:
- Not very thorough measurement of the required parameters. Incorrect measurements will result in too strong or, conversely, weak tension on the rods.
- Failure to comply with the diameter of the hole and fasteners. The parts must be exactly the same diameter as the drill; when installing the product, they must be completely adjacent to the wall of the hole, otherwise it will not be possible to hang the ceiling dryer correctly.
- Use of dowel nails. These fastening elements are unreliable and the structure may collapse after the first use.
If all of the above points are observed, the installation of a ceiling-mounted clothes dryer will follow all the rules and will not cause any inconvenience.
Sources
- https://homeasking.com/kak-rabotaet-sushilnaya-mashina-dlya-belya/
- https://cosmo-frost.ru/sushilnye-mashiny/vybor-sushilnyx-mashin/princip-raboty-i-ustrojstvo-sushilnoj-mashiny/
- https://uborka-v-dome.ru/odezhda/liana-dlya-sushki-belya-na-balkone.html
- https://stroy-podskazka.ru/sushilnye-mashiny/kak-podklyuchit/
- https://TechnoSova.ru/dlja-chistoty-i-porjadka/sushilnaja-mashina/podkljuchenie-svoimi-rukami/
Installation depends on the type of dryer
How the process of installing a new dryer will proceed depends on the room and type of dryer. First of all, it is important to decide on the type of drying, which can be exhaust, condensation or heat pump. The operating principles of the machines are different, which is reflected in the nuances of their connection.
- Exhaust systems work by removing air with moisture into the ventilation system, so the machine must be connected to home ventilation.
- Condensing machines direct heated air into a drum containing wet laundry, where it “collects” the liquid from the fabric. Next, the flow goes into the provided heat exchanger to “dump” the vapors, and the “dumped” moisture settles in the provided container. It needs to be emptied, so for convenience it needs to be connected to a sewer.
- Heat drying units are similar to condensing models with the difference that the moist air does not pass through a heat exchanger, but an evaporator.
The installation process of the dryer is determined by the type of unit.
The most difficult thing to work with is exhaust models, since they require connection to an air duct. Not all city apartments and private houses provide the opportunity to easily connect to centralized ventilation. But fewer and fewer such machines are being produced - manufacturers are actively replacing them with condensing and “heat pump” ones. We will talk about their installation in the article.
How to connect a dryer to communications with your own hands
After completing the installation of the drying unit, it is worth starting to connect it to the ventilation system or drain pipe, taking into account the principle of operation of the device.
Ventilation
The solution to the ventilation problem is quite simple. There is a ventilation opening on the body of the unit, to which a soft air duct must be attached. The connection is ensured using a special clamp included in the kit. The opposite end of the corrugated pipe is led into a ventilation shaft or window - in the absence of a ventilation hole. Bends of the corrugation by 90° are not desirable, since then the efficiency of the hood will be lower. We must try to connect the air duct with a minimum of bends and turns.
It is worth paying attention to one more important point. If you plan to install the dryer in a room with a high temperature, you should not route the corrugation along the top, as this will lead to the accumulation of condensation and the formation of an obstruction to the air outlet
Under such circumstances, it is worth considering another method, for example, making a hole in the wall at the level of the exit from the machine so that the corrugation section is located horizontally.
Sewerage
Condensation-type equipment involves collecting liquid during drying into a special tray, which must be manually emptied regularly. If you intend to simplify your life, you can create a connection for the dryer to the sewer. This installation option is possible thanks to a special drain hole connected to the sewer pipe using a regular hose. The connection technology in this way is similar to how a washing machine is connected. The hose is led directly into the drain or hung on the toilet, bathtub or sink.
Sewage connection diagram
Electricity
The final communication is the home electrical network. You can connect the dryer yourself to a separate line removed from the distribution box; the second method is to use an outlet. The use of the latter option is considered more logical, since the power of home devices, as a rule, is no more than 2.5 kW. A mandatory requirement for the outlet is that it must be grounded. In addition, the electrical network serving the drying must be protected by an RCD and equipped with a circuit breaker to protect the network from overload and current leakage. Usually it is sufficient to connect a 16 Ampere RCD and the same circuit breaker in the panel.
Installation of the machine in the panel
The technology for installing, fastening and connecting a dryer at home is not particularly difficult and does not require much skill. You can save on calling a specialist and do the work yourself.
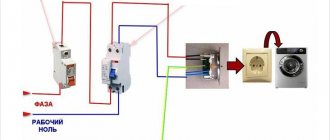
Selecting a socket and wire to connect the washing machine
To initially connect the washing machine, you should first purchase all the necessary electrical installation equipment. The reliability and durability of the circuit depends on this. Therefore, this aspect cannot be neglected.
Choosing a socket for a washing machine
First of all, let's focus on choosing an outlet. After all, the wrong choice of socket leads to its burnout, poor contact and possible damage to the washing machine. Here we are primarily interested in the type of outlet and its rated current.
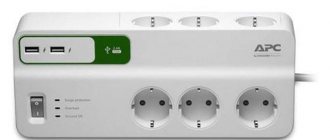
The photo shows a socket with a built-in RCD circuit breaker
So:
- First of all, let's look at the rated current of the sockets. It must correspond to the nominal parameters of the washing machine. The operating instructions or the machine's passport will help you find out.
- It may happen that the rated current is not indicated in the passport. But the power of the machine will definitely be indicated. In this case, we use the formula. In this formula, I is the desired rated current, P is the rated power of the washing machine, U is the rated voltage of the supply network for us, which is 220V. Of course, this is not a complete formula, but in our case it is quite enough.
- Modern washing machines and the socket for them are usually not particularly demanding. After all, for a machine with a power of up to 1.3 kW, a regular 6A socket is quite enough. But there are washing machines with a rated power of up to 3 kW. For such equipment you already need to choose 16A sockets.
- In general, the rated current of sockets can be 6, 10, 16, 25 and 32A. The latter type is presented quite rarely and is mainly for three-phase sockets. Based on our rated current, we select the nearest larger value.
- Now regarding the type of outlet. First of all, they must have a protective grounding, which must ensure advanced closure of the grounding contacts.
- Another aspect that should definitely be taken into account is the dust and moisture resistance class of the outlet. According to clause 7.1.47 of the PUE (Electrical Installation Rules), the bathroom belongs to zone three. In these rooms, all sockets must have a moisture protection level of at least 5. Therefore, the socket and washing machines must be IP45 or higher.
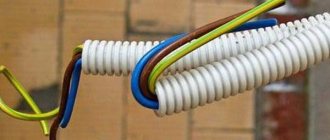
Choosing a wire for a washing machine
The correct choice of wire cross-section for connecting a washing machine is also decisive for the longevity of the circuit. After all, if you install a wire with a smaller cross-section, at best it will simply burn out, and at worst it will even lead to a fire.
So:
The choice of wire is also carried out based on the rated current of the washing machine and it is quite possible to do this yourself. This is done according to the table. 1.3.4 or 1.3.5 PUE depending on the wire material.
Selecting the wire cross-section for connecting the washing machine
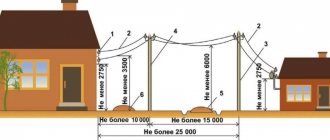
- In our case, it will be a three-core wire laid in a hidden way. Indeed, according to 12.22 VSN 59 - 88, wiring in bathrooms must be done in a hidden way without the use of metal pipes or ducts.
- But no matter what wire cross-section values you get, according to the table. 7.1.1 PUE it in any case cannot be less than 1.5 mm2 of copper wire. That is, if when choosing, you get a cross-section of, say, 1 mm2, then you should still install a 1.5 mm2 conductor.