There are usually a lot of household appliances used in modern houses and apartments. Therefore, the standard 1-2 sockets per room are not enough for property owners these days. Accordingly, in most cases, owners of apartments and houses install additional connection sockets in their homes. Of course, such a procedure should be carried out according to all the rules, observing certain standards. For example, during installation you should, among other things, maintain certain distances between socket boxes.
Why group
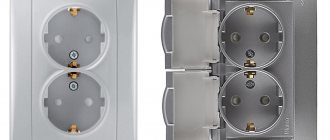
Of course, you can place sockets in the house in different places. However, too many of them over the entire wall area will most likely greatly spoil the appearance of the room. Therefore, in modern apartments, sockets in most cases are simply placed several times in one place. This allows you to maintain the attractive appearance of the walls and make the connection sockets less noticeable. Also, this installation method makes the subsequent operation of sockets more convenient. After all, most often different kinds of household appliances are located in apartments not far from each other.
Installation of socket boxes in tiles or wall panels
It is better to lay the cable and install the socket boxes in advance, before laying the tiles. But if the tiles are already there and you need to make an outlet or switch, then crowns for ceramic tiles will help. The drill bits will help you carefully drill holes in the tiles.
The hardest thing is if there is concrete under the tiles that needs to be tapped. In this case, it is best to use a diamond crown, otherwise there is a chance of damaging the tile (when chiselling with a regular crown).
There is a cheaper and dirtier way, this is drilling a hole with a grinder, the main thing is to drill everything out as carefully as possible so that the hole is covered by the frame from the socket.
Grouping rules
We’ll talk about what distance between socket outlets in a group should be chosen below. First, let's figure out what technologies can be used to install connection sockets in the block.
In a house, you can, of course, install several separate sockets in the same place, simply by placing the sockets close to each other at the same level from the floor. However, electricians rarely use this method of installation. When using this technology, it will most likely not be possible to mount the connection sockets absolutely evenly and neatly.
Therefore, in most cases, before installation, electricians group socket boxes into a single structure. Subsequently, such a block is simply mounted into the wall in one step. In a similar way, installers achieve a neat appearance of nests installed in the house. Sockets are usually collected in groups of 2-5 pieces. For industrial premises, blocks with a larger number of connection sockets can be used.
Hole cutting
After marking, in the marked centers of the circle it is necessary to make a hole using a drill with a slightly larger diameter than the crown drill (for example, an 8-10mm drill). We drill a hole with a margin, taking into account the length of the drill bit of the crown itself (but do not forget about neighbors and thin walls). This method is also suitable when working with a diamond core bit in drilling mode.
The process of gating. After drilling holes in the center of the future circle, you need to use a crown to go deeper into the wall a few millimeters (this only applies to the method of working with a hammer drill!). Along the intended circle, you need to drill the maximum possible number of holes to make it easier for the crown to “gnaw” the concrete.
With a diamond crown, you just need to drill - without chiselling, periodically letting the crown cool. It is worth noting that if a diamond bit gets on the reinforcement, its service life is significantly reduced.
When working with an angle grinder, the whole task comes down to making cuts in the wall to the required depth and hollowing out the area where the socket boxes will be located.
Installation Rules
The distance between the sockets in the block should be such that using the connection sockets in the future would be as convenient and safe as possible. But such groups themselves in the house, of course, need to be placed in accordance with certain requirements. For example, regulations do not allow installation of connection sockets closer than 50 cm to sinks and sinks. Also, such elements are not allowed to be installed at a distance of less than 60 cm from gas pipes.
Sockets are usually installed in the house at a height of 30-40 cm from the floor. Previously, such elements of a household network were most often installed higher - at a height of up to 90 cm. However, a whole group of sockets, as opposed to 1-2, mounted at such a height, will most likely spoil the appearance of the wall. Connection sockets installed closer to the floor are not so noticeable. In addition, it is more convenient to use sockets with this installation in the future. The comfort of the apartment owners will not be hampered by wires stretched everywhere.
From the slopes of windows and doors, such groups should be installed in such a way that the distance from them to the first socket is not less than 10-12 cm. It is better if it is the same in all rooms.
Groups can gather both from power outlets and from regular ones. According to the regulations, it is impossible to combine these types in one frame. Otherwise, powerful cables will interfere with the operation of regular outlets. It is also recommended to place power groups from ordinary sockets on one wall at a distance no further than the diameter of one socket box. This is also necessary to ensure that power cables do not subsequently interfere with the operation of normal connection sockets.
Rules for installing a socket box
The operating procedure is as follows:
- Using a d-6mm drill (or the same as on the crown), drill the center of the niches of future socket boxes (71mm between the “holes” if we are talking about a block)
Drilling depth - 5cm.
- Using the selected crown, drill out 5-10mm of concrete, after which the centering drill is pulled out from the crown
If you leave it, then when the hammer shakes during operation, the drill may become wedged and break off. In addition, when diamond drilling without impact, the drill will only smooth the concrete and interfere with the work.
- finish drilling the concrete with a crown to the required depth (about 5 cm)
The depth can be set in advance by placing the box on the bit and marking the required drilling distance with a marker.
When drilling, you need to rock the hammer slightly from side to side. This is necessary so that the sludge comes out and the crown does not jam. In this case, you need to adapt, since strong swaying also leads to a wedge.
This action greatly influences both the speed of operation and the increase in the service life of the product.
What is a socket box
Connection sockets for electrical appliances are mounted into the wall in a special hollow housing. Such an element is called a socket box. The dimensions of this type of product are standard in our country. Their diameter is almost always 68 mm. The distance between the socket boxes is 68 mm, therefore, will also be standard.
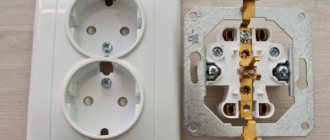
Such cases are usually made of plastic. On the sides of each socket box there are special mounting ears. Through such elements, these buildings are assembled into groups. The socket boxes can also be attached to each other using the tongue/groove system.
There are two main types of such housings on sale today: those designed for installation in brick or concrete walls and those used on drywall. The latter type of socket boxes have special elements that allow them to be tightly secured to the gypsum board. Also on sale these days you can sometimes find housings for recessed sockets. They differ from ordinary socket boxes only in their longer length.
General information about mounting boxes: sizes and types of socket boxes
A mounting box or socket cup is a special box that is used to organize electrical wiring in a room. It is necessary for the safe installation of system components such as:
- plug-type sockets;
Socket boxes are mounted into the wall, and then sockets and switches are installed inside them
- switches;
- regulators and control panels for setting electrical appliances;
- terminal blocks;
- dimmers that control light intensity.
Provided that the technology is followed and the dimensions are correctly selected, socket boxes in the walls will provide protection to users from electric shock.
What types of socket boxes are there: types and classification of products
To make glasses for sockets, plastic, as well as metal and wood are used. Each material has its own characteristics. Wooden boxes are only suitable for open wiring, so they are not as popular as plastic ones. Metal products are practically not used, since they often cause a short circuit. Their scope of application extends to wooden houses.
Plastic is considered the best option. Non-flammable material is used to make such glasses. Manufacturers of plastic products adjust the sizes of socket boxes for plasterboard and wall structures made of wood, concrete and other materials.
Metal socket boxes are used only for wooden walls
Plastic glasses are suitable for mounting sockets on surfaces with various types of finishes:
- Fiberboard;
- plywood;
- chipboard;
- lining.
Important! Regardless of the type of room, wiring must be installed in accordance with established rules and regulations. Thanks to this, the connection and subsequent operation of electrical devices will be convenient and safe.
According to the shape and type of construction, mounting boxes are:
- Round – universal-purpose products, the most in demand.
- Square - they have more capacity.
- Oval – designed for installation of 2 sockets or a “socket-switch” design.
- Composite - blocks that allow you to combine several socket boxes (from 2 pcs.) in one design.
Despite the differences in configuration, all designs are similar in appearance to a glass. Alabaster or building plaster is used to fix products in the wall.
The square socket box has a more spacious interior space
There are models on sale with and without additional fasteners. The choice depends on the surface material. Concrete is a dense and durable material. Products are securely fixed in it without additional fasteners. It is enough just to select the appropriate size of the crown for the socket box in concrete, make a hole and install the product in accordance with the technology. If the walls in the room are soft and hollow, it is better to take boxes with fastening strips. Due to them, the socket will be securely fixed in the hole.
The socket boxes differ from each other in design and color scheme. As a rule, this factor is important for overhead products that are installed in the baseboard. After all, they are part of the interior. However, external design does not in any way affect their functionality.
What parameters does the socket box have: diameter and overall dimensions?
Plastic cups are most often made from polyamide, polyvinyl chloride (PVC) or polypropylene. The size of the socket box for the socket, or rather its parameters, depends on the shape of the structure.
Glasses for sockets are made of special non-flammable plastic
For round products, the main parameters are diameter and depth. Size information is usually indicated on the glasses themselves. The diameter is designated by the letter “D”, and both external and internal indicators are measured:
- External - the maximum diameter, which determines the size of the outer part of the socket itself. It serves as a guide when selecting the diameter of the crown for the rosette.
- Internal – diameter that determines the maximum possible dimensions of the device that can be installed in the box.
The most popular are socket boxes with the following diameters: 75, 70, 68, 65, 64 and 60 mm.
Important! In order to install a switch or socket efficiently and reliably, you need to select these mechanisms so that their size matches the inner diameter of the mounting box.
The depth of the socket box is indicated by the letter “H”. As in the case of diameter, the glass has two indicators:
- Installation depth - shows the depth of the hole required for normal installation of the socket box in the wall.
- Internal depth – determines the depth of the box from the inside. This space is used to install the socket. A supply of wires is also located here.
Standard sizes of round socket box
Most often this parameter is 62, 60, 45, 42 or 40 mm. There are also deeper glasses up to 80 mm in size. This option is used if there are no junction boxes in the wiring. The increased depth allows for the installation of terminal blocks.
If the installation of oval boxes or composite blocks is intended, the center-to-center or mounting distance is also taken into account. This parameter shows at what distance from each other the centers of the axes (holes) are located. Thanks to this, you can achieve the optimal distance between sockets. According to the standard, it is 71 mm. However, this indicator can vary in both directions, since manufacturers sometimes deviate from generally accepted parameters.
For square boxes, the dimensions are determined by the following parameters:
- Height.
- Width.
- Depth.
- Center-to-center distance.
As an example, let's take a glass with dimensions 68x68x43. The dimensions of the socket box 68x68 indicate that both the width and height of the square product are 68 mm. The depth of the installation box is 43 mm.
The standard dimensions of a square socket box are 68x68x43 mm
Standard sizes of socket boxes and variations from different manufacturers
Standard size products have a diameter of 68 mm. Their depth is 45 mm. Taking these parameters into account, markings for installing cups are applied so that there is strictly 71 mm between the fastening centers. In accordance with this, the dimensions of the crown for the socket box are selected.
Note! Standard dimensions refer to the external dimensions of the product. The internal cross-section of such boxes corresponds to 65 mm, and their depth is 40 mm.
The sizes of glasses may vary from manufacturer to manufacturer. To avoid inconsistency, it is advisable to use mounting boxes and electrics from the same brand.
For Legrand socket boxes, the outer edge can reach 70 mm and the depth is 65 mm. These products are considered giants. Although the manufacturer offers several options, including boxes with a diameter of 68 mm and a depth of 60 or 40 mm.
Some manufacturers deviate from generally accepted sizes and produce glasses of non-standard dimensions
Glasses from the domestic manufacturer Hegel also have a depth of 60 mm with a standard diameter of 68. These boxes are designed for installing dimmers with complex designs and switches.
Schneider socket boxes have a clearly marked standard - 65x45 mm. These products are produced in Russia and are in high demand among buyers.
As for the depth of products found on sale, it varies between 40-60 mm. This parameter is selected taking into account the size of the fittings that will be installed. In stores you can also find in-depth options - 75-80 mm.
There are also smaller glasses. Their depth does not exceed 25 mm. Such boxes are used in cases where it is necessary to organize two power points in a thin partition and install sockets on both sides of the wall. This installation option will not allow the use of standard-sized elements, since they will not completely fit into the partition and will protrude above its plane.
Square products also have their own standard. Their size is 70x70 mm. As rare exceptions, you can find square glasses measuring 60x60 mm.
Increased depth of socket boxes can reach 80 mm
What distance should be between socket boxes?
How to properly mount connection socket housings in a group? These elements are connected in such a way that exactly 71 mm of free space remains between the centers of their axes. The enclosures are installed into the wall in special mounting sockets, previously made using a hammer drill and a special crown. The distance between standard socket boxes should be 71 mm, and this is how the recesses in the wall for such elements are knocked out.
The diameter of nests built in concrete, brick or, for example, drywall can be different. Usually it is 68 mm plus 1-1.5 mm. In this case, gypsum mortar is subsequently hammered into the gap between the socket box and the walls of the nest. After hardening, the latter firmly holds the socket body in the wall. Experienced electricians do not recommend leaving a gap that is too large for the solution. In this case, the sockets may subsequently fall out of the wall along with the frozen mixture.
Socket sizes
Everything about the size of the socket boxes is simple, the most common size of the socket box is 70mm in diameter. In the vast majority of cases, they all have the same size. And most modern sockets and switches are designed specifically for these sizes.
Types of socket boxes
It is important not to forget about such a parameter as the depth of the socket box . But even in this case, everything is simple, if you plan to connect several wires in the socket box, in addition to the socket or switch itself (for example, use a socket box instead of a junction box), then you will need a deeper socket box. If possible, use deep socket boxes; they are then easier to work with and install sockets in.
Switching wires in a socket box instead of a junction box
Remember! - Once installed correctly, the socket box never reminds of itself again.
What difficulties may arise during installation?
As you can see, the technology for installing groups of sockets is extremely simple. However, in practice, when installing such elements, craftsmen usually, unfortunately, encounter certain difficulties.
The distance between two socket boxes in a group is usually only 71 mm. This is certainly not too much. However, the close arrangement of the elements still practically does not impart rigidity to the blocks. Groups assembled from cases usually bend in different directions.
Because of this, when installed in sockets with a solution, the socket boxes begin to shift relative to each other. In addition, they can be very difficult to install at the same level with the plane of the wall. To ensure that a group of sockets subsequently looks neat and attractive, experienced electricians advise beginners to use a special template during installation. You can make such a device with your own hands in just a few minutes.
How to make a template
The distance between the socket boxes for the group should therefore be 71 mm. To mount the block as accurately as possible, you need to purchase 1 aluminum corner 40x40 mm. To make a template, you will need a piece of such material approximately 60 cm long (depending on the number of socket boxes in the group). On one of the shelves of the corner segment, you need to draw a straight line exactly in the middle.
Next, along this line, holes are drilled for the fasteners of each socket box. A 3 mm drill should be used for this. At the next stage, all socket boxes should be connected into a group and attached to the corner on the reverse side with self-tapping screws. Such a template will be longer than a row of nests knocked out in concrete or brick. Therefore, with its help it will be possible to insert socket boxes in exact accordance with the plane of the wall.
How to drill sockets
Seats for socket boxes, as already mentioned, are usually knocked out using a hammer drill and a special attachment for it - a crown. First, of course, you need to make markings on the wall by drawing a circle for each socket. Next, the crown is placed against the wall and, first at low speeds, and then at high speeds, the sockets are knocked out.
If there is no special attachment for a hammer drill in the house, sockets for sockets can be made in another way. To do this, according to the markings, first drill a series of holes as close to each other as possible. Then the nest itself is knocked out with a chisel.
Installation in high-strength concrete with reinforcement
If the concrete turns out to be highly durable, you start drilling and realize that this will take a long time, you can make your work much easier.
To do this, make several holes along the circle you started with an 8mm drill. You should end up with something similar to a revolver drum.
After this, continue with diamond or impact drilling. From there it should go like clockwork.
If you hit a large piece of reinforcement and you don’t want to ruin the new crown, then you can get out of the situation in two ways:
- switch the hammer drill to the chipper mode and knock it out with a chisel
True, this can greatly contribute to the appearance of new cracks in the plaster.
- remove a good crown and put in an old used one, then, without sparing it, chew through a metal rod (do not throw away the old ones, they may still be useful)
Knock out the concrete from the niche (using a chisel and hammer or a hammer drill), while providing a bevel for inserting the cable into the socket box.
Use a vacuum cleaner to remove all debris and dust.
How to mark up correctly
This operation can be performed with an ordinary simple pencil. Under each circle on the wall, you first need to draw approximate horizontal and vertical lines. Next, using a compass, you should apply circles on the wall with a slightly larger diameter than the diameter of the socket boxes. Experienced craftsmen advise drawing approximate lines in such a way that they protrude beyond the circle. In this case, drilling the wall exactly according to the markings will be easier in the future.
Sometimes craftsmen, when installing a group on a template, do not even drill a hole for each socket box. In this case, one common long nest is simply made in the wall. After installing the sockets, it is simply sealed with gypsum or cement putty.
Installation in a wooden wall
The installation box for sockets, which is installed in a wooden house, is made of thin metal, therefore, when installing hidden wiring in wood, it is necessary to use a crown slightly smaller in diameter than the outer circumference of the part.
When drilling, wood may slightly burn out, which will make installing a box for switches and sockets impossible, due to the discrepancy between the diameters of the hole and the socket box.
How to install enclosures
Thus, the distance between socket boxes mounted into the wall should be 71 mm. After the nests are punched, grooves are made in the wall for the leash. They are usually pierced using a grinder. At the next stage, the cables themselves are laid in the grooves and brought out into the sockets for the socket boxes. At the next stage, the procedure should be as follows:
- The socket boxes are installed into the sockets using a template and leveled;
- the template is fixed on the wall;
- the nests are covered with gypsum or cement putty.
After hardening, you just need to unscrew the template from the wall and remove it from the sockets. Next, you can begin installing the sockets themselves.
Preparing the solution and installing it in a niche
The next stage is the installation of the socket boxes themselves in the prepared niches. You can install socket boxes on alabaster, putty or plaster.
The hardening time of the plaster is approximately four to five minutes. Of course, finishing the installation job in 5 minutes is not a problem. The main headache is the hardening of the prepared solution in a diluted container and the inability to use it for other work.
Therefore, to prevent the plaster from hardening too quickly, you can mix plaster (Rotband) into it. You will gain an extra 10-20 minutes. Add 2 parts putty to 3 parts plaster.
The plaster just holds much weaker. When hardening, the cement mortar shrinks, but the gypsum, on the contrary, expands slightly and securely clamps the socket box in the niche from all sides.
In order for alabaster and plaster to stick more firmly, the niche must be moistened. Use a sprayer or sprinkler.
Next, the socket boxes are prepared. If they are of a block type, then they are assembled into a block (2 pieces or more). The plug for the wire entry is cut off.
By the way, it is best to make a groove for the wire not in the center, but to the left or right of the hole in the wall.
Since the outlet hole in the socket itself is on the side.
The solution is poured into the drilled hole in the niche.
A socket box is inserted into the niche.
Everything is rubbed down with a spatula and the remaining mortar is removed from the outside.
The main task is to align and fix the socket box in its place. Make sure that its edges do not protrude from the wall.
Once the solution has set, you can remove all excess from the inside.
After finishing work, the sockets themselves are installed. This seemingly simple work also has its own rules and mistakes that can lead to irreparable consequences.
How to install in drywall
On walls sheathed with gypsum plasterboard, the distance between socket boxes should also be 71 mm. For obvious reasons, attaching the housings with putty to such material will not work. However, the procedure for installing socket boxes on drywall is no different from installing them in concrete or brick. That is, the masters in this case:
- first make markings on the wall;
- drill holes in the sheets with a diameter of 68 mm plus 1-1.5 mm;
- insert socket boxes into the holes and secure them to special fasteners available in their design.
When installing plasterboard sheets, experienced craftsmen advise attaching sheets of plywood to them on the reverse side in those places where sockets will be installed in the future. The distance between the centers of the socket boxes, as we found out, in a group is usually small. But drywall is still a rather fragile material. Therefore, during installation and operation, the socket boxes may subsequently be broken out of the wall due to negligence.
If there are sheets of plywood behind the gypsum boards, the load when turning on/off electrical appliances on the socket boxes will be distributed over a larger area. This, in turn, will prevent breakage. In any case, the distance between socket boxes in plasterboard should be 71 mm. Installing this way will also extend the life of the connection sockets in the future.
Tools and consumables
What tools are needed to install a socket box in a concrete wall?
- firstly, it is a powerful hammer drill (for SDS-plus or max shank)
- concrete drill with a diameter of 6mm
- protective glasses
- building level
- spatula for working with mortar
- a regular concrete bit with an SDS-plus shank - if you have a small amount of work and brick walls. The most optimal and budget option.
- regular concrete bit with SDS-max shank. Provided that you have a very large house, or walls made of high-quality concrete and an appropriate hammer drill.
- diamond bit for concrete for hammerless drilling with SDS-plus shank
A more expensive option, but it has its advantages:
1) the time of drilling the socket is almost the same as using an SDS-max bit 2) using a lightweight SDS-plus hammer drill - less tired hands, no shocks 3) less noise and dust during operation
Remember that diamond drilling excludes any impact mode. Only drill mode is allowed.
The instructions usually indicate for diamond core bits that they are intended for wet drilling. However, as practice shows, the wear of the crown, even during dry operation, is minimal.
In addition, when water is supplied, the slag can “knit” the crown. Crowns for drilling ordinary socket boxes, as a rule, should have a diameter of 68 mm.
If you do not want to hammer the installation box into a niche, but have space for its free installation and adjustment, then use a diameter of 72mm. For the block type, only these are suitable.
Some people use a diameter of 65 mm, after which they even manage to tightly insert a socket or switch directly into the resulting hole, spreading the product with its paws against a concrete wall or even drywall.
This cannot be done, as stated above, walls are considered conductive material.
If an RCD suddenly starts tripping in your house, one of the reasons for this may be the refusal to use socket boxes and installing sockets directly into the wall. Therefore, do not immediately blame the cable, but check the sockets first.
The PUE also speaks about the need to install socket boxes: