Supplying power to household appliances is closely tied to deciding the optimal height of outlets in the kitchen. There are certain standards and rules, without which you will definitely not be able to correctly draw up a diagram and determine their location. In addition, a lot depends on the choice of wiring, machines and the total power required by the electrical appliances placed in the space.
Standards and requirements
All points are spelled out in detail in sections of state regulations - GOST 7397.0-89, 7396.1-89, 8594-80 and SNiP 3.05.06-85.
If you want to do everything correctly, re-read each section carefully. The abundance of rules should not be confusing - by and large, it all comes down to a few basic details.
- connected household appliances should not be located more than 1 meter from the installed outlet;
- you cannot place nests higher than 2 meters from the baseboard level - according to electrical wiring standards, there are simply no power cables there;
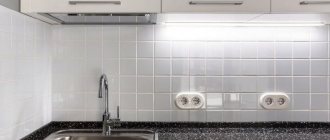
- placement of sockets in the immediate vicinity of the sink and stove is excluded - the minimum distance is 15-20 cm;
- the nest should be protected from splashes as much as possible;
- The minimum level above the tabletop is 15 cm.
What do you need to know when drawing up a layout of sockets?
First of all, what quantity will be optimal specifically for your kitchen. Blindly following neighbors' advice in this regard is obviously a losing proposition, because the success of installation is determined by the context, and not by some single solution for everyone.
This figure depends on how many household appliances you have in your kitchen and how much power they require, as well as on the configuration of the unit and the room as a whole.
Number of electrical appliances
Usually the main group of stationary household appliances is called stationary. This includes a refrigerator (built-in or free-standing), extractor hood, oven, hob, washing machine and dishwasher. Accordingly, each of the listed devices requires a separate outlet.
Add to this the auxiliary and temporary electrical appliances: they often move and are shifted from place to place. This is a kettle, blender, multicooker. As well as lamps that also require power from the network.
Add up all the units and add 2-3 more rosettes to the resulting number. This will be the right amount of them in the kitchen.
Total power of main equipment
The main load on the network comes from the largest household appliances. You can clarify the required values for consumed kilowatts using the documentation attached to it.
If you are too lazy to look, use our table, which shows the average indicators. This is quite enough to draw up the diagram correctly.
| Device | Power, W) |
| Boiler | 2 000 |
| Microwave | 2 000 |
| Fridge | 100 |
| Washing machine | 2 500 |
| Electric kettle | 2 000 |
| Electric stove | 5 000 — 15 000 |
| Dishwasher | 1 500 — 2000 |
| Lamps | 200 |
Expert advice
Dmitriy
electrician repairman
To avoid overloads and short circuits, calculate the electrical wiring for approximately 20 kW of power. This is more than you need even if your kitchen is extremely stuffed with household appliances. Often 15 kW is enough, because they almost never all work at the same time.
Location
We have already discussed simple arithmetic above: each piece of household appliance needs its own socket. To this number, add 2-3 more sockets along the left and right edges of the tabletop and at least one near the dining set. It would be nice to place another additional one at the entrance - next to the switch.
Be guided by convenience and official rules when determining the installation location. Of course, the law of scale works here: the larger the area you have, the greater the number of outlets should be within the accessibility zone.
Where to begin
To decide how to properly arrange sockets in the kitchen, first of all, a floor plan is drawn up, which will show the location of the furniture and all electrical appliances. Here it would be useful to consult with the person who will be in charge of all this management. There are quite a few little things in this matter, for example, it is desirable that the layout of sockets in the kitchen take into account whether he is left-handed or right-handed, so as not to subsequently get confused in the wires from the mixer or blender.
layout of sockets for electrical appliances (click to enlarge)
When the plan for arranging furniture and appliances is ready, you can now begin placing sockets in the kitchen, given that on most devices the connection wire is rarely longer than one meter. If the total power of two devices does not exceed 3.5 kW, then you should think about how to install a double socket. It is also suitable for permanently installed devices that do not turn on at the same time, but it is better to make calculations with a margin. If now it is difficult to imagine how a dishwasher and oven can be turned on together, then it is unknown what habits will appear later.
Types of sockets for the kitchen
They are also different - and this fact should be taken into account when placing them.
- overhead - mounted directly on the wall surface, clearly visible in the interior, not recommended for the kitchen, as water can easily get into them;
- built-in - they are also called hidden, almost invisible in the room, very convenient for delicate installation in difficult places;
- corner ones are not so common, but sometimes they come in handy if the set has an L-shaped configuration.
Also found retractable options. This is a kind of extension cord that provides access to electricity to all household appliances. This is especially true if you really have a lot of them, and you don’t want to see cable ties in the kitchen.
Selection of wiring and machines
It seems to beginners that everything is complicated, but in fact it couldn’t be simpler: all sockets are combined into 2 groups - with a 16A and 25A (or higher) circuit breaker.
The first will be connected to devices with a power of up to 3.5 kW. The second is more demanding - up to 5.5 kW or more. A fuse will protect against power surges in the network.
The type of copper cable used is also important: the number of cores and cross-section. It is selected according to the load and therefore the supply to different devices is also different. VVGng or ShVVPng are best suited.
The table reflects in a concise form all the necessary information for the correct construction of a single-phase network.
| Device | Section (sq. mm) | Automatic + charger (in Amperes) |
| Lamps, lamps and other light sources | 1,5 | 16/10 |
| Sockets | 2,5 | 25/20 |
| Boiler | 2,5 | 25/20 |
| Dishwasher | 2,5 | 25/20 |
| Washing machine | 2,5 | 25/20 |
| Electric stove | 6 | 40/32 |
| Electric heater | 1,5 | 16/10 |
Posting rules
- there is no need to connect devices with increased power to one point (for example, a microwave oven and an electric kettle) - there is a high risk of voltage surges with subsequent short circuits, knocking out plugs and failure of household appliances;
- large devices are supplied under a separate line - additional machines are allocated in the switchboard specifically for them;
- sockets should not be placed directly above large household appliances - it is better to be on the side with a minimum distance of 20 cm;
- If the socket is intended for equipment with a metal casing, an option with grounding is selected.
The larger the kitchen, the more outlets are required to provide power to all the household appliances housed in it. One of the main rules that you should arm yourself with is compliance with the three-level principle.
Three height levels
Nizhny . Washing machines, dishwashers, ovens, and hobs are connected to sockets at this height. Location - approximately 25-30 cm from the floor.
Average. This is how power is organized for all household appliances placed on the countertop. For example, a microwave oven, a slow cooker, a blender, etc. They can also be built into one of the kitchen cabinets. This level also includes a free-standing refrigerator or electric stove. Location - 10-20 cm from the tabletop level.
Upper. Everything is clear here: these are sockets for a range hood, a wall-mounted TV, and lighting. Approximately 2 m or higher above floor level.
Danger zones for electrical outlets in the bathroom and GOST rules
Danger zones in the bathroom and GOST rules
Some people mistakenly believe that sockets should not be installed in the bathroom at all. This may be partly true if the rules for the placement of faucets and the size of shower stalls are not followed. But in most cases, the standard size of this room allows you to place more than one outlet. The thing is that the bathroom is not uniform in terms of the degree of danger from electricity. It is divided into unique zones. For example, there is often water inside the bathroom sink, but almost never on the wall. Bathroom zones indicate the likelihood of water entering in a particular place, which can cause damage to the electrical system.
How to choose the best bathroom sink. Read about what you need to know when choosing here.
Zone 0 - the inside of the bathtub, washbasin or shower
Zone 0 - the inside of the bathtub, washbasin or shower
Any electrical appliances with a voltage of 220V are prohibited here. Only installation of waterproof devices with a maximum voltage of 12V is allowed.
Zone 1 is the area under the sink, above the bathtub, etc.
Zone 1 is the area under the sink, above the bathtub
It is allowed to install electrical devices with IPX5 protection here. Mostly water heaters are installed. When connecting, you must use three-core cable with a protective grounding conductor. Bathroom outlets are not permitted in this area.
Zone 2 - everything that is located 60cm or more from the first zone
There is also a zone prohibited for electrical outlets, but allowed for water heaters, hoods, and lamps that are turned on not from a switch, but from a cord.
Zone 3 - starts from where zone 2 ends
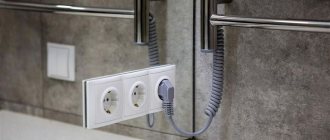
Example of a socket in a bathroom
Its width according to the old GOST is 2.4 m starting from the second zone. The new edition does not regulate and considers all the space beyond zone No. 2. It is in this area that the installation of sockets in the bathroom is allowed. Otherwise, if there is no third zone, it is prohibited to install a plug socket inside. It is allowed to mount only on an external wall, and even then at a distance of 60cm from the door.
In the Code of Rules SP 31-110-2003 , this is stated as follows:
14.40 In apartment bathrooms, washrooms, showers, bathrooms and pre-shower rooms in hostels and hotels, it is allowed to install plugs in zone 3 in accordance with GOST R 50571.11, connected to the network through a separating transformer or protected RCD for a current of up to 30 mA.
So, the electrical outlet in the bathroom should :
- be no closer than 60 cm from the edge of the bathtub, shower stall or washbasin (in zone 3);
- join via RCD
In GOST, in addition to determining the size of bathroom zones, there are additional requirements for the degree of protection.
701.512.2. Electrical equipment must have at least the following degrees of protection:
in zone 0 - IPX7;
in zone 1 - IPX5;
and in zone 2 - IPX4 (IPX5 - in public baths);
in zone 3 - IPX1 (IPX5 - in public baths).
Where instead of X, the degree of protection is replaced by the number that is suitable for a given zone, for example, for zone 1 equipment with protection IP55 is suitable, for zone 2 - IP44, then by analogy.
Socket layout in the kitchen
It is compiled in advance and takes into account the placement of each electrical appliance in space.
In fact, this is a key point, because your ease of use of household appliances depends on how well you distribute all the sockets on the walls.
The correct circuit includes two or more lines. This can be determined more precisely by dividing the space into zones, each of which has its own group of equipment. It’s best to think through the wiring issues with an empty room: in this case, you can carefully wire it up, take the power cables out and perform final post-processing.
To complete the scheme, you can use online designers. Or simply arm yourself with a blank sheet of paper on which to carefully draw a floor plan, taking into account all the available furniture and equipment. The starting point is taken as follows:
- distance of the socket to the device;
- height from floor or ceiling.
Expert opinion
Dmitriy
electrician repairman
In theory, everything often turns out logically and correctly on the diagrams, but in practice sudden jambs are often discovered. For example, the electric kettle you purchased turns out to have a too short cable. This is really a problem: when connecting the wires, they definitely shouldn’t be too tight. Therefore, when sketching, leave a certain margin of a few centimeters.
Here are ready-made designs that are perfect for modern kitchens with an area of 5 to 10 square meters.
Common mistakes
Installation of wiring and sockets before approval and approval of the kitchen furniture design project.
The problems you will definitely encounter in this case are hidden sockets behind cabinets, refrigerators, etc. It is very likely that you will even have to use carriers, since the factory cords and plugs will simply not reach the connection points.
At what height should I install it?
We will analyze in detail the optimal height for each electrical appliance used. This takes into account not only the convenience, but also the safety of their use. The size of the included cable plays a significant role: the longer it is, the more options you end up with.
For hood
The socket is located on the top level.
The distance from the ceiling is at least 15 cm, the distance from the floor is 190 cm and above. More accurately it needs to be determined situationally. In some cases, for example, it is appropriate to place the electrical outlet exactly above the upper cabinets of the headset.
For hob and oven
For them you will need 2 sockets, each of which will be powered by its own line.
For an oven, the acceptable height is 20 cm from the floor level. The 16A option is good.
The stove (or hob) is connected to a point that is located higher - 65-70 cm from the floor. Under no circumstances should the outlet be located in close proximity to it. This is contrary to safety standards: you need to maintain a distance of 50 cm - and place it on the left or right at the desired range level.
For refrigerator
This stationary household electrical appliance is equipped with a one and a half meter cord, so you can place the outlet based on the specific features of your room.
There are no exact recommendations, but it is worth taking into account the permanent increase in humidity in the kitchen. Hence the minimum distance from the floor - 20 cm. In practice, you can most often see a height of more than a meter: there is nothing wrong with this, especially if you are dealing with a whole block of sockets that provide access to the network for several electrical appliances at once.
You should definitely not install a point behind the refrigerator. This is inconvenient if you need to urgently disconnect it from the network.
For washing machine and dishwasher
Not all kitchens have a washing machine, but if it is installed, it must be next to the sink - it is in the cabinet next to it that you should connect to the network. The socket must be installed at a height of 20 cm. And it is necessary to have options with moisture protection to prevent short circuits and splashes from entering the holes.
For a dishwasher, its recommended above-floor level is 70 cm. In this case, the socket should be to the left or right of the appliance and as far as possible from the installed pipes.
Is it possible to power both versions of equipment from one line? Only if the power of the devices does not exceed 4 kW. You will need a separate 20A circuit breaker. In this case, it is best not to turn on both devices at once to avoid network overloads.
For coffee machine
Typically this device is located at eye level.
It is optimal if you choose a built-in design: in this case, the socket is installed in the lower cabinet at a distance of up to 70 cm from the floor. Do not forget about a minimum of 20 cm to avoid moisture ingress.
For microwave oven
It all depends on where you have this device.
If it is located directly on the countertop, then it is optimal to connect it to the socket built into the apron. It comes at a height of 15 cm.
In other cases, the microwave oven may rest on a low refrigerator or be completely hidden in a cabinet. In the first case, it is convenient to immediately install a double unit and connect it together with a stationary household appliance. And in the second, it is appropriate to use a hidden connection option.
For small household appliances
This is a blender, electric kettle, multicooker and other equipment that is mobile and can easily move from place to place.
It is best to connect it to the unit on the kitchen apron - it is located at a height of 105 cm from the floor or at least 5-10 cm from the countertop level.
Of course, you shouldn’t turn on all devices at the same time. Especially an electric kettle paired with other equipment - there are frequent cases of its breakdown due to power surges in the network.
And don’t forget about charging your phone or tablet. It seems that this is rarely useful, but life makes adjustments to any master’s plans.
For TV
If the receiver hangs on a corner, then you can use a corner socket and hide the wires directly behind the TV. The height is determined by the position of the TV itself - usually it is no higher than 1.6-1.9 m from the floor level.
In other cases, you don’t have to place a separate one under the receiver, but use any one from the nearest block. The main thing is that the included cable is enough. Moreover, it is desirable to be able to carefully hide it for a pleasant and aesthetic appearance.
Self-installation
If you have a certain desire, after a detailed study of video materials on the Internet, as well as current norms and regulations, it will be quite possible to install the sockets yourself. It is recommended to carry out the work taking into account the following algorithm of actions:
- A detailed diagram is drawn up.
- The points and lines specified in the project are transferred to the walls of the room.
- Holes are drilled for installing electrical boxes and grooves are made for laying wires (a grinder, a hammer drill, or a milling cutter may be required).
- Using plaster and plastic fasteners, socket boxes and cables are fixed to the wall.
- The laid line is checked and communications are connected to the apartment switchboard.
This technology is standard and may vary depending on various factors.
The grooves are usually sealed with a plaster mixture and are made strictly vertically so that, for example, when placing cabinets, their location can be predicted. The length of the protruding end of the cable must be at least 10 cm, which is necessary for normal connection of the fittings. Installing the outlet couldn't be easier. The main thing is to adhere to polarity and remember about grounding.
When planning the placement of a block of sockets, do not forget about choosing the correct center distance between adjacent mounting boxes. It must be strictly 71 cm, since, otherwise, it will not be possible to install fittings with a standard common frame. Ideally, it is recommended to install a residual current device on each line (group of lines), which will protect you and your household from electric shock in the event of emergency situations.
In this case, all equipment is de-energized, with the exception of the refrigerator (possibly also the router, emergency light and other consumers connected to a separate, non-disconnected line).