Calculation of heating boiler power by area
For a rough estimate of the required performance of a heating unit, the area of the premises is sufficient. In the simplest version for central Russia, it is believed that 1 kW of power can heat 10 m 2 of area. If you have a house with an area of 160 m2, the boiler power for heating it is 16 kW.
These calculations are approximate, because neither ceiling height nor climate are taken into account. For this purpose, there are coefficients derived experimentally, with the help of which appropriate adjustments are made.
The specified norm is 1 kW per 10 m2, suitable for ceilings of 2.5-2.7 m. If you have higher ceilings in the room, you need to calculate the coefficients and recalculate. To do this, divide the height of your premises by the standard 2.7 m and obtain a correction factor.
Calculating the power of a heating boiler by area is the easiest way
For example, the ceiling height is 3.2 m. We calculate the coefficient: 3.2m/2.7m=1.18, round it up, we get 1.2. It turns out that to heat a room of 160 m 2 with a ceiling height of 3.2 m, a heating boiler with a capacity of 16 kW * 1.2 = 19.2 kW is required. They usually round up, so 20 kW.
To take into account climatic features, there are ready-made coefficients. For Russia they are:
- 1.5-2.0 for northern regions;
- 1.2-1.5 for Moscow region regions;
- 1.0-1.2 for the middle band;
- 0.7-0.9 for the southern regions.
If the house is located in the middle zone, just south of Moscow, a coefficient of 1.2 is used (20 kW * 1.2 = 24 kW), if in the south of Russia in the Krasnodar Territory, for example, the coefficient is 0.8, that is, less power is required (20 kW * 0 ,8=16kW).
Heating calculations and boiler selection are an important step. Find the power incorrectly and you can get the following result...
These are the main factors that need to be taken into account. But the values found are valid if the boiler operates only for heating. If you also need to heat water, you need to add 20-25% of the calculated figure. Then you need to add a “reserve” for peak winter temperatures. That's another 10%. In total we get:
- For heating a house and hot water in the middle zone 24 kW + 20% = 28.8 kW. Then the reserve for cold weather is 28.8 kW + 10% = 31.68 kW. We round up and get 32 kW. If we compare it with the original figure of 16 kW, the difference is twofold.
- House in Krasnodar region. We add power to heat hot water: 16 kW + 20% = 19.2 kW. Now the “reserve” for cold weather is 19.2+10%=21.12 kW. Round up: 22 kW. The difference is not so striking, but still quite significant.
From the examples it is clear that at least these values must be taken into account. But it is obvious that when calculating the boiler power for a house and an apartment, there should be a difference. You can go the same way and use coefficients for each factor. But there is an easier way that allows you to make corrections in one go.
When calculating a heating boiler for a home, a coefficient of 1.5 is used. It takes into account the presence of heat loss through the roof, floor, and foundation. Valid for an average (normal) degree of wall insulation - masonry with two bricks or building materials with similar characteristics.
For apartments, different coefficients apply. If there is a heated room on top (another apartment) the coefficient is 0.7, if there is a heated attic - 0.9, if there is an unheated attic - 1.0. You need to multiply the boiler power found using the method described above by one of these coefficients and get a fairly reliable value.
To demonstrate the progress of the calculations, we will calculate the power of a gas heating boiler for an apartment of 65 m2 with 3 m ceilings, which is located in central Russia.
- We determine the required power by area: 65m 2 /10m 2 = 6.5 kW.
- We make an adjustment for the region: 6.5 kW * 1.2 = 7.8 kW.
- The boiler will heat the water, so we add 25% (we like it hot) 7.8 kW * 1.25 = 9.75 kW.
- Add 10% for cold weather: 7.95 kW * 1.1 = 10.725 kW.
Now we round the result and get: 11KW.
This algorithm is valid for selecting heating boilers using any type of fuel. Calculating the power of an electric heating boiler will be no different from calculating a solid fuel, gas or liquid fuel boiler. The main thing is the productivity and efficiency of the boiler, and heat loss does not change depending on the type of boiler. The whole question is how to spend less energy. And this is the area of insulation.
Connection of 15 kW to a private house. Connection diagram
If you are the owner of a dacha or a country house (or perhaps you are going to join the audience of developers), and your site is located in a settlement where the use of land for individual housing construction (individual housing construction) is permitted, then by law you are entitled to a connection to networks with full power 15 kW.
Whereas in dacha cooperatives and gardening partnerships they use a power of 4 or 6 kW. A power of 15 kW will allow you to organize a cozy home life, where household electrical appliances, their quantity and operational capabilities are of great importance.
Electrical installation work is carried out according to a project created on the basis of technical specifications (TU). And this document is developed individually for each farm. To do this, you must submit an application to the energy supply organization, where you indicate the desired connection power (15 kW) and voltage (230/400V). You will receive these values by first calculating the total power consumption of your electrical appliances.
Taking into account the data of your application and the capabilities of the power line, local electrical networks or the organization to which they belong will issue you a technical specification, which will indicate the figures of the permitted power, as well as the cross-section of the line cables, their brand and type. As well as requirements for grounding, lightning protection, switching and protective equipment, meters, automatic devices, RCDs.
In the creation of a project that is carried out by specialized and licensed organizations on the basis of this specification, PUE and SNiP, you must take an active part in order to be aware of all the nuances.
Three-phase automatic machine: selection according to power and load, connection in a single-phase network
To prevent short circuits and overload of the electrical network, a three-phase circuit breaker is used. The switching device can be used for direct and alternating current lines. The design of the standard model is represented by expanders with switching depending on the frequency of the circuit.
Which machine is suitable for 15 kW
The purpose of a three-phase circuit breaker is overload protection
The purpose of a 3-phase machine is protection against overcurrents and overloads. The 15 kW modification operates on a network with a voltage of 380 V, that is, you will need a 25 A device for input. When choosing, you need to take into account that in conditions of short circuits, the current strength increases and can cause a fire in the electrical wiring.
When selecting a 15 kW machine model for a three-phase load, you will need to take into account the parameters of the permissible voltage and current during a short circuit. It is worth focusing on the calculated current indicators of the cable with the minimum cross-section that protects the switch and the rated current of the receiver.
General points
In order for the house to be warm, the heating system must replenish all existing heat losses in full. Heat escapes through walls, windows, floors, and roofs. That is, when calculating the boiler power, it is necessary to take into account the degree of insulation of all these parts of the apartment or house. With a serious approach, they order a calculation of the building’s heat loss from specialists, and based on the results, they select the boiler and all other parameters of the heating system. This task is not to say that it is very difficult, but it is necessary to take into account what the walls, floor, ceiling are made of, their thickness and the degree of insulation. They also take into account the cost of windows and doors, whether there is a supply ventilation system and what its performance is. In general, a long process.
There is a second way to determine heat loss. You can actually determine the amount of heat that a house/room loses using a thermal imager. This is a small device that displays the actual picture of heat loss on the screen. At the same time, you can see where the outflow of heat is greater and take measures to eliminate leaks.
Determining actual heat loss - an easier way
Now let’s talk about whether it’s worth taking a boiler with a power reserve. In general, constant operation of equipment at the limit of its capabilities negatively affects its service life. Therefore, it is advisable to have a performance reserve. Small, about 15-20% of the calculated value. It is quite enough to ensure that the equipment does not work at the limit of its capabilities.
Too much stock is not economically profitable: the more powerful the equipment, the more expensive it is. Moreover, the price difference is significant. So, if you are not considering the possibility of increasing the heated area, you should not take a boiler with a large power reserve.
Electric installation work
We will not dwell in more detail on the preparation of documentation for connecting the power supply; this is a separate topic. Our task is to determine the materials and devices for external installation work, which, although they are an intermediate stage in the connection, are the most important, since they are related to human safety.
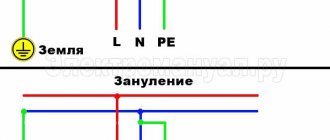
Single-phase or three-phase input?
For both three-phase and single-phase networks, the permitted power is indicated in the technical specifications. This can be 15 kW for both options, that is, the benefit of a three-phase network is not in power, but in the possibility of using an input cable of a smaller cross-section and reducing the load, since the current is distributed over 3 phases. Therefore, in a three-phase network, the rating of the input circuit breaker will be lower.
But the input distribution board will be increased in size, since the meter itself is larger than a single-phase one, and the circuit breakers occupy 3-4 modules. Three-phase RCDs also have larger dimensions. This is a disadvantage of three-phase input into the house, but it is not very significant compared to such advantages as the ability to connect asynchronous electric drives, electric boilers, heaters, and electric stoves in the house.
To avoid phase imbalance from powerful electrical receivers, the electrician-installer must distribute the load as evenly as possible. The operating voltage of a three-phase network is 380V, therefore, in order to eliminate the risk of fire and electric shock, it would be a good idea to install a three-pole additional circuit breaker right before entering the house. This prevents short circuits at the input.
External connection and electrical panel
When connecting a private house to the power supply, an air input is most often used (which is also indicated in the technical specifications) with the installation of an electricity metering cabinet (SHUE) to eliminate cases of electricity theft and problems with the commercial registration of electricity supply.
According to the standards, the input cable must have a cross-section of at least 16 mm2 if the core is aluminum, and 10 mm2 if the core is copper, at a distance from the support pole of 25 m. For a distance of less than 25 m, the cross-section of the aluminum wire is 10 mm2, copper - 4 mm2 .
If you have decided on the method of connection from the pole to the house (aerial or underground), as well as the type and cross-section of the cable, then it remains to figure out exactly how the wire is connected to the house, from where further wiring to the devices is made.
The wire cross-section is selected according to the PUE based on the long-term permissible current. For aerial input, the most common cable is VVG or VVGng (modern version), as well as cable AVVG and SIP (self-supporting wire). By the way, for underground input, VBBbShv or AVBbShv cable is most often used. As you already understand, the presence or absence of the letter “A” means an aluminum core.
Electric boilers electric boilers
Let's start with the fact that there are several serious reasons limiting the spread of electric boilers:
- not all areas have the opportunity to allocate the electrical power required for heating a house (remember that for a house with an area of 200 sq. m. this is approximately 20 kW),
- relatively high cost of electricity,
- power outages.
On the other hand, if the problems described above do not exist in your case, then an electric boiler may well be an ideal option for heating. This type of boiler really has a lot of advantages. Among them:
- relatively low price of an electric boiler,
- ease of installation of the electric boiler,
- lightweight and compact, they can be hung on the wall, which saves space,
- safety (no open flame),
- electric boilers are easy to use,
- electric boilers do not require a separate room (boiler room),
- do not require installation of a chimney,
- do not require special care,
- electric boilers are silent,
- electric boilers are environmentally friendly, there are no harmful emissions or foreign odors.
In addition, in cases where power outages are possible, an electric boiler is often used in conjunction with a backup solid fuel boiler. The same option is also used to save energy (first the house is heated using cheap solid fuel, and then the temperature is automatically maintained using an electric boiler).
It is worth noting that when installed in large cities with strict environmental regulations and coordination problems, electric boilers also often outperform all other types of boilers (including gas boilers).
Briefly about the design and configuration of electric boilers. An electric boiler is a fairly simple device. The main elements of an electric boiler are a heat exchanger, consisting of a tank with electric heaters (heating elements) mounted in it, and a control and regulation unit. Electric boilers from some companies are supplied already equipped with a circulation pump, programmer, expansion tank, safety valve and filter.
It is important to note that low-power electric boilers come in two different versions - single-phase (220 V) and three-phase (380 V). Electric boilers with a power of more than 12 kW are usually produced only three-phase
The vast majority of electric boilers with a power of more than 6 kW are produced in multi-stage versions, which allows rational use of electricity and not turning on the boiler at full power during transition periods - in spring and autumn.
When using electric boilers, rational use of energy is most important. Significant energy savings can be achieved by installing remote programmers that maintain the room temperature according to a schedule you preset. It is worth keeping in mind that the cost of such programmers is not at all high and usually ranges from 50 to 150 euros. In addition to saving energy, programmers significantly increase the comfort and ease of use of heating equipment.
If you decide to purchase an electric boiler, then the following tables will be useful to you with approximate values of the cable cross-section for the electrical connection of the boiler (Table No. 1) and the current values of the safety circuit breakers depending on the power of the boiler (Table No. 2)
Table No. 1 Approximate values of cable cross-section for connecting an electric boiler
| Boiler power | Cable cross-section for single-phase electric boilers | Cable cross-section for three-phase electric boilers |
| up to 4 kW | 4.0 mm2 | |
| up to 6 kW | 6.0 mm2 | |
| up to 10 kW | 10.0 mm2 | |
| up to 12 kW | 16.0 mm2 | 2.5 mm2 |
| up to 16 kW | 4.0 mm2 | |
| up to 22 kW | 6.0 mm2 | |
| up to 27 kW | 10 mm2 | |
| up to 30 kW | 16 mm2 | |
| Up to 45 kW | 25 mm2 | |
| Up to 60 kW | 35 mm2 |
Table No. 2 Current values of safety circuit breakers depending on the power of the electric boiler
| Boiler power | For single-phase electric boilers | For three-phase electric boilers |
| 4 kW | 25 A | 10 A |
| 6 kW | 32 A | 16 A |
| 8 kW | 40 A | 16 A |
| 10 kW | 50 A | 20 A |
| 12 kW | 63 A | 25 A |
| 14 kW | 25 A | |
| 16 kW | 32 A | |
| 18 kW | 32 A | |
| 22 kW | 40 A | |
| 27 kW | 50 A | |
| 30 kW | 63 A | |
| 45 kW | 80 A | |
| 52 kW | 100 A |
Among the most notable brands of electric boilers on the Russian market are: RusNIT and EVAN (Russia), ACV (Belgium), Bosch (Germany), Dakon (Czech Republic), Eleko (Slovakia), Kospel (Poland), Protherm (Slovakia), Roca ( Spain), Wattek (Czech Republic), Wespe Heizung (Germany).
| Manufacturers of gas boilers | MILeev Leonid [email protected] tel.: 8-926-22-760-99 |
Peculiarities
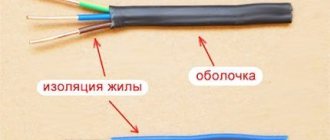
SIP is a self-supporting insulated wire, used for power supply in power networks. The SIP electric cable is used in a network with voltage: SIP-1, SIP-2, SIP-4 and SIP-5 are designed for a rated voltage of up to 1 kV, SIP-3 up to 35 kV.
Most SIP wires produced in Russia are color-coded in accordance with the PUE (Electrical Installation Rules) and the new GOST 50462-2009. The insulation of phase conductors and the supporting neutral conductor is made of thermoplastic polyethylene or silanol-cross-linked (light-stabilized) polyethylene, which can withstand temperatures of about 80-90°C for a long time
- SIPT-1, also known as SIP-1 - except for the zero core, all the rest are insulated with special polyethylene. SIP-1 is produced for 380 V networks. This is a four-wire cable made of aluminum or aluminum alloy, three cores are covered with light-resistant polyethylene, resistant to ultraviolet radiation, and the fourth without braid with a steel core acts as a carrier and neutral.
Hello. The topic of today's article is “ Cable cross-section by power ”. This information will be useful both at home and at work. We will talk about how to calculate the cable cross-section by power and make a choice using a convenient table.
Why do you need to choose the right cable cross-section?
In simple terms, this is necessary for the normal operation of everything related to electric current. Be it a hair dryer, washing machine, motor or transformer. Today, innovations have not yet reached the wireless transmission of electricity (I think they will not reach it soon); therefore, the main means for transmitting and distributing electric current are cables and wires.
With a small cable cross-section and high power equipment, the cable can heat up, which leads to loss of its properties and destruction of the insulation. This is not good, so correct calculation is necessary.
So, the choice of cable cross-section according to power . For selection we will use a convenient table:
Now we need to calculate the total power consumption of equipment and devices used in an apartment, house, workshop or any other place where we run the cable. Let's calculate the power.
Let's say we have a house, we are installing closed electrical wiring using a VVG cable. Take a sheet of paper and copy down the list of equipment used. Done? Fine.
How to find out the power? You can find the power on the equipment itself; there is usually a tag where the main characteristics are written down:
Power is measured in Watts (W, W), or Kilowatts (kW, KW). Found it? We record the data, then add it up.
Let's say you get 20,000 W, that's 20 kW. The figure tells us how much energy all electrical receivers consume together. Now you need to think about how many devices you will use simultaneously over a long period of time? Let's say 80%. The simultaneity coefficient in this case is 0.8. We calculate the cable cross-section by power :
Expert opinion
It-Technology, Electrical power and electronics specialist
Ask questions to the “Specialist for modernization of energy generation systems”
Cable cross-section by power table SIP Consider an example of such a designation SIP-1-3 20 1 25-0.4, here SIP-1 indicates the brand, 3 20 shows that three insulated conductors have a cross-section of 20 mm 2 each, 1 25 means that the neutral core has a cross-section of 25 mm 2, 0.4 rated voltage for this model. Ask, I'm in touch!
How to lay a route?
When planning an underground electrical route, you should adhere to the following basic nuances:
- Avoid crossing with other cables. If this is not possible, the distance from cable to cable should be at least 15 cm. In this case, in the area of intersection, special hard cases should be put on the cables, which are usually made from plastic water pipes. You can simply put a sawn asbestos pipe on the cable that was laid earlier, and then connect it with tape or ties.
- When crossing water, sewer, and gas pipes, it is necessary to maintain a distance to the cable, which should be at least 50 cm, if installation is carried out without a protective sheath. And 25 cm will be enough if there is a shell. The protective shell should extend two meters in two directions from the intersection points.
- If laying the cable is necessary along a pipeline or along sewers, gas pipes, then the distance from them should be at least one meter, and in the case of laying using pipes, this distance can be reduced to 25 cm.
- When the underground electrical main runs along the entire length of the heating main, the distance should not be less than two meters, and the heating main must have a good insulating coating.
- You should walk around the perimeter of the site if parking is required. And if you can’t get around it, then the route should be laid either a little deeper, or use hard cases when laying it.
- Large trees also need to be walked around in a circle, the radius of which should be at least two meters. Another option is to lay the route so that the tree trunk is at least two meters away. You can also lay a pipe about two meters long under the tree at the required depth, through which the cable will be routed.
- The distance from the cable laying site to the nearest bushes should be at least 75 cm.
- In the case when cables are laid along the foundation of the house, the distance from it should be at least 0.6 m.
Next, you should check compliance with the requirements, and you can begin creating the trench.
No wires, just cables?
The first question, which usually remains “behind the scenes,” is why you need to use a cable and not separate wires to connect an electric boiler?
In the theory of electrical installations and regulations, there are no prohibitions on using wires selected according to the cross-section and protected according to all rules to power electrical installations.
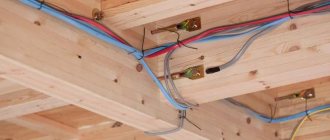
Another thing is that doing electrical wiring with wires is more difficult, or rather more inconvenient, than with a cable. Wires cannot be laid without protection. To lay them, it is imperative to use metal or electrical plastic pipes. Tightening wires into pipes requires some skills and special tools.
Unlike wires, cable lines can be laid: PUE 2.3.33: openly, in boxes or pipes, including pipes laid in floors and ceilings, ... and double floors.
On the other hand, my house is not an industrial production and for the fire safety of a wooden house, I would protect the cable with a metal pipe, especially if the boiler has a high power.
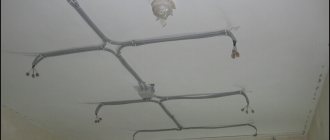
Installation of the unit
To begin, you will need to install your electric boiler indoors. This process is the simplest. The unit can be installed both on the floor and on the wall. If it is installed on the floor, then you will definitely need to make a special stand.
If the electric boiler will be installed on the wall, then you will need special anchors. First you need to make markings on the wall. Remember that your holes must be placed evenly on the wall. Next you need to drill holes and insert anchors. Once the anchor is firmly placed in the wall, you can hang the boiler.
Cable laid over the air
The main type of installation of the input cable is its installation by air. Air input has its advantages:
- Minimum labor costs.
- It takes a short amount of time to connect your home. It is rare that such work takes more than two hours.
- Low cost of consumables: anchor bolts or clamps, special brackets, insulators.
- Possibility of quick troubleshooting, even if the entire cable needs to be replaced.
The following types of cables are used for aerial installation:
How to choose the right cross-section for 15 kW?
If you want to independently calculate what cross-section you need for 15 kW, use the tables below. Everything about them is quite simple and clear. Find your voltage (380V), find your power (15 kW) and look at the value that is at the intersection of these parameters. As we already mentioned, this value is 4 sq. mm. However, the cross-sections for aluminum and copper cables are different, so we will publish two tables for you.
In order not to get confused about what cross-section you need for 15 kW , we recommend that you contact specialists. A qualified specialist will evaluate all the nuances of your situation, conduct an inspection and tell you what cross-section is needed for 15 kW, and also carry out high-quality cable laying and installation of all necessary devices.
Why choosing your own cable is not a good idea?
Of course, your desire to do everything yourself is commendable. However, if you do not have the appropriate education and permission to work with electricity, it is better to refrain from independently selecting and laying cables yourself.
Often, when connecting a small amount of power, you want to do everything yourself in order to spend a minimum amount of money on connecting electricity. However, saving in such a matter leads to dire consequences. A short circuit is far from the worst thing that can happen.
That is why it is important not only to know well what cross-section is needed for 15 kW in standard cases, but also to take into account all the features and nuances of your particular facility.
How to order specialist help?
In order to find out what cross-section is needed for 15 kW in your case, you just need to call the energy service company. You can do this right now. We have already told you that in most cases the cross-section is 4 sq. mm, but you can clarify this information specifically for your case by calling us by phone. We will tell you in detail what cross-section you need for 15 kW, and how to choose the right cable.
However, consultation with a specialist is far from the only advantage that you can take advantage of.
To bring electricity into the house, you need to know the laws of electrical installation and have the appropriate skills. The classic power of the connected network for home input on private plots is 4-6 kilowatts, but if the owner has permission to build an individual residence, he can connect a cable of 15 kilowatts. This is necessary to make it more convenient to use electrical appliances with increased power.
DIY installation technology
So we come to the main question of the article, in which we will consider how to properly lay an electrical cable in the ground on your own. To make the instructions convenient and understandable, we will provide them step by step.
- Draw a diagram of the wiring in the trench, on which mark the exact distance from the house, garden buildings and plantings, according to regulatory documents. If underground electrical installation will be used to connect street lighting in the country, be sure to indicate the installation locations for the lights.
- Mark the territory of your summer cottage with pegs and rope, then dig a trench according to the markings. After excavation work, remove stones, possible glass fragments or pieces of metal from the prepared trench, which may later cause damage to electrical wiring underground. Install lighting poles immediately if required.
- On the compacted bottom, make a uniform cushion of sand or fine soil, previously cleared of small stones, glass fragments, bricks and other objects that could damage the insulation.
- Lay the conductor in the ground as shown in the photo. To lay electrical wiring in a trench, it is recommended to use an AVBbShV cable with aluminum conductors or a more expensive option - VBBbShV, with copper conductors, or VVG-ng-LS, in the cases described above.
- Check the finished cable line using a megger, which will determine the presence of insulation damage and high voltage leaks (measure the insulation resistance). Remember to discharge the cable to ground or short-circuit the wires after measuring the resistance.
- Use the pipe following the rules and recommendations described above. If you need laying in a pipe (depth 50 cm, excavations often occur, laying under a tree, etc.), then use HDPE, PVC, steel or asbestos-cement pipes. The last type of pipes is cut lengthwise into two parts, making them like a pencil case, after which the wire is laid. This technology will allow you to quickly release electrical wiring during repairs.
- Take a photo of the trench network so you know exactly where the cable runs in the ground in your garden. By the way, it’s better to save the drawing too, because... it contains markings of all distances when laying a line from a house, fence, etc.
- Fill the trench with sand or fine soil, cleared of sharp objects. The layer should be uniform, about 15 cm. After backfilling, it must be thoroughly compacted.
- Lay a warning tape on the sand indicating that electrical wiring has been laid underneath it.
- Fill the remaining soil on top of the tape, making a hill, which after several rains will settle and level with the surface.
- Take the measurement again using a megohmmeter.
Video installation instructions
That's the whole technology for laying cables underground in a summer cottage. As you can see, drawing a line at home is not so difficult. More time and effort will be spent on land work - digging a trench.
Tags: sconce, view, harm, choice, house, , insulation, cable, like, kW, , installation, voltage, lighting, wire, laying, start, , size, calculation, repair, row, garden, network, connection, resistance, ten, type, current, , filter, photo, shield