A screwdriver is a tool designed for tightening screws and drilling small-diameter holes. There are mains ones, powered by 220V mains, and rechargeable ones, with two replaceable batteries.
Cordless and corded screwdrivers
If the battery in such devices fails, there are three options:
- replacing the battery is expensive; in a budget-class device, the price of the kit is close to the cost of a new device;
- repair is not always possible, and in some cases its cost is comparable to the cost of new batteries;
- Converting a cordless screwdriver to a corded one.
This article talks about how to power a screwdriver from a 220V network, or how to turn a cordless screwdriver into a network one.
Screwdriver device
This mechanism consists of the following parts:
- DC motor. It has the shape of a cylinder; instead of an excitation winding, the housing contains permanent magnets. This simplifies the design and provides sufficient torque at low speeds. The drive (sun) gear of the planetary gearbox is mounted on the electric motor shaft;
- Reversible speed controller. The adjustment circuit is assembled on a PWM controller and a field-effect transistor. Reversing is carried out by switching the polarity of the power connection to the motor brushes;
- Planetary reductor. Made in a separate building. It got its name because of its resemblance to the solar system. Consists of a ring gear, a central (sun) gear, satellites and a carrier. The ring gear transmits force through the spring-loaded balls of the load regulator. There are models with two-speed gearboxes. Increased speed is activated when using the device as a drill;
- Rotation force limitation mechanism. Serves to limit the force when tightening screws. Transmits torque through balls pressed by an adjustable spring;
- Removable battery. Consists of individual elements in one housing. The voltage in different models ranges from 9 to 18 volts.
Screwdriver device
What tools and materials will be needed for the remodeling?
To convert a battery-powered device into a network device, you will need to prepare some tools and materials:
- pliers;
- several screwdrivers of different sizes;
- wire cutters;
- soldering iron;
- construction knife;
- adhesive tape for insulation.
To convert the screwdriver to mains power, you will also need to provide a housing for the converter. The shell from an old battery is quite suitable for this role - it will only need to be slightly altered.
Power Options
To convert a cordless screwdriver into a 220V network, you need to take into account that the device requires a much lower output voltage - from 12 to 18 V. To convert the tool, you will need to equip it with an adapter, or converter.
There are several options for power sources that allow you to convert a battery unit into a network one:
- Pulse. Such a power source works using an inverter system - it first rectifies the input current, and then converts it into high-frequency pulses and transmits it to the instrument either directly or through a transformer. The advantages of a pulsed network element include small dimensions, high efficiency of 98% and short circuit protection.
The disadvantage of a switching power supply is low power - Transformer. Such a power supply consists of several parts - a direct step-down transformer, a rectifier, a stabilizer and a capacitor. Sometimes the system includes a fuse and a high-pass filter to eliminate interference.
Transformers are quite powerful and inexpensive, but their efficiency is low and they are bulky
Attention! When using a transformer, you need to take into account that part of the output voltage will be taken by the stabilizer. Accordingly, the maximum current value should be slightly higher than necessary.
Screwdriver battery design
Converting a screwdriver to 18650 lithium batteries
The design of the battery does not depend on the brand. In all devices, the battery design is similar and differs in appearance, housing and contacts.
Battery device
The housing contains several elements connected in series. Their number depends on the voltage of each element and the battery as a whole. When using the most common nickel-cadmium elements with a voltage of 1.2V, 10 pcs are needed to power a device with a nominal value of 12V. Battery capacity is indicated in ampere hours.
Interesting. With a series connection, the output voltage increases, but the capacitance does not change and is equal to the capacitance of the individual elements.
What is needed for remodeling
To remake a screwdriver, you need to briefly familiarize yourself with the electrical diagram of the tool. The tool is driven by an electric motor. Depending on the power and class of the tool, the voltage can be 12, 14, 18 volts. The electric motor receives power from a battery of batteries of the appropriate voltage.
The engine transmits torque to the cartridge through a mechanical gearbox. Engine speed is changed both by the gear reduction system and by a reversible electronic speed controller combined with a power button.
Screwdriver device:
- Accumulator battery.
- Speed regulator.
- Power button.
- Electric motor.
- Gearbox.
- Cartridge.
How much power does the power supply need and how much does the screwdriver consume from the power supply?
Calculating the required power of the power supply is not difficult - you need to multiply the current consumed by the electric motor of the tool by the voltage. For example, the tool is powered by a battery with a voltage of 12 volts. The current that the electric motor needs to operate is 10 amperes. We get 120 watts. But this is the minimum value.
To ensure normal operation under loads, for example, when driving a screw into hard wood, the power supply must be selected with a margin of 30-40%. Otherwise, the screwdriver will not be able to work normally under load or the power supply will fail.
The current strength, depending on the model, can be 7-10 A for household screwdrivers and 30-40 A for professional models. The battery voltage can be 12 V, 14 V, 18 V depending on the specific model.
The required voltage, power and battery capacity parameters are usually indicated on the label of the tool itself or in the technical documentation for it.
If the operating voltage of the instrument is 12 V, the number of options for choosing a power source increases, for example, you can connect it to a computer power supply. It is quite possible to purchase an old one with a power of 300 W for a low price. In addition, the output power is sufficient with reserve. The advantages of this option include: ease of modification, as well as the fact that a computer power supply with a power of 300 W or more is relatively easy to find.
The block parameters are indicated on a sticker located on the wall. For example, it states that a voltage of 220 v is supplied to the input, a current of 25 A is supplied to the output of 12 v. We get a power of 300 W.
If desired, you can use the following as a 12 V power source from the mains:
- LED driver;
- electronic transformer for powering low voltage halogen lamps;
- car battery charger.
If the instrument is designed to be powered at a different voltage, say 14 V or 18 V, there are few options for choosing a power supply. For a tool operating on a voltage of 14 V and having a maximum current of up to 25A, a universal power supply unit AIDA BSh 14 PRO is available for sale. There is also an 18 V power supply, designed for current up to 20 A, AIDA BSh-18 PRO.
You can make your own power supply for the required voltage. But this requires certain knowledge of electronics. You can see a diagram of such a power supply. There are power supply circuits that can be mounted instead of batteries.
When connecting power from the charger to the screwdriver, you must use a wire with a cross-section larger than 2.5 mm². Otherwise, the wire will become very hot, which can lead to melting of the insulation and a short circuit.
The level of voltage loss also depends on the length of the wire. The longer the wire, the correspondingly greater the losses. If you choose the wrong wire length, it may turn out that the screwdriver “does not pull”, it cannot be used to tighten a screw into hard wood, etc.
The quality of the wire connection also affects the voltage loss. Wires connected by twisting will have a high transition resistance, which will significantly affect voltage losses.
Types of battery cells
Battery for screwdriver
These devices use elements of different types and voltages, each of which has its own advantages and disadvantages.
The most common are nickel-cadmium (Ni – Cd) with a voltage of 1.2V.
Advantages:
- low price;
- stored in a discharged state.
Flaws:
- have a memory effect;
- high self-discharge;
- small capacity;
- small number of charge/discharge cycles.
More advanced nickel-metal hydride (Ni-MH) voltages are 1.2V.
Advantages:
- less memory effect and self-discharge;
- large capacity and number of charge/discharge cycles.
Flaws:
- higher price;
- do not tolerate low temperatures and storage in a discharged state.
The most advanced lithium-ion (Li-Ion) voltage 3.6V.
Advantages:
- no memory effect;
- very low self-discharge current;
- high specific capacity, allowing to reduce the weight and dimensions of the device;
- the number of charge/discharge cycles is many times higher than other types of batteries.
Flaws:
- high price;
- loss of capacity three years after manufacture.
Connecting the screwdriver to the charger
Sequencing:
- Solder or attach two wires with alligator clips to the terminals of the charger.
- Disassemble the old battery and remove the dead cells from it.
- Drill a hole in the battery case for the cable, thread the cable into the hole. It is advisable to seal the connection with electrical tape or heat-shrink tubing to prevent the wire from tearing out of the housing.
- Elements removed from the battery will disrupt the weight distribution of the screwdriver - your hand will get tired. To restore balance, a weight should be placed in the body - it can be dense wood or a piece of rubber.
- Solder the cable to the terminals of the former battery, connected to the screwdriver.
- Assemble the battery housing.
- All that remains is to test the updated tool in action.
Installation of a finished power supply in the housing of an old battery
Procedure:
- Disassemble the old battery and remove the non-functioning elements from it.
- Install the power supply into the battery case. Connect the high voltage terminals and low voltage terminals.
- Assemble and close the battery case.
- Install the battery into the screwdriver.
- Plug the power supply into the outlet and check the updated network tool in operation.
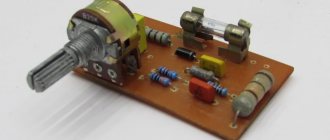
Homemade power supply
Step-by-step instruction:
- Disassemble the old battery case and remove the dead batteries from it.
- Install the elements of the electrical circuit of the power supply onto the circuit board, solder the contacts.
- Install the assembled board into the case. Use a tester to check the presence of voltage at the output.
- Connect the low voltage wires to the terminals of the old battery. Assemble the body.
- Connect the screwdriver to the electrical network and check its operation.
Connecting to an external power supply
What to do:
- Disassemble the screwdriver and find the motor power wires inside. Install the connector for the power supply into the case and solder the wires to the connector. Secure the wires with hot glue.
- Choose a suitable power supply, for example, from a laptop. Find an adapter for the low voltage connector.
- Connect the screwdriver to the new power supply and check its operation.
Connecting to a power supply from a computer
Instructions:
- Find or buy a computer power supply with a power of at least 300 W.
- Disassemble the screwdriver body. Find the motor power wires inside. Solder the connectors for the computer power supply to the wires.
- Remove the connectors for connecting the computer power supply from the case.
- Connect the screwdriver to the new power supply.
- Connect the power supply to the network and check the operation of the device.
Converting a screwdriver to power from a 220V network
If the battery fails and it cannot be repaired, the only way out is to convert the cordless screwdriver into a mains one.
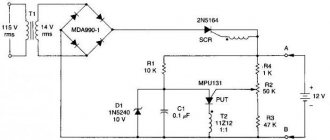
DIY power supply for 12V screwdriver
In this case, the power of the power supply must exceed the power of the engine, taking into account possible overloads at the moment of completion of tightening. It is not indicated in the device passport, but this parameter is written on the body of the electric motor, or it can be calculated by connecting the device to a constant voltage source through an ammeter. For a 70W motor, a 120W power supply is sufficient.
Important! The charger's power is insufficient to operate it. When converting a cordless screwdriver into a mains-powered one for 220 volts, you must use a different power supply.
Using an external power supply
The external power supply device is larger in size than the built-in one, but in any case, if you power the screwdriver from the mains, the tool will be “tied” by a wire to the outlet.
External power supply
The current coming from the power supply reaches 10-15A, so the cable cross-section must be at least 1mm².
Interesting. The screwdriver can be powered from an old car battery or from a car through the cigarette lighter socket.
Computer power supply
The simplest and cheapest option is to use a power supply from an old computer with a power of at least 300W and a current of 15A.
In old units there was a switch, in modern ones - to turn it on you need to short-circuit the wires going to the device. The color of these wires depends on the model. This can be found on the Internet or by selection.
The 12V output is located in a four-pin connector: black “–”, yellow “+”.
Such devices have a built-in fan, so when making a housing for it, it is necessary to make holes or install it with the fan facing outward. It's best to simply hide the excess wires inside the case.
Important! A 14.4 or 18 volt screwdriver will operate at reduced power.
Car battery charger
The requirements for this device are the same as when using a computer unit.
If so, it is advisable to use a device with a built-in voltmeter and voltage regulation. Some models have a current-limiting resistor installed inside. It needs to be short-circuited.
How to make a homemade power supply
In addition to the purchased one, you can make your own power supply. To do this, you need a 160W transformer, the kind that was installed in tube TVs.
First of all, it is necessary to determine the required number of turns. The procedure is as follows:
- disassemble the transformer;
- unwind all secondary windings from the reel;
- wind 10 turns of wire;
- assemble a transformer;
- connect to 220V network;
- measure the voltage on the secondary winding;
- divide the number of turns (in this case 10) by the measured voltage.
The resulting value is multiplied by the supply voltage of the screwdriver and the required number of turns is obtained.
Transformer
Attention! The number of turns per volt can be obtained by measuring the voltage and counting the turns in the secondary winding.
The step-down winding is wound with a wire with a cross-section of 1 mm² to reduce the voltage drop in the transformer.
The output of the transformer is alternating voltage, but the device requires constant voltage, so a diode bridge is installed in addition to the transformer. It is assembled from diodes on radiators with a voltage of more than 20V and a current of 10A. It is mounted together with a transformer or in a battery case from which the elements have been removed.
Built-in battery power supply in case
If you have the desire, time and direct hands, the unit can be placed in the battery case. To do this, a ready-made device with the appropriate parameters is purchased, removed from its housing and mounted in the battery housing. The terminals are soldered with a wire with a cross-section of at least 1 mm² to the battery terminals, and the power cord is replaced with a longer one.
Built-in power supply
Important! If there were ventilation holes in the power supply case, then it is necessary to make similar ones in the new design.
How to carry out installation correctly - is a counterweight needed?
Operational reliability and safety depend on the reliability of the installation of the electrical part. A soft multi-core cable is used as a network and low-voltage cable. If the device is external, the ends of the cable should be connected to its terminals. We treat copper wiring and brass contacts with soldering acid, after which they are easily soldered. In practice, special clamps called “crocodiles” are often used. In the screwdriver itself, you cannot do without soldering; the “crocodiles” do not hold so tightly that the contacts do not separate during operation.
Manufacturing a battery-based power supply
The ideal option is to use an old battery case. It is disassembled and the entire internal part is removed. This releases harmful substances; care should be taken to protect the respiratory tract and skin. The body is washed with soda solution, running water and dried. On the inside of the contacts, solder the ends of the cable, observing polarity. In order not to guess, we temporarily connect the cable, turn on the screwdriver and see in which direction the spindle rotates, mark the wires. We make a hole in the bottom of the case and pass the wires through. Inside the housing, the cord should be securely fixed by wrapping insulating tape around it. This thickening will prevent the wiring from stretching and breaking. Then we solder the ends to the contacts.
We place a counterweight inside the body. The best material would be compressed rubber. It has the necessary characteristics: high density, insulating properties. To prevent the rubber from dangling inside, we cut it out with a slight overlap. To place the counterweight in the housing, we bend the material slightly and place it so that it will not oscillate and will serve as additional insulation. Perhaps the counterweight may seem unnecessary to some, but it is not. The design of the screwdriver ensures that the center of gravity is in the handle. This loads the arm, but relieves the hand. When batteries are removed from the case, the center of gravity shifts, increasing the load on the hand. Work becomes uncomfortable and difficult. A homemade counterweight restores the center of gravity close to the factory one.
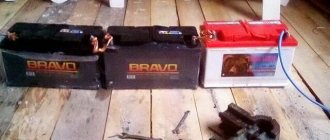
Assembling a working battery from two that have lost capacity
From two faulty devices you can assemble one that is suitable for use.
Important! By connecting a power supply to the body of the faulty battery, a second repaired one will provide mobility when performing small amounts of work.
Finding faulty elements
The battery is assembled from individual elements. They do not fail at the same time, but even one faulty element impairs the performance of the entire battery.
To determine the parts that have lost capacity, you must:
- charge the battery;
- work until power loss;
- disassemble the battery;
- measure the voltage on each element separately.
Batteries on which the voltage is noticeably less than others or absent altogether must be replaced.
Battery repair
After identifying and removing the faulty parts, the remaining parts are assembled into a device suitable for further use. The connection is made by soldering, wires with a cross-section of 1.5 mm² or a strip similar to the one with which the parts were connected before.
If there is an insufficient number of serviceable elements, we purchase the missing ones or convert the instrument to a 220-volt mains power supply.
Knowing how to convert a cordless screwdriver into a corded one with your own hands will help you save money and not have to purchase a new device.
Is it possible to convert a cordless screwdriver into a corded one?
A cordless screwdriver is a fairly convenient tool, but sometimes the advantages of such models turn into disadvantages. When the battery is completely discharged, you need to buy a new battery. It can be very expensive, and in some cases it is simply impossible to find a suitable battery, for example, if the model has long been discontinued.
Converting a screwdriver to work from the network is quite possible. This will require some effort, but the improved device will no longer need to reinstall the batteries.
If you remake a cordless screwdriver, the torque in it will always remain the same
Diagram of a transformer power supply for a screwdriver
Finally, we’ll make our own transformer power supply for a 12, 14 or 18 V screwdriver. Such a source, of course, will be quite bulky, but the beauty of the design lies in its simplicity. Even a novice radio technician with only general knowledge of electrical engineering can cope with repeating the circuit.
For this homemade power supply, you will need a transformer capable of delivering the current we need at a voltage of 12-13 V (for a 12-volt tool), 14-16 V (for a 14-volt tool), or 18-20 V for an 18-volt tool. You will also have to find 4 powerful rectifier diodes and several electrolytic capacitors.
If we have a 12-volt screwdriver that consumes current up to 10 A (most household ones), then we can take a unified anode-heat transformer TAN-138-127/220-50 (TAN-138 220-50), which has 2 windings of 6 each, 3 V at a current of 10 A. It weighs, however, more than 6 kg.
| Winding | Voltage, V | Rated current, A |
| 1–2, 4–5 | 110 | 3,9/2,3 |
| 2–3, 5–6 | 7 | 3,9/2,3 |
| 7–8 | 355 | 0,285 |
| 16–17 | 355 | 0,285 |
| 9–10 | 200 | 0,25 |
| 18–19 | 200 | 0,25 |
| 11–12 | 25 | 0,285 |
| 20–21 | 25 | 0,285 |
| 13–14 (15) | 5 (6,3) | 10 |
| 22–23 (24) | 5 (6,3) | 10 |
Another option is the filament transformer TN-61-127/220-50 (TN-61 220-50). It will be able to provide a current of 8 A at a voltage of 12.6 V (two windings) or 18.9 V (3 windings). Although it weighs less, it still weighs a lot - 3 kg.
| Winding | Voltage, V | Rated current, A |
| 1–1a, 4–4a | 3,2 | 1,66/0,95 |
| 1–1b, 4–4b | 6,3 | 1,66/0,95 |
| 1–2, 4–5 | 110 | 1,66/0.95 |
| 1–3, 4–6 | 127 | 1,66/0,95 |
| 4–8 | 6,3 | 6,1 |
| 9–10 | 6,3 | 8 |
| 11–12 (13) | 5 (6,3) | 8 |
| 14–15 (16) | 5 (6,3) | 8 |
If we have the appropriate knowledge and skills, then any dismountable network transformer with a power of 200–250 W can be used to manufacture a power supply. We disassemble, wind up all the secondary windings, leaving only the network winding, and instead wind one secondary winding at the required voltage and current.
If we have a transformer with a toroidal core at our disposal, then it is better to prefer it. Rewinding is more difficult, but firstly, it does not need to be disassembled, which means there will be no problems with humming after assembly. Secondly, the dimensions of such a transformer with the same power are much smaller.
What diodes are needed? Any rectifier that can withstand a current of 10–20 A and a reverse voltage of at least 30–40 V is suitable. Electrolytic capacitors for a voltage of at least 25 V (for a 12-volt power supply) and one non-polar paper capacitor with a capacity of 1 μF for an operating voltage of at least 400 V. However, you can do without the latter. Now let's take a look at the diagram.
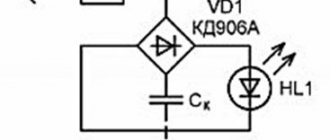
The mains voltage is supplied to transformer Tr1, reduced to the required value, rectified by the diode bridge VD1–VD4 and supplied through wires to the tool, to the handle or compartment from which faulty batteries have been removed and capacitors C3–C5 are installed. They are energy storage devices and provide high starting current when the screwdriver is turned on.
Capacitor C1, connected in parallel to the mains winding of the transformer, reduces the reactive component of the inductive load (transformer) and slightly increases the efficiency of the device. As stated above, you can do without it. When assembling the device, do not forget to install diodes on radiators that are not electrically connected to each other. If the radiator is common (for example, a metal case or power supply chassis), then we install diodes on it through mica insulating spacers.
So we figured out how to power a cordless screwdriver from the mains. Now we can choose a power supply suitable for these purposes or make it ourselves.
Currently reading:
How to convert a 12 or 18V cordless screwdriver into a mains one with your own hands
How to make a switching power supply with your own hands: the best assemblies and circuits
What is a power supply and what are they?
How to make a power supply or charger from an ATX computer power supply
How to use a computer power supply
Self-powered screwdriver
Work with hand tools can also be done in a building where there is no electricity. In such cases, the device is connected to a car battery or to any other power device that has parameters suitable for the operation of a screwdriver.
To connect a car battery, you need to take wires with alligator clips, expose one end and solder directly to the contacts of the tool’s electric motor. The second end is attached to the battery terminals with a clamp, observing polarity.
The principle of connecting a portable battery is similar to a car device. Only the ends of the wires are equipped with copper clamp terminals suitable for fastening.
Read also: How are welded seams indicated on drawings?
An electric tool lasts much longer than a cordless one. Therefore, you should not throw away the screwdriver if the batteries have exhausted their service life. A household man will be able to convert his power tool to mains power, thereby extending its life.
A screwdriver is convenient due to its omnipresence - independence from boundary wires makes it possible to get into hard-to-reach areas. A set of two power modules allows you to power one of them while working with the other. However, each battery pack has a finite number of charge/discharge periods, failing once they are used up. In inexpensive tools, the blocks break faster, and the user receives a gadget with a working motor, but without power. Then the dilemma arises: “is it possible to connect a screwdriver directly to the charger?”
You can power such a screwdriver by connecting it to the network through a power supply, because its motor operates at 220 volts.
How to redo it?
Let's look at how to convert a cordless screwdriver into a mains-powered one using a power supply from a computer. But before you go to disassemble the old system unit or to the store to buy a new power supply unit, read what is written on the screwdriver body. Usually the recommended voltage is indicated there, most often it is 12 V. For this option, finding a power supply is as easy as pie. But if a larger value is specified, then in some cases the search may take longer. In a word, remodel only a 12-volt screwdriver so as not to complicate your life.
Step 1. Remove a used 500 W power supply from the old system unit or buy the cheapest one at any store or computer repair service.
Buy a power supply
Step 2. You can read all the detailed information about the technical characteristics of the computer unit on the sticker, which is located on the side of this part.
Review the power supply specifications
Step 3. Then you can start remodeling. Disassemble the original but finished battery and remove all power elements from it.
Disassemble the old battery
Step 4. We no longer need the batteries, but save the terminal holders and terminals. Carefully remove the latter from the batteries.
Remove the terminal holders Carefully remove the terminals
Step 5. Solder a wire with a cross-section of 3 mm² to the terminals, having previously stripped it.
Solder the wire to the terminals. This is what it should look like
Step 6: Attach the terminals to the terminal holder.
Secure the terminals to the terminal holder
Step 7. Remember that your “negative” wire is blue (for example). Insert the terminals according to this information and the symbols on the battery case into the case itself.
Insert the terminals inside the housing
Step 8: While holding the terminal holder inside, drill through the top of the former battery housing with a 3mm drill bit.
Make a hole in the body
Step 9. Remove the chamfer with a larger drill so that the 3 mm screw is easily recessed into the plastic (its head should not protrude).
Remove the chamfer and screw in the screw
Step 10: Tighten the screw. This way you will secure the terminals and wires themselves inside the battery case.
Secure the terminal holders inside the housing with a screw
Step 11. Drill another hole in the battery case to bring the power wire out of it.
Make a second hole in the battery case
Step 12. We recommend securing the wire inside the housing so that it does not pull on the terminals when you pull on the cord during operation. To do this, wind several layers of electrical tape at a certain distance at the wire exit from the housing. It will not allow the wire to come out of the hole at a greater distance than required.
Electrical tape will help secure the wire.
Step 13. Assemble the battery case back, twist all the parts. The dummy battery with the ability to connect the screwdriver to the network is ready.
Assemble the battery case
Step 14 But that's not all. Now we need to connect our plug to the power supply. Look again at the information sticker on it: it will indicate what color wires provide 12 volts. Here these are yellow and black-yellow wires.
Look at the wire colors
Step 15. Connect in parallel one black-yellow and one yellow wire, as well as two black (“ground”). If you only have one 12V line, then simply use two yellow wires and two black ones.
Twist the required wires in parallel. This is how it should turn out
Step 16: Solder the wires to the XT60 power connector.
Solder the wires to the XT60
Step 17. Solder the wire coming from the dummy battery to the other part of the connector.
Solder the wire from the battery too. This is how it should turn out
Step 18. To start the power supply from a computer without the system unit itself, connect the green wire to the black wire - to ground. This can be done with a jumper from a regular paper clip.
Close the contacts with a paper clip
Step 19. The power supply is ready for use. You can turn it on. Excess wires can be cut off or wrapped into a bundle so that they do not interfere.
Excess wires can be cut off. Don't forget about isolation
Step 20. Check system functionality. In general, the screwdriver is ready to work from the network. And since a dummy battery was made for such a connection, that is, the wires were not directly connected to the device, if you wish, you can buy a new battery for such a screwdriver and use both it and this system.
The screwdriver has been rebuilt and is ready to go
Power supply options
There are several options for converting a screwdriver to work from the mains. The task is to power the device's electric motor using an intermediate source.
We use a laptop charger
You can make a 12 V power supply for a screwdriver with your own hands, even without technical knowledge. You just need to find an unnecessary laptop charger that has technical characteristics similar to those for powering a screwdriver. The main thing is that the output voltage matches the desired one (12-14 volts).
To achieve this goal, you must first disassemble the battery and remove faulty elements from there. Then follow the following manipulations:
- We take the charger from the laptop.
- We cut off the output connector, expose it and tinning the ends of the wires.
- Solder the stripped wires to the battery input wires.
- We isolate the soldering points to avoid short circuits.
- We make a hole in the housing so as not to pinch the wire, and assemble the structure.
The basis is the power supply from the computer
To manufacture such a device, you will need a block from a personal computer in A.T. format. It is not difficult to find, this is an old model of a power supply device that can be easily purchased on any radio components market
It is important to know that you can use a unit with a power of 300-350 W with a current in the 12 V power supply circuit of at least 16 A
It is AT format blocks that correspond to such parameters. There is a power button on the body of this device, which is very convenient during operation. A cooling fan is installed inside and an overload protection circuit is mounted.
The procedure for reorganizing the block:
- We remove the cover of the BP case. Inside we will see a board with many wires going to the connectors, as well as a fan.
- The next step is to disable power-on protection. We find the green wire on the large square connector.
- We connect this wire with the black one from the same connector. You can make a jumper from another piece of wire, or you can simply cut it short and leave it in the housing.
Then in the output bundle we find a smaller connector (MOLEX) and perform the following operations with it:
- We leave the black and yellow wires, and cut the other two short.
- To make it easier to locate the power supply during operation, we solder an extension cord to the black and yellow wires.
- We attach the second end of the extension cord to the contacts of the empty battery compartment. This must be done by soldering, you can make a good twist, and you must strictly observe the polarity.
- We make a hole in the housing so as not to pinch the wire during assembly. The device is ready.
Power from car charger
Having a charger for a car battery, it is quite simple to make a device to power a screwdriver. To make the modification, you just need to connect the power terminals of the charger output to the power supply of the electric motor.
If you have a charging device with continuously adjustable output voltage, you can use it as an 18-volt power supply for a screwdriver.
How to power a screwdriver while maintaining its autonomy
If the master works in a building that does not have electricity, and the batteries have already deteriorated, there are ways to power the screwdriver:
- replace old battery banks with new ones;
- connect the screwdriver to the car battery;
- connect the tool to another battery, for example, taken from an uninterruptible power supply.
Replacing old elements
Attention! When replacing batteries, pay attention to the correct polarity of connecting the elements.
Open the battery housing.
You need to open the battery case
It is necessary to solder the new batteries together and assemble the battery
Attention! The converted battery should only be charged with a specially selected charger.
Video: how to replace used batteries for a screwdriver
Connecting to a car battery
- Open the screwdriver body.
It is necessary to remove the top cover from the instrument
You need to attach the wires to the contacts
The cable must be insulated
All that remains is to close the screwdriver body