What wire cross-section is needed to connect the oven?
Electrical cable with a cross section of 2.5 mm. sq. – this is the best option for connecting the oven and its safe operation. In this case, excessive heating will be prevented, which often leads to short circuits with adverse consequences.
Interesting materials:
How long does it take to clean a laptop? How much does it cost to clean sofas? How much does it cost to clean your computer from dust and replace thermal paste? How much does it cost to dry clean a down jacket? How much citric acid should I use to clean my washing machine? How much citric acid should I use to clean the kettle? How much citric acid should I use to clean my washing machine? Washing machine citric acid cleaning how many grams? How to clean the drain filter on a Samsung washing machine? Dry cleaning what is it?
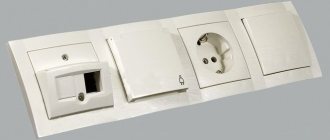
Ideas: where else can you place sockets in the bathroom?
Sockets in the bathroom are a necessity that for some reason many people refuse. We are convinced that the main problem and refusal of them is that people simply do not understand where to put these sockets in the first place... Let’s figure it out today and you won’t have to deny yourself any more of this miracle of our time!
Let's start with the basics: technical information about sockets in wet areas
There are several mandatory rules for placing sockets. Wet rooms, as we all know, are not suitable for the presence of open sources of electricity. To ensure your own safety and the safety of family members, it is important to remember:
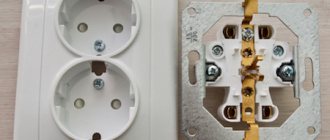
- All sockets with moisture protection are equipped with grounding;
- Concealed wiring is required (in the wall or box);
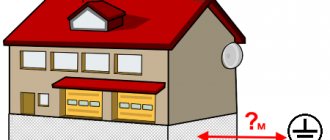
- Distance to water is at least 60 cm;
- Distance from the floor - 25 cm;
- Make good insulation at the connection points in the wiring;
- Use lids with a rubber seal.
Remember that some appliances must be connected to the mains at all times (for example, a washing machine, which requires an IP44 waterproof socket). And some, like a water heater, are connected directly to the wiring. So the number and placement of sockets should be calculated based on the number of consumers and the frequency of their use.
Electric storage boiler design
Knowledge of the structure and operating principle of the unit will allow you to avoid annoying mistakes during installation and operation, and this will increase the duration and safety of use.
Storage water heater device
What elements does an electric boiler consist of?
- Bracket for fixing the boiler to the load-bearing surface . Placed at the top of the device, it ensures reliable fastening of the boiler. It is made of thick sheet steel and welded to the outer casing by contact welding.
The boiler is equipped with special brackets with hinges, with which it is hung on the wall
Cold and hot water supply pipes
Boiler thermostat
In the photo - new and used magnesium anode
Water heater indicator light
Photo of water heater safety and check valves
Most boilers consist of such elements. Minor technical differences do not affect the installation process.
Don't forget about safety
A boiler is a powerful electrical appliance. Therefore, when working with it, you should never forget about safety. It is best to do this by connecting the boiler through an RCD - a residual current device.
Its main advantage is simplicity. Thanks to this, the RCD is not only very inexpensive, but also provides high reliability and durability. Externally, it looks like a small circuit breaker through which the cable in the electrical panel is connected. You need to choose it based on the power of your water heater.
The operating principle is simple. By passing current through itself, the RCD measures it and compares it with the outgoing one. If a leak is detected, the circuit is automatically broken. Such a leak can occur for various reasons, but the most likely is an electric shock to a person. It is the RCD that will promptly turn off the electricity supply, saving a person’s life.
Depending on the model, the RCD can respond to different leaks - from 10 to 30 mA. It is better to choose a model with this indicator of 10 mA. Yes, it may trigger falsely, especially if the boiler has been in service for more than a year. But it will prevent serious wounds and burns from electric shock. For clarity, here is a table showing how an electric shock affects a person:
- 5 mA – slight tingling.
- 10 mA – muscle contractions, cramps.
- 30 mA – burns, difficulty breathing.
- 80 mA – severe burns.
Experts recommend slightly reducing the comfort of use, significantly increasing the safety of using the equipment.
The diagrams for connecting a water heater to an RCD are quite simple - the usual zero, phase and grounding. Problems usually do not arise here, especially if you pay attention to the color markings on the cable.
Connection diagram of the boiler to the RCD
Step-by-step instruction
All work on installing and connecting the boiler can be divided into several stages. We will describe each of them in detail, so that even a person who does not have the relevant experience will not have any difficulties when performing the work.
Installing a water heater on a wall
Today you can see both storage and instantaneous boilers on sale. In general, their installation is quite similar, although storage models are associated with additional difficulties - primarily due to weight. Therefore, we will consider this option - it will be much easier to cope with a lightweight storage water heater.
The work is carried out as follows:
- Mark on the wall the places where the boiler mounts will be located. This is easy to do - measure the distance between the “ears” on the water heater and transfer it to the wall. It is better to use a level so that the “ears” are as horizontal as possible.
- Using a drill or hammer drill, make sufficiently deep holes in the wall.
- Drive the dowels into them and screw in the anchor bolts. They must be long and thick enough to support the significant weight of the water heater - it can exceed a hundredweight.
There is no need to worry about the finishing - even if a small piece of plaster falls off during the drilling process, this section of the wall will still be hidden behind the boiler, so it will not be noticeable.
The slightest misalignment can cause the boiler to misalign and, as a result, significantly reduce its service life. Therefore, the tank should be positioned as level as possible.
Having completed this important stage, you can proceed to the next one.
Connection from an outlet
Before you start connecting an electric boiler to the network, you should figure out whether the selected equipment is suitable for this.
Don't forget that the water heater will most likely be installed in the bathroom. And here there is always high humidity. In addition, a normal minor failure may cause water to enter the outlet, causing a short circuit. Therefore, it makes sense to purchase a special socket with moisture protection. Some experts recommend connecting the boiler directly to the panel without using an outlet. However, this is not always convenient. For example, cutting off a plug may void your warranty. So, if the boiler breaks down, you won’t have to rely on warranty service.
Otherwise, there are no problems - the water heater is simply plugged into an outlet, like a regular refrigerator, electric kettle or mobile phone charger. But it’s worth considering that this option is usually suitable for not very powerful boilers.
Connection directly from the distribution panel
There is another way to connect the boiler to the electrical network - directly from the panel. It is suitable for cases where the device power is 3500 watts or more. The socket will not withstand such voltage, so you have to choose a more complex, but also reliable method.
To connect, you will need a large cross-section cable - it will be powered directly from the electrical panel. If the device power is in the range of 3.5-4 kW, then connecting the boiler to a single-phase network is suitable. If the boiler has more power. You will have to connect it to a three-phase network with a voltage of 380V, so take this fact into account when purchasing.
Rules for laying electrical cables
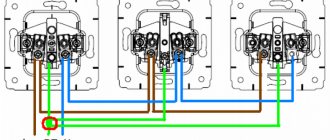
When renovating new houses, the wiring is not dismantled; sockets are installed in the places provided for this. In older buildings, electrical cables need to be replaced. Aluminum wiring cannot withstand the load, so copper wires with a cross-section of more than 1.5 mm² are used. For household appliances, powerful power lines are created, equipped with an RCD. Special boxes are used to distribute wires. They are placed under the ceiling taking into account safety requirements.
Electrical cable with rubber protective tube.
When connecting directly, the wiring is hidden under floor tiles and suspended ceiling structures. The cables are covered with rubber protective sleeves. Internal wiring laid in grooves is considered safe for the bathroom. The external type is rarely used; in this case, the cables are covered with plastic channels.
Connecting an instantaneous water heater to a 220 V network
Connecting the boiler to a household (220 V) or industrial (380 V) type network is carried out without the permission of the energy company, in fact, at the request of the owner of the house or apartment.
Moreover, to “plug in” the water heater into the “socket”, the performer of such work only needs to have rudimentary skills in installing electrical appliances, multiplied by information about the diagram and connection procedure. Let's consider the procedure for connecting a water heater to the network, offering detailed instructions for this process to boiler buyers who are inclined to install it themselves.
Instantaneous water heater in an apartment
Where to begin?
Of course, from fastening the boiler to the supporting surface. After that, a separate line will have to be “pulled” to the heating device, connected to the central distribution box.
The storage tank is fastened using standard means - using anchor bolts of the recommended cross-section and brackets welded to the boiler casing. That is, first, holes are drilled in the wall according to a template, after which anchors are “put” into the equipped channels. And only at the very end is the boiler “hung” on the heads protruding from the walls.
Next, the outlet from the water supply network is “connected” to the corresponding “connectors” of the water heater. Moreover, a magnetic filter is installed at the connection point, protecting the boiler from scale.
After this, a “hot” pipeline is removed from the pressure fitting of the heating device, stretched to a specific tap or distribution unit - a manifold.
The electrical cable is installed in an open manner, in a polymer casing fixed to the plinth under the ceiling . The recommended cross-section of the cable “core” is 2.5 millimeters.
How to connect the boiler to the network?
Having finished installing and piping the boiler, we can move on to directly connecting the storage water heater to the energy line.
Connection diagram for instantaneous water heater
To do this we will have to do the following:
- Install a protective shutdown device on the “far” side of the electrical cable to protect users from possible “breakdown” of the boiler body. Moreover, the RCD is mounted either next to the central distribution board, or directly in the electrical “cabinet” using a free connector. And the boiler cable is connected to the “output” of the protective device.
- Next, it is necessary to connect the “input” of the RCD with the outputs of the central “zero” and “phase” fuses, providing power to the electrical line extended to the boiler. Well, after completing the work on the “far” side of the cable, it is necessary to break the power circuit by turning off the RCD.
- The next stage - arrangement of the boiler connection point to the electrical network - is carried out in the area of the “near” edge of the cable. Moreover, in the case of connecting a low-power boiler, a regular electrical outlet is mounted at this point, into which the plug of the electric heater is “plugged in.”
- If the water heater demonstrates sufficiently high power or the owner of the boiler wants to receive additional safety guarantees, then instead of an outlet in the network, an intermediate fuse of 16 Amps is used. That is, the far end of the cable is inserted into the housing, having first removed the bottom cover, and the same automatic fuse is “embedded” between the boiler and the RCD, in a moisture-proof place.
Connecting an instantaneous water heater to a 220 V network is even easier; to do this, you need to do the following:
- Arrange the “far” edge of the electrical cable by installing an RCD and connecting it to the central power grid.
- Install a waterproof distribution box with a 16-25 A fuse near the water heater. Connect the “near” edge of the cable to the “input” of the fuse.
- Connect the instantaneous water heater cable to the “output” of the fuse.
- Turn on the RCD and intermediate fuse.
Moreover, the security of the connection will remain even if you use a fuse with two contacts, installing it only on the “phase” of the boiler or instantaneous water heater.
Where to mount the socket or fuse for the boiler?
An intermediate distribution board with a fuse can be placed almost anywhere - even near. However, from a usability point of view, it would be wise to place this unit closer to the boiler. But not in the bathroom or in the kitchen. The standards for the safe operation of electrical installations insist on this. Therefore, the best location for this “mini-shield” is a section of the wall to the left or right of the door frame leading to the boiler location.
Intermediate distribution board
The socket will have to be placed almost right next to the boiler. Since the length of the power cord with plug usually does not exceed 1.5 meters. Therefore, there is simply no special opportunity to choose a location in this case. However, even at this distance from the boiler in a damp area of the kitchen or bathroom, you can find a fairly safe place, located away from taps, showers, towel rails and faucets.
In addition, for the storage heater you will have to purchase a special socket with a moisture-proof housing and spring-loaded contacts that maintain a tight connection even if the plug is removed from the connectors multiple times.
It is necessary to understand that even the best and most expensive socket will not be able to provide the level of security for the connection and the user that even the cheapest fuse can easily provide.
Therefore, we recommend that all owners of boilers with power cords replace the plug with a fuse, making a small and simple upgrade to the design of the water heater.