Quite often a situation may arise when the number of sockets in an apartment, or in a separate room, becomes insufficient to use all the necessary electrical appliances. You have to use extension cords, which creates some inconvenience. Or connect devices to the network one by one. This leads to a lot of time wasted. It's no surprise that many people wonder: how to add an additional outlet in an apartment?
If the wiring is quite old and is in unsatisfactory technical condition, then it is advisable to replace it entirely. To do this, new wiring is laid with the number of electrical outlets required for convenient use. It is advisable to combine this option with major renovation of an apartment or private house. Since a complete replacement of wiring entails a violation of the integrity of the walls, and, accordingly, their further restoration.
Power supply for additional kitchen outlets
The power supply for additional outlets can be “taken” from existing outlets or a new power supply can be provided from the electrical panel.
1. The first option for power supply (from sockets) to additional sockets is suitable if you have a fairly modern house and the electrical wiring is made according to modern standards (cable with copper conductors and a dedicated group for the kitchen).
2. If you have an old house and the wiring is made of aluminum and the apartment has a minimum number of groups of electrical wiring (1 group of lights + 2 groups of sockets), then it is better to route the power supply to additional kitchen sockets from the electrical panel.
3. There is no need to wire new additional sockets from old kitchen sockets. Or rather, it can be done, but it is dangerous. As the load on the old electrical circuit increases, the circuit breaker will begin to “knock out”. If you increase the rating of the circuit breaker, it will not be “knocked out”, but the electrical wiring will become dangerously hot and it is quite possible that the wiring will catch fire or, at a minimum, melt and, as a result, it will need to be completely replaced.
4. Options are possible. For example, in the example of the article, and this is the P44 house series, in the kitchen there was initially planned one power outlet above the kitchen work area, and with grounding. From the wires of this outlet we will “power” additional kitchen outlets.
Related article: Dry kitchen screed: level the kitchen floor with your own hands
Having decided on the power supply, we move on to planning.
Do-it-yourself installation in an apartment wall: instructions
There are certain requirements for installing sockets in an apartment. You must first calculate the power required for the power point. Consider the nuances of installation in rooms with different microclimates. The power outlet requires a special connection.
Capacity calculation
Power is the main characteristic of an electrical device. Before purchasing an electrical outlet, calculate the total load it will withstand. Also consider whether the electrical wiring can withstand such a load. Look for data in special tables that show core cross-sections, material, voltage, current and power of the wire.
The bathroom is a room with high levels of humidity. If a power point is installed here, then adhere to the following rules:
- sockets must be installed at least half a meter from grounded parts (pipes, sinks, batteries);
- the electrical socket is placed at a height of 50-100 cm from the floor;
- above-plinth devices are mounted no closer than 30 cm from the floor.
Also, the electrical outlet must be stable, durable, with a certain degree of moisture and dust resistance.
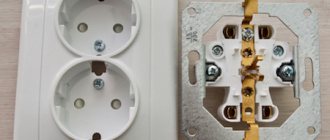
A double socket is used to connect two household appliances at once. They are stationary and prefabricated.
A fixed socket is installed in the same way as a regular one. It is important to ensure that the cables are connected to the conductive plates, otherwise a short circuit will occur.
A prefabricated product is more difficult to install. For installation, you need a conductor of the same length as that connected to the main socket box. This means that a network with three wires (2 power and ground) requires three additional cables. Additional ones are stretched between the socket boxes. In the one in which there is an output of the main electrical wire, pairs of cables (main and auxiliary) are connected to the terminals. In the second socket box everything is connected as standard.
Power sockets are needed to connect powerful appliances: washing machine, water heater. The design differs from a conventional product: it is much thicker and is designed for a load of at least 40 Amps.
Before connecting, make sure that the wiring meets safety requirements. Otherwise, you cannot connect the power outlet, otherwise a fire may occur. A separate line is allocated to it, leading to the distribution panel.
A power outlet is installed in the place where the power cable exits. This is usually next to the stove. Fastening is carried out with dowels.
Panel houses have nuances:
- for electrical wiring installed using the open method, there is no need to drill a place for the box;
- in the case of closed electrical wiring, grooves for conductors will be required, while the cable is laid in a corrugation.
It is necessary to use corrugation. It protects the conductor from breaking, which can lead to short circuits and inoperability of sockets and switches.
The box can be fixed using gypsum mortar. When it dries, the process of connecting the electrical fittings continues. Electrical sockets are a must-have attribute in the house. Based on the type of installation, they are divided into overhead and internal. The choice depends on the type of wiring. The connection method is the same and does not cause any difficulties. Even an ordinary person can connect the outlet. It is only important to follow the installation instructions and safety requirements when working with wires.
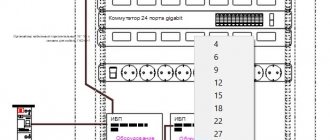
Additional outlets in the kitchen - wiring plan
The electrical wiring plan is made based on the location of the future furniture. As a rule, additional sockets are placed above the kitchen work area, in the middle of the work tables. One outlet needs to be planned for the refrigerator, one for the hood.
In the example of this article, the wiring diagram for additional kitchen outlets looks like this:
additional sockets in the kitchen diagram
The plan is drawn up, we buy the material.
Additional sockets in the kitchen: Purchasing materials
To make additional sockets in the kitchen we need:
- Electric cable VVGng 3×2.5 mm2. An alternative is NUM cable, of the same cross-section;
- Mounting boxes for hidden electrical wiring (socket boxes);
- Distribution boxes. They can be replaced with the same mounting boxes;
- To connect aluminum and copper wires, connecting blocks are needed;
- To “freeze” the cables in the groove, alabaster is needed;
- You will need electrical tape.
Additional sockets in the kitchen: stages of work
Let's divide the work into the following stages:
- Gating;
- Installation of boxes and laying of electrical cables;
- Opening boxes;
- Sealing the grooves.
Grilling
We make grooves and niches for mounting boxes (socket boxes) using a hammer drill along pre-marked routes. The work is noisy and dusty. Warn your neighbors about the noise if necessary. The furrows must be of such a depth that the cable in them is covered with at least a 5 mm layer of plaster mortar.[
Installing boxes and laying electrical cables
“Freezing” of boxes (distribution and installation) and electrical cables in the grooves is done with alabaster.
In the mounting boxes, the holes for the cables have already been made; you need to cut out the plugs.
Related article: Areas of application of textured paint
Level the boxes and secure them in a niche on several alabaster “spatulas”. After the first portions have hardened, strengthen the fixation with an additional portion of alabaster. Do not block cable openings.
If you are installing several boxes in a chain, then lay the cables for the socket cables immediately before installing them.
If the kitchen backsplash is made of tiles, then the mounting boxes should protrude from the wall by 8-10 mm.
In concrete walls it will be difficult to secure the cables in the grooves. Here you can go in two ways: after 40-50 cm, widen the furrows and secure the cable with staples, or use spacers to hold the cable in the furrow (as in the photo). After “freezing” with alabaster, the spacers are removed, and the cable lies in the furrow.
Sealing furrows with gypsum plaster
We seal all furrows and mounting boxes with gypsum plaster. After it has dried, you can proceed to disconnecting the wires in the junction boxes.
Wiring
Wiring or disconnection is the connection of wires to the power supply line and the installation of wire connection nodes, if they are planned.
Important! Before work, turn off the power supply and check that there is no power supply to the additional outlets.
To connect aluminum and copper wires, we use power terminal blocks. To connect copper wires we use twisting. You can use welding (if you have a welding machine) or connect the wires through terminal blocks. When using terminal blocks, look at what load they are intended for. The connections are insulated with two layers of electrical tape and placed in a box. I make wire connections according to all the rules and usually wall up the junction boxes.
Important Safety Tips
Installation work must be carried out during a complete power outage. To do this, turn off the circuit breakers or plugs in the distribution panel. It is strictly forbidden to turn them on until the work is completed, so family members should be warned about the repair.
What you need to pay attention to during installation:
- monitor the condition of cable insulation and do not use damaged ones;
- Do not cut live conductors with wire cutters;
- It is advisable to follow the recommendations for installing electrical outlets - no lower than 20 cm from the floor.
We suggest you familiarize yourself with: Distance from the house to the fence - building standards in relation to the neighboring site (SNiP)
To work you will need a professional tool:
- indicator screwdriver;
- perforator;
- alabaster;
- Phillips and flat screwdrivers;
- pliers;
- stationery knife for stripping insulation;
- rubber gloves, safety glasses;
- the socket itself;
- conductors;
- socket box
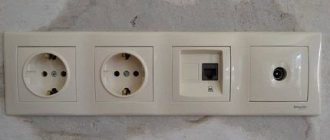
Additional sockets in the kitchen for a TV antenna
I supplement the additional outlets in the kitchen with a new outlet for the TV antenna. I put it next to the electrical outlet.
Additional sockets in the kitchen for TV.
I lay the antenna cable in a groove and wall it up with alabaster. The cable is imported, double insulated, so it is quite suitable for bricking. Although it would be more correct to lay it in a corrugation or box.
Related article: Making a battery box in the kitchen
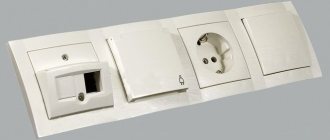
After finishing, additional kitchen sockets look like this.
Groups of sockets on the kitchen apron.
Socket block on the kitchen apron.
Refrigerator socket.
Electrical and TV socket block for kitchen TV.
©Remont-kuxni.ru
Other articles
- No entries found
Similar
Similar articles:
- Combination of kitchen and dining room by stages of work
- Stages of kitchen renovation: choosing material for renovation
- Rules for installing kitchen sockets
- Connecting the hob and oven to one cable...
- Renovation of a small kitchen 6 square meters
- How to combine the kitchen and dining room of a small apartment
- Do you need an RCD for the kitchen?
- Kitchen renovation from a photo: analysis of a kitchen renovation 8 meters in...
- Connecting the hob and oven yourself
- Small kitchen appliances
Methods for transferring a connection point
There are two simple methods that allow you to transfer sockets without destroying the wall finish:
- By creating a loop - involves creating a jumper from the old “point” to the new connection point.
- By extending the wire - involves extending the electrical line in the cavity of the new groove.
If the new chosen location is much further than the previous one, you can make a complete replacement of the entire line by laying a separate wire from the distribution box located at a slight distance. But, unlike the two methods described above, laying a new line requires large-scale repair work.
An important point: it is necessary to extend the conductor with an electric cable, the cores of which have the same cross-section and are made of the same material
When choosing a daisy chain method for connecting a new outlet, keep in mind that such a connection is very unreliable for installing three or more power points. If one section or socket is damaged, the entire sequential chain of devices will be inoperative. And, according to the rules of the PUE, it is not allowed to be used to power powerful electrical appliances: microwaves, electric stoves, refrigerators, washing machines, etc.
Another negative side is that when two sockets are connected with a single cable, the current load sequentially passes from one device to another. Therefore, when several devices are plugged into sockets connected through jumpers at the same time, there may not be enough voltage for their operation.