How to determine the poles of a magnet
Humanity became acquainted with magnets quite a long time ago: the first deposits of magnetite stone were discovered in ancient times on the territory of modern Greece, not far from the city of Magnisia. The “Stone from Magnisia” instantly intrigued the residents of the locality, because it attracted iron objects. And if in those distant times the properties of stones simply caused surprise and delight, today the capabilities of magnets are used to the fullest: depending on the type, they help organize the operation of various sensors, motors and microphones.
Understanding the intricacies of how magnets work is not so difficult: there is a lot of information, but it is quite accessible and understandable even to a schoolchild who has just begun to be interested in physics. First of all, we advise you to study the types and methods of using permanent magnets, as well as clarify how to determine the poles of magnets and electromagnets without special equipment.
A natural magnet, or magnetic iron ore as it is called today, is a substance around which a magnetic field is always present. Any piece of iron ore has a fairly strong magnetization, but the molecules of the material move in two directions, which means even a very small magnet will have a north and south pole.
If you have two pieces of iron ore in your hands, then answering the most common question “how to determine the poles of a magnet” is not at all difficult, because opposite sides are magnetized, but identical sides are repelled.
In the modern world there are several types of magnets, besides natural magnetite:
· Temporary - these are metal products that are magnetized only when they enter a magnetic field. Nails, paper clips, bars and other small things begin to attract each other and similar objects;
· Electromagnets, which humanity became familiar with in 1825, when they were invented by an engineer from England, William Sturgeon. The structure consists of an iron core on which wire is wound. A magnetic field of the required strength and polarity can be obtained only if a current is applied through it. We encounter electromagnets every day, because almost all equipment works with their help, but at the time of their invention they were not appreciated;
· Permanent, most numerous. They charge only once and form a magnetic field around themselves constantly. We have already become acquainted with a natural permanent magnet - it is natural iron ore, but there are several types of artificial magnets. The most popular are ferrite and neodymium. The latter are considered the strongest and can last more than 100 years.
The easiest way to purchase neodymium magnets: they are available in every specialized electrical equipment store. Wondering how to determine the poles of a neodymium magnet and check its performance? Modern magnets are no different from natural ones and behave exactly the same, which means they repel if the poles are the same, and attract if they are different.
The simplest and most understandable way to understand the poles is to use special devices. A compass is a quick answer to the question “how to determine the north pole of a magnet”: an arrow pointing north will definitely be attracted to the south pole of the magnet.
A modern electronic teslameter is also quite suitable, because if you bring the probe of this device to a piece of iron ore, the corresponding letter – S or N – will appear on the display.
Instead of the device, you can use an additional marked magnet: like poles will repel, and different ones, of course, will attract.
If you only have a diagram of the device, then you will definitely be interested in how to determine the poles of a magnet from a drawing. To do this, you can use the “left” hand rule, which suggests placing your left hand in such a way that the magnetic lines of force enter the palm and the four fingers coincide with the direction of the current. The thumb in this case will indicate the direction of movement of the conductor.
How to determine the south pole of a magnet if you don't have a compass at hand? Make a device from scrap materials: for example, using a needle and water or a plastic jar with powdered sugar. The needle will be magnetized and point north while lying in the water, and the powdered sugar will turn into charged dust and spin along the lines of force above the magnet. The sun will help you find out where is north and where is south, but you will need the ability to navigate the area and basic knowledge of geography.
Permanent magnets
Once upon a time, the legendary shepherd Magnes found a natural magnetic stone that attracts iron. Subsequently, this stone was called magnetite or magnetic iron ore .
Figure 1. Magnetic iron ore - magnetite
A piece of such iron ore is called a natural magnet , and the attractive property it exhibits is called magnetism.
The existence of magnetic iron ores and their remarkable property - magnetism - has been known for a long time. However, people could not yet use these properties. At that time, the only practical use of natural magnets was to determine the cardinal directions with their help: a natural magnet, suspended on a thread, turned one end to the north and the other to the south. This is how the first compass appeared, which was widely used by sailors.
Nowadays, the phenomenon of magnetism is used extremely widely in various electrical and radio installations. However, now not natural, but so-called artificial magnets .
Artificial magnets are made from special grades of steel and its alloys. A piece of such steel is magnetized in a special way, after which it acquires magnetic properties, that is, it becomes a permanent magnet.
The shape of permanent magnets can be very diverse depending on their purpose. In Fig. Figure 2 shows, as an example, the most common forms of permanent magnets: straight, horseshoe-shaped, ring and semi-ring.
Figure 2. Permanent magnets of various shapes
To get acquainted with some of the properties of a permanent magnet, we will perform a series of experiments.
Let's take a straight magnet, lower it into iron filings and then take it out. We will see that the sawdust will only stick to the ends of the magnet (Fig. 3). This means that the greatest attractive force of a permanent magnet is found at its ends, and the middle does not have magnetic properties.
Figure 3. The greatest force of attraction of a magnet is found at its ends
The ends of the magnet are called poles , and the line passing through the middle of the magnet is called the neutral line . For a ring-shaped magnet, the poles will be those places where the greatest attractive forces are found.
Let's do another experiment. Let's hang a straight magnet on a thread or take a magnetic needle mounted on the tip of a tripod (Fig. 4). In both cases, we will notice that a rectilinear magnet (or magnetic needle) will take a very specific position: one pole of the magnet will face the north pole of the Earth, and the other will face its south pole. The end of the magnet that faces north is called the north pole of the magnet , and the end facing south is the south pole of the magnet.
Figure 4. A magnetic needle and a suspended rectilinear magnet turn their poles towards the poles of the Earth
So, each permanent magnet has two poles: north and south. The north pole of a magnet is designated by the letter C (north) or N (north), the south pole by the letter Y (south) or S (south).
Finally, let's do the third experiment with a permanent magnet. Let's bring a steel object to one of the poles of the magnet (it doesn't matter which one). This object will be attracted to the pole, and considerable force must be applied to tear it away from the magnet. The same will happen with items made of cast iron, nickel and cobalt. But there are metals that are not affected by a permanent magnet. For example, let us bring a copper object to the pole of a permanent magnet. The magnet will not attract it to itself. The same can be observed with other objects made of non-ferrous metals - aluminum, brass, silver.
Consequently, a magnet attracts iron, steel, cast iron, nickel, and cobalt. All these substances are called magnetic . All other substances that are not attracted to a magnet are called non-magnetic .
DID YOU LIKE THE ARTICLE? SHARE WITH YOUR FRIENDS ON SOCIAL NETWORKS!
Related materials:
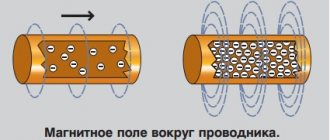
- Magnetic field of current. Magnetic lines of force
- Magnetic field strength
- Magnetic induction
- The effect of a magnetic field on a current. Left hand rule.
- Electromagnetic induction
- Right hand rule
- Mutual induction
- Self-induction
- Self-induction EMF: basic postulates
Add a comment
In amateur radio practice, as well as when designing devices that use magnets and inductors, it is sometimes necessary to know the polarity of magnets and the direction of magnetic fields. The proposed devices allow you to determine the polarity of magnets.
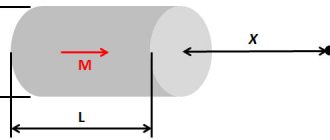
I've put together two different options. The main unit of the first device is two rectangular magnets, which are poured into a cylinder, in the center of which there is an axis of rotation on a bearing. Filling is carried out with epoxy resin. When such an assembly is introduced into the magnetic field of the magnet under study, the assembly turns to the opposite pole and tries to be attracted to it. A hole is made in the housing in order to visually observe the position of the magnet. The poles of the cylinder assembly are painted in different colors, corresponding to the opposite poles of the magnetic assembly. That is, inside the cylinder, for example, there is a magnet with the north pole towards the edge, and on the surface of the cylinder there is a south pole marker. Then it will be more convenient for the observer to determine the pole of the magnet under study. The magnetic assembly device is shown in the figure below:
Fig.1. Internal structure of the magnetic assembly.
To determine the polarity of the magnet, you should bring the device with the disk to the magnet being tested. Let's assume that we bring it to the north pole, in which case the disk will turn towards the magnet with the south pole of the first magnet inside the assembly. And in the viewing window, the observer will see the surface of the assembly painted blue, which corresponds to the blue pole of the magnet under study. On the contrary, if we bring the device to the south pole of the magnet under study, then the assembly will turn towards it with the north end of the second rectangular magnet, and the part with the surface painted red will be opposite the inspection hole.
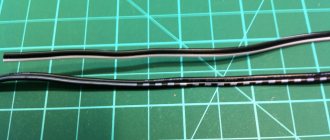
The second device is more advanced because it has a light indication. A cylindrical magnet is installed in a rod of non-magnetic material. At its end there is a ring to which the positive wire from the battery is attached by soldering. The movement of the magnet inside the rod is limited by the walls on which the contacts for the north and south poles are fixed, as shown in the figure:
Rice. 2 Electronic-mechanical field polarity indicator. The magnet is stabilized in space by a spring. Two LEDs are mounted in the end part of the housing, indicating the poles of the magnets. Suppose the rod is close to the north pole of the magnet under study. In this case, the magnet inside the rod will tend to be attracted to the magnet under study. In this case, the contact of the magnet rod will touch the contacts of the north pole indicator and close the power circuit of the blue LED. If the magnet under study is facing the south pole towards the rod, the magnet will retract into the rod and press the contact of the magnet rod to the contacts of the south pole and light up the south pole LED. You can also use a regular compass to understand the polarity of magnets. And if you make a completely electric indicator, you can use a circuit based on a Hall sensor. The simplest diagram is shown in the figure below (taken from the site https://www.valtar.ru/):
Fig3. Determination of the magnet field based on the Hall sensor.
When there is no magnet, the reed switch is open, and no supply voltage is supplied to the circuit. Let's bring the magnet to the Hall sensor and the reed switch. The reed switch will close, and, depending on the polarity of the magnet, 0 or supply voltage will appear at the output of the Hall sensor.
RegenTech (C) 2016