What to do if the homemade product does not work
If suddenly you have assembled a perpetual electric motor with your own hands, but it does not rotate, do not rush to get upset. Most often, the reason for the motor not rotating is that the distance between the magnet and the coil is too large. In this case, you just need to trim the legs a little yourself, on which the rotating part rests.
Also check whether you have cleaned the ends of the coil well and whether contact is ensured in this place. The symmetry of the coil also plays an important role, so try to do everything carefully and slowly.
That's the whole technology for assembling a homemade magnetic electric motor at home. If you watched the video lessons, you are probably convinced that you can make an engine from a battery, copper wire and a magnet with your own hands in different ways. We hope that the instructions were interesting and useful for you!
It will be useful to know:
- How to make a USB fan at home
- How to legally pay less for electricity
- How to solder wires correctly
Read more about how to create an electromagnet
It's quite easy to build an electromagnet. All you have to do is wrap a few turns of insulated copper wire around the iron core. If you connect a battery to a wire, electric current will begin to flow and the iron core will become magnetized. When the battery is disconnected, the iron core will lose its magnetism. Follow these steps if you want to build the electromagnet described in our Magnets and Electromagnets experiment:
Step 1 – Gather Materials
To build the electromagnet described in our Magnets and Electromagnets experiment, you will need:
One iron nail 15 centimeters long. Three meters of insulated stranded copper wire. One or more D-cell batteries.
Step 2 - Remove some of the insulation
The copper wire must be exposed so that the battery can be connected well to the power grid. Use a pair of wires to remove a few inches of insulation from each end of the wire.
Step 3 – Wrap the Wire Around the Nail
Carefully wrap the wire around the nail. The more wire you wrap around the nail, the stronger your electromagnet will be. Make sure you leave enough wire unwind so you can attach the battery.
A wire is wrapped around a nail to create an electromagnet.
When you wrap the wire around the nail, make sure you do it in the same direction. You need to do this because the direction of the magnetic field depends on the direction of the electric current it creates. The movement of electric charges creates a magnetic field. If you could see the magnetic field around a wire carrying electricity, it would look like a series of circles around the wire. If an electric current flows directly towards you, the magnetic field it creates spins around the wire counterclockwise. If the direction of the electric current is reversed, the magnetic field also reverses direction and sends the wire clockwise. If you wrap part of the wire around a nail in one direction and part of the wire in the other direction,
Magnetic field around a conductive wire.
Step 4 – Connect the Battery
Attach one end of the wire to the positive terminal of the battery and the other end of the wire to the negative terminal of the battery. If all went well, your electromagnet is now working!
Don't worry about which end of the wire you attach to the positive terminal of the battery and which to the negative terminal. Your magnet will work just as well as it did anyway. Which will change the polarity of your magnet. One end of your magnet will be its north pole, and the other end will be its south pole. By reversing the way you connect the battery, you can reverse the poles of your electromagnet.
Tips for Strengthening Your Electromagnet
The more turns of wire your magnet has, the better. Keep in mind that the further the wire is from the core, the less effective it will be.
The more current passes through the wire, the better
Attention! Too much current can be dangerous! When electricity passes through a wire, some of the electrical energy is converted into heat. The more current flows through the wire, the more heat is generated
If you double the current passing through the wire, the heat generated will quadruple! If you triple the current passing through the wire, the heat produced will increase 9 times! Items can quickly become too hot to handle.
Try experimenting with different kernels. A thicker core can create a more powerful magnet. Just make sure the material you choose can be magnetized. You can test your core with a permanent magnet. If a permanent magnet is not attracted to your core, it will not make a good electromagnet. For example, aluminum rod is not a good choice for the core of your magnet.
Nail magnet
Today I would like to tell you how to make a simple electric magnet.
Maybe someone already knows this or learned it in physics or crafts class. I'm going to show this to those who don't know it yet. We need copper wire, electrical tape, AA battery, nail, scissors, there are test pins in the box.
First we need to wrap the copper wire around the nail.
It looks like this. The coils need to be tight. Cut off the ends and remove the insulation.
Then connect the terminals. Cut a piece of electrical tape. Connect one contact to negative and the other to positive. We have such an electric magnet. Let's check it out.
Thank you very much for watching.
https://crazyinvent.com
DIY electromagnetic motor
This homemade electric motor can be easily made from scrap materials at home. It is worth noting that such a device can be used not only as a visual example, but also for its intended purpose, for example, by attaching a fan to the rotor.
To make it you will need:
- Spoke;
- Thin metal plates;
- Bolts with nuts;
- Copper wire;
- A piece of plywood.
From a metal sheet 0.2 mm thick, cut out 5 rectangular plates 40 by 15 mm. We make holes in the center of all plates and put them on the prepared knitting needle. Next, you need to secure the plates together with electrical tape.
Then, on the axis you need to attach a homemade current breaker, which is made of the metal from which the plates are made. The breaker dimensions are 3 by 1 cm. This plate is folded in half and placed on the axle.
Next, we make the base from plywood. To do this, drill three holes on a piece of plywood measuring 50 by 50 mm (two for bolts along the edges and one in the center for installing the rotor). We make a U-shaped holder for the upper part of the rotor from a metal plate. And drill a hole in it in the center.
After this, to make the stator, we cut out three plates from metal that will connect the bolts in the lower part of the structure and make two holes for the bolts in them. We put these plates on the bolts, and insert the boots into the holes on the wooden platform.
Next, the bolts are wrapped with electrical tape, and 500 turns of copper wire is wound onto it. A holder for a contact breaker is attached to one of the corners of the wooden structure. Electricity of 12 Volts is connected to the coils.
The principle of operation of an electric motor made of a battery and a magnet
The coil, made of several turns of wire, is also a segment through which reverse current flows, and has both positive and negative charges on its sides. Which are attracted to the magnet placed below.
In order for the structure to rotate, it is necessary, firstly, to correctly calculate the distance from the magnet to the coil, and secondly, to make sure that the conductors are in good contact with the battery terminals. These same conductors must also be properly cleaned so that the enamel of the wire does not interfere with the passage of direct current.
Unique application of anti-stress balls
This electric motor can be used as a unique and interesting addition to the interior of a room or office. You can always buy such a toy in a store, but it is much more interesting and educational to make it yourself, using available materials and tools.
Heart on a battery | Electric motor made of wire, batteries and magnet
People have been puzzled by the creation of a perpetual motion machine for a long time. In theory, the possibility of implementing this device is denied by the postulates of thermodynamics. And we won't even try. This is just for intrigue.
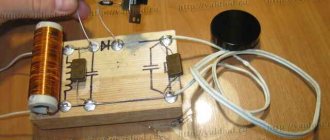
Let's take an ordinary AA battery, a neodymium magnet and copper wire. In addition to the aesthetic side, the wire must be bent so as to have a fastening and center of gravity at one point. This is important for the stability and rotation of the structure.
Assembling an electric motor
We put a battery on the magnet and then place a wire heart on it. The system begins to rotate.
This happens because an electric charge arises in the wire. And this is nothing more than the ordered movement of charged particles. Each of them is subject to a magnetic field, which deflects the direction of their movement. This deflection is called the Lorentz force. In physical language, this is the force with which an electromagnetic or magnetic field acts on a point charged particle. A special case of the Lorentz force is the situation when the magnetic field is directed perpendicular to the velocity vector. In this case, the force becomes centripetal.
Lorentz force f acting on a charged particle (charge q) when moving (with speed v).
That is, charged particles move in a circle, creating rotation of the structure. Those who are especially curious can even calculate the rotation speed by obtaining its formula from the following expression:
The battery will run out after some time and the movement will stop. But the impression will remain. Memories do not live in a copper heart, unlike the present. Hmm... Impressions, memories, love, no matter how banal it may be - what is not a perpetual motion machine?!
simplescience.ru
Battery stylus
This device will allow you to control your phone using your fingers. To complete it you will need:
- Current source, preferably a tablet-type element.
- Nail 15 cm.
- Sandpaper.
- Plastic bag.
- Metal file.
- Gel pen.
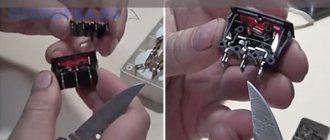
We cut off the ends of the nail. If you have an electronic sharpener, you can do this easily. After this, we polish our nail. Next, take a helium pen. We remove the cap from it. It needs to be glued to the nail. Some handles have cylindrical rubber bands. This is exactly what we need. It needs to be glued to a nail. Now we attach the battery to the stylus, stretch the bag and secure it with an elastic band. The excess can be cut off.
Details in the video.
How to make a dialer from a battery?
In fact, this is the simplest device. To make it you will need:
With this test you can easily determine whether the wire is intact or not. It is advisable to find the dead battery crown in order to remove the contacts from it. But if anything is possible, the connector can be purchased at an online store or radio store in your city.
Now let's assemble a simple chain! We connect our light bulb to the connector at one end. We attach a wire to the second end of the light bulb. Next, using the contacts, we attach the probe to the battery. The sample is ready!
In principle, it can be made from a phone battery. Watch the video below for more details!
Expert opinion
It-Technology, Electrical power and electronics specialist
Ask questions to the “Specialist for modernization of energy generation systems”
Assembling an electric motor Having prepared all the necessary materials, you can proceed to assembling a simple electric motor that runs on just one battery. Ask, I'm in touch!
How to make a lighter from a battery?
To create an electric lighter you need to acquire the following equipment:
- A 9 volt crown battery. Costs about 100 – 200 rubles. But you can find it cheaper.
- Thin wire, but it is better to use nichrome thread.
- Wires.
- Button.
- 2 bolts.
- Transparent glue.
- Soldering iron.
- Tin.
- Rosin or soldering acid.
Apply glue to one narrow side of the current source and glue the bolt. It must have nuts on it. We repeat the same thing on the other side. Next, we take the dead old battery crown and remove the plate with poles from it. This is a place for contacts. A similar connector can be purchased at a radio store for little money.
After this, use a soldering iron to connect one wire from the connector to the bolts. Next we wrap the wire around the nail. And we make a spring out of it. We attach it to the bolts using the previously installed nuts.
We attach the second wire to the button and batteries. For more details on how to make a lighter from a battery, see the video below. Perhaps you can use foil in place of the wire. That is, if you make a thin strip and twist it into a spiral.
How to make a stun gun from a battery?
For production you will need:
- Krona battery 9 volt.
- Conversion transformer. It can be removed from the charger or AC adapter.
- Ebonite rod 30-40 centimeters long.
- Insulating tape
- Wire.
Build process
To assemble a battery shocker, attach 2 pieces of wire to the end of the rod. Steel wire 5 cm long. They also need to be connected to a transformer and an energy source.
Next you will need to attach the battery to the two-pin connector of the transformer. At the other end they place a rod and attach a switch. If you press it, an electric arc will pass between the steel contacts. For the human eye to notice this arc, you need to press the button as many as 25 times per second.
In this homemade product, the current strength will be low and therefore it will not be possible to knock out anyone using such a stun gun. Therefore, it can only be used to intimidate as a means of defense.
How to make a motor from a battery correctly
This electric motor is rather of a demonstration nature. In order to make a simple motor, it will take some time and available materials.
Essential elements:
- Battery 1.5 V;
- Small magnet;
- Pins;
- Scotch;
- Plasticine.
First of all, it is necessary to make a coil, which will act as a rotor. To do this, we wind enameled copper wire around the battery (6 turns). We thread the ends of the wire into the resulting coil and secure it with knots.
We bite off the ends of the coil with pliers (they should be about 4 cm long). We completely clean one end of the varnish, and the other only on one side (it will act as a breaker).
Next, using tape, attach the pins to the battery contacts. To do this, you just need to attach pins and wrap the battery with tape. Then, a magnet is installed on the battery using plasticine.
We insert the coil into the ears of the pins. A magnetic field is generated in this coil, due to which the movable structural element rotates. If rotation does not occur, swap the coil contacts.
The simplest electric motor
Details Published: September 11, 2010
The other day I was showing my child how an electric motor works. I remembered a physics experiment from school.
Source materials:
- AA battery
- Enameled wire 0.5 mm
- Magnet
- Two paper clips, about the size of a battery
- Stationery tape
- Plasticine
Bend part of the paper clip.
We wind a coil of enameled wire. We make 6-7 turns. We fix the ends of the wire with knots. Then we clean it up. We completely clear one end of insulation, and the other only on one side. (In the photo, the right end is stripped from the bottom)
We fix the paper clips on the battery with tape. Install the magnet. We attach the entire structure to the table using plasticine. Next, you need to position the coil correctly. When the spool is installed, the stripped ends should touch the paperclip. A magnetic field arises in the coil, and we get an electromagnet. The poles of the permanent magnet and the coil must be the same, that is, they must repel each other. The repulsive force turns the coil, one end loses contact and the magnetic field disappears. By inertia, the coil turns, contact appears again and the cycle repeats. If the magnets are attracted, the motor will not spin. Therefore, one of the magnets will need to be turned over.
The process of building a homemade motor in the video:
Add comments can only registered users.
www.zabatsay.ru
The best homemade magnets
The use of magnets in everyday life is so widespread that listing them all would take a lot of time. But since many are rather entertaining, we will dwell in more detail on listing the widely used ones.
Magnets use:
- During installation work;
- Window cleaning;
- As holders.
First of all, it is worth noting that finding magnets is not a very difficult task. Small magnets you can find in old headphones. More powerful neodymium magnets can be removed from old computer hard drives.
Let's assume that you are working with a wooden structure. In one hand you hold a hammer, and in the other an element of this design. In this case, holding an armful of nails is not entirely convenient. To do this, you just need to place a magnet in your chest pocket and glue nails to it.
There are situations when you have to tighten screws in hard-to-reach places where it is not possible to hold the screw. To do this, simply attach a magnet to the metal part of the screwdriver. A magnetized screwdriver allows the bolt or screw to hold on its own.
If you glue small magnets to your computer desk (in any convenient place), you can use them as holders for various USB or other types of wires. To do this, small springs are placed on the wires (springs from handles can be used), which are a metal magnetized structure.
As a component of decor, magnets can be used as fastening elements for a puzzle located on the refrigerator door. To do this, take any photograph that is outlined into certain elements. A small magnet is glued to each element using ordinary glue. The photo is divided into its component elements. After this, it is assembled on the refrigerator door in the form of a puzzle.
Battery disposal rules
It is highly recommended not to dispose of batteries that have become unusable as other waste. This is explained by the fact that the device contains various substances that cause significant harm to the environment, for example:
The body of the device begins to rust over time, which means it loses its original tightness. Because of this, toxic substances enter first the soil and then into groundwater. Then underground water flows carry them into large bodies of water.
Therefore, a system for recycling batteries has been developed in all countries. Products that have become unusable are widely used in metallurgy, in the manufacture of fertilizers or pencils.
Some large hypermarkets, for example IKEA, accept old power sources. To do this, they placed special bright yellow containers. You can also donate batteries to organized collection points.
If you want to make something original or extend the life of batteries, remember that your experiments must be safe. Do not involve small children in this process or use damaged batteries.
Expert opinion
It-Technology, Electrical power and electronics specialist
Ask questions to the “Specialist for modernization of energy generation systems”
How to make a battery burner? There are situations when you have to tighten screws in hard-to-reach places where it is not possible to hold the screw. Ask, I'm in touch!
How to make an electric motor from a battery: step-by-step instructions
Now we move on to the main stage, engine assembly. Watch this video, the whole process is explained here, after the video we will talk in more detail about each stage.
- We make a motor coil from a copper wire; to do this, we wind the wire around the battery, leaving 5 centimeters in length on each side. You need to make about 15-20 turns.
- Remove the winding from the battery, this is what it should look like.
- We clean the end of the winding from the enamel using a regular knife.
- We make two mounts for the engine. We take a small wire 10 cm and wind several turns.
- We insert the battery into the holder and immediately attach the motor mount to it. This is how it should turn out in the end.
- To start it, place a magnet on the battery and push it a little.
So we managed to make a mini engine from a battery, nothing complicated. Such an engine will always surprise all your guests. Watch another video of how such engines are made, there are a few other ways, you will find everything here. Read about how to make a car charger.
Automatic cabinet lighting.
How to make a perpetual motion machine from a battery
In order to make this gadget, you will need basic tools that every home has, or that can be bought at any specialty store.
So, we will need:
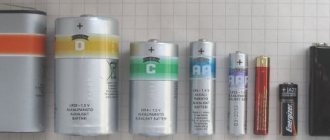
1. Regular 1.5 volt AA battery
2. Copper wire
3. Ordinary round magnets, preferably not very bulky
4. Working compartment for batteries
So, let's start directly assembling our miracle engine. We wind copper wire around a pen or pencil or other long stick so that we get the shape of a spring.
We attach magnets to both sides of the battery.
Insert the battery with magnets inside the wire spiral, and then connect the wires at the ends.
And now the battery with magnets will move in a circle inside the spiral. This craft is also popularly called the simplest electric train. Good luck.
maxpark.com