Convenience in the kitchen for the housewife is not just a thoughtful arrangement of furniture, but also the presence of various household appliances that greatly facilitate the cooking process. All modern devices are electric, that is, they require connection to a current source.
Adjustments to the existing premises can only be made during a major renovation. Therefore, when planning it, you should draw up a design project with an exact list and placement of household appliances and think about how to place sockets in the kitchen correctly and in the right quantity. This will not be difficult if you have an idea of the safety standards and rules that will be discussed in the article.
Location standards
When designing sockets, you should be guided by the following regulatory documents:
- GOSTs 7397.0-89, 7396.1-89, 8594-80.
- SNiP 3.05.06-85.
We list the standards applicable to the installation of kitchen sockets:
- They should be located at a height of more than 2 cm from the baseboard.
- The household appliance that needs to be connected to the network must be located no more than 1 m from the outlet .
- They are positioned so that they are not exposed to splashes of water or moisture vapor.
Calculation of the total power of electrical appliances and selection of components for network installation
The main load on the network comes from the operation of powerful electrical appliances. These include: ovens, electric kettles, multicookers, hobs. For example, an electric stove consumes from 2 to 15 kW, and a washing machine – up to 2.5 kW. These data must be indicated in the instructions by the manufacturers.
To understand what loads the electrical network should be designed for, take into account all appliances, lamps and devices that are connected on a permanent basis and regularly used in the cooking process. It is necessary to add up their power, this will be the desired result. Usually 15 kW is enough for correct operation, but experts recommend increasing this value to 20 kW.
It is also necessary to choose the correct wiring. For different loads, different wire sections in millimeters are used:
- 1.5 for lamps and fixtures;
- 2.5 – for washing machines, PMMs and other devices with a power of less than 2.5 kW;
- 6 – for ovens, electric stoves.
Recommended types of wires are VVGng or ShVVPng with copper conductors. For wiring inside walls, you can use single-core wires, and for flexible connections, multi-core wires.
Sockets with a built-in circuit breaker are divided into two types - 16A and 25A. The former work with equipment with a power of up to 3.5 kW, and the latter from 3.5-5.5 and above.
How many of them do you need in the kitchen?
The calculation is quite simple: it consists of the number of electrical appliances that are present in the kitchen, with a margin of 20-25% . Sockets to consider:
- under the hood;
- for a stove (if it has electric ignition, an induction surface or an electric oven);
- for large household appliances (refrigerator, washing machine, TV);
- for built-in appliances, kettles, microwaves and other used appliances.
Then add stock. The resulting figure will be the answer to the question about the number of sockets that need to be made in the kitchen. If there are not enough of them, then it will be difficult or even impossible to redo them later, and you will have to use extension cords, which is inconvenient.
Recommendations for wiring and circuit breakers
- for a group of sockets into which devices up to 3.5 kW are connected, a 16A circuit breaker is installed
- for devices up to 5.5 kW automatic 25A. Moreover, it is better to extend a separate group to this pantograph
You can also navigate using the following table for selecting machines and cables when connecting a hob:
- since the kitchen is a wet room, plus a huge number of objects with a metal case, it is mandatory to install an incoming RCD with a current of 30 mA in the panel in front of all machines
- all sockets must have a grounding contact, for a rated current of up to 16A, for hidden wiring
- A separate socket is installed for each pantograph
- do not use carriers or extension cords in the kitchen
This is not only an additional load on the wiring, but also a potential short circuit (due to spilled tea or other liquid).
Rules and layout of sockets
Determine how many household appliances will be there or may appear in the near future. Then check and write down the power of each and the connection features, if any. Approximate power figures:
- Large appliances : electric oven – from 2500 W;
- hob – 1000-1500 W;
- dishwasher – from 1000 W;
- washing machine – from 1500 W;
- water heater – from 1500 W;
- refrigerator – 200-1000 W;
- freezer – 300 W.
- microwave oven – from 800 W;
- TV – 200-330 W;
The placement of sockets is subject to certain rules to prevent situations that could lead to unpleasant consequences:
- Pay special attention to the fact that the total power of the devices plugged into the outlet should not exceed the permissible value. For example, you cannot connect a kettle and a microwave oven to the same outlet at the same time. The power of devices can be clarified in their technical data sheets.
- It is necessary to install so many lines in the kitchen that power the sockets so that there is enough supply for all appliances with a double supply. This means that the kitchen needs to be roughly divided into parts with the location of the appliances, then the resulting power should be divided into socket groups in these parts and multiplied by two in each resulting group.
- For electrical appliances with high power (large household appliances, electric stoves, etc.), it is better to install separate lines with a suitable cross-section, copper and through protective automation. For convenience, it is better to sign each machine in the electrical panel.
- Devices with a metal body require grounding. Therefore, sockets for them must be connected through a differential circuit breaker or RCD (residual current device).
- It is prohibited to install sockets directly behind built-in electric ovens, refrigerators, and hoods; they should be located on the side at a distance of approximately 20 cm.
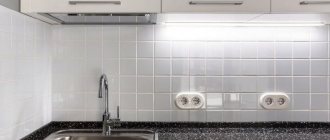
- The sockets are installed above the tabletop, stepping back 10-15 cm. Conditions must be strictly observed to prevent moisture and splashes of grease from getting on them. Installation above a sink and stove is prohibited. When installing sockets near pipes, make sure that they have covers and rubber seals that will protect them from moisture in the event of a breakthrough.
Manufacturers indicate on the packaging for sockets what power they are designed for; these figures should be taken into account when purchasing. They produce options of 10 amperes, which corresponds to 2.2 kW, and 16 amperes – 3.5 kW.
Preliminarily draw up a diagram of the location of the sockets. This point should receive most of your attention. The importance of this stage lies in the fact that the ease of use of household appliances in the kitchen, the safety and aesthetics of the room will depend on how accurately and successfully the diagram is drawn up.
The placement of sockets should be strictly drawn on the kitchen plan and it should be noted how the electrical lines will be laid to them.
Do not forget about the design of the room; they should not spoil the overall appearance. If sockets for large household appliances, as a rule, are not visible behind the kitchen apron, then located above the countertop they can add an interesting look or ruin it.
In modern kitchens, the choice is often made in favor of pull-out options; they are hidden in the work surface without changing its aesthetics, and appear when needed. Another advantage to note is that they are easy to install; you can often order installation when making a kitchen set.
TOP 5 common mistakes
When performing electrical installation work with your own hands, serious mistakes are often made. Which can lead to additional costs for their elimination or expose household members to the danger of electric shock. To avoid this, let's look at the most common mistakes:
- The cross-section of the wires supplying the kitchen does not correspond to the connected load. In this case, the wiring will overheat and may fail, or even cause a fire.
- Installation of sockets before drawing up a plan for the arrangement of furniture in the kitchen. In this case, there is a high probability that some outlets will be closed and you will have to be content with fewer resources. Or install new ones after finishing the finishing work.
- The locations of the sockets are not consistent with the water pipe laying plan. Then when gating walls, drilling, etc. you can damage the pipeline and flood the room.
- The permissible socket rating does not match the equipment being connected. As a result, the device will overheat and may melt or burn out.
- The dimensions of the socket do not allow installation of the desired device or interior element.
At what height should they be made?
Experts recommend adhering to a three-level scheme, considering it the most successful model:
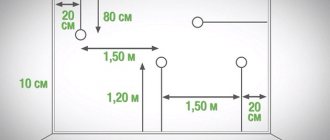
- The lower level is occupied by large household appliances. Such sockets are located at a height from the floor of approximately 10-30 cm.
- The next level— intermediate —occupies the bulk of the equipment. Most often they use sockets that are located above the working surface of tables, this is convenient. According to the rules, they should be at a height of 10-20 cm above the tabletop.
- And at the very top level there are sockets for the kitchen hood, as well as lighting devices connected via an electric plug. Here the height is at least 2 m from the floor level.
Distances and locations
When you have decided on the quantity, it’s time to move on to calculating the required sizes and indentations.
To do this, draw something like a scan of the walls where the furniture will stand. Here you will need the exact dimensions of the kitchen - length, height of the room. Gradually, in the form of rectangles, you draw the equipment and all the cabinets.
If the kitchen is corner, do the same with the adjacent wall.
Next, take your plan with the number of sockets and transfer them to the wall layouts. For each technique, follow its own rules.
Refrigerator socket
For built-in refrigerator
It is better to place the socket in the kitchen plinth - this way it will be accessible, and if necessary, the device can be turned off. The socket should not be placed behind the appliance - it may interfere with the installation of the frame and the refrigerator itself. If the kitchen configuration allows, you can place the outlet in an adjacent cabinet. In this case, the height of the outlet varies from 20 to 70 cm from the level of the finished floor and no further than 10–20 cm from the refrigerator itself.
For free standing refrigerator
It is allowed to place an outlet directly behind it. But the best option is 5–10 cm from the refrigerator: the socket will be in constant access, and if necessary, you will not have to move the refrigerator.
Sockets in the work area and above the tabletop
The height of the tabletop is usually 85cm, maximum 90cm. Then there is a partition with a height of 550-600mm and then cabinets.
Place sockets in this area 105cm from the floor.
In this case, they will not end up in the middle of the wall, and it will be convenient to cover them with the same microwave.
The minimum distance from the countertop should be at least 5cm so that the kitchen plinth does not touch them. Location: one set in any corner, plus between the hob and sink.
As mentioned above, at least two pieces. If you don't like the look of sockets above the kitchen splashback, consider the option of a pull-out unit from the countertop.
You definitely need to consider whether there will be built-in appliances in the upper cabinets. For example, a microwave.
You will also have to make a separate outlet for it. It is not feng shui to pull the cords from above to the tabletop area.
Hood
Also at the top, at a height of 1.9m-2.0m, there is an outlet for the hood. However, a lot can depend on the brand. If this is a cheap option, then you can get by with the cable outlet and then connect it directly inside the equipment.
But if this is an expensive model, then it comes with its own fork. And cutting off the factory plug will void the warranty.
Sockets for hob and oven
If this is not a single appliance, the electric stove, hob and oven are connected to different sockets. When the oven is located in the classic way under the hob, the sockets are placed at a height of 10 cm from the level of the finished floor in the kitchen basement in the center of the frame or in an adjacent cabinet.
How to install?
All that remains is to proceed with installation according to the prepared diagram:
- First, the sockets are distributed along the walls and on the kitchen apron, marks are made, and they are correlated with the output voltage cables.
- Then, in the marked places, holes are made in the wall, necessary for proper installation using a hammer drill and a round nozzle.
- A socket box is installed, which is securely fixed in the wall.
- Power lines are connected to the socket, fixed in accordance with installation rules, and covers are installed.
- It remains to check the functionality.
Retractable options are installed in a hole that is drilled in the work surface. You can connect them to a socket hidden behind the kitchen unit or located in the apron.
If you do not have experience, it is better not to take risks and turn to specialists.
Types of sockets
Manufacturers develop and present to consumers different types of products, which have their own pros and cons. To choose the right type of electrical goods, you need to weigh the pros and cons.
- Overhead models are installed on a wall, panels or kitchen apron. They stand out clearly and can serve as interesting decor. However, they are unsafe for the work area: the protruding housings are easy to catch, water vapor and water droplets get into them. If you want just such a solution, then the craftsmen recommend corner models, which are attached to the joint between the apron and the lower covers of hanging cabinets, or to the corner.
- Hidden or built-in units are well camouflaged under the surface of walls or facades. Indispensable for difficult places and corner kitchens, safer. If there are covers, they are completely protected from the effects of drops of various liquids.
- When closed, built-in pull-out products are completely invisible. They are mounted in worktops, upper and lower tier of cabinets. They are convenient because they extend only when needed, to the required length, and do not interfere with cleaning at all.
The products also differ in power and degree of protection against dust and moisture IP. You cannot connect equipment that consumes a large amount of electricity to a regular model; a reinforced version is required. And, you shouldn’t install unprotected housings next to the sink.
Preparing for installation
Before installing sockets, it is recommended to make markings on the wall.
The beginning of the kitchen electrification process is drawing up a project, carrying out calculations and purchasing everything necessary.
For work you will need the following tools and materials:
- hammer drill, grinder, soldering iron;
- pliers, wire cutters, knife;
- screwdrivers;
- roulette, level;
- copper cable VVGng-Ls 3×4mm²;
- spatula, putty;
- corrugated plastic tube.
Drilling tiles for a socket.
Preparation of the base is carried out in the following sequence:
- Markings are applied to the walls. Lines are made only in the vertical and horizontal directions. The places where sockets and mounting boxes will be located are marked.
- Using a grinder and a hammer drill, grooves and holes are made for the glasses.
- Plastic tubes with a cable pre-stretched inside are placed in the grooves. After this, the grooves are sealed with putty.
You can continue working after the solution has completely set. To avoid subsequent stripping, the solution must be laid so that it does not form a convex layer after hardening.
Common Mistakes
You should not install sockets near a heat source.
During the design and installation process, inexperienced craftsmen make the following mistakes:
- Design errors. After installing the furniture, the sockets are located behind cabinets and large household appliances.
- Saving on cable, which leads to overheating and melting of the insulation.
- Connecting washing and flow-through devices through simple machines.
- Incorrect placement of sockets (above the sink and stove, close to gas pipes).
- Placing the cable in grooves without using plastic tubes.
By following the work technology and using high-quality materials, you can easily make reliable and durable wiring on the apron.
How to make a rosette on a kitchen apron
It is better to install internal sockets on the kitchen apron that will not protrude above the countertop.
Depending on the style and design of the kitchen, the socket on the apron can be internal or overhead. The choice depends on the material of the walls, the size of the room and the priorities of the housewife.
To make an internal socket, it is necessary to make a hole and wall up the sleeve in it before installing the panel. After this, a block with terminals and contacts is fixed in it. To install the outer cover in the apron, a hole is made in the shape of the terminals.
The standard for installing overhead products is to pre-mount a bracket in the wall to secure the housing. For this, a wooden block is used, fixed in a niche. To attach the socket, 3 holes are made - for the cable and self-tapping screws.
The best option is indoor installation. This way, the products will not protrude above the countertop, and appliances and fixtures can be placed close to the wall.
How to cut a hole for a socket on a kitchen backsplash
It's easiest to make holes in MDF. To do this, use a sharp knife, manual or electric jigsaw. After sawing, the edges must be treated with any sealing substance to protect them from moisture.
Holes in ceramic tiles can be made with a diamond core bit, a hand cutter or a wire after pre-drilling the outline.
The most difficult thing to work with is glass. It is almost impossible to make a hole in hardened material yourself. It is advisable to include this procedure in the order for the manufacture of an apron at the company. To do this, you need to accurately measure and calculate everything in order to achieve complete alignment of the holes and wires.
Step-by-step connection algorithm
Installation of sockets on the kitchen panel is carried out in the following sequence.
- The cable cores are stripped and soldered with tin.
- The ends of the cable are inserted into the mounting boxes and contact blocks. They are being tightened. The quality of the contacts is checked by pulling the wires.
- The block is fixed. It is fixed in the glass by screwing in bolts that regulate the position of the legs. To make sure that the block is securely fastened, you need to insert the plug into the terminals several times and pull it out.
- The outer cover is secured. The room is de-energized and the cable is connected to the network.
1. Drilling holes in the tiles
Punching holes in tiles
Drilling holes under tiles
4. Cable entry into the installation box
Installation of installation box and sockets
Installing socket boxes in a concrete wall
Before turning on the voltage, you need to visually inspect the circuit again to eliminate the possibility of a short circuit.
Which cable to use
The laying of power supply cables is planned based on the power of household appliances:
- Copper cable with a conductor cross-section of 8 square meters. mm is planned to provide individual high-power consumers - electric stove, hob, electric oven, heating boiler, storage water heater, instantaneous water heater, automatic washing machine, dishwasher;
- Copper cable with a cross-section of 4-6 sq. mm - microwave, refrigerator, electric kettle, food processor;
- Copper cable with a conductor cross-section of 2-4 mm - for a toaster, blender, electric meat grinder, coffee maker, coffee machine, TV and other consumers.
If installing a block of sockets, it is recommended to lay a separate line to the block from a cable with a cross-section of 6-8 mm, this will ensure reliable operation without overheating the line.
copper cable VVGng
Installing separate lines to high-power consumers will ensure a reliable supply of electricity to the device and emergency shutdown by a circuit breaker. For example, if the heating element of a washing machine fails and there is a short circuit in the circuit, an individual machine will turn off only the power line of the washing machine. And the rest of the devices will continue to operate as normal.
Attention! When laying new wiring, you need to use only copper cable, no twists with aluminum, only solid wires from the machine on the panel to the kitchen outlet!
Which cable to choose for the kitchen
The next step is to calculate the cross-section of the common supply wire of the electrical panel and the outgoing wires to each pantograph in the kitchen. To buy a good cable, follow the rules below:
- if the load of devices does not exceed 3500 W - copper cables VVGng LS 3*2.25m2;
- if the load of the devices does not exceed 5500 W - copper cable VVGng LS 3*4m2;
- if the total load of all electrical appliances is up to 10,000 W - copper cable VVGng LS 3*6m2;
- if the total load of all electrical appliances is up to 15000 W - copper cable VVGng LS 3*10m.
If your home has an old grounding system (that is, there is no third protective conductor), then installing a three-conductor cable is still a suitable option. This is done to save you from replacing or reconstructing the wiring in the future.
In any case, another wire will not be superfluous. It can be useful in case of a broken cord or any other damage.