Series connection of resistances
If the conductors were connected in series in a circuit, their resistance at each point will be the same. The resistance in the sum of all circuit elements will be equal to the sum of the voltage reduction in the circuit sections.
Experience can confirm this. The series connection of resistances is calculated using instruments and mathematical verification. For example, three constant resistances of known magnitude are taken. They are connected in series and connected to a 60 V power supply.
After this, the expected indicators of the devices are calculated if the circuit is closed. According to Ohm's law, there is a current in the circuit, which will allow us to determine the voltage drop in all its sections. After this, the results obtained are summed up and the total value of the reduction in resistance in the external circuit is obtained. The series connection of resistances can be confirmed approximately
If we do not take into account the internal resistance created by the energy source, the voltage drop will be less than the sum of the resistances. Using instruments, you can verify that equality is approximately observed
Stages of connecting and installing the socket block
For carrying out installation work when connecting sockets. Naturally, you will need tools. Their set is quite standard:
It is not necessary to buy the latter; you can simply borrow or rent it. Still, the tool is not cheap and there is no point in spending extra money if there is no particular need for it. There should definitely be no problems with all other equipment.
When attaching the socket box to the wall surface, screws are used. If it is located inside, then you will need to make a cavity in the surface. We will consider a standard situation in which only one cable is connected to the electrical outlet from the panel.
You don’t have to worry too much about whether all the cables will fit into the box, which is already occupied by a socket. A standard 42 mm socket box will easily accommodate everything you need.
Features of installation of daisy chain connection
As already noted, the daisy chain method is used to connect sockets located in the same group, which power low-power devices, such as a computer, audio equipment...
This type of connection is more economical and technically simpler. After all, to implement it there is no need to lay a lot of cables and use additional protection. But it is worth noting that each additional point of the created chain will make it more vulnerable.
For example, we know that the rated current per outlet should not exceed 16A. If you connect such a load to one point, then nothing bad will happen. But when you turn on such a load on at least 2-3 sockets of one line, its total readings will increase, and as a result, the power cable may not withstand it.
The key condition for a daisy chain connection is that the cross-section of the jumper conductors will correspond to the conductors of the main supply line
According to the PUE, during a daisy chain connection, it is not allowed to break the PE conductor of the protective grounding wire. In any case, its contour must remain unbroken.
The use of one of the technical solutions helps to reduce material costs when connecting PE conductors to sockets:
Installation instructions from existing
First, they determine which one will be sufficient. Secondly, special attention is paid to the choice of wire to prevent overheating of the contacts.
Varieties
GOST, for use in domestic premises, recommends several types of
- No grounding. Type C 1a. Provides operation of simple devices; in operating mode it can withstand up to 250 W, 10A DC and AC up to 16A.
- With two contacts on the sides for grounding. Type C 2a. Designed for connecting heating columns, washing machines, electric ovens, pumps and other household appliances. The power parameters are similar to the previous ones.
- Equipped with pin format grounding (how to install a grounded socket?). Type C 3a. Designed to connect powerful energy consumers. Characteristics are the same as C2a.
- Type C5. Old type, withstands up to 6A.
- Euro sockets with a protruding body and widely spaced holes for the plug. They are type C6 and are suitable for devices with the same plugs.
Each device consists of
- pads;
- protective housing;
- contacts.
Wire selection
If the requirements of the standards are not met, the contacts overheat
- A three-core cable is suitable for grounded ones.
- Without grounding - two-wire, in which the yellow conductor is intended for grounding:
- blue - for the neutral wire;
- red and brown - for the phase.
- Ungrounded wiring consists of two wires - zero and phase.
- Three-core (grounding, neutral and phase) increases the safety of cable operation and helps to avoid electric shock.
For installation of wiring inside the room, it is advisable to use a wire with a copper core
Serial and parallel connection
- Professionals advise connecting additional sockets in parallel when the cable to the new point is pulled from the junction box. This method is the safest.
- Most often, a serial connection is chosen, in which the next one is taken from one point, that is, the cable is connected from an existing socket to an additional one. This method is also called a loop method; it is chosen when it is inappropriate to use the first one.
Sequential rules
The main condition for serial connection is the ability to use electrical appliances with low power
Advantages and disadvantages
The final version of the wiring diagram
To determine the optimal connection diagram for sockets and switches, it is necessary to prepare a wiring plan, calculate the number of devices and the possible maximum power. At the same time, in newly built buildings it is necessary to plan future possibilities without unnecessary modesty: an additional TV, the purchase of a separate freezer, and the like.
Based on the data received, the connection type is selected. The advantages of the sequential method include:
- simple connection system and circuit assembly;
- the ability to adjust the voltage level, make it less;
- You can use one fuse per circuit.
The disadvantage becomes obvious after a malfunction occurs - if one socket breaks, the rest will not work.
Compliance with safety precautions when installing sockets
Compliance with basic safety standards will allow you to perform high-quality work on connecting and operating sockets
Work with electricity is classified as dangerous. Even low voltage leads to burns, injuries and other unpleasant consequences. Compliance with safety precautions:
- de-energize the room in which the work is being carried out;
- check the area before starting with a special device (you can plug the device into the network);
- use rubber gloves and equipment with rubberized handles;
- when “increasing” the length, it is not enough to twist the wires; soldering is required;
- contact with connected bare cables is not allowed;
- the excess should not “stick out” - it is shortened and placed in the wall;
- check whether the devices are suitable for the current and voltage levels used.
Anyone can connect sockets using these methods.
The schemes have advantages and disadvantages; before the final choice, it is important to establish the power of the equipment and the method of branching the wiring
Basic standards for the physical part of socket installation
When installing an outlet, you need to know what to connect, where, what the electrical wiring has to do with it, what you cannot do with your own hands, and what you should never do. Right? Sorry, no – wrong! Despite the fact that a socket is primarily an electrical product, it is the physics of installation and fastening of this terminal product that is very important.
Let's (without electricity for now) see what errors can lie in wait in this simple, but very well detailed workflow:
- The main fastening element of the socket is the supporting frame. This is a metal square on which the filling is mounted;
- Fixation in the wall is carried out due to spacer brackets
(inside the socket) and
locking screws
, with which the frame and socket box are connected into a single whole; - The socket box
is securely fixed to the wall.
What are the main mistakes that novice electricians make when performing the task of how to properly connect an outlet? You are right, they start with the problem of how to connect the wires to the outlet, which sometimes leads to big problems with cleaning.
What happened in this case? It's simple. The socket was not secured; after the plug of the mixer, where the meat for the dog’s porridge was ground, was pulled out, the socket was pulled out along with the plug. This led to a cataclysm. The socket fell into the mixer bowl, which led to the following consequences. The hairdryer, broom, massager and beer on the floor are not exhibits. The family was going to the bathhouse when the mixer bowl exploded, causing all this destruction.
The socket burned out and so did the wiring, causing problems on the circuit connected to it. How to solve intractable problems in the electrical network. The good thing is that no one was hurt. This is what the outlet looks like now. Obviously this is a dummy.
Before connecting the wires to the socket, make sure that you understand exactly how to securely attach it to the socket!
Before you begin wiring, make sure that the outlet box is securely installed in the wall, that the spacer brackets will secure the inside of the outlet, and that the locking screws will allow you to secure the frame. Otherwise, when you pull out the plug, you risk pulling out the socket from the wall
, and you have already seen the consequences.
When thinking about how to choose the right retaining screw, give preference to a longer and thinner screw. A thick one can destroy the plastic glass of the socket box, which is why there will be no fixation.
Fixing in the wall
It is important to securely secure the socket box in the wall hole to prevent the socket from being pulled out during operation. For this, it is best to use alabaster, which you can buy in the store.
Dilute it with water to form a thick paste, then spread the mixture into the socket hole. After this, insert the socket box into the wall on the alabaster and be sure to level it. For the mixture to dry, you need to wait an hour and a half and only then install the socket. It is attached to the socket box with claws and screws - the socket is inserted and the fastening bolts are tightened. The final stage is the installation of the decorative panel.
Sockets in drywall
This is both hidden and open wiring - it belongs to the first category because the wires are not visible, and it falls into the second category because the wires are not walled into the wall and can be reached. In addition to standard tools (unless you are installing a socket block), you will need steel wire for installation. The procedure is as follows:
- The socket and socket box are removed from the wall. They are screwed to the drywall, so there is no need to break anything.
- The steel wire is inserted into the hole and pushed in the direction where the new socket is planned to be installed. At this stage, you just need to make sure that there is a gap between the plasterboard slabs, profiles and the wall into which the corrugation with wire will pass (wiring unprotected from mechanical damage cannot be left inside).
- If you can find the way with the wire, then a hole is drilled in the right place for a new socket box. A strong rope is screwed to the wire and it is pulled back.
- Then, using a rope, a corrugation is pulled between the sockets, the wires are inserted into it and connected.
If it is not possible to stretch the wire between the profiles, then a more radical remedy is used - unscrew a sheet of drywall, stretch the wire and screw it back. All that remains is to putty the damaged joints and install the socket. In some cases, instead of unscrewing the whole sheet, a hole of the desired shape is simply cut out in the drywall (after unscrewing the fastening screws), which is then put in place and puttied.
Components for assembling a triple socket
Let's look at what main components our triple socket will consist of. The modern electrical equipment market offers customers a wide range of sockets. However, in this abundance, finding a triple socket in a single housing is very problematic. Even after finding the product you are looking for, a person may encounter two problems:
- 1. Obviously overpriced product;
- 2. The model does not meet the buyer's requirements.
What to do in such a situation? Most craftsmen use this method in 99% of cases - they assemble a block of single sockets
. Therefore, a triple socket is often assembled from three ordinary sockets.
To do this, we need three regular sockets with a rated current of 16 A. Moreover, we only need their internal part. You can safely throw away the overhead frames for each outlet, since we won’t need them. And to combine three single sockets, we need a special overhead frame with three holes, which will create the appearance of a single whole.
Socket connection diagrams
When installing electrical wiring, it is important to choose the right scheme for connecting several outlets to each other. There are three ways in total:
- Parallel connection or star connections.
- Serial or loop.
- Mixed.
The concepts of “series” and “parallel” are arbitrary in this context, and they should not be perceived in the classical understanding of connections of electrical circuit elements.
The above methods can be supplemented with a ring connection, when all sockets in an apartment or house are powered from one wire. Such a scheme may include all three connection options. Each of them has its pros and cons. When choosing a connection method, it must be taken into account that the electrical connection is vulnerable at twist points. At the same time, increasing the number of distribution boxes reduces the service life of the wiring.
Let's look at each socket connection diagram in more detail.
Series circuit
A daisy chain connection involves connecting several sockets in series in a row with each other. The connection is made without a distribution box, since the cores are fixed at the contacts of the sockets in the socket boxes. A phase and a neutral conductor are supplied to the main socket. Wires extend from it to other points.
This method is used when it is necessary to combine sockets into a single block. But such a circuit is not suitable for connecting power devices, such as electric and microwave ovens, washing machines, and air conditioners. If the load is exceeded, the contacts may burn out. And if the wire in the first socket burns out, those connected after it will not work.
It is also important to note that the ground wire cannot be run as a loop, it must be connected to each point, as shown in the diagram above
Parallel connection
The parallel connection of sockets is also called a star connection. The essence of the method is that the circuit includes distribution boxes in which independent connections of sockets are made. One main power cable comes into the box. Wires are branched from it point by point. Outwardly, it resembles a star, which is why the method got its name.
An important advantage of this method is the autonomy of the outlet, that is, independence from the state of others. If one of the sockets fails, the others continue to function. But if the main cable burns out, then the voltage disappears in all. However, in such cases it is always known with certainty where to look for a break.
Another disadvantage of this connection scheme (in parallel) is the increased wiring consumption. To connect each outlet, you need to draw a separate line, which increases the cost of electrical installation work.
Mixed scheme
A mixed connection helps improve the reliability of the socket connection diagram. This method is often used when installing points using the daisy chain method. The essence of the method is to install a distribution box to which the power cable is connected. Then the electrical wiring is laid out for each outlet in the room. Branches are made from it to the remaining points, which are located between the box and the far connection point.
Mixed connection provides reliability because the circuit includes independent power points. If one of them fails, the remaining sockets are not deprived of voltage and continue to function. Finding a break will also not be difficult, since the electrical points are connected independently of each other.
Ring connection
Connecting sockets with a ring is an unusual scheme, as it is rarely used. But this method has its own number of advantages. The meaning of the wiring is to lay the main power cable around the perimeter of the room. The wiring comes out of the distribution panel and goes into it at the other end.
The joints for branches into separate rooms are made in distribution boxes. The connection is made using a cable or star type.
The cross-section of the main cable is selected based on the total load of the room, when several devices are turned on simultaneously in each room. A ring connection is not inferior in reliability to a parallel connection, since the circuit maintains the autonomy of the points.
How to choose the right method
It all depends on the amount you can afford to spend, the power of the device that will be connected to this outlet, as well as the presence or absence of decoration on the walls (the desire and ability to ruin it).
In any case, the most reliable way to connect any outlet is a separate (parallel) connection directly to the main panel or distribution box in the room (if the cable cross-section allows). If the outlet is planned only for connecting a TV or similar not very powerful devices, then a daisy chain connection is also quite suitable.
If you plan to install wiring in a new house or modernize (replace) an old one in an apartment, then first of all you need to, without undue modesty, imagine what electrical appliances you would like to have - what can be connected to the network in principle. Based on this, it is already possible to calculate the required cross-section of wires and the method of connecting them.
The procedure for installing the loop
All work requires a professional approach and compliance with safety regulations. You need to know how to properly connect a group of outlets. Before starting, it is necessary to de-energize the entire apartment in order to disconnect both phase and zero. The absence of voltage is checked with an indicator at the place of work. Installation is carried out in the following sequence.
- Marking and preparing the site.
- Wall chipping.
- Laying the cable from the junction box to the first socket box.
- Preparing wires for jumpers.
- Installation of socket boxes.
The quality of installation depends on the types of contact elements. Models with a flat-spring connection method are considered reliable. In extreme cases, it could be a plate clamped with a bolt. The cable supplied to the socket must protrude beyond the wall surface by no more than 80 mm. If necessary, it should be shortened.
The cable braid is removed, the wires are separated to the sides. On the left is the phase, on the right is the neutral, in the middle is the ground wire. Their ends are exposed by 10mm using an insulation stripper or knife. The socket has self-clamping spring terminals for easy operation. Insert the sufficiently stripped end of the wire into the hole until it stops.
Then you need to check the reliability of fastening of all wires by pulling. First of all, the leads are packaged, and the entire structure is inserted into the socket box, pre-fixed on the sides with screws. The level is checked for horizontalness, then the screws are finally tightened. The last to be installed is the front panel, the overlay frame.
Types of devices and their features
There are quite a lot of varieties of plug sockets and blocks. Each type has its own design features and purpose.
- Hidden devices are mounted directly into the wall - in special socket boxes.
- Open devices are produced for those apartments where the electrical wiring is not hidden in the wall.
- Retractable socket blocks are mounted in a table or other furniture. Their convenience lies in the fact that after use, the devices can be easily hidden from prying eyes and playful children’s hands.
The devices differ in the method of clamping the contacts. It comes in screw and spring types. In the first case, the conductor is fixed with a screw, in the second - with a spring. The latter are more reliable, but they are not so easy to find on sale. The devices are fixed to the walls in three ways - claws with jagged edges, self-tapping screws or a special plate - a support that facilitates both installation and dismantling of the socket.
In addition to conventional, inexpensive devices, there are models equipped with grounding contacts. These petals are located in the upper and lower parts, and a grounding wire is attached to them. To ensure safety, sockets are equipped with curtains or protective covers.
Main popular types
These include:
- type “C”, it has 2 contacts - phase and zero, usually purchased if intended for low or medium power equipment;
- type “F”, in addition to the traditional pair, is equipped with one more contact - a grounding one; these sockets are becoming more popular, since a grounding loop has become the norm for apartments in new buildings;
- Type “E”, which differs from the previous one only in the shape of the grounding contact, is a pin, the same as the elements of the socket plug.
The last type is less common than the others, since it is less convenient to use: turning the plug 180° with such a socket is impossible.
The security of the case is the next difference between the models. The degree of security is indicated by the IP index and a two-digit number following these letters. The first number indicates the class of protection against dust and solids, the second - against moisture.
- For ordinary living rooms, IP22 or IP33 class models are sufficient.
- It is recommended to buy IP43 for children, as these sockets are equipped with covers/curtains that block the sockets when the equipment is not in use.
- IP44 is the minimum required for bathrooms, kitchens, and baths. Not only strong humidity, but also splashes of water can pose a threat. They are suitable for installation in basements without heating.
Installing an outlet on an open balcony is a sufficient reason to purchase a product with a higher degree of protection, this is at least IP55.
How to connect an outlet
Options for connecting sockets: parallel and serial.
The socket can be connected either to the panel or in a row with existing sockets. By connecting it directly to the panel, we free ourselves from some of the problems (this method is called “parallel”). But, as a rule, you have to connect them into one cable (this method is called “serial”) and here you need to make sure that the wire from the shield is thick enough. The wire in the example below is rated for up to 15 amps. The connection diagrams are trivial and we present them here only for general information. The PE ground wire is drawn with a broken line.
In the diagram, the right two sockets are considered to be connected in parallel. The left sockets are in series. Connecting sockets in a cable (“in series”) is absolutely not dangerous for connecting lighting fixtures, irons and kettles, drills and fans, refrigerators and vacuum cleaners. If you also connect a TV, computer, video player, printer, Wi-Fi access point, or satellite dish receiver to this cable, then you are guaranteed completely unexpected failures and even equipment breakdowns. Sockets are divided into several types: built-in, overhead, external, with and without a grounding contact, with and without curtains, sockets for a three-phase network... Wikipedia has an excellent article on this topic, which not every specialist will read in its entirety. Here we will show you how to connect a double socket. We connect the socket into the open wiring at the dacha. At the time when the dacha was built, there was no talk of any “earth” wires, so we use a simple double socket without a grounding contact and without curtains. In our opinion, curtains only complicate life without increasing safety at all. You need them in that short period of life when you have small children growing up. But for this time you need (even necessary!) to buy special plastic plugs. This is how the double socket looks disassembled on the floor:
Double socket without ground contact
Is it possible to connect sockets in series?
Connecting sockets in series mode has a number of disadvantages and limitations. In a large room and a significant number of powerful electrical appliances, this method cannot be used - the load is too high. It is better to parallel the sockets or use the ring type. The recommended quantity per chain is 5-6 pieces.
Another disadvantage is the uneven distribution of voltage at power points. Each outlet accounts for a portion of the total electrical flow. Therefore, serial connections are not used in residential and industrial premises. But you can use it in Christmas tree garlands and others.
Connection diagram for socket and switch: loop, series, parallel
Let's look at how to connect an outlet or a multi-unit unit. You can connect electrical outlets in parallel via a junction box or using terminals; this method is also called a daisy chain connection. When connecting electrical outlets with a cable, the cable is connected to the first unit of the block, and the cable for the next block is powered from the last. For a daisy chain connection, mandatory independent disconnections of the socket are required. To do this, the conductors are connected to the neutral conductors through terminals or soldering. Zero and phase are connected to the first electrical outlet. A clamp is placed on the grounding wire, from which a grounding wire is supplied to each of the units. To connect the second socket block, you need to connect the phase and working zero from the last unit of the first block, and the ground wire into the compressor.
Now let's look at connecting a conventional single-key switch. To do this, we connect the phase wire to the switch using a clamp marked with an English “L” or an “outward” arrow; we connect the zero to a clamp with an “inward” arrow or the letter “N”. We screw both wires securely. Since grounding is not used in switches, we cut off the excess wire and insulate it.
Another pressing question: “How to connect a switch from an outlet”? To do this, it is better to use a block consisting of an electrical outlet and one or more switches. A new cable is laid from the junction box. One core of the cable carries the phase to the switch, and the other leads the working “zero” to the socket. The remaining conductors pass to the lamps through switches. 3-wire wires (zero, ground and phase) are laid from the junction box to the lamps.
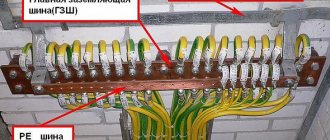
Installation of branches in a socket box
In order to fully comply with the requirements of the PUE and at the same time not incur too much cost for laying a separate PE conductor to each socket, you can make branches directly in the socket box. For this purpose, special terminal blocks or crimp sleeves can be used.
The main advantage of terminal blocks is that there is no need to use special tools for their installation.
Such products are installed very quickly and easily. In addition, each of them can be easily dismantled for repair or maintenance of the connection points of wiring elements. In turn, the advantages of crimp sleeves include a higher quality of electrical connection, as well as their low price. When using terminal blocks or crimp sleeves, you must be very careful carefully, since you will need to compactly arrange all the resulting connections in the socket box. Some experts recommend not limiting yourself to making a branch for the ground wire, but connecting the phase and neutral to the socket contacts in the same way. Phase and neutral wires can be connected directly to the socket contacts.
The quality of such a connection is largely determined by the type of contact. Standard bolt clamps are often not able to provide sufficient reliability of the connection of two wires inserted into them at once. Therefore, for devices intended for connection with a cable, it is necessary to use terminal blocks. Another option is to use high-quality devices equipped with several clamps for each terminal.
Existing connection methods
Sockets with more than two pieces are connected in three ways: in series, in parallel and mixed. Electricians use other terms - star (for the first option), loop (for the second). Before choosing one of the methods, you need to find out the pros and cons of each, and choose the one that is suitable for a particular apartment.
If the room has electrical wiring, it is important to consider the way the cables are routed and the total power available. New ones may exceed the limit; the wire will have to be pulled from the shield
Parallel connection
The essence of the method is to connect sockets in one distribution block, which bears the entire load when the electrical equipment is turned on. A cable is pulled from the common house panel to the distribution box, and wiring is pulled from it to each power point (separate wires).
The advantage of this method is the independent operation of each power point and switch. If one device burns out, the others will continue to work. But if the main wire becomes unusable, the voltage will disappear completely. In such a situation, it is easier to find the gap and fix the problem.
Serial connection
A daisy chain connection means a sequential transition from the first outlet to the next. Instead of twisting wires, device contacts are used. The phase and neutral cables are connected to the first mechanism, then to the next and sequentially to the last.
The “pure form” method is rarely used. For example, if you need to install an additional socket or switch or move one of the devices some distance. In the second situation, they leave the old access point and lead from it to a new location - this way there will be less need to scratch the walls.
Mixed connection and grounding in series connection
If you decide to use a series connection of sockets, you can strengthen the overall design by using a mixed method. The essence of the method is as follows:
- A central cable is connected to the distribution box from the common panel board.
- In the preliminary wiring plan, the most distant point of access to power is selected.
- The selected outlet is connected from the distribution box cable.
- The rest are powered from this device.
This method increases the reliability of the network. If an outlet fails, the others continue to work. Disabling the entire system is possible only in the event of a malfunction of the main cable, twisted in the junction box.
This technique has disadvantages - the large length of the wires used, the need to install several junction boxes (for each branch). To know for sure whether high-power devices can be connected to the network, it is necessary to calculate the voltage before the cable wiring stage. An accurate calculation will help you choose how to connect the sockets in the end - in series, parallel or mixed.
Ring connection
This type of connection is rare in post-Soviet countries. The method has a number of undeniable advantages, which is why it has recently been gaining popularity.
How to properly connect sockets to each other with a ring connection:
- From the main (communal) panel to the apartment (house, dacha), a common cable is run in a circular manner.
- In each room (premises), a cut-in is made on the main wire, a distribution box is installed, and a separate circuit is drawn to a separate room.
- Lastly, branches are made to each access point.
Open and closed wiring
The difference between the methods is noticeable to the naked eye. The closed wiring is located inside the wall, for which grooves (grooves) are punched or cut into it, in which the connecting wire is hidden under a layer of putty. Open wiring is laid along the surface of the wall, on which it is held in special fasteners or laid in plastic guides - cable channels.
Accordingly, if you can see the wires that fit into the outlet, then the wiring is of an open type. Otherwise, closed wiring is used, for the installation of which the walls were cut.
These two methods of connecting an outlet can be combined with each other - if the old points are connected in a closed way, then nothing prevents you from connecting a new one in an open way. There is only one choice - in wooden houses the socket can be connected exclusively in an open way, just like all other electrical wiring.
Open wiring - advantages and disadvantages
An analogy with the most common extension cord (surge protector), which is essentially an additional branch of the electrical network, but is connected not to a junction box, but to an outlet, will help you understand why open wiring is good.
Advantages:
- You don't have to cut the wall to install a new outlet. This is especially true for those premises that have already been renovated.
- Installation does not require tools such as a wall chaser or a hammer drill.
- In the event of a breakdown, you don’t have to open the wall - all the wiring is in front of your eyes.
- Installation speed. Even after all the work has been completed, adding another point to the existing wiring is a matter of several minutes.
- If desired, you can quickly completely change the wiring - ideal for temporary connection schemes.
Flaws:
- There is a high probability of external influence on the wiring - children, pets, you can simply accidentally hook it. This disadvantage is mitigated by laying wires in cable channels.
- Exposed wires spoil the entire interior of the room. True, it all depends on the design abilities of the owner of the room - cable channels will fit perfectly into modern design solutions, and if the room is made in a retro style, then special wires and other accessories are produced for this.
- The need to purchase special fasteners, even if cable ducts are not used - in wooden houses, open wiring should be laid at a distance of 0.5-1 cm from the wall surface. Wires are often laid inside iron pipes - all these requirements are aimed at increasing the safety of using open electrical wiring.
As a result, this connection method justifies itself if for some reason there is no point in laying the wires to the outlet inside the wall. Besides the fact that the wiring will be visible, there will be no differences in the operation of the outlet.
Hidden wiring - pros and cons
Despite some significant disadvantages, it is used almost everywhere - the advantages of its use still outweigh.
Advantages:
- The wires to the socket fit into the wall, so wallpaper or other finishing can be done freely on the outside.
- Meets all fire safety requirements (in concrete buildings) - even if a short circuit occurs, there is no fear of a fire from the wires in the wall.
- There is a very low probability of damage to the wiring - it can only be damaged when drilling walls.
Flaws:
- For installation you need to cut the walls.
- It is difficult to carry out repair work.
- If the walls are finished, then after installing an additional outlet you will have to redo it.
The disadvantages are leveled out by preliminary calculations - if you plan in advance where and which block of sockets should be installed, then problems usually do not arise in the future.
Installing an outlet block
To work you need a certain set of tools:
- voltage indicator;
- level;
- universal screwdriver;
- pliers;
- pencil and construction knife;
- press pliers;
- thermotube;
- hammer drill
First, the wiring diagram is performed. It indicates the location of distribution boxes, sockets, and switches. Mark the route along which the wires will go. They must be positioned strictly vertically and horizontally, and have no more than one bend at a right angle. The depth of the channels is up to 2.5 cm, width 3. The length from the box to the outlet is no more than 3 meters. The diagram should be saved so that during the next repair you do not get caught in the wire.
The most labor-intensive work is gating walls. It is more convenient to do this with a special tool, but you can get by with improvised means - a hammer, a chisel, a grinder, a drill with an 8-10mm Pobedit drill bit. It should be held perpendicular to the wall and operated at low speeds. Cool the drill periodically in water.
Next, holes are made for the socket boxes. The sleeves are mounted on alabaster or plaster. To prevent the solution from hardening quickly, you can add PVA glue to the water. The standard box has a depth of 45 mm. Everything you need can easily fit into the socket box.
Selecting a device for installation
The market offers a wide range of different models of sockets, both universal and special. And only a small part of them can be used in everyday life:
- C1A is a distribution device that does not have the possibility of grounding. Works with direct current no more than 9A, and alternating current up to 15A. Maximum voltage up to 250 volts.
- C2a - sockets with lateral grounding contacts, the design provides a contact for connecting a PE wire. Designed for connecting energy-intensive consumers such as electric stoves and washing machines to the network.
- C3A - The grounding contact is made in the form of a pin; it differs from the option described above only in the design of the grounding contact.
- C5 is a classic type of Soviet sockets. A square with a cylindrical cutout for an electrical appliance connector. Nowadays they are losing their relevance, since there is no possibility of connecting modern European plugs for electrical appliances. Can withstand current up to 7 amperes.
- C6 - modern Eurotype sockets. Installation is carried out on top of the wall when the junction box is located on top of the mounting hole.
The choice of a specific outlet model depends on the purpose and operating conditions. In rooms where there is high humidity and there is a risk of moisture getting into the outlet, a special model with protection parameters from moisture and dust is required. The level of such protection is determined by the markings on the case.
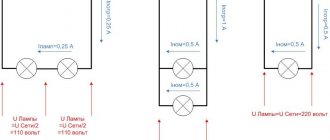
Problem on serial connection of conductors
Condition. Two lamps and a resistor are connected in a circuit one behind the other. The total voltage is 110 V and the current is 12 A. What is the value of the resistor if each lamp is rated at 40 V?
Solution. Since a series connection is considered, the formulas of its laws are known. You just need to apply them correctly. Start by finding out the voltage across the resistor. To do this, you need to subtract the voltage of one lamp twice from the total. It turns out 30 V.
Now that two quantities are known, U and I (the second of them is given in the condition, since the total current is equal to the current in each series consumer), we can calculate the resistance of the resistor using Ohm’s law. It turns out to be equal to 2.5 ohms.
Answer. The resistor's resistance is 2.5 ohms.