How to prevent sparks
suppression circuits
To prevent sparks from forming at the contacts, manufacturers install arc suppression chambers that cool the arc. Some brands may make solderings from materials that are not susceptible to oxidation. Current will pass through them. You can use several methods yourself.
Spark arresting circuits
Suitable for high-speed devices that generate sparks at the moment of closing. Most often there are two options:
- For relays and DC starters. You will need a diode with an anode on the negative pole and a cathode on the positive pole. Energy dissipation occurs on the active part (self-induction). The diode will close the circuit.
- Snubber. The shunt RC circuit is designed to dissipate the energy accumulated in the inductance at the moment of active resistance of the network.
The contacts are located close together, so the spark extinguishing circuit reduces the load.
Pressure plates
The method is suitable for sparking contacts of a starter or machine. A special spring mechanism ensures tight contact between the contact pads. To connect, you will need to install a spring mechanism in the closed contact position, retracting it and lowering it back. A click/thump should be heard.
Removing carbon deposits
You can clean the surface of conductors not only with fine sandpaper. An eraser or a wooden match will ensure a smooth surface and eliminate the risk of increasing contact resistance.
Main causes of the problem
Weak contacts or oxidation may cause a crackling sound when the switch is turned on.
The crackling noise may sound like a buzzing or buzzing sound. There are several reasons for a breakdown.
Oxidation of contacts
If the contacts of the device become overgrown with carbon deposits or oxidize, an electric arc occurs the moment they come together. The cause of sparking is complicated by the size of the deposit. When shoots form on the end plates, the wiring can catch fire, i.e., the contacts close.
Plate loosening
The spring that presses the contact at the moment of switching on weakens - the characteristic sharp and clear click is no longer heard. A problem is indicated by the device turning on softly and the need to press the button for the light to appear. The danger is that the switch sparks constantly, causing a fire risk.
Lamp power mismatch with contacts
A halogen lamp or high-power LED source creates a load on the contacts. The simplest way to solve the problem is to replace the switch with one that corresponds to the lighting power indicators.
Poor quality of contacts and plates
A breakdown typical of budget models. The button operates on the principle of soft start, which, in combination with low-power automatic machines, provokes sparking.
Other causes of contact failure
High humidity causes oxidation of switch contacts
Factors that cause switch sparks and crackles also include:
- high humidity – activates the oxidation reaction;
- incorrect or weak connection of cores;
- increased load on contacts - humming occurs;
- constant voltage fluctuations.
Broken contacts will lead to failure of household appliances.
How to prevent sparks
Spark arresting circuits
To prevent sparks from forming at the contacts, manufacturers install arc suppression chambers that cool the arc. Some brands may make solderings from materials that are not susceptible to oxidation. Current will pass through them. You can use several methods yourself.
Spark arresting circuits
Suitable for high-speed devices that generate sparks at the moment of closing. Most often there are two options:
- For relays and DC starters. You will need a diode with an anode on the negative pole and a cathode on the positive pole. Energy dissipation occurs on the active part (self-induction). The diode will close the circuit.
- Snubber. The shunt RC circuit is designed to dissipate the energy accumulated in the inductance at the moment of active resistance of the network.
The contacts are located close together, so the spark extinguishing circuit reduces the load.
Pressure plates
The method is suitable for sparking contacts of a starter or machine. A special spring mechanism ensures tight contact between the contact pads. To connect, you will need to install a spring mechanism in the closed contact position, retracting it and lowering it back. A click/thump should be heard.
Removing carbon deposits
You can clean the surface of conductors not only with fine sandpaper. An eraser or a wooden match will ensure a smooth surface and eliminate the risk of increasing contact resistance.
Unsuitable cookware
Not only internal damage, but also the use of unsuitable utensils can cause sparks in the microwave. If you put metal utensils in the oven (even if it only has a small metal edging), the microwave will spark.
If you discover that you have accidentally left a metal cutlery (fork or spoon) in a dish, stop the oven, remove the prohibited cutlery, or replace the cutlery with the correct one. The sparking will stop.
Also, the formation of sparks is caused by too small a volume of heated food. In this case, the microwaves will be reflected from the walls of the chamber and spark.
Causes of sparks and arcs
Before we look at why contacts spark, let's understand the basic concepts. The switching device and its contact system must provide a reliable connection with the possibility of breaking it at any time. The contacts consist of two electrical plates, which in the closed position must be securely pressed against each other.
An arc occurs when switching inductive circuits. These include various electric motors and solenoids, but it is worth remembering that even a straight piece of wire has a certain inductance, and the longer it is, the greater it is. At the same time, the current in the inductance cannot stop instantly - this is described in the laws of commutation. Therefore, a self-inductive emf is formed at the terminals of the inductive load, its value is described by the formula:
E=L*dI/dt
Interesting! In our case, the rate of change of current plays an important role. When turned off, it is extremely high, and accordingly the EMF will tend to large values, up to tens of kilovolts (for example, a car ignition system).
As a result, the EMF increases to such an extent that its value breaks the gap between the contacts - or sparks are formed. The quality of any connections is described by their contact resistance: the lower, the better the connection and the less heating. When they open, it increases sharply and tends to infinity. At the same moment, the area of their contact heats up.
In addition, between the open contacts against the background of increasing self-induction EMF and increased air temperature due to heating of the surfaces when the plates are opened, air ionization occurs. As a result, all the conditions for arcing and sparking are present.
If we talk about why contacts spark when an electrical circuit is closed, then this happens not with an inductive load, but with a capacitive load. You see this every time you plug in your laptop or phone charger. The fact is that the discharged capacitance (capacitor) at the input of the device at the initial moment of time represents a short-circuited section of the circuit, the current of which decreases as it is charged.
If you observe sparking in a relay or switch in the closed position, the reason for this is the poor condition of the contact surfaces and their high temperature.
Why is the machine buzzing in the dashboard?
Automatic switches must be installed in each electrical panel. Working devices do not make any sounds during operation, but sometimes various sounds begin to be heard from the shield - hum and crackling, and it may also begin to heat up. What is the cause of the crackling sound and why is the machine buzzing in the dashboard? Do you need to replace the protective device urgently or should this only be done if the noise is disturbing the occupants of your home?
Causes. What makes strange sounds?
If the machine is connected to the network, but the current flowing through it is small, the sounds from it are practically inaudible. The reason why the machine buzzes in the panel when under load is the design features of the device.
Circuit breaker hums
The machine in the panel can only buzz due to an electromagnetic release that protects the line from a short circuit. It consists of an electromagnet with a movable core. The release coil is connected in series with the contacts of the device, and when the current exceeds the protection setting, the moving part of the solenoid is attracted to the stationary part, which leads to the circuit breaker turning off.
The reason why the machine hums in the panel under load is that the current in the network is alternating with a frequency of 50 Hz. This causes the coil and core to vibrate in a manner similar to the hum of mains transformers.
In a fully operational device, the amplitude of vibrations is insignificant and the noise is practically inaudible, but during the service life of the device, the fastening of the release may weaken and the magnitude of vibrations and sound increase. This makes it more noticeable, especially at current levels close to the rated current of the machine.
The machine crackles under load
The crackling noise heard from the device always indicates the presence of sparks. Most often they occur when the moving and fixed contacts or terminals at the place where the wires are connected are worn out.
If in a working device all connections are tightly adjacent to each other, then when the connection terminals or contact group burn out, the electric current passes through soot, an air gap or point contact of conductive elements.
The flow of current through damaged areas is always accompanied by heating and further destruction of the connections, and if this process goes far enough, then sparks and the accompanying crackling noise are added to it.
Therefore, such a sound indicates the need to immediately turn off and replace the circuit breaker. Otherwise, it is possible not only for the device to fail, but also for it to catch fire and destroy the entire electrical panel.
Reasons for heating
Any circuit breaker gets hot during operation. The reason for this phenomenon is the built-in thermal protection, which turns off the machine when overloaded.
The operating element of this release is a bimetallic plate, which bends when heated. The end of the plate presses on the switch mechanism, which causes the protection to operate.
The thermal release is heated when electric current flows through it, which is why the machine is always slightly warmer than the environment, but its temperature should not exceed 60-70°C .
If the body of the device is heated above the permissible temperature and the device frequently turns off without exceeding the load on the line, then the cause of overheating is most likely poor contact of the connected wires in the terminals of the device.
What to do if your circuit breaker buzzes, crackles or gets hot
Rumble, crackling, overheating or frequent shutdown of the device indicate various malfunctions that need to be eliminated or the machine itself needs to be replaced. The necessary actions depend on the specific manifestations of the malfunction.
Rumble in the building
Most often, this problem does not require any action, especially if the circuit breaker is located in a non-residential area. The reason why the machine hums is due to loose fastenings of the electromagnetic release parts, which does not affect the protective properties of the device.
If the sound coming from the case interferes with sleeping or listening to TV, then the device must be replaced. Repair in this situation is only possible by disassembling the case, which is not provided by the manufacturers.
Cracking noise during operation
This sound indicates poor contact between pins or terminals. To determine the location of the fault, you need to inspect the terminals and wires. In this situation, two options are possible:
- The terminals have not melted, the insulation of the wires is unchanged. In this case, the cracking noise is caused by worn contacts of the contact group; they cannot be replaced or repaired and the circuit breaker must be replaced.
- The plastic near one of the terminals has darkened or melted, and the wire insulation has also become burnt or darkened. Such signs indicate poor contact and/or poorly clamped wires . Most likely, the device will have to be replaced, but before changing the machine in the panel, you can try to solve the problem by removing the damaged section of the wire and reconnecting it to the machine. After repairs, you should periodically monitor the device and replace it at the first sign of burnt terminals.
| Information! Cracking and overheating may be accompanied by the smell of smoke or burnt plastic. |
Overheating of the case or frequent shutdown of protection
This situation can also occur if there is poor contact inside the device or in the terminal block, but the location of overheating cannot always be determined by the state of the insulation.
In this case, the faulty terminal can be determined by touch, by the temperature of the wire sheath. The insulation near the loose connection is warmer than the rest and this terminal must be additionally clamped with a screwdriver.
Conclusion
The reason why the machine in the panel is humming, as well as heating up or crackling, may be a serious malfunction of the device and ignoring these problems can lead to failure of the device and even to its ignition and even a fire.
Therefore, if unusual sounds or odors appear, it is necessary to carefully inspect the device and decide on the possibility of its further operation.
Main causes of the problem
Weak contacts or their oxidation can lead to a crackling sound when the switch is turned on.
The crackling sound may resemble a buzzing or buzzing sound. There are several reasons for a breakdown.
Oxidation of contacts
If the contacts of the device become overgrown with carbon deposits or oxidize, an electric arc occurs the moment they come together. The cause of sparking is complicated by the size of the deposit. When shoots form on the end plates, the wiring can catch fire, i.e., the contacts close.
Plate loosening
The spring that presses the contact at the moment of switching on weakens - the characteristic sharp and clear click is no longer heard. A problem is indicated by the device turning on softly and the need to press the button for the light to appear. The danger is that the switch sparks constantly, causing a fire risk.
Lamp power mismatch with contacts
A halogen lamp or high-power LED source creates a load on the contacts. The simplest way to solve the problem is to replace the switch with one that corresponds to the lighting power indicators.
Poor quality of contacts and plates
A breakdown typical of budget models. The button operates on the principle of soft start, which, in combination with low-power automatic machines, provokes sparking.
Other causes of contact failure
High humidity causes oxidation of switch contacts
Factors that cause switch sparks and crackles also include:
- high humidity – activates the oxidation reaction;
- incorrect or weak connection of cores;
- increased load on contacts - humming occurs;
- constant voltage fluctuations.
Broken contacts will lead to failure of household appliances.
List of required tools
Some consumers, if they detect a malfunction of the switch due to sparking, crackling or humming of the device, immediately turn to electricians. However, damage that can be repaired can be repaired yourself. In most cases, it is enough to bend the contacts for the device to function normally.
The following tools are needed for repairs:
- indicator screwdriver with a lamp or electronic display;
- a regular type screwdriver for unscrewing screws/screws;
- insulating tape and fine-grain sandpaper;
- pliers, marker, knife for stripping wiring insulation.
All switches have a plastic housing, a protective frame and an internal operating mechanism. The frame can be attached to the mechanism with latches or screws. The socket box contains a working mechanism, fixed with spacer tabs or screws. To perform repairs, you need to provide access to the contact group by removing the outer box from the device.
Required Tools
When a spark appears in the switch, it is not necessary to call professional electricians. You can remove simple damage yourself.
To work you will need:
- indicator screwdriver – a model with a light bulb or electronic display is suitable;
- a standard screwdriver, which is used to unscrew screws;
- insulating tape;
- fine-grained sandpaper;
- pliers;
- marker;
- stationery knife for removing the insulating coating from the cable.
Before starting repairs, you need to know the design of the device. The switches are produced in a plastic case and have internal operating units and a frame. It is attached to the device with screws or latches. The main mechanism is located in the socket box and is secured with spacers or screws.
To make the contacts easier to access, you will need to remove the outer part from the switch.
Signs of malfunction and main types of breakdowns
The switch is faulty if you hear a crackling noise when you turn it on.
Before you can fix a faulty switch, you first need to understand how it works and also become familiar with the main reasons why it could break. Characteristic signs of failure:
- when you press the key, the changeover mechanism begins to jam and does not move to the desired position;
- at the moment of switching, you can hear a crackling sound, and sometimes you can notice something sparkling inside;
- After pressing the button, the device simply does not turn on the lighting.
Typically, these malfunctions are observed with only one of the keys, but the possibility of failure of two or even 3 switching mechanisms at once cannot be ruled out.
In the first case, the axis on which the base of the key is fixed could presumably fall out or a foreign object could get inside (dust accumulated). With characteristic crackling and sparking, one of the closed contacts or both of them has probably burnt out. If the light does not turn on at all after pressing the key, the problem is most likely that the contact at one of the points where the conductors connect to the terminals is broken and the current is not supplied to the load. In this case, it is first checked to see if the voltage has gone out in the entire apartment and that the light bulb is fully operational.
Types of electrical devices
If the switch sparks, it must be replaced with a new device or repaired. Turning on the light with a crackling sound, sparking and other problems is unacceptable - a short circuit in the wiring, fire and fire may occur.
To repair a light switch, you need to know what types of devices there are:
- One-, two- and three-key - widely used in residential premises, the circuit is closed when a key is pressed.
- Push-button products are equipped with an LED indicator and have no fundamental difference in the design of the mechanism from keyboard models.
- Dimmer devices with the ability to adjust the light intensity: the switch contacts when the wheel rotates.
- Rotary models have a simple design; they turn on the lighting when you turn the handle on the body.
By type of control, innovations in the field of electrical engineering include touch switches, products with an electronic time delay timer, acoustic and remote models. Most consumers have keyboard products installed that they can repair themselves.
Repair algorithm
Dismantling the switch
If the switch shorts, you can repair it yourself, working in stages:
- Line loss. The machine in the input panel is turned off.
- Checking for voltage. This can be done by touching the indicator screwdriver to an outlet in another room.
- Dismantling the device. You will need to remove the switch from the groove and remove the decorative trim. After this, the voltage is checked again, the screws on the sides are unscrewed, and the housing is removed from the socket.
- Disconnecting cables. For two-key models, you will need to mark the input wire with a marker.
- Disassembling the case and searching for contacts. The contact group is located above a plastic button mounted on screws.
- Troubleshooting. The contacts are cleaned or the device is completely replaced.
- Reassemble the case in the reverse order, reconnect the wires. The finished mechanism in the housing is returned to the socket box.
- Turning on the machine in the panel and testing the switch for serviceability.
How to repair touch switches
Touch switch board
Touch modifications are equipped with a remote control and special boards with control chips. It is worth disassembling such a switch after reading the manufacturer's instructions.
Device repair:
- Removing the decorative trim.
- Visual search for the panel with sensors, which is located under the plate. Depending on the number of lines served, there are 1-3 elements.
- Search for a sensitive area on the pad - sensors are indicated by circles.
- Detection of LEDs indicating the position of the switch (red - on, blue - off). Under this panel there are nodes to which conductors are connected.
- Disconnecting inputs and outputs. You need to remove the clips that secure the touchpad.
- Removing the bolts from the housing mounted on the socket box and inspecting problem areas.
- Checking voltage on individual cables. The faulty wire is replaced.
- Reassembling the mechanism. The main unit is connected to the power supply, placed in the socket and secured with screws. After this, the touch panel and decorative overlay are attached.
A special feature of the touch switch is that it interrupts the power supply in the event of a breakdown. When the light bulb burns out, the device is switched off. It does not change even after installing a new lamp. To turn on the light you need to touch the plate.
Causes of sparks and arcs
Before we look at why contacts spark, let's understand the basic concepts. The switching device and its contact system must provide a reliable connection with the possibility of breaking it at any time. The contacts consist of two electrical plates, which in the closed position must be securely pressed against each other.
An arc occurs when switching inductive circuits. These include various electric motors and solenoids, but it is worth remembering that even a straight piece of wire has a certain inductance, and the longer it is, the greater it is. At the same time, the current in the inductance cannot stop instantly - this is described in the laws of commutation. Therefore, a self-inductive emf is formed at the terminals of the inductive load, its value is described by the formula:
E=L*dI/dt
Interesting! In our case, the rate of change of current plays an important role. When turned off, it is extremely high, and accordingly the EMF will tend to large values, up to tens of kilovolts (for example, a car ignition system).
As a result, the EMF increases to such an extent that its value breaks the gap between the contacts - or sparks are formed. The quality of any connections is described by their contact resistance: the lower, the better the connection and the less heating. When they open, it increases sharply and tends to infinity. At the same moment, the area of their contact heats up.
In addition, between the open contacts against the background of increasing self-induction EMF and increased air temperature due to heating of the surfaces when the plates are opened, air ionization occurs. As a result, all the conditions for arcing and sparking are present.
If we talk about why contacts spark when an electrical circuit is closed, then this happens not with an inductive load, but with a capacitive load. You see this every time you plug in your laptop or phone charger. The fact is that the discharged capacitance (capacitor) at the input of the device at the initial moment of time represents a short-circuited section of the circuit, the current of which decreases as it is charged.
If you observe sparking in a relay or switch in the closed position, the reason for this is the poor condition of the contact surfaces and their high temperature.
Consequences of sparking
Due to sparking, metal evaporates from the contacts, heating them up and increasing the contact resistance. The latter causes them to burn even more, after which they spark even more. The consequences of these processes can lead to a partial or complete lack of switching ability of the device, even to the point of sticking or fire under certain circumstances. It is necessary to monitor the condition of all connections and moving switching elements.
Typical causes of failure
The light switch serves to close/open the circuit and supply electricity to lighting fixtures - chandeliers, lamps, lamps. The operating principle of an electrical device is based on the formation of contact between the receiving plate and a contact pair (one or more depending on the type of switch).
Main reasons:
- High humidity in the room or directly at the installation site, which leads to oxidation of wires and contacts.
- Insufficiently well secured contact, wear of the working mechanism - as a result, the device shorts.
- Using a broken device. Some consumers continue to use the switch if it crackles, buzzes, or sparks.
- Violation of the voltage parameters of the electric current on the current-carrying conductors connected to the switch.
- Stable voltage drops in the network, which provoke failure of the internal mechanism of the device.
- The total power of lamps switched on by the device exceeds the permissible value for a specific switch.
It is extremely rare that a device has a manufacturing defect, which leads to malfunctions. Mostly devices begin to spark due to the direct or indirect fault of the user. A common cause is moisture in rooms such as the bathroom or kitchen. High indoor humidity and constantly changing temperature can cause oxidation of contacts.
Repair features
After cleaning, you need to connect all the wires
If the contacts of the switch are melted, this indicates that a short circuit has occurred, as a result of which the mechanism overheated and became deformed. In this case, only replacement will help; such a switch can no longer be repaired. In order for the new device to fit, you need to take the old one with you to the store, then there will be no problems with choosing accessories.
In addition, the wire contacts at the terminals may become loose. If everything looks fine on the outside, you should try unscrewing the wiring from the mounting points and screwing it back on, tightening the screws tightly. If the check reveals that this is not the case, then it is worth checking the quality of the wiring with a special device - a multimeter.
https://youtube.com/watch?v=FP3_fqpoNdQ
Warning!
But let us remember firmly: without the qualifications and skills of an electrician, without special tools and protective equipment, it is impossible to carry out work on ANY electrical equipment, including household electrical appliances! You can only use the standard controls without disassembling anything.
Electric shock will not warn you in advance, and its consequences are unpredictable and can be long-lasting. Especially if you have been drinking alcohol. Already from a shot of vodka, a person’s electrical resistance drops 1000 times, and an otherwise harmless pinch can turn out to be a fatal blow.
As a rule, in this case, a person is bothered not so much by noise or hum, but by whistling in the ears. Fortunately, the problem can be solved with proper configuration. And in the Signia line, for example, there are hearing aids with a tinnitus masking function.
They can be localized in the ear canal, different parts of the inner ear, affect the brain... They are detected on CT and MRI. Correcting the problem may require surgical removal and serious treatment afterwards.
All this is not a complete list of possible causes of noise, humming and whistling in the ears. This is why diagnostics are needed to determine the true one. But you have to be prepared and understand that this doesn’t always work out right away.
And sometimes the cause of tinnitus cannot be found; whistling, ringing and humming can simply be heard by a person, but have no further effect on health. This also happens. However, there is no need to despair. Correction of true tinnitus is multifaceted: from working with a psychologist and taking sedatives to specially designed auditory perception training, when as a result a person stops noticing whistling and other unpleasant sounds in the ears.
Nuances when disassembling various types of switches
To power a large number of spotlights, ceiling lighting and other lighting fixtures, three-key switches are often used. The design of such models is distinguished by fairly thin keys. But, as for two-key switches, dismantling a three-key switch begins with removing each of them one by one. To simplify this procedure, many models are equipped with a small rectangular hole at the bottom of the keys, into which a screwdriver can easily fit. If you want to disassemble the dimmer (adjustable switch with rotary knob). Its dismantling is fundamentally no different from the classic model. The only difference is that instead of keys, you first have to remove the regulator knob. The touch switch is disassembled by removing the outer panel
For this purpose, you can use either a regular screwdriver or a special holder, which you can make yourself from wire if it is not included in the kit. In this case, special care must be taken so that the glass does not crack. If the switch is paired with a socket, then to dismantle the first one you will need to remove the socket along with it. In this case, the socket cover will have to be removed, since one of the fastening bolts is often hidden under it. Pass-through switches have the same design as conventional ones, and, accordingly, the same disassembly procedure
The only difference is the number of wires, since the phase connection is made in several positions at the same time.
Carrying out repair work
In order to repair a room switch, you need to prepare the required tools:
- fine-grained sandpaper;
- Phillips and flat screwdriver;
- indicator screwdriver;
- felt-tip pen.
To ensure your own safety, you must turn off the power supply. You can verify that there is no voltage using the indicator in the socket closest to the switch.
Before you start work, you need to turn off the power to your house or apartment.
Next, the switch is removed from the groove. To do this, remove the decorative cover and check the voltage again, just in case. The side screws are unscrewed and the housing is pulled out of the socket.
The circuit breaker is pulled out of the box before thoroughly stripping the current-carrying conductors.
Then you need to disconnect the wires. If the device is a two-key device, it is recommended to mark the input wire with a felt-tip pen so that during subsequent assembly you do not mix up the contacts.
Next, you should begin disassembling the case. It is necessary to get close to the contacts, which in most cases are the cause of the device malfunction. These structural elements are located immediately behind the key, which is secured with screws. Repairing them is not difficult at all.
After gaining access, you need to carefully inspect the hemispherical contacts, and if there are signs of burnout on them, you should sand them until a metallic sheen appears. If the carbon deposits do not come off, you can try to remove it using a sharp screwdriver tip.
The housing is assembled in the reverse order, the wires are connected, and the switch housing is inserted into the box.
The switch is secured in the socket after repair using a screwdriver
The machine located in the control panel is turned on and the functionality of the device is checked. If the switch operates correctly, and no extraneous visual or sound effects are observed during its operation, then the device has been repaired successfully.
If the contacts are not cleaned well enough, you will have to disassemble the switch again and repeat all repair procedures.
Repair technology
So, to make the repair instructions clear to you, we will consider it step by step, with photo examples for each important point of repair.
- First you need to prepare a tool: a marker, fine-grained sandpaper, an indicator and a regular screwdriver.
- Turn off the circuit breaker at the input panel to de-energize the electrical network in the house and protect yourself from electric shock.
- Make sure there is no voltage in the room by checking the presence of power at a nearby outlet yourself using the indicator. If you do not know, we recommend that you read the instructions to which we referred.
- Remove the light switch from the gate. Before repairing the product, you need to remove the decorative cover yourself, check again that there is no voltage with an indicator screwdriver, unscrew the side screws and pull the housing out of the socket.
- Disconnect the wires. If the light switch is a two-key switch, we recommend marking with a marker which of the wires is the input one, so as not to confuse it later and to make the connection correctly on your own.
- Disassemble the case and get to the contacts, which are most likely the cause of the repair. These structural elements are located immediately behind the plastic key, which is secured with screws. Repairing them will not be difficult, as you will see further.
- Visually inspect the contacts in the form of a hemisphere (you can see them in the photo) and if they are burnt, use fine-grained sandpaper to clean them to a metallic shine. If you cannot remove the carbon deposits well with sandpaper, you can carefully clean it with the tip of a screwdriver. This is enough to fix the light switch yourself.
- Reassemble the housing in reverse order. The video below shows how a light switch is disassembled and assembled at home.
- Connect the wires and install the housing in the socket box.
- Turn on the machine on the dashboard and check if the light switch works. If the switch does not crack and works correctly, you can be proud - you managed to fix the product. If the light is on when the switch is off, it means that you did not clean the contacts properly or did not connect correctly, so you will have to do everything again.
Video instructions for assembling the case
Thus, in 10 steps you can repair the product yourself. As you can see, the repair is not difficult and even a novice electrician can do it. We also recommend that you familiarize yourself with the tips provided below, which will allow you to quickly and correctly repair a switch in your apartment.
- If an old-style switch breaks, you can of course fix it, but there is no point in doing so, because... Every part wears out over time, and in electrical work it is very dangerous to use old switches and sockets, especially if they often break down. Today, even such leading companies as Legrand have inexpensive but reliable products, even with lighting, a chain (cord) or a dimmer.
- The reason why the contacts on the key switch burn out quickly is because the light bulbs are too powerful. We recommend replacing incandescent lamps with more efficient and at the same time less powerful light sources -. In this case, you can forget about repairing the switch for a long time.
- Before proceeding with complete disassembly of the case, check how well the wires are tightened with screws. You may be able to fix the switch simply by tightening the screws with a screwdriver.
- In order not to confuse the order of assembly of spare parts of a disassembled case, we recommend using a camera: take photographs of each of the disassembly stages one by one and, if necessary, assemble the structure from the photo.
It happens that when you turn on a specific electrical appliance in the apartment, for example a multicooker or a lighting system using energy-saving lamps, or the power supply of a specific electrical appliance, the circuit breaker in the electrical panel begins to buzz. Moreover, this phenomenon is usually not associated either with the increased power of the connected consumer, or with the corresponding current approaching the nominal value of the machine. And it is associated with a certain power or with a certain household appliance.
In some cases, the hum disappears completely with increasing load power, and often the owner of the home has no complaints about the smell of burning... This means that it is not the arc that is humming inside the machine. And then what? Where does this hum come from? Is he dangerous? How to fight this phenomenon and is it worth fighting it at all? Let's think about this.
What's buzzing there?
Anyone familiar with the device knows that two protective release mechanisms are simultaneously implemented inside it: thermal and electromagnetic.
The thermal release mechanism is based on the gradual deformation of a bimetallic plate, which, heated by the overload current passing through it, bends; this process is relatively inertial, however, if the current is equal to the nominal value of the machine, then after a few seconds the deformed plate will press on the trigger mechanism, and the charged spring of the switch will open the circuit .
The electromagnetic release mechanism is designed for the event of a short circuit; it is designed to instantly open the circuit when, during a short circuit, the current through the electromagnetic coil reaches such a value that a spring-pressed iron core is sharply retracted into this coil, which, when retracted, presses on the same spring-loaded switch - the circuit again it suddenly opens.
So, since the bimetallic plate cannot hum, it does not participate in magnetization, but is only heated by the current passing through it, therefore the hum of the machine is associated with the coil.
Indeed, the iron core of the coil is always in the magnetic field acting in the protected alternating current circuit. If the core is not pressed securely enough by the spring, if there is some play inside the circuit breaker body, then under certain conditions this core will indeed emit a rather noticeable hum.
Why is it buzzing? What are these conditions?
Firstly, if the shape of the current in the coil surrounding the core is distorted by a pulsed load connected to the network, producing pronounced peaks from transient processes, then the magnetostrictive effect of such peaks will inevitably generate noise from the iron core of the machine’s coil.
Secondly, if the core, even in the cocked machine mode, falls into the saturation region, then it will also hum.
Thirdly, if the core still has a strong backlash, it can transmit vibration to the plastic body of the machine and to other elements of your shield.
Thus, when three conditions are combined: core saturation, strong backlash, and the presence of impulse noise, we will theoretically hear maximum noise.
Who is to blame and what to do?
The answer to the question about the cause of the hum is logical: the manufacturers and developers of the humming machine did not provide for all the possible nuances associated with how the core will behave when the machine is cocked. And there is only one way out here. If you don’t want to put up with noise, then you need to purchase a machine whose coil core does not hum from interference, backlash, or possible saturation, and if it hums, it’s not very loud. If the hum does not bother you too much, you can leave the humming machine alone.
One of the main malfunctions of switching devices is sparking contacts or their complete absence. The main cause of this problem is wear of the contact system or failure of other components of the device. If you do nothing about it, you will end up having to completely replace the switch, relay, or other switching device. In addition, sparks and heat can cause a fire. But let's take a closer look at the reasons for sparking contacts and how to eliminate them.
Repair algorithm
Dismantling the switch
If the switch shorts, you can repair it yourself, working in stages:
- Line loss. The machine in the input panel is turned off.
- Checking for voltage. This can be done by touching the indicator screwdriver to an outlet in another room.
- Dismantling the device. You will need to remove the switch from the groove and remove the decorative trim. After this, the voltage is checked again, the screws on the sides are unscrewed, and the housing is removed from the socket.
- Disconnecting cables. For two-key models, you will need to mark the input wire with a marker.
- Disassembling the case and searching for contacts. The contact group is located above a plastic button mounted on screws.
- Troubleshooting. The contacts are cleaned or the device is completely replaced.
- Reassemble the case in the reverse order, reconnect the wires. The finished mechanism in the housing is returned to the socket box.
- Turning on the machine in the panel and testing the switch for serviceability.
Repair procedure
If the switch sparks due to a loose contact, it is necessary to ensure a continuous connection between the pair and the receiving plate when the light is on.
Important! All work related to electrical wiring can only be carried out after the line has been de-energized!
When a light switch crackles, there is probably a short circuit in the circuit, so you need to clean the wire contacts and reconnect the device to the line. If it continues to work incorrectly, you need to replace the device with a new one. A shorted switch cannot be used.
How to repair your device:
- Disconnect the power supply and check with an indicator screwdriver that there is no voltage.
- If the key switch sparks, you need to pry off the housing with a screwdriver.
- Pull out the circuit of the switch cover, check the voltage at the terminals.
- If there is carbon deposits on the wires, they need to be disconnected from the socket and cleaned.
- When the indicator sparks due to unstable contact, it is enough to tighten the terminals with screws.
After this, you need to assemble the device in the same sequence. It is necessary to pay attention that a phase should be connected to the contacts of the key switch - this guarantees the safety of replacing lamps in lighting fixtures. By pressing the key the phase is switched off.
In addition, there are lamps that stop working if the switch is connected incorrectly - the light may flicker and not deliver the full load.
How does the filter work?
- Varistors limit surges and surges in voltage and protect devices from failure. You can see their effect in the middle diagram. The first diagram shows how strong the jumps can be. Such bursts will instantly kill your equipment.
- Choke – smoothes the current. These are inductor coils, in essence - a copper wire wound into a coil may have a ferrite core. Installed in series with the circuit.
- Capacitors smooth out the voltage waveform, like an inductor, but are installed in parallel.
To understand why this happens, you need to remember the laws of commutation:
We've sorted out the filters. A logical question arises: if filters need to be installed from the production line, why then are lamps and switching power supplies “noisy”? The answer is very simple, because an unscrupulous manufacturer simply solders jumpers instead of a filter.
Why a different sound like a crackling sound is made after turning on an LED lamp - we describe in detail
Budget LED lamps cause interference and degrade the quality of the 220V power supply. Interference also occurs during the operation of “energy-saving” lamps—compact fluorescent lamps. The reason for their occurrence will be described below, but first, check how high-quality the lamp you purchased is and what kind of interference it produces.
To hear interference from LED lamps and CFLs, you need a regular FM radio. To do this, turn on the lamp, radio and bring its antenna to the network wires. You will hear a whole aria of crackling, rustling and hissing - this is the interference created by LED lamps, or rather their power supplies.
To understand how to eliminate interference from LED lamps, you need to learn more about interference.
When you turn on the light there is a crackling sound in the switch. Why does a socket or switch spark: what to do?
Why does a light switch sometimes spark and crackle?
Probably every person has observed such a picture as when you turn on the light, the switch sparks.
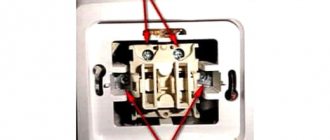
And it sparks more when turned on than when turned off. This question is quite common, but I did not find a specific answer when searching, and therefore I decided to enlighten my readers a little. Let's start in order. When you turn on the switch, especially in the dark, a spark is typically visible in the form of a small short-term flash. Then the light turns on and the sparking disappears. There may be 3 main reasons here.
1 reason:
The contacts of the switch are overgrown with carbon deposits (oxidation) and when approaching each other they create an electric arc, which we see. This is the most common reason for the switch to spark, since the deposits on the closing plates already look like shoots, and they create sparking before the contact is completely closed.
Reason 2:
The spring (plate) pressing the contact when turned on has weakened significantly. Do you hear a clicking sound when you turn it on? It should be sharp and clear, that is, pressed and immediately click. If your switch turns on softly and you literally have to press it with your finger (sometimes the light doesn’t turn on until you press hard), then it means the spring is the problem. Here the sparking process may not disappear, but spark constantly (some people observe it) since the contacts are not closed with the required force and the reason for the sparking is a weak contact.
Reason 3:
The switched light source, chandelier, floor lamp, sconce have powerful lamps (especially halogen), which significantly overload the load on the same closing contacts. Here you need to look at the power consumption of all lamps, and, if possible, change the switch according to the design. That is, in more budget switches, the contacts and plate (spring) are not made very well and can give a “soft start”. You also need to look at what machines are on this line; perhaps their power does not correspond to the load.
Definitely, if your sparking lasts a split second and disappears, or if completely new switches spark, it’s okay; in practice, it has been observed that almost all switches spark when turned on. And if you observe constant sparking, heating of the switch key, as well as flickering of light bulbs in chandeliers and lamps, immediately begin repairing the switch. The switch is rarely repaired (if you only tighten the spring and clean the contacts, but this will not last long), it is usually replaced
It is also worth paying attention to the wiring that goes to the switch and its attachment to the contacts. Sometimes the contact weakens and sparking begins, turning off and heating the key, in this case you need to tighten the screws of the contacts
If you see that the switch is constantly sparking (you can see a glow), heating up, crackling (making noise), you should immediately call an electrician to your home and repair the lighting circuits.
Remember, a sparking switch can become a source of fire!
Electricity is no joke!
masternachasspb.ru
Why does the socket switch spark? Do-it-yourself repair and construction
Quite often it happens that when you turn on the switch, the light begins to flash and sparking, accompanied by crackling, is observed in the switch. Then everything calms down, and the next time you turn it on, everything repeats. The same thing happens
10i5.ru
Why does the machine hum or buzz in the panel under load and what should I do?
Very often we are faced with such a problem as the sudden appearance of an abnormal operating sound from a circuit breaker in the panel room.
A slight hum from an electromagnetic starter surprises few people, and some even consider this effect to be its usual mode of operation, although this is not the case for new devices. So what should you do when your machine buzzes like this or buzzes?
First of all, remember that all machines installed in a panel under normal operating conditions should never make any sounds.
If this sound appears, then first of all decide what it sounds like:
- hum
- buzz
All your further actions will largely depend on this.
Such sounds appear when the machine is energized and under load. That is, current flows through it. Moreover, the greater the load, the louder the machine can make noise.
Let's look at the first fault, namely humming. If your machine makes a sound during operation like a starter or contactor, this indicates a defect or defect.
Do not look here for damage to electrical wiring, bad contacts, etc. A humming machine definitely needs to be changed.
Although this does not mean that his defense will not work as it should.
It can still shut down properly and operate during short circuits.
But how long it will work like this - a month or two, or it will burn out at any moment, you will never know in advance.
Moreover, if in the electrical panel it stands in one tight row with other intact circuit breakers, its sudden damage or ignition will lead to the failure of all neighboring switching devices.
Therefore, it is better not to delay the replacement and immediately buy another one. Do not listen to the advice of those who recommend simply knocking on the machine body with some blunt object.
For example, the back of a screwdriver. Apparently after this the sound disappears.
Replacing a machine is not such a difficult job, and many people do it even under voltage.
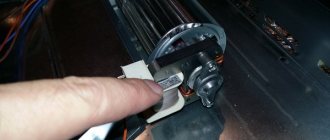
Also, do not try to repair or disassemble it yourself. Such modular devices are made disposable and cannot be restored at home.
They are assembled not with screws at all, but with rivets. These rivets can only be drilled out.
If you do this, you will see the following picture inside.
The only thing that can hum here is the trip coil or the electric magnetic release, which is triggered by short circuits.
Its core is constantly in a magnetic field, and if it is not tightened enough, it will actually make a similar sound. Under the influence of an electric magnetic field, the coil enters resonance and begins to vibrate.
Some people notice that when other devices are turned on, the sound disappears. But the point here is not in the device, but in the change in load and induction density. Following it, the vibration amplitude changes, and therefore the hum.
For example, this may be caused by connecting consumers with a pulsed load to the network. Such as power supplies for computers or LED strips.
Turn off the fancy LED backlight and the noise disappears.
You cannot fix this, because some machines initially perceive such a load normally and operate without extraneous noise. Or at least you don't hear them.
And others will get on your nerves and hum like a transformer.
Don't blame the electricians for this, they have nothing to do with it. You just received a defective product.
Therefore, even if you buy well-known brands (ABB, Hager, Schneider, Legrand), and not cheap IEK or TDM, you can still run into trouble.
Only pre-installation tests and loading the machines with a long-term primary current can save you from this. But 99.9% of users never do this.
With sound in the form of buzzing it’s a little more complicated. If you hear a buzzing from your switchboard, and not a dull hum, urgently look for the cause, otherwise disaster will come to pass.
This sound is caused by a small electric arc that occurs when there is poor contact. This noise may come and go.
Your primary task is to determine the specific location where this sparking source appears by turning off all the machines in the row one by one. At the same time, do not turn off the load from the sockets, otherwise the crackling sound may disappear.
When you have found the culprit, carefully examine his contacts. Unlike the first case (humming), the modular machine itself or its internal components may have nothing to do with it.
As a rule, the culprit is insufficiently good contact at the point where the cable cores are connected to the terminal.
What to do if you examined all the contacts, but did not find any visible traces of sparking or burning? In this case, turn off the voltage in the entire panel room by unclipping the input load breaker.
Next, use a screwdriver to tighten the screw terminals of all switching devices in the panel.
If you have a special insulated electrician's screwdriver, then this can be done without completely cutting off the electricity.