An alternative energy source based on solar panels is an excellent option for organizing an independent power supply. It will provide high energy efficiency not only on hot days, but also in cloudy weather. It would be nice to have such a device at home, wouldn't it?
To do this, you just need to correctly select the technical components and carry out installation. Anyone can do this if they know the diagrams and methods of connecting solar panels. We will tell you how to build a productive system that converts “green energy” into electricity needed to power household equipment.
In addition, you will learn how to choose a place to install solar panels and how to combine them with a stationary electrical network. Useful tips and important recommendations will provide effective assistance to home craftsmen. To make it easier to understand, thematic photographs, diagrams and videos are provided.
Where is the best place to install the panels?
The first thing you need to do before installing and connecting a solar battery is to decide on the location of the unit.
To install photovoltaic modules, it is convenient to use stationary structures made of metal profiles, or more modernized rotary analogues
Solar panels can be placed in almost any well-lit point:
- on the roof of a country cottage;
- on the balcony of an apartment building;
- in the area adjacent to the house.
The main thing is to provide the necessary conditions for obtaining maximum electricity generation. One of these is the orientation and angle of inclination relative to the horizon. So the light-absorbing surface of the unit should be directed to the south.
Ideally, the sun's rays should fall on it at 90°. To achieve this effect, it is necessary to select the optimal slope angle depending on the climatic conditions of the region. This indicator is different for each region.
To ensure maximum performance of solar panels, it is recommended to change the angle of the devices 2-4 times a year: April 18, August 24, October 7 and March 5
For example, in the Moscow region, the angle of inclination of the surface of solar panels for the summer months is 15-20°, and in the winter months it changes to 60-70°.
Image gallery
Photo from
The most popular place to install solar panels
Positioning on rotating stands
Mounting solar panels on the facade
Solar panels on the attic fence
When placing solar panels in the area adjacent to the house, it is better to raise the panels above the soil surface by at least half a meter - in case a large amount of snow falls. This solution is also correct in the sense that it provides sufficient distance for air circulation.
It is worth remembering that even a small shadow has a detrimental effect on the electricity generation of the unit. Panels should be placed only in places that are not subject to even the slightest shading.
Some “craftsmen” install additional glass on top of the panels to protect the batteries, but even with visible transparency, the glass layer can reduce the efficiency of the panels by 30%
There are several ways to fix the panels:
- by activating the clamping clamps;
- by bolting through through holes located at the bottom of the frame.
The supporting structure must be made of corrosion-resistant materials. Regardless of the installation method, you cannot make changes to the panel design yourself or drill additional holes.
It is the homeowner's job to keep the panels clean. Collecting dust, snow and bird droppings on the screen will reduce the amount of electricity produced by the system by at least 10%.
Stages of installing solar panels
After you have prepared everything you need for a home power plant, selected a location and drawn up a diagram of the layout of the panels, proceed directly to the installation. For this:
- Assemble the frame - any durable materials (steel, aluminum or wood) are suitable for this. It is advisable to use durable options, since the power plant will last you more than one year.
Rice. 9: Assemble the frame
Depending on the installation location, they can be manufactured and assembled separately from the installation site, but the dimensions must take into account the dimensions of the panels in advance. Be sure to leave an air gap between the roof and the battery for ventilation.
- If the modules in the panels are not soldered together, be sure to perform this procedure. Do this very carefully, as fragile parts can be easily damaged.
Rice. 10: Solder the modules
If you purchased ready-made panels in which nothing needs to be soldered, proceed immediately to installation.
- Installing ready-made solar panels does not require additional manipulations - the main thing is to securely fix them on the frame.
Rice. 11: install panels
If you are assembling them from modules, make a base of dielectric material with holes for ventilation, install an adhesive base and close with a sealed transparent lid.
- Solder the connecting wires - the panels can be connected to each other either in series or in parallel, but most importantly, do not forget to install a blocking diode in the power circuit of each of them. This will prevent the battery from discharging back into the module circuit after sunset.
- Connect the solar panel to the rest of your home power plant.
It should be noted that the position of the sun in summer and winter is radically different, so it is very effective to adjust the angle of inclination. For this purpose, a corresponding moving mechanism can be provided in the frame or support bracket.
Solar battery connection options
Solar panels are made up of several individual panels. To increase the system output parameters in the form of power, voltage and current, elements are connected to each other using the laws of physics.
Connecting several panels to each other can be done using one of three solar panel installation schemes:
- parallel;
- sequential;
- mixed.
A parallel circuit involves connecting terminals of the same name to each other, in which the elements have two common nodes for the convergence of conductors and their branching.
In a parallel circuit, “pluses” are connected to “pluses”, and “minuses” to “minuses”, as a result of which the output current increases, and the output voltage remains within 12 Volts
The maximum possible output current in a parallel circuit is directly proportional to the number of connected elements. The principles for calculating quantities are given in our recommended article.
A series circuit involves connecting opposite poles: the “plus” of the first panel to the “minus” of the second. The remaining unused “plus” of the second panel and the “minus” of the first battery are connected to the controller located further along the circuit.
This type of connection creates conditions for the flow of electric current, in which the only path remains for the transfer of energy from the source to the consumer.
With a serial connection scheme, the output voltage increases and reaches 24 Volts, which is enough to power portable equipment, LED lamps and some electrical receivers
A series-parallel or mixed circuit is most often used when it is necessary to connect several groups of batteries. By using this circuit, both the voltage and current can be increased at the output.
With a series-parallel connection circuit, the output voltage reaches a level whose characteristics are most suitable for solving the bulk of household problems
This option is also beneficial in the sense that if one of the structural elements of the system fails, the other connecting circuits continue to function. This significantly increases the reliability of the entire system.
Image gallery
Photo from
Connecting solar cells
Number of panels depending on needs
Series connection of solar devices
Direct connection to lighting devices
The principle of assembling a combined circuit is based on the fact that devices within each group are connected in parallel. And all groups are connected in one circuit in series.
By combining different types of connections, it is not difficult to assemble a battery with the required parameters. The main thing is that the number of connected elements must be such that the operating voltage supplied to the batteries, taking into account its drop in the charging circuit, exceeds the voltage of the batteries themselves, and the load current of the battery provides the required amount of charging current.
Installation price
Almost every person is interested in the question of the cost of installing solar panels. It all depends on who exactly will carry out the installation.
Doing it yourself will cost much less. However, remember that for installation you must have the skills to position and secure modules on the roof. You should also know how they are connected and configured.
Installing solar panels in a private home is quite complicated, so only an experienced person should do it.
If the connection is incorrect, there is a high probability of failure of home appliances and lighting. This often provokes a fire and other adverse consequences.
The cost depends on the quantity and quality of solar panels. In addition, the composition of the entire system should be taken into account. On average, it costs about 5 thousand rubles to connect one module.
Prices also depend on the power of the device. Panels range from 50 to 300 W. This is enough to ensure the operation of household appliances and lighting.
The cost of such panels is 20-70 thousand rubles. If you choose panels with a power of 0.5-1 kW, they will cost about 200 thousand rubles.
If you equip a 2-3 kW station, you will be able to use electrical energy unlimitedly. On average, the cost of installation will cost 600 thousand rubles.
Solar power system assembly diagram
Connection of solar panels is carried out using built-in connecting wires with a cross-section of 4 mm2. Single-core copper wires, the insulating braid of which is resistant to ultraviolet radiation, are best suited for this purpose.
If you use a wire whose insulation is not resistant to UV rays, it is recommended to lay it externally in a corrugated sleeve.
The end of each wire is connected to an MC4 connector by soldering or crimping, resulting in a sealed connection
Regardless of the chosen scheme, before connecting solar panels, it is imperative to check the correctness of the electrical installation.
When connecting panels, it is not recommended to exceed the technical requirements for the permissible current and maximum voltage of other devices. It is important to adhere to the charge controller and inverter specifications specified by the manufacturer.
The standard assembly diagram for the simplest solar power plant is as follows.
The connection diagram of the panels to the battery, inverter and controller is simple in design, and therefore does not cause any particular difficulties in connection
To avoid damage to the controller, it is important to follow the sequence when connecting system elements.
Installation work is carried out in several stages:
- The battery is connected to the controller using the appropriate connectors and remembering to observe the polarity.
- A solar battery is connected to the controller through connectors, maintaining the same polarity.
- A 12 V load is connected to the controller connectors.
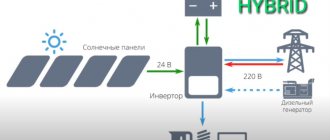
- If it is necessary to convert the electrical voltage from 12 to 220 V, then an inverter is included in the circuit. It is connected only to the battery and in no case directly to the controller.
- Electrical appliances designed for a voltage of 220 V are connected to the free output of the inverter.
After making the connection, you need to check the polarity and measure the open circuit voltage of the panels. If the indicator differs from the passport value, the connection is not made correctly.
To connect the device to the system, there is no need to open the junction box - all connecting connectors are located within easy reach
At the final stage, the solar battery must be grounded. To minimize the likelihood of a short circuit, fuses are installed at the connection points between the battery, inverter and controller.
The energy of solar power plants will be used in powering low-power household appliances and in charging batteries of mobile equipment:
Image gallery
Photo from
Energy-saving lamps in the interior
Solar street lighting
Ensuring the operation of LCD TV
Charging batteries of mobile devices
For those wishing to build a solar battery with their own hands, the information provided in the following article will help.
Where to put the inverter?
The inverter and other devices included in the solar panel complex must be installed in a separate or common room with free access.
For batteries, it is necessary to make a special rack or stand to make servicing convenient. It is not always possible to allocate a separate room, but in any case, the most convenient conditions for placing the equipment should be created. If there are children in the house, it is advisable to fence the room, and ideally, have a lockable door.
Connecting multi-directional elements
When using a sequential solar panel installation scheme, in order not to reduce the efficiency of the devices, all panels of the common circuit should be placed at the same angle and on the same plane.
If the panels are located in different planes, this may lead to the fact that the closest or more illuminated one will work more powerfully than those located a little further away.
This means that the near panel will generate electricity, some of which will be released to heat the distant panels. And the reason lies in the fact that current flows along the path of least resistance. To minimize losses, it is better to use a separate controller for each panel.
The main requirements when using the controller are the power of the connected panels over 1 kW and the distance between the batteries at a sufficiently large distance
The issue can also be resolved by installing cut-off diodes. They are placed inside between the plates. Thanks to this, while delivering maximum power, the plates do not overheat.
The voltage drop in the connections, as well as the wires themselves, of the low-voltage part of the system is also important.
Table of discrepancy between the transmitted power and the wire cross-section, indicating in red the parameters at which there is a risk of strong fire heating
An example is the fact that on a meter piece of cable with a cross section of 4 mm2, when a current of 80A (voltage 12 V) passes, the values drop by 3.19%, which is 30.6 W. When twisting is activated, the voltage drop can vary from 0.1 to 0.3 V.
Choosing a solar battery
Three types of solar panels are popular today as a source of electricity:
- With a polycrystalline module - they are distinguished by stable generation performance, regardless of the intensity of sunlight. Also, solar batteries based on polycrystalline silicon are characterized by a relatively low efficiency - from 9 to 18%, depending on the manufacturer. Over time, the efficiency does not decrease, but the disadvantages of polycrystalline elements include a relatively short service life - about 10 years.
- With a monocrystalline module, such panels produce electricity unevenly in sunny and cloudy weather and lose power over time. But the efficiency of autonomous power supply based on monocrystalline silicon is in the range from 12 to 25%. And the service life of monocrystalline panels is about 25 years.
Rice. 3. polycrystalline and monocrystalline module - With amorphous crystals - used in flexible plates, they have a rather low efficiency - about 6%. The maximum power declared by the manufacturer decreases significantly over time of operation and can drop by 20 - 40%. The service life is quite low - no more than 5 years.
Rice. 4: amorphous module
Combination of solar energy and stationary network
When planning to use electricity from the sun in parallel with an equipped centralized stationary network, the connection diagram is made slightly different. And the main reason for this decision is that the private consumer does not have the opportunity to “dump” the remaining energy.
And this can provoke voltage surges lasting up to one second.
When combining solar electricity with a stationary centralized network, they are guided by the same rule: the more sources are connected, the more complex the scheme becomes
According to the above diagram, the voltage from the heliofield is first directed towards the battery, and from there it is transmitted to the load.
When designing this installation option, it is worth taking two types of load into account:
- non-redundant – lights in the house, household appliances, etc.;
- redundant – emergency lighting, refrigerator, electric boiler.
Keep in mind: the larger the battery capacity, the longer the backup electrical appliances will work in autonomous mode.
When choosing this method of generating energy into the network, be prepared for the fact that you will have to apply for permission from local power grids.
Despite the fact that inverters for solar panels produce voltage, the quality of which is sometimes higher than that in the centralized network, local power grids do not give the go-ahead for the electric meter to rotate in the opposite direction.
For this reason, according to the scheme, solar inverters stop working when the voltage in the network is lost. And the redundant load begins to be “powered” from the battery.
Advantages and disadvantages of solar energy
Pros:
- At the use stage - environmental friendliness (with a caveat: production and disposal are just as “dirty” as any other electronics).
- After the initial investment, the resulting electricity is conditionally free (some funds are required for maintenance at the end of its service life).
- Full autonomy is possible: you can organize energy supply in places where a centralized power supply is not even planned.
- You do not depend on the tariff policy of energy companies.
- If certain standards are met, it is possible to “sell” excess electricity to city networks.
Minuses:
- The relative high cost of the equipment (as can be seen from the examples of use, this is not always a problem).
- Dependence on weather conditions (in regions where there are few sunny days, use is difficult).
- The equipment needs periodic updating - there is natural wear and tear.
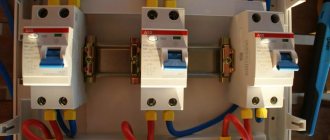
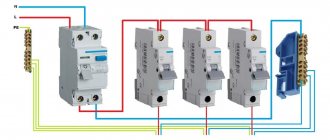
Fuses and connectors
The fuse is located in the main distribution panel, that is, on the electrical panel. It protects the inverter from damage.
In addition, the system has a disconnect switch, which is designed to disconnect the home installation from the external power supply, for example when it is damaged or some maintenance work is being carried out.
Attention! Installation with solar panels must be connected to the network by an authorized electrician. You cannot install such devices into the electrical network without permission - there may be fines, so be sure to invite a local electrician.
Soldering and assembly of panels
Do-it-yourself solar panel assembly can be divided into three stages:
- Frame production;
- Soldering of photoelectric converters;
- Installing them into the frame and sealing them.
The frame can be made from wooden planks or welded from aluminum corners. One way or another, its dimensions, shape and choice of materials for manufacturing directly depend on how it will be mounted.
Required materials and tools
To assemble a solar battery you will need the following materials:
- aluminum or steel corner with a section of 25x25;
- bolts 5x10 mm – 8 pcs;
- nuts 5 mm – 8 pcs;
- glass or polycarbonate 5-6 mm;
- glue – sealant Sylgard 184;
- glue – sealant Ceresit CS 15;
- polycrystalline converters;
- flux marker (a mixture of rosin and alcohol);
- silver tape for connecting to panels;
- tire tape;
- fine solder;
- foam rubber - 3 cm, sawdust or shavings;
- dense polyethylene film 10 microns.
Tools needed for assembly:
- file;
- hacksaw for metal with blade 18;
- drill, 5 and 6 mm drills;
- open-end wrenches;
- soldering iron
Assembly steps
Assembly consists of several stages:
- First you need to decide on the dimensions of the frame frame. They will depend on the dimensions of the panels themselves and their quantity. When solar panels are placed on the roof, the panels can completely cover the slope or occupy a small part of it - there are no specific rules, so what width and length the frame will be is chosen by the assembler himself.
- It is necessary to install glass on top of the frame to protect the photocells from destruction. It can be secured with a thin layer of silicone sealant, but it is better not to use epoxy resin for these purposes, since it will be extremely difficult to remove the glass in case of need for repair work without damaging the panels.
- When connecting solar panels to the network, it is better to choose a mixed scheme, as it is optimal. The assembled panels are placed into a previously prepared frame. At this stage, it is important not to confuse the back of the panel with the front.
- To protect the back of the battery during assembly, you can make a foam mat and wrap it in plastic wrap. Sawdust or shavings are also suitable, but the main thing is that their particles do not remain on the elements.
- After this, you need to remove air bubbles that form between the photocells and the glass, since their presence will interfere with the efficient operation of the battery. To do this, you need to place a load on the panel and a hard sheet of plywood on the soft mat. Thus, the photocells become jammed and must be left like this for half a day. Then the weight is removed, and the plywood and mat are removed. It is too early to install the battery after this; the sealant needs to fully set.
- The last stage is the manufacture of the back wall of the battery from chipboard or fiberboard with a backing - this will prevent deformation of the panels.
How much can we save on a photovoltaic battery?
Considering the significant investment in a photovoltaic installation, we are interested in how much we will gain in price from its implementation. Assuming that a 5-kilowatt mini-power plant will be installed in a house located in central Russia and will generate 4,500 kWh of electricity per year. This corresponds to the average electricity demand for a family of four.
Therefore, if we pay 6 rubles. per kW/h, we will save about 20,000 rubles. This provides reimbursement after approximately 12 years.
This calculation applies to current prices (as of early 2022) and current regulations. It is difficult to predict how things will change in the near and distant future.
Useful video on the topic
Interesting facts about installing solar panels are in the video.
Leave a comment Cancel reply
Similar posts
Types of controllers for solar panels and how to choose
Features of metal cable trays
Types of solar-powered garden lamps and lanterns, how and where to use them.
Photo manual: DIY solar battery step by step
Solar panel for home heating
To determine the number of panels, pay attention to their power and clearly define their purpose.
The process of installing a solar system on the roof of a building
In addition to screens, you will need a battery, a controller, and a converter.
How many solar panels do you need for your home?
To correctly calculate power, you need accurate data on electricity consumption for one day. Let’s say 100 kW/h per month (this figure is shown by the electric meter), then the panels are required to generate this amount of current per month.
The panels produce current only during the day, delivering the maximum amount in clear weather. If the sun's rays are directed away from the batteries, then the efficiency will decrease significantly. Productivity decreases by 15-20 times in cloudy weather. This is taken into account in the calculations. Therefore, on average, it turns out that the solar battery produces energy from 9.00 to 16.00. In the morning and evening, the production is 30%, and during the day - 70%.
Graph of peak power of solar panels by hour
Therefore, a 1 kW (1000 W) panel produces 7 kW/h, 210 kW/h per month. Plus 3 kW/h in the morning and evening, but this is a reserve for a cloudy day. Based on this calculation, it turns out that a 2 kW panel produces 420 kW/h per month, a 100 watt panel produces 700 watts per day, and 21 kW in 30 days.
It’s very good if a 1 kW panel produces 210 kWh per month, but there are nuances:
- Not all days in a month are sunny. To make a correct calculation, conduct a study of forecasts and calculate how many cloudy days there are in 30 days. By calculating the number of cloudy days from the number 210, the energy production per day is subtracted. Let's say 4 days. The result is 186 kW/h.
- Also in spring and autumn, when it rains, daylight hours are shorter. Therefore, the number of batteries is increased by 30-50%.
Classification of solar panels - Loss of electricity going to the battery and converter.
- In winter, batteries practically do not work, so an alternative is installed during this time.
For low consumption, install a generator. By agreement and permission, a wind station is installed to generate electricity.
Calculation for a battery on a solar panel
A battery of a certain capacity must provide the house with electricity at night. Let's say 3 kW/h is required at night, the battery requires the same power. The battery power is 12 volts 200 A, then the electricity in it will be 12 x 200 = 2400 watts (2.4 kW). However, the battery is running low.
Scheme of connecting panels to each other
Attention. Do not allow the battery to completely discharge.
Batteries for solar systems are discharged by 70%, car batteries - 50%. Therefore, a spare battery is needed to replace it in case of discharge.
It is best to use this calculation. If 10 kW/h is consumed per day, then the working battery (rechargeable battery) is identical in characteristics. On a sunny day, the battery is charged by 20-30%.
Calculation and diagram of connecting the battery to the panel
A 220 V energy converter has an efficiency of 70-80%. Taking into account all the electrical losses in the batteries and the converter, the total figure is 40%.
Required number of photocell cells
In single-family houses, polycrystalline panels with a power of 240-260 W are most often used (they are characterized by a relatively high efficiency of 18%, and their price is not high). If you choose 250W modules, you will need 20 solar panels, which take up about 35 m2 of roof area.
Attention! Roof panels should be positioned so that they are not obscured by a chimney, tall tree, electrical tower or adjacent building. This may cause overheating and damage to the module.
Therefore, manufacturers equip their panels with shunt diodes (from one to four). When one row of cells is shaded, the diode starts to work, then current flows using a bypass (English bypass - backup path, backup route to ensure continuous operation of the system).