Pressure switch RDM 5: adjustment and instructions for use
The Gilex pressure switch is one of the main elements of the automated control structure of a pumping station. The device control unit, which includes the device, allows you to optimize the operation of the equipment when the liquid pressure in the pipeline increases or decreases.
How to make the adjustment correctly
The RDM-5 relay is designed for a pump with a hydraulic accumulator and consists of a metal casing, inside of which there is a contact group controlled by a rubber membrane connected to the supply line. The device automatically starts the station when the pressure in the pipeline decreases to the lower specified limit and turns off the power when the maximum level is reached.
Factory settings:
- voltage: 220-230 V;
- temperature: 0…+40°С;
- recommended pressure size: 1.1-4.8 atm;
- lower response limit – 1.2 atm;
- upper level – 3.1 atm;
- pressure difference: 1.8 atm.
Connecting and setting up the RDM-5 relay:
- Connect the device to the pump outlet.
- Open the protective cover.
- Connect the RD contacts to the central electrical network using a three-core cable with a cross-section of 1.5 mm² (device data sheet).
- Start the installation, with all taps in the system open. After removing air from the water supply, turn off the supply and turn off the power.
- Install the taxiway casing.
- Start the station and fix the lower threshold.
- Wait some time until the pressure in the line reaches the maximum level, and the station should turn off automatically. Remember or write down the value that was on the pressure gauge scale.
- Compare the results obtained with factory recommendations. If the measured parameters differ from the standards or the operation of the relay does not provide sufficient pressure, you can adjust the setting yourself.
How to set the lower pressure limit
The technical parameters of the RD installed at the factory may not correspond to local operating conditions. The design of the device provides for adjusting the relay parameters with your own hands.
Before starting the adjustment, you must make sure that the pressure in front of the expansion tank will be 1.3-1.4 atm.
Otherwise, all the manipulations performed will not lead to the desired result, since the contacts of the electrical device will not close and the station will not work.
Under the device casing there is a small and large nut with springs. By rotating the adjusting mechanism to the right, the maximum operating limit will increase. The shutdown limit decreases when the nut moves in the opposite direction.
Fine adjustment - instructions for stabilizing pressure in a home water supply system:
- Disconnect the hydraulic accumulator and connect the RD to the receiving point.
- We start the pump, check the tightness of the system and the operation of the unit at standard settings.
- The pressure gauge recorded 3 atm.
- Remove the relay casing.
- Using a large mechanism, we adjust the pump stopping threshold, the recommended values are 2.5-3.1 atm.
- We install the hydraulic accumulator in place and check the pressure in it (the norm is 1.5 atm).
- At the highest point of water intake, open the tap, monitor the pressure force and record the moment the pump starts (lower level).
- We close the tap, observe the increase in pressure and mark the upper stop limit of the device.
Technical conditions for the operation of pumping stations recommend setting the lower limit value 0.2-0.5 atm higher than the expansion tank.
The initial response limit can be adjusted by loosening or tightening the small nut with a spring, as well as by reducing the air concentration in the expansion chamber of the accumulator.
What functions does the device perform?
Relays are equipped with pumping stations for servicing water supply systems of residential buildings. The device is compatible with any pumping equipment operating from a single-phase network with a voltage of 220 V.
Automation stabilizes the operation of the pumping mechanism, starts the installation when the pressure decreases (opening mixers, etc.) or stops functioning when the density of the liquid exceeds the permissible parameters.
Operating principle
Gilex is a switching relay that is activated by water pressure. After assembling the device and starting the station, the machine operates for 20 seconds and then turns off. The next launch is possible only if the indicators in the central highway decrease.
The RD activates the pump, and it continues to pump liquid until the density in the line reaches the design values. If there is high pressure or depressurization of the pipeline, the relay disconnects the contacts and the unit stops.
Pressure switch rm 5 adjustment instructions. Pumping station pressure switch: adjustment, configuration
The design of the hydraulic accumulator (HA) includes a bleed valve, a container, a five-pin fitting (tee) with couplings for connection, a flange, as well as a pressure switch that sets the general rhythm of operation.
The main functions of the water pressure sensor in the water supply system:
- is responsible for the operation of equipment without significant loads;
- is an important pump control element;
- increases the operating time of the membrane and equipment as a whole;
- controls the filling of the container with water.
A pressure gauge indicating the pressure in the container is included in the kit or purchased separately.
The pump collects water from the well, directing it through a pipeline. Then it enters the hydraulic accumulator, and from it directly into the house.
The main task of the membrane tank is to maintain constant pressure and operating mode of the pump, for which there is a certain activation frequency - approximately 45 per hour.
During an increase in frequency, the equipment experiences excessive loads and fails after a short time. It is necessary to adjust the water pressure switch for the pump so that the equipment operates without excessive loads.
By regulating the storage tank we mean creating the required amount of atmospheres directly in the tank and correctly determining the thresholds for turning the pump on and off.
Design features and parameter settings
The peculiarity of this equipment is that it is very simple to implement. The relay has a fitting for attachment to the pipeline system. It also includes terminals that are used to connect the device to the electrical network.
There is a spring-type mechanism inside that controls the operation of the entire device. The springs are adjusted by turning the threaded element. That's the entire design of the unit.
For this reason, adjusting the water pressure switch for the pump is quite simple.
Most often, the relay is used in everyday life, that is, for installation on local city pipelines. For such models, the manufacturer always sets the factory settings. It is important to note here that the parameters set by the manufacturer are average, that is, those that are suitable for most systems. In numbers, these parameters look like this: the upper limit is 3.0 atm, and the lower limit is 1.5 atm.
Principle of operation
The pressure switch for the hydraulic accumulator has the shape of a box with different control elements installed in the housing. The relay is connected to one of the tank outputs. The mechanism has small springs that need to be adjusted by turning the nuts.
Features of the equipment:
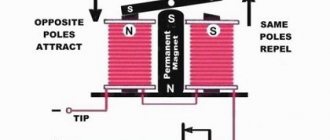
- The springs are connected to a membrane that responds to pressure surges. Increasing the spring tension compresses the helix, decreasing it leads to stretching.
- The contact group begins to respond to these actions by connecting or disconnecting contacts, thereby sending a command to the pump.
- The storage tank fills, increasing the pressure. The spiral transmits the pressure force and turns on taking into account the set value or turns off the pump.
- Water is consumed simultaneously with a decrease in pressure, which is detected by a relay.
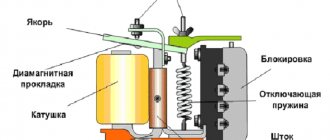
The unit contains the following parts: a plastic or metal body, a steel piston, a membrane, brass plates, threaded rods, terminal blocks, couplings for electrical wires, a contact unit, springs, a hinged platform.
The operating principle of the control equipment is quite simple. The device responds to changes in pressure inside the storage tank. The movable platform is raised or lowered by springs taking into account the pressure on the piston connected to contacts that signal the pump to start or complete pumping.
Operating principle of the equipment
The essence of the unit’s operation is as follows. It registers the fluid pressure in the pipeline using a spring.
If sufficient pressure arises corresponding to the lower set limit, the switching contact closes and the device starts working.
As soon as the pressure reaches the maximum value, the spring acts on the contact, opening it, thereby turning off the device. Thus, the operation of water pumps is controlled using a relay.
In addition to the fact that this device has mechanisms for setting pressure limits, there are also additional elements such as a “dry” forced start button, devices for a smoother start, operation indicators, etc.
Connection to hydraulic accumulator
As a rule, the accumulator kit is sold disassembled, so the control unit must be installed independently. You can connect the pressure switch to the pump as follows:
- The equipment is disconnected from the power supply. If there is already water in the storage tank, it must be drained.
- The device is mounted permanently. It is connected to a five-pin fitting or to a pipe. In this case, the relay must be firmly fixed.
- The cable connection diagram is usual: the device has a contact group for the electrical network and the pump, and there is also a grounding connection. The cables are threaded through the holes on the housing and connected to the terminal blocks.
Selecting the correct connection diagram for the water pressure switch for the pump
First, it’s worth understanding what the plumbing system consists of:
- its first part is the water intake point. It may be a water pipe or a well;
- hydraulic accumulator;
- pressure switch;
- water purification system. It usually consists of filters and several containers;
- water tap for which comfortable water pressure is provided.
Composition of a modern water supply system First of all, it is worth understanding what pressure the residents of the house need. It is also important to find out the water pressure at the water intake point. This point is important because at a pressure below 1.4 atm, water is not drawn due to the relay being turned off.
Such problems can also arise if you use a city water supply, because the water pressure in it is not always more than 1.0 atm.
When drawing water from a well, these difficulties will not arise, and the water supply pressure will depend only on the technical characteristics of the pump.
To ensure uniform and normal water pressure, you should choose the right pumping equipment
It can be seen that each relay has its own setting option; it is usually described in detail in the instructions for a specific device model. All types of relays have a general purpose and mechanism of action.
Model for pumping station
Manufacturer's choice
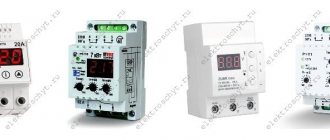
There are a large number of different models of devices on the market. They differ in price, appearance and have slightly different characteristics.
| Image | Manufacturer and model | Characteristics | Cost, rub. |
| Gilex RDM-5 | Operating temperature from 0° to 40° Pressure range 1.0 – 4.5 atm. Voltage 220 – 230 V, 50 Hz Maximum rated power HP 2 | 900 | |
| Pressure switch PM 1 15, Grundfos | Operating temperature from 0° to 40° The pump starts at a pressure of 1.5 bar and runs as long as there is flow. Dry running protection | 5 655 | |
| Pressure switch PM/5(p)1/4, UNIPUMP | Mains voltage - 230 V, 50 Hz. The maximum switching current is 12A. Working pressure - 5 bar Power - 1500 W. | 467 | |
| Pressure switch PA 5 1-5 bar, WATTS | Pressures from 1 to 5 bar. Pressure drop 0.5 – 2.5 bar. Current 16 A. Maximum coolant temperature 90° In the room 55° | 997 |
Installation and connection
Connecting any mechanism begins with the preparatory stage. First you need to choose the location for installing the relay. According to knowledgeable people, the device should be installed directly near the pump outlet.
In this place, turbulence and pressure differences are remarkably leveled out.
Before choosing a location, it is imperative to familiarize yourself with the operating conditions of the selected device, because some of them can only be used in heated rooms.
Example of device installation location
The next stage of preparation will be the selection of the necessary pressure thresholds:
- Minimum – determines at what pressure the pump starts operating.
- Maximum – controls the moment the pumps stop working.
- The difference between these two values is called the pressure range. This indicator is directly proportional to the frequency of pump activation.
A device with a special threshold setting scale The third point of preparation is the registration of parameters. On a household appliance, this process will not cause difficulties, since it is adjusted using a pair of springs, which in turn are regulated by threaded regulators. The relay has two springs:
- a large spring serves to control the upper pressure limit;
- small – determines the pressure difference.
1 – spring for setting the upper limit (pump shutdown); 2 – differential adjustment spring (pressure difference) During preparation, several more devices are installed: shut-off valve, valves (return and breakdown), cleaning filters and sewage drain.
Installation should be carried out by professionals or people who at least have an idea of the operating principle and installation rules of such devices.
Installation (and then adjustment of the water pressure switch for the pump) must be carried out exactly as written in the instructions:
- First, a tee is installed at the selected location on the pipe, to which a drain valve or fitting connected to the water pressure switch is attached.
- During installation, a threaded connection is used, which should be properly sealed using FUM tape.
- There are devices that cannot be installed in the usual way. They are equipped only with a rigidly fixed nut. During installation, rotate the relay directly.
- Electricity is connected using a cable. Its cross-section must match the requirements of the device, depending on the power.
- The kit sometimes includes a grounding terminal. If available, a grounding cable must be installed.
Appearance of a disassembled relay and electrical connection diagram Example of a mounted and connected device
Should we consider electronic analogues?
Mechanical devices, of course, are more popular, but electronic models have some undeniable advantages:
This device does not require constant adjustment
Prices for electronic water pressure switches for a pump can range from two to four thousand rubles.
It depends on the manufacturer, the materials used in production and the store selling it.
If you spend some time searching for the right device, you can buy a quality unit at a fair price. If you are purchasing it for long-term use, saving on it is not the best option.
Equipment setup
Before setting the pressure switch, it is necessary to take into account that this indicator is inextricably linked with the pressure inside the storage tank. First, you need to create the required amount of pressure inside the tank, and only then move on to working with the element of controlling the operation of the system.
The adjustment is carried out in three stages:
- set the pressure inside the accumulator;
- set the pump activation level;
- determine the switch-off mark.
To optimize operation, you need to adjust all indicators several times experimentally, taking into account fluid flow, pipeline height and pressure in it.
Installation of equipment
The best place to install this device is considered to be the place located at the outlet of the hydraulic accumulator. At this interval of the pipeline there is the greatest degree of leveling of parameters such as pressure surges, as well as turbulence of the fluid flow.
It is worth noting that for certain models, some manufacturers set a microclimate operating threshold. In other words, operation is only possible at temperatures of +4 degrees Celsius or more. There is also a limit on humidity - no more than 70%.
What pressure should the pumping station be adjusted to?
A very important question, not all consumers understand the intricacies of the operation of the equipment. Incompetent actions always have negative consequences.
Practical advice. Do not set the maximum pressure too high, as this will cause the pump to fail faster.
By increasing pressure, consumers hope to achieve two goals.
- Increase the volume of water pumped in one turn on.
Many people believe that frequent starts of an eclectic engine quickly damage it. It’s true, during switching on, the inrush currents reach critical values and overheat the winding. But in the case of a pump, the dependence is more complicated; we will explain which one below. Due to frequent starts, the engine may fail - Only at high pressure can household appliances work: washing machine, sink, shower, etc. The belief is also only partially valid.
For household appliances to operate, sufficient water pressure in the system is required.
Find out how to increase water pressure in an apartment with your own hands in a special article on our portal.
In connection with such beliefs, the maximum pressure is set within 3–4 atm, especially since the technical characteristics allow creating pressure of up to five or more atmospheres. Operating values do not exceed 80% of the maximum, which means everything is normal. But that's not true. What value should I choose for optimal operation of the pump and household equipment? This issue needs to be considered in detail.
The choice of pressure directly affects the quality of equipment operation
- Design and principle of operation of a water pressure switch for a pump
- As pressure increases, the volume of water in the accumulator increases. But its increase is too expensive, literally and figuratively. For your information, in a 10-liter cylinder, due to an increase in pressure by one atmosphere, the amount of water increases by approximately 1 liter. If the initial air pressure in the cylinder is 1 atm., then the water pressure in the rubber chamber is 1 atm. its volume is 4 liters, if the pressure is 2 atm., then the volume increases to 5 liters, and at a pressure of 3 atm. the water volume is 5.5 liters. Indeed, the pump will turn on less often. But we must understand that each increase in pressure by one atmosphere requires significantly more electrical energy, and in addition, the pump elements work with increased loads. As a result, attempts to achieve savings result in direct losses - you will have to replace expensive equipment more often.
- It is believed that if the pressure is low, then household appliances do not function. This is not true, all washing machines, dishwashers and other appliances work perfectly with a water pressure of 1 atm.
Operating principle of the pumping station
Experienced plumbers strongly recommend installing the pump at a pressure in the range of 1.2–1.7 atm. Such parameters are considered the golden mean, the load on the electric motor and pump is acceptable, and everything in the house works as it should.
Step-by-step instructions on how to adjust it yourself
The setup is carried out with the power turned off. To check the result, the station is connected to the network.
Tools
The system is regulated by setting the relay. You will need a simple tool for the job:
- socket or open-end wrench;
- screwdriver.
Preparation
The principle of its operation is to close and open electrical contacts. Therefore, first:
- Turn off the power supply.
- Unscrew the screw located in the cap with a screwdriver.
- Remove the casing from the device.
Process
Under the relay cover there are two springs: large and small. The pressure in the water supply acts on them through a membrane. The 2 relay positions depend on the tension of the springs.
Adjustment steps:
- Tightening the nut on the large spring increases the release pressure. Select the direction of rotation of the nut. 1 turn of the nut changes the value of the lower pressure gauge reading by approximately 0.4 bar (1 atm. ≈ 1 bar). Having loosened or tightened the spring by eye, turn on the system and take readings from the monitoring device.
- If the previous actions did not lead to the desired result, continue adjusting the large spring. After a successful attempt, they move on to setting up a small spring.
- This spring sets the difference between the lower and upper readings of the pressure gauge of working equipment. Changing the characteristic it regulates requires approximately 2 times less revolutions than adjusting a large spring to the same value. Compressing the small spring increases the operating range of the system when the engine is off. The control results are checked similarly to the previous case, under real plant operating conditions. Now you can immediately check the lower and upper values of the pressure gauge.
After setting the pressure gauge control values, it is recommended to ensure that the pump starts no more than 30 times per hour.
Installation and adjustment of pressure switch RDM-5
Diary entry created by user Serj, 01.06.: 110.950,
After dancing with tambourines, when connecting the RD, everything worked with the following settings: GA - 1.6 atm On pressure - 1.65 atm Off pressure - 3.0 atm
Here are the photos I took. The HA is mounted on a bracket to the wall.
Addition 06/07/2017.
I downloaded the above instructions from somewhere, now from experience I can say that it’s complete crap
How to adjust the device?
Setting up the pressure switch is carried out after installing the internal and external water supply network of the house and connecting it to the electrical network.
Connections of external and internal pipelines must be verified by tests so that subsequent leaks do not interfere with the adjustment process. Due to leaky joints, the pressure before or after the pump will spontaneously decrease, which will also affect the operation of the relay.
Next, the pressure switch is adjusted as required by the instructions:
- Without connecting the internal water supply pipe, check how the relay works together with the pump at the factory settings. At the same time, check the tightness of the external pipeline.
- Remove the plastic relay cover covering the adjustment screws.
As a result of the settings, the difference between the lower and upper limit should not be less than 1 Bar. Practice shows that the optimal pressure drop is about 1.5 Bar, then the pump will not turn on too often. After completing the adjustment, do not rush to put the cover back in place; monitor the operation of the system for 1 day. Minor adjustments may be needed.
Expert opinion
It-Technology, Electrical power and electronics specialist
Ask questions to the “Specialist for modernization of energy generation systems”
Pump pressure switch or how to adjust the controller? After performing maintenance on the station and adjusting the air pressure in the expander, you can proceed to readjusting the adjustments. Ask, I'm in touch!
Setting up the pm5 pressure switch
I decided to write about the problems that I encountered when operating pressure switches such as PM/5, RDM-5.
Other people also encountered these problems, as I read about on Drive.
Maybe this will be useful to someone.
When I moved to a private house, there was no water in it - only a well outside with a vibration pump.
Therefore, we had to make the water supply from scratch, buy a normal pump, a filter, a hydraulic accumulator, and of course a pressure switch.
And I bought the most typical relay:
The seller advised to take not the cheapest, but more expensive - Italian “Italtekhnika”
There are also purely Chinese versions of this relay, such as Belamos, Gilex.
It worked without problems for 3 years, but one day I discovered that the pump did NOT turn off - it was constantly running!
Behind this flange:
The following membrane costs:
Under it there is a metal plate with legs:
She presses on this plate, and thereby closes the relay, or allows it to open:
In my case, it turned out that the galvanized part with the flange was very rusty inside, and the rust prevented the membrane from lowering and prevented the relay from opening!
Interestingly, I don’t have any metal pipes at all - everything is plastic!
It was the part itself that rusted.
I cleaned off the rust, but I already understood that the relay was finished - it would continue to rust and fail again:
A few months later this happened.
But this time the water simply stopped flowing.
If the relay did not turn off last time, then this time it did NOT turn on! )
The narrow hole in the flange was completely rusted and no longer allowed water to pass through.
But I was ready for this - a new relay had already been purchased! )
It must be said that if the relay does not turn on, this is garbage and does not threaten anything.
But if the pump is powerful and there are no relief valves, then something in the water supply may burst. Or the pump will burn out.
So then it’s worth checking these relays and having a protection system (pressure valve) and indication of pump operation (disconnect the lamp, at the same time you can hook up some kind of Wi-Fi logger to it to view the pump on/off graph).
I also encountered the problem of burnt contacts on such relays.
Source
Pressure switch RDM 5: adjustment and instructions for use
The Gilex pressure switch is one of the main elements of the automated control structure of a pumping station. The device control unit, which includes the device, allows you to optimize the operation of the equipment when the liquid pressure in the pipeline increases or decreases.
Pressure switch rm 5 adjustment instructions
This device operates fully automatically, which allows you to constantly maintain a given water pressure in the water supply.
Setting the upper and lower limits was created in order to be able to adjust the water pressure switch for the pump, as well as to maximize the service life of this device without repairing it.
Connecting a water pressure switch of this type is most often carried out in a heated room.
It is worth noting that modern pump models have in their basic configuration such elements as a fitting for mounting a relay, a built-in filter and a check valve. For this reason, some of the models of these devices can be installed in a direct block with the pump itself.
Another important point is that there are water pressure switch circuits for connecting via a waterproof system. Such samples can be mounted directly in the well itself, where water is collected.
Design features
If we talk about what this device is, from a design point of view, it is a small device that looks like a compact block with two springs, the adjustment of which is carried out using the corresponding nuts.
The springs correspond to the upper and lower limits of the adjustable parameter. Accordingly, one nut for each of the parts. There is also a membrane that is connected to springs and reacts to changes in pressure.
If the value of the characteristic decreases to a minimum value, then the element weakens; if, on the contrary, the pressure increases, then the spring will compress more strongly.
It is important to understand here that compressing or loosening this element directly affects the connection or disconnection of contacts. In other words, springs control whether water pumps are turned on or off.
Pumping station pressure switch device
In the design of stations for individual water supply, RM-5 or its foreign analogue, which is fully compatible in terms of terminals, is used as a regulator of pressure limits. However, changes in the internal structure are possible and, as a result, malfunctions of the pressure switch of the pumping station are also different, although they can be grouped into groups based on similarity.
Inside each model (RD5 or PM5) there is a metal movable plate (platform), on which two springs exert pressure from opposite sides. Also, the water pumped into the bulb indirectly puts pressure on it.
By rotating the clamping nut of the corresponding spring block, you can increase or decrease the response limits. The springs seem to “help” (or hinder) the water pressure to move the plate.
The mechanism is designed in such a way that when the pad is displaced, several groups of electrical contacts are closed or opened.
That is, the scheme itself works as follows:
The pump pumps water into the accumulator. Power is supplied to the motor through closed contacts in the pressure switch.
The water pressure in the tank increases, and when a certain value set by the upper limit springs in RD-5 is reached, the mechanism is activated and the electrical circuit is broken - the pump is turned off. The liquid does not flow back into the well thanks to the valve.
As water is drawn, the bulb is emptied, the pressure in the system drops and the lower limit spring in the relay is activated, closing the contacts to the pump. The cycle repeats.
How to make the adjustment correctly
You often come across the position of installers that, they say, the relay pressure set at the factory is enough for the water supply system to work comfortably and satisfy the requirements of the home owner.
But, as life shows, having moved to our own private house, where a modern pumping station with a pressure switch is installed, the water pressure does not satisfy us (it is small).
Asking a specialist to adjust the pressure in the system is useless (most often), so you should look into this issue yourself.
So, the plumbing system of a house most often consists of:
- The water intake point can be a village water pipe or a well with a submersible pump.
- Pressure switch with hydraulic accumulator.
- Water purification in the form of a system of containers and filters.
- Consumer.
How to properly adjust the pressure switch. Firstly, it is necessary to understand what pressure will be needed so that it is sufficient in the process of opening all points of consumption, especially for the shower, as the most powerful consumer. Secondly, you need to know the pressure at the water intake point.
After all, how the relay works, and therefore the pump. If the pressure at the point of intake is below 1.4 atm, the relay will not even turn on, that is, the pump will not work.
This often happens if your private house is connected to the village water supply network, where the pressure most often does not rise above 1.0 atm.
If water is drawn from a well or well using a pump, then the pressure in the home network will depend on the technical parameters of the unit. In any case, not lower than 2.0 atm. That is, you don’t have to worry that the relay won’t turn on, so you can safely adjust it.
Review of popular models
There are two types of pressure switches: mechanical and electronic, the latter are much more expensive and are rarely used. The market offers a wide range of devices from domestic and foreign manufacturers, making it easier to select the required model.
RDM-5 Gilex (15 USD) is the most popular high-quality model from a domestic manufacturer.
Fig.4 RDM-5
Characteristics
- range: 1.0 - 4.6 atm.;
- minimum difference: 1 atm.;
- operating current: maximum 10 A;
- protection class: IP 44;
- factory settings: 1.4 atm. and 2.8 atm.
Genebre 3781 1/4″ (10 cu) is a budget model made in Spain.
Rice. 5 Genebre 3781 1/4″
Characteristics
- body material: plastic;
- pressure: upper 10 atm;
- connection: threaded 1.4 inches;
- weight: 0.4 kg.
Italtecnica PM/5-3W (13 cu) is an inexpensive device from an Italian manufacturer with a built-in pressure gauge.
Rice. 6 Italtecnica PM/5-3W
Characteristics
- maximum current: 12A;
- working pressure: maximum 5 atm;
- lower: adjustment range 1 - 2.5 atm.;
- upper: range 1.8 - 4.5 atm.
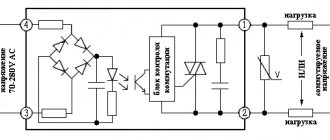
The pressure switch is the most important element in the water intake system, providing automatic individual water supply to the house. It is located next to the hydraulic accumulator, the operating mode is set using adjusting screws inside the housing.
When organizing a water supply system at home, you need not only a pump, but also automation to ensure its operation. One of the necessary devices is a water pressure switch. This small device turns on the pump when the pressure in the system drops and turns it off when a threshold value is reached. The magnitude of the on and off parameters can be adjusted. How this device works, how to connect it and how to regulate it is in the article.