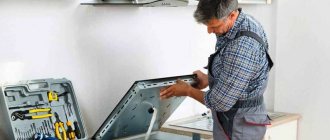
This review analyzes the advantages of existing models of hobs. Methods of their installation and methods of connecting to the electrical network are described. Let's evaluate the advantages of each panel when choosing a product. After receiving installation information, we will select the most convenient way to connect the hob at home, guided by the technical parameters of the kitchen.
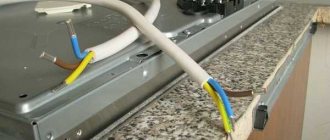
There are many types of hobs with different nuances in their connection Source faqindecor.com
What are hobs?
Before we study connecting the hob to the electrical network, let’s get acquainted with its varieties. Built-in hobs are rectangular or hexagonal in shape, their width is 250 – 900 mm, their depth is 600 mm.
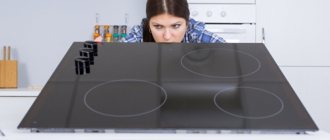
A beautiful panel pleases the hostess’s eye Source www.hotelresidencia.com
The manufacturing material is focused on various preferences and financial status of the consumer:
- Aluminum . Such devices require daily monitoring. They are very user friendly. These devices have an affordable price and withstand mechanical and thermal stress. The material is impact resistant but sensitive to scratches.
- Enameled . Their main advantage is their reasonable price. Enameled devices are available in a wide range of colors. They, unlike aluminum ones, do not show fingerprints. The disadvantage is the heaviness of the product, which does not always suit the parameters of the mounting surface.
- Stainless steel . These models are more expensive than enamel and aluminum. Reliable and durable. The downside is that fingerprints and water marks remain visible.
- Built-in glass-ceramic hob . Modern models with touch control. They have a stylish design and are easy to use. This material heats up and cools instantly. The only disadvantage is that glass ceramics is fragile and susceptible to cracks. Cold water sometimes causes chips due to impact on a hot surface.
How to connect a gas hob: step-by-step instructions
Working with the tabletop
A pressing point in the event is correct sizing. Usually a template is included with the stove itself. It will be used to make a cut in the tabletop. However, it’s better to check everything again - no one is immune from mistakes.
It is important to choose the correct location for the future built-in panel. Focusing on the role of the item in kitchen interior design, we should not forget that:
- A prerequisite is access to fresh air.
- It is necessary to ensure that no water gets on the surface.
- The panel must be located at a safe distance from the furniture in the kitchen.
How to make the right cut? To do this, the outline of the future device is drawn on the countertop. Then all that remains is to cut it out with a wood saw. A little trick from the experts - when working, it is best to step back from the edges of the drawn contour by 1-1.2 inwards. Then the future “seat” is treated with a special sealant (it is better to choose silicone - it is the most moisture-resistant). This measure will protect the material from moisture penetration.
The problem of choosing hobs
Choosing a product on the market is difficult due to the lack of suitable types. After all, the type of installation of the hob depends on the parameters of the selected model.
Hob: view after installation Source tehznatok.com
Main product classification:
- Products are gas , electric and induction . As for the electric panel, this is the best option for a house where gas is not installed. If the buyer's first priority is comfort, experts recommend purchasing a gas appliance. The induction hob is characterized by a modern set of advantages.
- Dependent panel . A dependent model is a model produced together with the oven. In this case, the oven is located inside the kitchen unit or is integral with the hob. The combination of oven and hob does not always happen, even if they are manufactured by the same company.
- Independent model . It is not connected to the oven. The main advantage of such units is the arbitrary location of the device in the kitchen. The dependent model is made so that it can be placed exclusively above the oven.
Differences by type of control:
- Mechanical mode of operation requires a rotating mechanism. Most consumers prefer this type.
- Touch models work with a light touch of your hand. This is a truly innovative method. Cleaning the panel is easy because the surface is smooth.
The main rule when choosing is security parameters. Source m.sm-shop24.ru
How to cut a hole
To carry out work to create a mounting hole for the hob, three types of tools can be used:
- Drill;
- Jigsaw;
- Milling machine.
To create an accurate and correct cut, it is better to use a manual router, but it is unlikely to be found in the tools of an ordinary person who is not involved in assembling furniture. The second option is a jigsaw, even if it is not available, purchasing this tool will not be difficult, its cost is not high.
There is always a drill in the house, but using it to make a hole makes it difficult to install the hob later. The cut edge turns out to be uneven - this requires additional work to seal the hole. This process takes a sufficient amount of time.
In order to cut a hole with a drill, you will need an 8 mm drill, or 10 mm is possible. The principle of operation is to drill holes at a short distance. Drilling is carried out until they become a single slot.
It is important to understand that work is carried out only on the internal side of the marking. It is required to place a stool under the cut-out piece inside the tabletop itself, this will keep the furniture safe and sound if the cut-out rectangle falls
Making a hole using a jigsaw is much easier, but you will need a drill. Using it you need to make one hole, which will be the basis of the work. It is also possible to make a cut by hand, but there is a danger of making the cut inaccurately. The first cut can also be made with a jigsaw, but this requires some experience with this tool.
The main thing to remember is to take precautions. The cut-out part of the table top must be ensured to fall safely - this will eliminate the possibility of damage to the furniture
After cutting out the hole for the panel, the edges of the slot are treated with silicone. If moisture gets in, the countertop for the hob may become deformed - this will lead to damage to the appearance of the kitchen. A hole cut with a drill is more difficult to process, since the torn edges interfere with the correct application of the composition; you will need to devote a sufficient amount of time to this process.
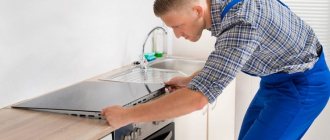
How to install a panel into a countertop
Independent connection of the surface first requires proper installation of the panel into the prepared cutout of the kitchen unit.
Installation is carried out in several stages:
- We determine the future location . Dimensions are determined with a ruler. It is most convenient to use a cardboard blank.
- Draw the shape of the panel on the board. A maximum of 1 mm can be left to allow the product to easily enter the panel.
- Drilling panel borders . Pre-drill in the corners of the marked shape. Diameter 9-10 mm. The drill must be made of wood or metal.
- The next step in installing the hob into the countertop is to cut a hole using a jigsaw. The tool is inserted into the finished hole, pressed firmly against the board, and then begin the cutting process. In this case, the brush should be pressed along the marking lines at low speed.
- Attach it securely to the top of the table using a set of clamps. Then remove the remaining wood.
- The remaining gap must be filled with special silicone sealant .
The process of installing a gas panel Source stroy-podskazka.ru
After installing the device in the set, you can begin the process of connecting it to the electrical network.
See also: Catalog of flat roof house projects
Preparing the bore hole
Marking
The appearance of the finished kitchen depends on how accurately the markings are made, and an error of even half a centimeter will force you to purchase a new countertop.
Marking can be done in two ways:
- put the device in place and circle it with a marker;
- calculate and mark the mounting location to the nearest millimeter.
Despite the apparent simplicity and attractiveness of the first path, there are a lot of chances to make mistakes and apply incorrect markings.
Preliminary sizing
It is much safer to mark the installation location through careful calculations:
- The boundaries of the interior space of the cabinet above which the hob will be placed are drawn on the surface of the countertop. Thus, the place within which the work will be carried out will be designated. The markings must be applied with a pencil so that the lines can be easily erased upon completion of the work. If the countertop does not allow you to draw clearly visible lines, then you should stick paper masking tape on its surface, and draw markings on it.
- It is necessary to find the future center of the hole into which the housing will be installed. To do this, diagonals of a rectangle are drawn on the tabletop, formed by the front and back parts of the tabletop and the drawn boundaries of the cabinet.
- The center of the hob will be located at the intersection of the drawn diagonals. You need to draw two straight lines through it: one parallel to the edge of the tabletop, the other perpendicular.
- On these straight lines you need to mark the dimensions of the built-in part of the housing. You can look at them in the technical documentation or try them on yourself. These dimensions should be increased by 1-2 mm to make it more convenient to install the device later.
- Straight lines are drawn through the marked marks (parallel and perpendicular to the edge of the tabletop). They form a rectangle, exactly corresponding to the recessed part of the body and located in the center of the tabletop.
- It is necessary to ensure that the minimum distance specified by the manufacturer in the technical documentation is maintained between the final marking lines and surrounding objects.
- The resulting rectangle must be outlined with a marker and the extra lines erased so as not to make a mistake when cutting a hole.
The marked rectangle corresponds to the size of the hob
Cutting the mounting hole
To cut out a seat for the hob, you can use the following tools:
- milling machine;
- jigsaw;
- drill.
The highest quality cut is obtained when working with a milling machine. A slightly lower-quality cut is made by an electric jigsaw with a fine-toothed file.
For work you can use a drill or jigsaw
The procedure for cutting a hole with a jigsaw is as follows:
- Drill holes in the corners of the marked rectangle (from the inside) with an 8-10 mm drill.
- Using a fine-toothed file, carefully make a cut along the marked lines. The body of the jigsaw cannot be kept suspended; it should be pressed tightly against the tabletop.
The hole is cut along the marked lines
But not every household has convenient tools. A much less beautiful, but nevertheless suitable for installation cut can be made using a conventional drill.
The procedure for cutting a mounting hole using a drill is as follows:
- Using an 8-10 mm drill, holes are made along the intended line. They need to be drilled from the inside of the marks so that the drilled areas are in contact with the intended cutting line. Holes must be made as often as possible so that the cut piece of the tabletop can be easily broken off.
- Rough edges of the hole must be aligned with the marked line. To do this, you can use a rasp or a small file for wood or metal. The resulting edges must be made as smooth as possible.
Attention! After the mounting hole is made, you need to insert the hob into it. The device should fit effortlessly and completely cover the cut hole with its body.
Sealing the mounting hole
The next step is sealing. It is necessary to protect the countertop from water during cleaning or cooking. A tabletop made of wood or chipboard can swell and deteriorate as a result.
Sealing is done using acrylic sealant for plumbing or nitro varnish. It must be carefully applied in a thin layer from the inside to the ends of the hole made. There is no need to apply sealant to the top surface of the countertop - a special gasket in the form of a sealing tape that comes with the panel will be used there.
The ends of the table top are treated with silicone
Sealing tape sticker:
- An adhesive layer covered with a film is applied to the sealing tape. It should not be removed all at once, but peeled off gradually as it sticks to the surface.
- The tape is glued around the perimeter of the mounting hole in one piece. It is not cut at the corners, but simply glued with a turn.
- The end and beginning of the tape are connected end-to-end, without overlap or gap.
Some manufacturers equip hobs with aluminum seals. Instructions for installing them are contained in the documentation for the device.
Panel fastening
The hob is mounted as follows:
- The device is inserted into the mounting hole and centered so that the front side is parallel to the edge of the countertop.
- From inside the cabinet, the cabinet is attached to the tabletop with special plates included in the delivery set.
- Installation must be carried out in such a way that there are no gaps between the hob and the countertop.
- Using a utility knife, trim off the excess sealant from the top.
The seal is cut with a utility knife
Connection Tips
The process itself - how to connect the hob to the mains - is quite simple. You will need the following tools and components:
- An impact drill that is attached to a drill bit of a specific size to drill into a wall.
- Plastic inserts.
- Mounting screws for container.
- Screws for mounting the socket.
- Screwdriver.
- Knife to clean the ends of the crimp wires.
- Insulating tape.
Safe installation of the hob Source my-muzh.ru
In general, the plan for how to install the hob safely and independently should look like this:
- The connectors can be connected directly through the plate terminals. To access them, disconnect the cover on the back surface and remove the safety device.
- We focus on the color marking of the wires and the shade of the connected terminals. A single-phase network requires the use of a red wire with a membrane.
- Using a plug with a grounding terminal requires connecting the green/yellow wire.
A competent and secure connection first requires information about the parameters of the network connected to your home. Based on these technical parameters, the connection algorithm is selected.
Step-by-step installation instructions
Speaking of tools, if the built-in panel is installed in a new set, and the hole for mounting the housing in the countertop has not yet been made, you will need a drill and an electric jigsaw. To connect to the electrical network, you will also need a screwdriver, pliers, and a voltage indicator.
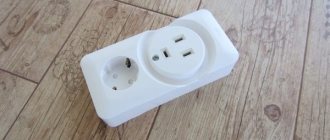
The first thing you should take care of is a 220-volt electrical outlet into which the built-in hob will be connected. The choice of its location and installation must be done before installing the furniture. In addition to the panel, the stove set includes an oven. If the first one is installed without a cabinet, it can be plugged into one outlet. The electrical outlet should be installed lower than the built-in hob will be located to prevent it from being exposed to moisture and grease during cooking.
When the installation of the outlet and kitchen wall is completed, you can begin to work. You can install the built-in hob using the following step-by-step instructions:
First you need to determine the size of the mounting opening that needs to be cut in the countertop. This information can be found in the instructions provided by the manufacturer. If there are no instructions, you need to carefully measure the seats. It’s a good idea to make a cardboard model according to these dimensions (sometimes it is included in the kit), which you then need to install on the tabletop and trace with a pencil. It is necessary to ensure a gap between the seating parts of the body and the edges of the table from 1 to 2 millimeters.
We carefully mark the future hole. You will need a long ruler and a pencil. Don't forget that the tabletop is made of pressed sawdust and decorated with an artificial stone coating. For this reason, you should not cut a hole closer than 50mm to the edge, as thin sections of the table may collapse. Using a drill, carefully drill holes in the corners of the marked area, without going beyond its limits. We use an 8 – 10 mm drill for this purpose. During the drilling process, it must be installed and held strictly perpendicular to the surface.
We insert a fine-toothed wood blade into the electric jigsaw to avoid chipping the surface of the tabletop at the edge of the slot. Having inserted the blade into one of the prepared holes, we make a cut along the markings, pressing the jigsaw tightly to the surface. After finishing cutting, we make sure that the built-in hob easily fits into the seat with a small gap. Otherwise, the edges of the hole should be trimmed.
It is advisable to protect the end sections of the made slot from moisture. For this purpose, the edges are treated with sealant, as shown in the photo below. Then you can stick on the sealant included in the kit.
Now the built-in hob is prepared for installation, after which it is installed and connected. Carefully insert it into the hole and, using gentle hand pressure, push it down until the protruding edges completely adhere to the surface of the tabletop. Before this, you can apply a layer of silicone sealant to the surface, which will then be covered by the built-in hob. This will ensure the sealing of the connection.
When pressing on the surface, you should be careful, especially if it is glass. It is important that the built-in panel lies evenly on the surface of the countertop. Otherwise, placing a heavy pan on it may create a breaking force.
The last stage of installation is that the built-in panel is secured using special fixing clips included in the kit. The clips are installed from below, after which the body is fixed
Protruding excess sealant that was applied to the surface of the countertop must be carefully removed. If an oven is installed under the hob, a layer of thermal insulation is laid between them.
The detailed process of installing an electric hob into a countertop is demonstrated in video lessons:
Algorithm for connecting the panel to single-phase networks
This option is possible if a wire of three cores is embedded in the wall.
Scheme for connecting the panel to single-phase networks Source rolexforum.ru
To install the panel, the following steps are required.
- Use a screwdriver to unscrew the plate located behind the panel.
- Use jumpers to connect the first, second and third terminals. The phase connection is carried out using a brown, black or white wire
- We connect the blue wire to the zeros. These are numbers four and five.
- Cables for hobs are connected to the protective terminal (yellow).
- Tighten the mounting screws.
- It is necessary to check the reliability and tightness of connections and the functioning of the product.
The preliminary stage of connection is to check the technical condition of the sockets. If necessary, replace it.
See also: Catalog of companies that specialize in electrical work
Applying markings to the tabletop
The dimensions for the technological hole in the countertop can be specified by the manufacturer in the instructions. If they are not there, you will have to take the measurements yourself. It is not difficult. To do this, you need to turn the panel over and take its dimensions, taking into account that it should lie on the tabletop along the entire perimeter. For convenience, you can make a template by cutting it out of a sheet of cardboard to the appropriate dimensions. Then transfer the dimensions to the tabletop using a long ruler, square or prepared template. With maximum precision to avoid curvature, use a pencil or marker to draw the outline on the tabletop.
How the hob is connected to three-phase networks
Connecting the product to an outlet requires the use of a five-core wire.
Structurally, it consists of:
- three phases;
- grounding intended for protection;
- "zero".
Connection diagram of a panel with three phases Source rolexforum.ru
The process of connecting the hob is as follows:
- We connect a single-phase wire (black or white or shade) to the first terminal, another to number 2, and the rest to the third.
- The fourth and fifth terminals are connected with a jumper, and a blue neutral conductor is connected to them.
- Grounding requires connecting a yellow-green wire.
Electrical connection
If you are not familiar with electricians, it is better to invite a specialist who will connect everything correctly.
There are several connection methods:
- using a plug and socket;
- copper cable sleeves;
- through screw terminals for connecting wires.
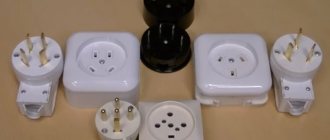
In the first case, we are, of course, not talking about an ordinary 220V outlet - connecting a hob to it is strictly prohibited.
Instead, a special power socket and plug are used, designed for 32-40 Amperes.
This kit can be purchased at an electrical supply store. You should consult a professional to select the correct outlet. In addition, to connect the hob, a separate electrical wiring line with a cross-section of at least 4-6 mm2 must be laid.
In addition to a special socket and plug, you can also use screw terminals to connect wires or use copper sleeves designed to connect electrical wires.
In general, the choice of cable cross-section directly depends on the power of the built-in hob.
You also need to know that connecting the power cable through a regular circuit breaker is not allowed. You need to use a difavtomat or RCD in conjunction with an AV.
For the installation of electric hobs in apartments and private houses, the VVGng-Ls cable is most often used, which is characterized by reduced smoke and gas emissions in the event of combustion and, with proper operation, lasts at least 30 years.
The wires are connected according to the standard diagram specified in the instructions for the hob. If 4 wires come out of the stove, and your network is single-phase (3 wires come out of the wall), then the two terminals phase 1 and phase 2 on the hob must be connected using a brass jumper.
Installing the hob plug
If the device is equipped with a cable, where the plug is connected, and there is a suitable outlet in the room, then all that remains is to turn on the product.
In another case, it is necessary to carry out a certain algorithm of actions:
- The plug is pre-disassembled and the cable is passed through the prepared hole.
- We connect the brown and blue wires to the plug outputs.
- If o and “N” are present on them, then the brown wire is connected to the terminal with the letter “L”, and accordingly “N” receives a blue cable.
- The yellow-green wire is attached to the central terminal of the plug.
- The plug is assembled together and secured with a bolt.
Connection of wires in a plug Source cable.ru
Installation nuances
Kitchen hobs are gas, electric and induction. Each of them has its own characteristics and requires a specific approach to installation. But there are general rules that apply to all types of kitchen installations.
Before proceeding with installation, you need to make sure that the following nuances are observed:
- the presence of a ventilation system and an exhaust hood equipped above the stove or the presence of a powerful fan in the window;
- tabletop material with a heat resistance level not lower than 100 °C, and the surface itself is not thinner than 25 mm;
- if you plan to install a panel between two cabinets, make the distance between the walls and the stove at least 15 cm;
- the gap between the wall and the slab must be at least 5 cm, and if it is smaller, then heat-insulating material is laid.
Any discrepancy in the installation of equipment is fraught with its incorrect operation and the occurrence of a fire hazard.
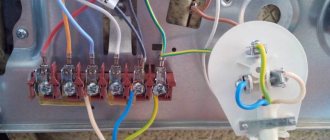
Electrical panel
Electric stoves are especially popular among users. They are easy to use, durable and beautiful. If they break down, you can carry out repairs on your own without calling a specialist. Of course, if you do not have at least minimal knowledge in the field of electrical engineering, then it is better to leave the installation and subsequent repairs to specialists.
On the back wall of any built-in electrical panel there is a diagram according to which the connection is made. If you do something wrong, it can result in a short circuit and incorrect operation of the burners. Some models are equipped with a wire for direct connection of the stove to the panel. This eliminates the need to make an additional electrical point for the socket. Installation in this case consists only of connecting the cable to the panel, installing it in the hole made and sealing it.
Gas hob
The gas stove, built into the countertop, is installed by the owner of the equipment himself. But a representative of the relevant service must make the connection and check the fault.
Typically, gas panels are attached to the countertop using special brackets that come included. After installation, you can connect the power cable and open the gas supply. At this stage you need to be extremely careful and take into account all safety regulations.
You need to make sure there is no leakage. For this, a special gas analyzer or the “old-fashioned” method is used. The joints between the panel and the pipe are lubricated with a soap solution and the gas is opened. If bubbling is visible, there is a problem that needs to be fixed.
Installation rules above the oven
Induction panels have many advantages over gas and electric stoves.
The following advantages can be highlighted:
- the surface quickly heats up to a certain temperature;
- easy to care for and keep clean;
- savings in energy consumption;
- the absence of open flame and too high temperatures makes the equipment safe for children.
When installing a stove above the oven, you need to take into account some subtleties. The oven must be equipped with a cooling system and forced ventilation.
The countertop into which the panel will be mounted must be perfectly flat. If you neglect this rule, then perhaps the deformation will disrupt the normal operation of the equipment, and it will quickly fail.
Gas hob connection diagram
Once a gas stove has been selected, it is not difficult to connect it, provided that a similar unit has been used in this kitchen before. The gas hob must be connected using a flexible hose.
Example of a gas hob Source t10p.ru
The main safety requirement is to turn off the gas tap at the entrance to the apartment before starting the connection.
All modern gas surfaces are equipped with electric ignition.
Algorithm for how to connect a gas hob:
- Black and brown wires are attached in the plug to the terminal responsible for the phase.
- The blue wire is connected to the connector responsible for “zero”.
- The yellow-green colored cable is connected to ground in the central part of the plug.
- We check the functioning of the ignition in the gas hob.
Gas device installation:
- Installation is carried out in the workbench after cutting out a rectangle of the required size using a penetrating saw.
- It is advisable to leave a gap between the panel and the wall of about 5-6 cm for ease of installation of auxiliary communications.
View of the connected gas panel from below Source kuhnyamy.ru
Connecting gas communications
In the case of connecting a gas panel, it is better to contact an experienced specialist, because you will need to make sure that the connection is tight and does not poison.
In general, the connection is made in exactly the same way as for a conventional gas stove. First, we connect the gas supply with a paronite gasket to the hob.
After this, we check the connection for gas leaks - generously apply a soap solution to the connection site.
If bubbles do not form, then the connection is sealed and does not allow gas to pass through.
The electric ignition of the installed gas hob is connected to a regular 220V socket.
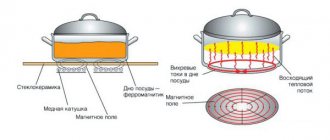
Connecting induction panels
Such plates are economical and efficient. Using the induction unit, only the bottom of the pan is heated, while the surface itself remains cold. Surfaces with this type of heating are the most expensive on the market.
Induction hob - a stylish and modern device in the kitchen Source tehnikaportal.ru
To connect an induction hob, you need to go through a certain algorithm of actions.
- There are two types of electrical cords. To connect the stove, you only need to buy the wire that is suitable for the wiring of your home.
- Now you need to open the cover on the back side of the surface. Here you should find a small rectangle. It needs to be dismantled.
- Opening the cover, we find the necessary terminals. We pre-mount the wires into the clamps. They must be securely tightened. This securely holds the cable out of the box.
- The next step is to remove the copper plate. The old style induction cooker has three cores. The modern model boasts 4 cores. The neutral entrance is in the middle. Phase holes are located on the sides. The ground terminal can be found at the bottom.
- It is necessary to establish a reliable connection between the wires and terminals. To install them, unscrew the fasteners and insert the end of the wire into the hole. Grounding is pre-connected. At the next stage, “zero” is added. The final step is to connect the phase holes.
How to connect induction panels Source mekelektro.ru
- The copper element is installed between the phase terminals.
- Be sure to check the strength of all connections.
- After the connection process, we check the operation of the device by turning it on.
When connecting, the electrical factor comes first. The surface heats up in a matter of seconds, so the burners can immediately begin their functions, creating comfortable use
The disadvantages of such panels include large electricity consumption. Consequently, connecting a hob imposes certain safety requirements when carrying out the described work.
Window cutout for panel installation
After making sure that the markings are correct, you can begin cutting out the hole. Using a drill with a diameter 2 mm larger than the width of the jigsaw file used, drill 4 holes in the inner corners of the drawn contour. Insert a jigsaw blade into one of the holes and make a cut in the tabletop along the entire contour. To prevent large chips, you need to use a fine-toothed file or a hand router.
Place the panel to be installed into the resulting niche and align it. See from the outside whether everything is done smoothly. If everything is done correctly, proceed to the next stage of cutting into the tabletop . Now treat the cut areas with sandpaper, a file, or a rasp. If the countertop used is made of wood, be sure to exclude the possibility of moisture penetration. To do this, carefully treat the cut area with moisture-proof material:
- silicone;
- sealant;
- nitro lacquer
If the countertop is made of plastic materials, this treatment can be skipped. The plastic will not swell or swell due to moisture. Can be coated in several layers for reliability. After the last layer has dried, cover the cut with self-adhesive sealant. Preparations are complete. Installation can be done.