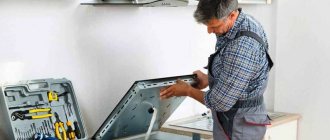
When purchasing a new induction cooker, you should not rush to plug it into one of the available outlets. In this case, first of all, it is necessary to determine the possibility of connecting a given household electrical appliance to a particular section of the electrical wiring and select the most optimal way to connect it. Let's consider the question of how to connect an induction cooker.
It should be noted that before purchasing an induction cooker, it is necessary to clarify what load limit is determined for the apartment (house) and evaluate the possibility of using a particular induction cooker, taking into account its maximum power consumption.
Connecting a tabletop induction cooker
A tabletop induction electric stove, as a rule, has a cord and a plug for connection to a regular household outlet. That is, in this case there is no need to purchase an additional cord and plug to connect the electrical appliance. But in this case, it is very important to choose the right outlet to turn on the electric stove.
Very often they make a mistake - they plug the electric stove into one of the free sockets, without taking into account its load capacity, that is, the amount of load that can be plugged into a given socket.
In the best case, one of the circuit breakers in the electrical distribution panel will turn off - as a result of an overload in one of the electrical wiring sections. But if the wiring is not properly protected, for example, if several wiring lines are connected to one circuit breaker, an overload will damage the wiring.
Therefore, before you start using an electric stove, you need to find out its maximum power consumption and make sure that this electrical appliance can be plugged into one of the available outlets. Power consumption is indicated in watts (W) or in kilowatts (kW) in the passport on the body of the electric stove, as well as in the technical specifications in the operating instructions for this household electrical appliance.
It should be remembered that a regular household plug socket is designed to turn on household electrical appliances with a rated power of no more than 3.5 kW, which corresponds to a load current of 16 A. That is, if the power consumption of the electric stove does not exceed this value, then it can be plugged into this socket.
Next, you need to make sure that the section of electrical wiring that powers this outlet is able to withstand the load of the induction cooker. How to find out?
First, you need to know which cable is plugged into the outlet and how it connects to the rest of your home's wiring. The cable feeding the outlet must have a cross-section of at least 2.5 square meters. mm.
If the cable is connected directly to the home distribution panel, then such wiring line can withstand the current of the household outlet; a circuit breaker of the required rating can be installed to protect such wiring line. This option is most preferable in terms of reliability.
The second common option is that the cable powering the outlet is connected in a junction box. In this case, you need to take into account the loads of other outlets connected to this junction box.
The cable that runs from the main distribution panel to the distribution box must withstand the total load of the outlets powered from it. Therefore, if the load on the induction cooker is an overload for a given section of the electrical wiring, then to turn it on, you should select another outlet of the appropriate load capacity.
Secondly, it is necessary to assess the technical condition of the electrical wiring. If the electrical wiring is in unsatisfactory technical condition, then when a new load is turned on, it may be damaged (See - How to inspect electrical wiring in an apartment). In this case, it is necessary to pay attention to the condition of the cable, in particular its insulation.
A cable with copper conductors is preferable, but if old aluminum wiring is installed in the house, then there is a high probability that such a cable cannot withstand the permissible load.
It is also necessary to pay attention to the condition of the electrical wiring contact connections at the cable connection point in the home distribution panel, socket, as well as intermediate contact connections in the distribution box.
To connect an induction cooker to the network, do not use extension cords or tees. For safe operation of an induction cooker, it must be grounded, that is, plugged into an outlet with working grounding.
You also need to pay attention to the condition of the outlet. If the plug of an electrical appliance does not make good contact with the socket connectors, then the socket must be replaced.
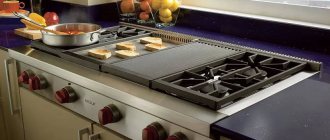
Connecting an induction hob
An induction hob has more power; it is plugged into a power outlet, not a regular household outlet, designed for a current of more than 16 A.
The power socket for connecting the induction cooker is selected according to its load. The total load of an induction cooker can be on average 25-32 A, depending on the number and power of burners.
To power the induction cooker, in this case, an individual electrical wiring line must be laid. The cable cross-section depends on the load of the induction cooker: for a current of 25 A, a copper cable with a cross-section of 4 square meters should be laid. mm, for a load of 32 A - 6 sq. mm.
For safe operation of the induction cooker, the electrical wiring must have a working protective ground. That is, for a single-phase network, a three-core cable must be connected to connect the induction cooker. Accordingly, the purchased power socket and plug set must also have a third grounding contact.
If it is not possible to purchase a power outlet of the required power, then as an alternative, you can connect the induction hob to the terminal block installed in the installation box. The terminal block must be able to withstand the rated current of the induction cooker connected to it.
As for the cable through which the induction cooker is connected, in this case it all depends on the configuration. If the power cable is included, then it is enough to connect it to the terminal block directly on the induction cooker, and then to the purchased power plug or in the terminal block, depending on the chosen method of connecting the induction cooker.
If the cable is not included, it must be purchased separately. When purchasing a cable, you must pay attention to its cross-section - it must correspond to the load being connected. It is necessary to purchase a flexible three-core cable with a cross-section of 4 or 6 square meters. mm for rated currents of 25 and 32 A, respectively.
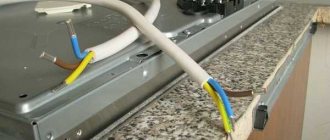
To avoid errors, it is recommended to connect the cable to the stove itself, as well as to the plug, according to generally accepted color markings: brown or black - phase conductor, blue - neutral conductor, yellow-green - protective grounding conductor.
If the cable is already connected to the terminal block of the electric stove, then you need to check that it is connected correctly. The following terminal markings are usually indicated on the terminals of an induction cooker:
L – phase output or L1, L2 (L3) – phase outputs for two-phase (three-phase) connection;
N – zero output;
PE – connection point for the protective grounding conductor.
Two-phase and three-phase connection of an induction cooker
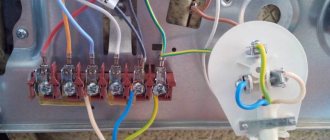
Certain types of induction hobs may provide a two or three-phase connection to the electrical network. If the house has a three-phase input, then such an electric stove is connected as recommended by the manufacturer - to two or three phases of the electrical wiring with a four or five-core cable.
The electric stove is connected to a single-phase household electrical network with a three-core cable, and special jumpers between the phases, which are usually included, are installed in the terminal block on the induction cooker. If there are no jumpers, then the connection to two or three phase terminals is made with a wire of a cross-section corresponding to the load of the electric stove.
It should be taken into account that if the kit includes a cable for two- or three-phase connection, then it is not designed for single-phase connection, since when the induction cooker is connected single-phase, the load on the phase conductor increases to the total load of all phases.
Therefore, when using a four (five) core cable to connect to a single-phase network, two (three) phases on the plate are connected to the cable cores, and at the other end of the cable, when connected to a plug or terminal block, the phase conductors are short-circuited with each other and connected to one phase of the electrical network . Or a new three-core cable is purchased, which has sufficient load capacity for a single-phase connection of an electric stove.
Connecting an induction cooker with an oven
The process of connecting an induction hob with an oven is no different from connecting one induction hob. The only difference is the higher power consumption, since in addition to the induction hob, oven power is added. Accordingly, it is necessary to select the correct cable cross-section, as well as a set of power sockets and plugs to connect the electric furnace to the network.
Relocating an electric stove socket
Often, when renovating and remodeling a kitchen or when purchasing a new kitchen set, there is a need to move the socket for the electric stove. Since there is only one such outlet, we are strictly tied to the place of its installation and cannot mount an electric stove or electric hob in another place, although, often, in order for the kitchen to be as convenient and practical as possible, this needs to be done.
There are several different ways to move an electric stove socket , including simple ones that you can handle yourself, but such solutions are less reliable and even, often, dangerous. More complex, thorough, correct methods of moving a power outlet will require certain experience and tools, but will ensure maximum reliability, ease of maintenance and operation, and in addition, such installation will not spoil the appearance of the kitchen.
Now we will look at the three most common methods of moving an electric stove socket , and it’s up to you to decide which one to choose. By the way, even if you decide to entrust the relocation of the outlet to a professional by calling an electrician for this, be sure to familiarize yourself with all the options in order to check its operation.
How to lengthen the wires in a socket
The need for this usually arises in two cases: a break in the electrical circuit or connecting new equipment. Before starting work, turn off the power supply at the panel and check the voltage supply to the wires to be repaired.
Copper wires
For their extension, crimping is best suited:
- take a tinned copper sleeve with a diameter of 4 mm2;
- insert the bare wires into it overlapping, adding for reliability an additional copper core with a cross-section of 1.5 mm2;
- Use special pliers to clamp the cartridge on both sides;
- insulate the connection with a thermal tube, which should be longer than the sleeve;
- heat the tube with hot air;
- lay the cable in the box.
To be sure, you can put another layer of insulation at the junction.
Aluminum wire
In terms of reliability, aluminum is inferior to copper in terms of oxidation and fragility. Therefore, when working with him you need to be extremely careful. The most suitable option for expanding them is terminal blocks. Both self-clamping and screw ones are suitable.
When using screw terminals, you must:
- remove insulation from sections of wires of the required length;
- insert one end into the terminal hole and carefully tighten the screw;
- perform a similar operation with the exposed end of the second segment.
This connection does not require additional insulation.
Extension cord for electric stove
The easiest way to move an electric stove or hob some distance from a power outlet in the kitchen is to use an extension cord.
Everything is simple here, we plug the extension cord into the existing socket, connect the connector itself to the new installation location of the stove, and this, in fact, completes the transfer.
The main advantages of this transfer method are:
- Simplicity. Using an extension cord, any person who does not have any special knowledge and skills in electricity and electrical installation can easily move the outlet for the stove to the place they need.
- Low cost. This solution will most likely be the most cost-effective, because you will only need to buy an extension cord for the electric stove.
Unfortunately, this method also has serious disadvantages that make this method of transfer undesirable:
– Lack of extension cords for electric stoves . It is quite difficult to find an extension cord for an electric stove on sale, especially if a three-phase connection is used. Since the electric stove is the most energy-intensive device in the apartment, the extension cord uses a large cross-section cable, as well as a special power outlet designed for high current. In addition, a large variety of power connectors of various types complicates the selection task.
Most likely, you will have to assemble such an extension cord yourself by purchasing the appropriate cable, plug and socket.
– Unreliable connection . When using an extension cord, several unnecessary connections appear in the power supply circuit of the electric stove, some of them detachable, which sharply reduces the reliability of the entire system. There is a high probability of contacts loosening and heating, which often leads to fire.
– Possibility of mechanical damage to the power cable . When moving an electric stove, the electrical cable is most often laid openly, simply placed on the floor or passed through furniture, for example, across a kitchen unit. In such conditions, there is a high probability of mechanical damage to the cable under various circumstances - this could be rodents, chafing of the cable, pets or children, or simply a break as a result of careless work nearby.
– The appearance of the room is spoiled. In everyday life, we are surrounded by many electrical appliances, all of which are plugged into an outlet. The kitchen is probably one of the most loaded rooms with various equipment; if you do not organize the connection points correctly, you can simply “drown” in the wires; they will interfere not only with cleaning the room and moving around it, but also simply irritate you with their appearance. Therefore, an extension cord for an electric stove lying on the floor will not add attractiveness and practicality to your kitchen.
– Possibility of electric shock to a person . Elements of electrical wiring accessible to people, which include an extension cord, are dangerous in themselves because they can, under certain conditions, for example, if the insulation is damaged, cause harm to human health through electric shock. In addition, due to the presence of water in the kitchen, these risks increase significantly, because pipes or plumbing fixtures may burst, and, what happens even more often, your neighbors above may flood you. In such conditions, using an extension cord becomes especially dangerous.
As you can see, this method has more disadvantages than possible benefits; the extension cord should be used only as a temporary solution, until the implementation of a more reliable, complete, comprehensively safe one, such as those presented in the following paragraphs of our article.
How to increase the length of the temperature sensor wire for a heated floor
The temperature sensor wire can be extended up to 50 m. For this, a PVA copper cable of the same cross-section is used. In this case, terminal blocks that do not require additional insulation are ideal.
Similar: How to test wires with a multimeter
Necessary:
- Remove the plastic covering from a small section of both wires:
- clean off exposed ends;
- insert them into the terminal hole from opposite sides;
- carefully put it into the installation pipe.
Replacing the power supply cable for an electric stove from the panel
The most reliable, but at the same time, the most expensive option for moving an electric stove socket is laying a new electrical cable from the electrical panel to the required installation location .
At the same time, you get a solid cable that does not have unnecessary connections, damage, wear, etc. is the best way to move a stove socket. In addition, you can install a larger cable and use a more powerful electric stove or hob.
The advantages of this method are obvious:
– Reliability. Having decided to lay a new cable from the electrical panel to the new installation location of the power outlet, subject to all the rules for choosing a cable and laying the wiring, you will receive the most reliable solution that will satisfy all possible requirements and will serve you for many years.
The disadvantages include:
- Price. Laying a new line to the stove outlet will be the most expensive and labor-intensive method. This price is for maximum reliability.
– Installation time. Complete replacement of the electrical wiring to the electric stove socket from the input panel is a long process. If you follow all installation rules, and also take into account the future visual appeal of such an installation, you need to put in a lot of effort, which will accordingly take a sufficient amount of time.
Most often, the power cable for an electric stove is replaced entirely when a complete renovation is carried out in an apartment or house. In cases where complete confidence in the wiring is required, when it is possible to combine the transfer with general reconstruction and quickly repair all possible damage.
The most optimal, in my opinion, option for moving an outlet for a hob or electric stove is to extend the existing cable and lay it to a new location for installing the outlet , in accordance with all the rules and regulations of electrical installation.
How to combine copper with aluminum and which is better and more reliable
When extending an electrical wire, you must first find out what metal its cores are made of. It is impossible to extend a copper cable with an aluminum one and vice versa. If such a need does arise, then a relatively safe way is to use terminal blocks.
Thus, if you approach the extension of any wire with great responsibility, follow all the stated recommendations and rules for working with electrical installations, then in the future you will not have any problems with the operation of electrical appliances that make your life easier.
Relocating an existing electric stove socket using cable extension
PICTURE
This method combines the two previous ones, combining all their advantages and eliminating their disadvantages. With a significantly lower cost of work and the necessary materials and labor, this method is not much more expensive than the method using an extension cord, but is almost as reliable as completely replacing the cable.
The procedure for extending the power cable for an electric stove socket and laying it to a new location for installing the power socket is as follows:
– The electricity supply to the installation site in the electrical panel is turned off. Most often, an electric stove has an automatic switch of the highest rating - 32-40A; most likely, there will only be one of these, not counting the introductory one, and it needs to be turned off. Then, carry out a control check, for example, with an indicator screwdriver, to ensure that there is no voltage at the transfer site.
– The old socket for the electric stove is removed, the type and cross-section of the power cable is determined. In addition, the connection method is selected, depending on the selected installation option (points below), the method of connecting the conductors, etc. After which, the appropriate electrical materials, cables, fasteners, etc. are purchased. Most often, a VVGng-LS cable 3x6 for a single-phase network and 5x2.5 for a three-phase network is used for an electric stove. Then there are two main options:
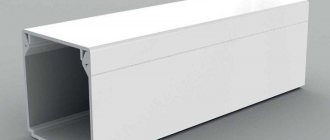
– If in the future the place where the old outlet for the stove was and the route from it to the new installation location is closed, for example, by a kitchen unit, then you can install an external distribution box, and from it, for example, into a cable channel or corrugated pipe fixed to the wall with clips, already stretch the cable.
– If you need to make a hidden wire, then a built-in distribution box is installed at the connection point (if it does not already exist), in which the cores of the old cable are connected by color to the new one. Select one of the permitted connection methods - terminals, welding or crimping. To the new installation location of the power outlet, a groove is made into which the selected cable is laid.
Ideally, it would be, of course, to raise or lower it strictly vertically, move it either on the floor or along the ceiling, and then lower it vertically to the desired location. But most often, in domestic conditions, it is enough to move the cable, wiring it horizontally along the wall and fix the location of the cable for yourself by taking a photo or drawing a plan.
– After which all that remains is to install a new power socket for the stove; it can be either surface-mounted or built-in, whichever is more convenient for you. If you have a hob, then it will be enough to leave a cable outlet of the required length, which can then be immediately connected to the stove without purchasing an additional power cord.
Here I see no reason to describe the disadvantages or advantages of this method of transfer, they are already in plain sight. This is something in between the first options:
– such a solution will be much cheaper than completely replacing the cable, but will still cost more than using an extension cord
– will be almost as reliable as a solid cable, but there will still be a connection that, in order to approach the properties of a solid cable, must be made in compliance with all rules and regulations
– the speed of such a transfer will be faster than replacing the entire cable to the switchboard, but much slower than simply installing an extension cord.
In any case, if you do everything carefully and correctly when installing, choose a good cable and other materials, then the socket for the electric stove in the new place will serve you for the entire service life without any problems.
If you know how else you can move the socket for an electric stove or you have any questions or comments, be sure to write in the comments to the article, I will try to answer everyone promptly.
Basic methods of extension
First, let's look at how you can extend a wire or electrical cable at home. If the cores of both spliced conductors are made of the same metal (copper or aluminum), then the following extension methods can be used:
- Using WAGO terminal blocks. The most convenient option not only for extending, but also for connecting electrical wires. It is recommended to use even in situations where the conductor cores are made of different metals. The main condition for their use is to connect circuits in which the current does not exceed the rated current indicated on the terminal block. We advise you to buy them in “trusted” places and not to be fooled by the low cost - the market is oversaturated with fakes that melt and burn.
- Budget connecting blocks, so-called polyethylene terminal blocks, allowing you to extend the wiring. The peculiarity is that when the monolithic core is tightened too tightly, the metal part of the terminal block cracks. They cannot connect multi-wire conductors. To do this, they need to be tinned or crimped with an NShVI type tip to obtain reliable and durable contact.
- Twisting of veins. The old-fashioned method, which is one of the most unsafe, but at the same time popular even among experienced electricians. To extend electrical wiring using twisting, it is necessary that the broken end be at least 30 mm (for reliable splicing). Read about how to properly twist wires in the corresponding article. Be aware that twisting is prohibited according to PUE 2.1.21. Therefore, do not use this method in its pure form (without crimping with a sleeve or PPE, soldering or welding).
- Soldering. Another option for extending electrical wiring is to use wire soldering. If you know how to use a welding machine, this method will allow you to efficiently build up a conductor of even a large cross-section (4-6 mm2).
- Shells. Sleeve crimping is an excellent connection method and is well suited for cable extensions. But you may not have enough space to repair the broken wire in the outlet.
- Walnut or other similar branch clamps. With their help, branches are connected for entering private houses from overhead power lines. Also suitable for extending wires. The main disadvantage is its large dimensions.
- Scotch locks are great for branching, connecting and extending low-current wires. They can be used to connect 220V circuits, but are better suited for information lines, such as twisted pair.
We draw your attention to the fact that it is possible to extend aluminum conductors with copper ones only if a special terminal is used for splicing. All other options that allow you to extend the line are strictly prohibited! Read more about connecting aluminum and copper wires in the article: https://samelectrik.ru/kak-soedinit-alyuminievyj-provod-s-mednym.html.
So we looked at what methods exist for extending electrical wires at home. Next, we will present to your attention typical cases when you need to extend the wiring yourself, but now we recommend watching the visual video instructions:
Unique engineering board Bentline SUPERBASE
Solid board is a popular floor covering that is often chosen, but this coating has its drawbacks: in the Russian climate, the board often begins to dry out, which leads to warping, the appearance of gaps and cracks. Moreover, the thicker the boards, the greater the effort that occurs when they dry out.
But there is a solution - this is a perfect version of an engineered board with a unique design and SUPERBASE fastening system!
Bentline engineered board has a 2-layer construction, with a SUPERBASE fastening, which no other manufacturer has. It is specially designed for the conditions of the domestic climate with sudden changes in humidity and temperature conditions.
First steps. Slab countertops
The first attempts to make something from the brought slabs. Although there may be some attempts, the material costs money and the right to make mistakes is as much as there is money in your pocket. Train at your own expense, as they say.
Therefore, each board is carefully inspected and tried on; the proverb about measure seven times is in action.
The work itself is not tricky, creative, there are several boards and they need to be selected so that they look beautiful and there is no overspending. All sizing and trimming is done with the minimum possible removal of material, simply sawed off a little here, cut a little there with a chisel.
How to extend the wire of an LED strip
You can use soldering or use a connector connection. The advantages of soldering are inexpensive and reliable.
To do this you need:
- measure the tape to the required length;
- make a cut, following the special markings;
- clean the area to expose the contact pair;
- solder wires to it.
Plastic connectors clamp the contacts by activating a special mechanical latch. This method is simple and easy, but over time the contacts may oxidize. Therefore, preference should still be given to soldering, although this method is more complex.
Help is needed! Extend the cable
I bought a set of built-in appliances (hob+oven, or, to put it simply, stove+oven). HANSA BCCI 64096014
Only the oven is connected to the 220V electrical network; the hob is connected to the oven through a special connector. Unfortunately, the length of the cable does not allow them to be separated to the sides. I would like a higher oven, so that the distance is 40 centimeters from the hob. Currently the option is available only from below the hob.
Has anyone gone through this? Maybe there is a similar cable (extension cable)? There is no desire to farm or spoil the original cable.
I wrote to technical support - they are silent.
No duplicates found
You don’t have to “collectively farm” - you will have to pull out the contacts from this connector, unsolder them, unsolder the wires on the other side - solder them to the required length - and on the other side actually solder the contacts and insert them into the connector - that is, replace the wires with long ones.
This is what these contacts look like; when pulling them out, do not use much force so as not to damage the connector.
I'm afraid all this will lead to loss of warranty, I'd rather make the extension cable myself from Molex12pin-M and Molex12pin-F. Thankfully, they suggested
True, you'll have to wait for it from eBay, I don't know where else to get it
Good evening! The situation is similar with a similar Hansa kit. Tell me, did you solve the problem and how?
Hello, I haven't decided yet. Oven under the hob. But it turned out fine, the edge of the surface protrudes above the switches, nothing is flooded. The only downside is that it’s a bit slow to get food out of the oven. Pros - the switches are nearby, it is intuitively clear what to turn where to turn on the burner.
PS this account has been permanently banned for a long time
Google “twelve pin molex”
He is. They come in different sizes, with different key locations. And even if Molex itself has never produced such connectors, the OP will immediately find what he needs using the search phrase.
You are right. But this seems to be okay. I even found a Molex part number - 50-84-1125.
like 50-84-2122, 1125 has all round pins
oh vice versa. that's right
The mating connector is similar to this MFA-12M pitch 6.35, and the connector from the hob is similar to this MFA-12F pitch 6.35 (M-male, F-female). Buy a “mother” and a “father”, you just need to pay attention that the connectors can be sold without internal metal contacts, that is, only plastic parts, take the wires of the required length, buy contacts for these connectors, etc. happiness will be somewhere close.
I'll continue googling tomorrow, thanks. There are a lot of these Molex standards, I’m trying to figure out something similar from photographs
Most likely you will have to cut it. in principle, it’s okay, you take 2 blocks with 12 terminals and connect the whole thing.
then there will be a loss of warranty
just call a technician from the store to connect.
Let him connect it himself and sign the passport.
that's all.
in general, dependent plates are taken mainly only for installation in one table. and if separately, then they take independent ones. but it's more expensive, yes.
Here there is MFA-12M https://www.kontest.ru, and the second one is on order.
There are websites of service companies, and many of them sell spare parts. Besides, there aren’t really service centers like “rembytekhnika” in the city that you could call about purchasing a set of plugs?
I live in the village))) I'll look
return it, get an independent panel
Secondly
The hob needs to be wiped down periodically. Sensors are crap. I now have a Rolsen single-burner touchscreen - it is triggered by a wet rag. I can unplug Rolsen. From which socket will I pull the built-in equipment? Switches on the hob are completely excluded. Water will run out of the pan and inside.
I now have the option of leaving the switches on the side (as in conventional stoves) so that they don’t get filled with grease. The only problem is the short cable (luckily they already suggested a solution). Give up benefits? For ease of installation?)
Switches on the hob are completely excluded. Water will run out of the pan and inside.
Nowadays mechanical switches remain only on the most budget models! Sensory everywhere! it doesn’t flood anything, well, if you’re a pig, you’ll flood the sensors and the sky and even Allah!
take out the machines in the kitchen somewhere. This is how we do it, although it’s a private house, the gas boiler is hidden in a hefty closet, and there are all the automatic equipment in it – a refrigerator, a gas chamber (giggle), just kidding, an electric oven. and the hob itself is gas. but the meaning is the same - bring the machines closer, and not in the panel :) in the distribution panel the machine is shared in the kitchen
Rolsen? This is tough. But there is a lock on the sensors from children and rags. Let me send you an Italian panel for 17,000, a normal new one. I work at an online store.
I'm happy with the German Hansa)
German? Have you seen the gas turbine engine? This is Chinese Poland. Germany is the same as Kaiser, Sigmund Stein and Kupersberg with Korting near Moscow.
Let there be Poland. I have a Zelmer EK1300 multicooker. Polish, sort of. I can't say anything bad. Quality goods. There is zero Chinese in Hans. The manufacturer is actually Poland.
Bosch initially wanted to take it. But one hob costs 26 thousand. Also, the burners are not quite the same as I wanted. Both Bosch and HANSA are SCHOTT CERAN. If you can't see the difference, why pay more? 31 thousand set of hob + oven. What are the strengths of Italian technology? I'm trying to remember Italian technology. and only the hood comes to mind.
By the way, about Rolsen. Despite the fact that this is a Russian product with the involvement of the Chinese (like Redmond), their products are worth the money. The quality is worse (Redmond products, for example, need to be finished after purchase using at least a drill), but I wouldn’t call them outright weak.