Cable ducts are used for laying electrical wiring in rooms; the dimensions in the table allow you to quickly select the necessary components. Boxes are made of metal or plastic and can be painted in various colors. Manufacturers offer additional components for neatly going around corners or doorways in an apartment or office.
Standard sizes of cable channels - table
Product parameters and requirements for the construction of cable systems are regulated by the GOST 52868-2007 standard, but many manufacturers are guided by technical specifications during production.
The characteristics of cable channels for electrical wiring from the In-Liner company, having a rectangular or square cross-section, are given in the table.
Please note that when installing partitions, the compartments have different areas.
| Box dimensions, mm | Usable area, mm² | Allowable number of separators, pcs. | Number of compartments when installing partitions, pcs. |
| 25x30 | 568 | Not provided | 1 |
| 60x40 | 1767 | 1 | 2 |
| 80x40 | 2645 | 2 | 3 |
| 120x40 | 3840 | 4 | 5 |
| 100x60 | 5063 | 2 | 3 |
| 120x80 | 8510 | 4 | 5 |
| 200x80 | 14430 | 6 | 7 |
Types of cable channels
First you need to decide on the type of cable channel. We talked in detail about what types of cable channels there are in a separate article, now we will briefly repeat it again. They are distinguished according to 4 criteria:
- According to the method of installation and location in space.
- According to the material from which it is made.
- By design.
- By appearance.
To choose a cable channel for electrical wiring, you need to take into account all the differences, let's look at what they are.
What does the cable channel look like?
The classic design consists of:
- a box-shaped base (with a rectangular, triangular or shaped profile), which is attached to the surface with screws or glue;
- a cover equipped with elastic hooks for fixing with mating flanges on the base;
- connecting elements that allow you to assemble a single highway from several channels;
- adapters for contouring external or internal corners;
- removable dividers, which are offered for boxes with increased width;
- block for installing sockets (used only on some types of channels).
An industrial tray consists of side guides and crossbars connected by arc welding, rivets or bolts. There are holes for mounting. The structure is placed on brackets pre-fixed to the wall.
The tray ensures that cables are held at a given height. The design does not provide protective covers.
Selection of cable tray size
The tray size is selected based on the following criteria:
- the height of the structure must be greater than the diameter of the largest cable or bundle of wires;
- The width of the structure should ensure the laying of several cables in several rows.
The useful cross-sectional area of the tray is calculated by the formula:
useful section, sq. mm =0.95*width*height, i.e. for a LM 100x65 tray, the usable area will be 0.95*100*65=6175 sq. mm.
To ensure efficient operation of the cable route, it is necessary to make a preliminary calculation of the tray's fillability. Clause 2.1 of the Electrical Installation Rules (PUE) states that “that in cable trays, cable products can be laid in several layers, both in an ordered and random arrangement. At the same time, the sum of the cable cross-section, which also includes outer sheaths and insulation, should be no more than 40% for boxes with openable covers and 35% for solid structures.”
To calculate the area occupied by one cable, use the formula:
S = D², where S is the area of the wires, D is the outer diameter of one cable (including the outer sheath and insulation). By calculating the cable area, you can find out the fill level of the trays, and for this you need to take into account the sum of the cable cross-sections.
Calculation of gaps between wires
To calculate the useful cross-sectional area, it is worth taking into account the existing gaps between the wires, this indicator is calculated using the formula: S=(2r)²
When making calculations, it is important to take into account the fact that power cables mostly heat up under load, which means there is a risk of overheating of the cable route. Therefore, there must be free space around the power cables; for this, it is recommended to increase the resulting cross-sectional area by at least 25%.
Types of cable channel
Various types of cable ducts are designed for domestic, commercial or industrial use. Products differ in size, type of installation and load-bearing capacity. When arranging open electrical wiring, different types of channels are used (for example, depending on the number and cross-section of the cables being laid).
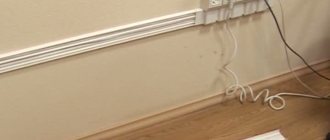
Skirting
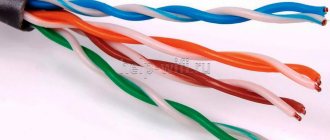
The box is placed at the junction of the wall and the floor. The product looks like a standard plinth with a removable strip. The cavity located inside is suitable for installing thin telephone cables or twisted pair cables. The elements have a length of 2.5 to 3 m and are equipped with connecting strips and overlays for external or internal corners. The shade is selected depending on the type of coating on the floor or walls.
Floor-standing
The boxes for laying electrical wiring, designed for floor mounting, are distinguished by a height reduced to 10 mm and a spherical lid. The products are made from impact-resistant PVC plastic in different colors or aluminum alloy with anodized coating. For industrial premises, boxes are available with a height of up to 60 mm and a width of up to 100 mm. The hemispherical lid allows you to transport trolleys and does not create obstacles for the movement of personnel.
Inside the box there are several cavities for laying wires, separated by partitions.
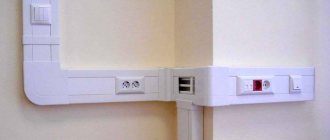
Parapet
Cable channels are designed for installation on the walls of premises. Additional adapters allow you to join boxes or go around corners. Parapet products are used in residential or office premises for power supply wires or connecting equipment (for example, air conditioning units). They have a rectangular cross-section ranging from 80x40 to 120x60 mm. In addition to the standard white color, components are available with other shades or decorative coatings that imitate wood or stone.
How and with what cable channels are attached to the wall
It was already mentioned above that the cable channel consists of a box and a cover. The box is attached to the wall
- Self-tapping screws, if the walls are wooden, or covered with plasterboard, plywood;
- Liquid nails are used to glue plastic channels if the finish is compatible with them.
- Plastic dowels and screws.
In reinforced concrete walls, the wiring is usually installed inside the wall. Factory panels made in Soviet times have special grooves for laying electrical wires, holes for switches and sockets. Now in a number of regions, gating of panel walls is prohibited. Therefore, a change in the location of electrical wires, or an increase in the number of electrical devices, forces apartment owners to lay wires over the wall in cable channels.
First you need to mark the lines on the wall where the cable channels will pass. Lines must be drawn using levels.
Next, on a line drawn on the wall, which should coincide with the middle (the center line of the cable channel), drill holes with a Pobedit drill with a diameter of 6 mm at a distance of 50-60 cm from each other, and insert plastic dowels into these holes.
Align the box with the line on the wall and mark the points on the box where you want the holes for the screws to be. You can easily pierce a plastic pencil case with an awl, but for a metal or aluminum box you will need to use a 4-5 mm drill. Then, through these holes, the cable channel is screwed to the installed plastic dowels.
The cable channel can be attached to the wall using a dowel-nail.
In the same way, cable boxes are attached to a brick wall or a wall made of aerated concrete blocks, but not sheathed on the outside with thermal insulation and plasterboard. Now that the cable channels and fittings have been secured, you can begin installing electrical wiring and telecommunications, installing sockets and switches in installation boxes.
Scope of application of the cable channel
A novice installer should know what a cable duct is needed for. Plastic or metal boxes with a lid are used for laying power or low-current wiring in residential or office premises. Installation of structures on the facades of buildings is allowed, provided that protection is provided against the penetration of rain or melt water into the internal cavities. Open trays made of wire or steel profiles are designed for laying thick power cables and are used in industrial environments.
Dimensions
The occupancy of the cable channel is regulated by the rules for electrical installations. The optimal design is considered to be one that meets the following parameters:
- Height of sides for laying (side walls). The value must exceed the diameter of the largest wire, or the entire bundle.
- Width. This implies the possibility of laying the cable in several rows. If the design is intended for the joint placement of low-current and power lines, the installation of dividing partitions is necessary.
Important! The density of the laid wires directly affects the heat dissipation. The heat dissipation rate is lower for a line with cables tightly “pressed” to each other.
To ensure self-ventilation, it is recommended to choose a perforated or wide tray with low sides.
How to choose a box for laying wires
Before selecting a channel, you should develop a preliminary design of the electrical wiring and determine the range of materials. Standard boxes are 2 m long and are supplied in packs. Their quantity per package varies from 9 to 100 pcs. It is also necessary to purchase the required number of connectors and corner transitions.
Material
For internal installation in residential premises, plastic boxes are suitable, characterized by their compact size and neat appearance. Metal products are designed for installation in basements or industrial facilities. Steel boxes can be used to route power supply cables between distribution panels on the same floor or inside a building.
Box color
The color of the material is selected depending on the decoration of the walls of the room. Manufacturers offer plastic channels in various shades. When exposed to sunlight, the pigment loses its brightness. Steel boxes have a galvanized surface and are rarely covered with a layer of enamel. Aluminum ladders are designed for workshop installation and are not painted during production.
Methods of installation and fastening of cable trays
To build any cable network (power and low-current cables, signal lines, security and fire alarms, SCS and LAN, etc.), it is necessary to lay a large number of cables that come out of the work premises.
The use of metal cable trays to create a system of cable channels on site is one of the standard solutions. Trays are installed in technical rooms, cable tunnels and shafts, mounted in corridors, workshops and even in offices and shops.
Let's look at the main methods of attaching trays. For convenience, the circuits are divided into three groups: installation to the wall, ceiling and floor.
Attaching the tray to the wall
A popular method of attaching a tray is organized through the use of cable shelves (consoles, wall brackets, console brackets).
In turn, shelves (brackets, consoles) can be attached directly to the wall or to special racks or profiles that ensure reliability and durability. The main advantage of using cable racks when installing a route on a wall is the ability to install several parallel tiers of cable trays for separate cable routing. Thus, cable standards, for example, recommend that optical cables be laid separately from copper cables, which determines the need to install several groups of trays in parallel. When laying the route in a vertical plane, it is possible to use a bracket-bracket.
Advantages of using shelves and brackets
- Simplicity and speed of installation
- Strength, reliability and high load-bearing capacity of the structure
- Versatility:
- on the basis of one profile of different lengths, it is possible to assemble wall, ceiling and floor structures with different suspension heights and different lengths of shelves;
- the design of many consoles (brackets, shelves) allows mounting mounting elements both above and below the console itself;
- Possibility of mounting trays not only horizontally, but also in a vertical position
A similar method can be considered for attaching cable shelves to racks (mounting profile) attached vertically to the floor, ceiling or other structural elements of the building (structure).
Attaching the tray to the ceiling and ceiling structures
Dimensions
Rectangular plastic cable ducts are produced in a wide range of sizes. On the one hand, this allows you to select the optimal profile for each individual case. On the other hand, such diversity complicates the choice of products and components for them, especially if you need to make branches and taps.
We offer a table of standard sections of plastic mini-channels and main boxes indicating the number of products in the package. Please note that the standard length of the segment is 2 m. The larger side in the section is always the width, and the smaller side is the height (that is, the profile is made as “flat” as possible).
Laying cables and closing boxes.
Laying several wires in a box requires some skill - they tend to fall out and boxes with longitudinal internal borders come in handy here. They prevent wires from falling out.
At the same time as laying the cable, closing the box with a lid is the best option. High-quality box locks will tightly close the cable channel and prevent the wire from falling out under its weight. In this case, the covers of the cable channels should be slightly longer than the box and then the connections will be less noticeable, and the channel line will be uniform.
It is advisable to cover corner transitions, ends and joints with fittings and plugs. If these are not expected, then the lids of the boxes are left longer - bending them covers the problem areas.
Sizes and colors
Selecting the appropriate size of cable channels is quite simple. Standard sections include 12x12, as well as 40x40 and 100x60. For corner products, the most acceptable size is 40x40 mm. The range of main standard sizes is shown in the table below.
All these products are sold in two-meter trays. The connection of individual elements is made with special couplings. They are fastened with screws, which are screwed in every half meter. You have to buy fasteners yourself, because they are not supplied.
Color solutions also play an important role when choosing cable channels. It depends on them how good the product will look in a certain room. Today you can buy boxes in almost any color. Products made to look like wood are considered quite popular. For example, a pine-colored cable channel is in demand. They are often installed in wooden houses. The classic color for offices is white. Buyers often pay attention to the black color.