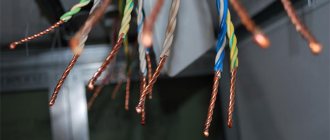
Everyone who uses headphones has sooner or later encountered the fact that they fail. As a rule, this manifests itself in the form of one non-working speaker. This kind of breakdown is typical for headphones, and it is due to the fact that their wires are constantly bent. Below in the photo, red circles show the areas most at risk of cliffs.
As practice shows, if such a breakdown occurs, in most cases performance can be restored. We'll tell you in detail how to solder your headphones so that they continue to delight you with clear sound.
Headphone repair
If you have minimal skills in working with a soldering iron and a tester, broken wires can be repaired.
Troubleshooting
In working headphones, the sound should be clear, without crackling or loss of sound, and the voice of the speaker at the other end of the line should also be without crackling or interruptions. If this is not the case, then there are two possibilities: a malfunction of the device or headphones. To check, the headphone plug should be connected to a known working device:
- problems remain - a malfunction in the headphones;
- the problems are gone - the device is faulty.
You can do the opposite: connect known-good headphones to the device:
- the problems are gone - the stereo headphones are faulty;
- The problems remain - the device is faulty.
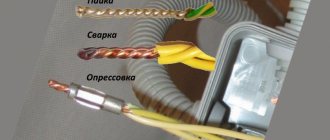
In most cases, the reason is broken wires to the plug or “rocker” (volume control buttons) or to the speaker. The earphone or rocker should be disassembled and the wires soldered, and the plug should be changed or repaired.
Before soldering the wires going to the plug, determine the location of the break. This is done with a tester or multimeter turned on to check resistance:
- connect the tester to the plug; bend the wire, following the tester readings;
- when the cable bends at the break point at the plug, the device readings will change;
- If the break is permanent, then there may be a malfunction or break near the earphone.
Continuity of wires
If the cable inside the plug breaks or it is impossible to remove the protective sheath from it, it is necessary to determine whether the wires match the speakers, microphone and control panel. In this case, different connection schemes are possible:
- the microphone and the rocker are connected using one pair of wires or different ones;
- sometimes the microphone is connected with a shielded wire;
- There is one common wire for all elements or one for each part.
First of all, before soldering the headphone wires, you need to find the ends going to the speakers. This is done with a tester or multimeter turned on to measure resistance:
- strip the wires to 10 mm of insulation; if there is a shielded wire among them, then it goes to the microphone;
- put on headphones and start ringing the wires one by one;
- when connecting the tester to one of the channels and the common conductor, a crackling sound is heard in one of the phones;
- to the left and right channel - in both.
If the headphones do not have a microphone, then the cable is soldered to the plug, and in the headset, after dialing the speakers, the wires going to the microphone and buttons are determined:
- 4 wires. The remaining one is connected to the microphone;
- 5 cores The remaining two are connected to each other and do not communicate with the speaker - they are connected to a microphone and soldered to the common terminal and the microphone terminal. If they are ringing with stereo headphones, then this is the control panel, and the microphone and both wires are connected to the microphone output;
- 7 cores These are two pairs - to the microphone and to the buttons. Soldered by color in parallel to the common and microphone terminals.
How to solder headphones to a plug
The plug is made of soft plastic, and the pin with slip rings is poured into it. To repair, the case will have to be cut and then connected using heat-shrink tubing of a suitable diameter.
A break in the wire going to the plug can be repaired by soldering:
- cut the cable;
- carefully cut the sealed plastic case and remove the plug itself from it;
- remove cable residues from the housing using a thin drill;
- the cable going to the headphones is stripped to the length required for soldering;
- use a tester to check the functionality of the headphones;
- tin the ends of the cores by 5 mm;
- put the notched housing through the previously drilled hole onto the cable;
- solder the wires to the metal middle of the plug, according to the colors of the insulation or the results of ringing;
- the middle with a soldered cable is placed in a plastic case;
- A piece of heat-shrinkable tubing is put on top and heated with a hairdryer.
The plug on the headphones is also replaced.
Headphone speaker repair
If there is no sound from one of the speakers, the reason may be a broken wire connecting to it. To repair a faulty earphone, you must open it. In large models, the cover is attached with screws, and in small ones - with latches or with glue. Such speakers are opened with a knife inserted into the gap between the covers.
The soldered wire must be secured inside. To do this, a knot is tied on it, or it is glued with superglue.
The disassembled speaker is assembled and, if necessary, the covers are glued to each other.
Knowing how to replace the wire and how to change the plug will help you save on purchasing new stereo headphones, and in order to solder the plug to the headphones, you need to know the pinout of the wires.
5, 6 or more wires
Depending on the implementation option, there may be 5 or more wires inside the cable from the headset.
Up to 10! Be that as it may, they always try to make the signal wire from the microphone in its own “ground” braid. In short, if you gutted your cable and it looks something like this:
or even this: no one will immediately tell you how to properly solder the plug to such headphones. There can only be one piece of advice here: take a tester and test all the wires until you determine where the right ear is and where the left is. The remaining wires are to the microphone.
Determine by color which wires may be common and connect them all together. Solder all signal signals according to the connector pinout (see pictures above).
Then test the headphones and microphone. If something is wrong, look for the reason. No one will really tell you anything here; proceed using the scientific dildo method.
Good luck!
Sources
- https://masterpaiki.ru/kak-pripayat-shteker-k-naushnikam-vseh-tipov.html
- https://pro-instrymenti.ru/elektronika/kak-pravilno-payat-naushniki/
- https://stroy-podskazka.ru/naushniki/kak-payat/
- https://svaring.com/soldering/praktika/pajka-naushnikov
- https://headphonesbest.ru/faq/remont-provoda-24213
- https://electro-shema.ru/remont/kak-pripayat-naushniki-k-shtekeru.html
- https://myearphones.ru/instruktsii/kak-spayat-naushniki
How to solder wires to a plug depending on the type of plug
Let's look at how to solder wires to a plug, depending on the type of plug and the location of the contacts on it.
2-pin connector:
2-pin headphone jack
There is no point in describing anything in detail here, because in this case it is almost impossible to mix up the wires.
3-pin connector:
3-pin connector (soldering diagram)
The principle of soldering a plug to the headphones, if we have 3 wires, is as follows:
Plug 3 pins (soldering diagram)
It might also look like this:
Plug 3 contacts, option 2 (soldering diagram)
If we have 3 wires (right, left, screen), then solder the copper wire (screen) to the largest contact on the plug, as shown in the figure, and the colored ones (from the headphones) to the remaining two, observing the correct location of the wires.
In the case of 4 wires, carefully twist two copper wires into one and solder them in the same way as in the case of three wires in the figure above.
Soldering 4 wires to a 3-pin plug
Soldering 4 wires to a 3-pin plug
4-pin connector:
In this connector, two wires are responsible for the left and right headphones, one wire is for grounding, and another is for the microphone.
Schematically it looks like this:
4-pin plug (diagram)
Or like this:
4-pin plug (diagram 2)
Video on how to solder wires to a plug (4 pin and 3 pin)
Other connectors
When repairing other connectors, it is not the headphone soldering pattern that changes, but the order in which the contacts are connected. If in the case of a two-pin connection it is difficult to make a mistake, then 5 wires can easily be mixed up.
In a three-pin plug, a copper wire is connected to the largest contact, and two colored wires are connected to the remaining small ones. If there is no microphone, then 4 wires can be connected in the same way to a plug of this type, the only difference is that there are two copper cables instead of one, they need to be twisted together. If there is one, then the last wire (fourth or fifth) is responsible for the microphone; there is a special contact for it.
How to strengthen the headphone wire
The difficulty lies in the plug itself, since this is the most dangerous place for the integrity of the cable. By lightly pressing on the plug or rotating the cable, you can find the position at which the two headphones will work. Then it is possible to argue that the difficulty lies in the connector.
Before starting repairs, it is important to understand what the most popular types of headphone jacks are and how they are connected. This will help you figure out how to solder when there are 4 or 3 conductors in the cable. In good brands (KossPortaPro, Philips, Sony, Sennheiser) a separate protected core is used for a separate channel; in cheap options, a common background is used for two channels
In good brands (KossPortaPro, Philips, Sony, Sennheiser) a separate protected core is used for a separate channel; in cheap options, a common background is used for two channels.
The strength of the connection largely depends on how you solder the wires to the plug. If the sound disappears (sometimes present, sometimes absent), first of all it is necessary to identify damaged areas and places of rupture. Often the wires break or the places where the headphones are attached to the 3.5 jack plug are damaged.
Jack plug
Nowadays, headphones made in the form of a zipper are popular. Having put on headphones or a headset, the user can fasten them “under the throat”. This way they wear less
If the shell is removable and it is possible to get to the contact on the speaker itself, then to repair the headphones you first need to check the circuit for a break with an ohmmeter. To do this, we place one of its probes on the speaker terminal, and the second on the connector terminal. If the device shows “1” or an infinity sign, then the integrity of the cable is compromised and it needs to be repaired.
Then you need to determine where the cable broke. You need to be especially attentive to places where there are kinks and frayed insulation. You can cut off the cable little by little and check where the break occurred; The headphones are torn, so the length of the headphones will be reduced, but this is a small price to pay for high-quality sound and no interference. Sometimes the situation requires a cable that is quite long: how to extend it - you need to take care of this. It is best to use a whole wire rather than using several pieces.
For reliable soldering, it is best to use POS-61 solder and tin the conductors with pine rosin. To tin wires with insulating varnish applied, you must first remove it. This is done using a small drywall knife or sandpaper.
All wire ends must be thoroughly stripped; It is best to strip the wires with a knife, cutting the insulation in a circle 1 cm from the end, and then remove it with one movement towards the end of the wire. The main thing when cutting the insulation is not to cut the wire core. It is best to cut wires with a length difference of at least 1 cm, so that the soldering points of adjacent wires do not converge at one point. This will prevent short circuit. For soldering, a soldering iron of 25 W or more is sufficient.
To properly solder the plug, it is recommended:
- clamp it in a vice attached to the table;
- hold the wire with one hand holding tweezers;
- use the second hand to perform soldering operations with a soldering iron.
When discussing how to solder a plug to headphones, it is impossible not to mention the importance of concentration and accuracy. Shaky hands, as well as poor eyesight, are factors that contribute to poor-quality soldering. The next step is to secure the wire
For this purpose, there is a clamp on the connector (where the background wire is soldered), an insulated wire is inserted into it and crimped using pliers
The next step is to secure the wire. For this purpose, there is a clamp on the connector (where the background wire is soldered), an insulated wire is inserted into it and crimped using pliers.
When soldering is done, you need to wait about 30 seconds, and then, holding the plug in one hand, make light swinging movements with the wire with the other hand. This way you can check the quality of the soldering, how well the wires are strengthened; Some headphones are secured with a clip to the collar of a shirt or one of the top buttons for reliability when moving.
Let's return to the question of how to fix headphones if the wire is broken: it is impossible to complete this procedure without a soldering iron. It is better that the sting is as small as possible, otherwise it will be difficult to control or sagging will form.
So, if your headphones are broken, don’t rush to buy new ones. Knowing how to solder headphones, you can save both your money and your nerves.
Soldering wires with plug
It's easy to solder headphones with your own hands. The instructions given are relevant for a minijack, but the principle is little different in the case of other connectors.
First you need to prepare the entire tool:
- soldering iron;
- solder;
- liquid flux or rosin;
- stationery knife;
- plug
The soldering iron is plugged in to allow it to heat up. Make an incision 5-15 mm above the plug to protect yourself from a potentially worn area.
There are 3 to 4 wires inside. Before soldering, they must be cleared of 10-15 mm of rubber insulation, and 3-4 mm of insulating varnish must be removed. This can be done using a utility knife or fine-grained sandpaper.
Then you need to take a new plug, disassemble it and thread the wires into the housing. If you want to keep the old plug, you will have to carefully remove the insulation from it.
Next, select a heat-shrinkable tube of suitable diameter and hide the wires in it. The excess length is cut off in advance. (You can skip this step.)
To solder, you need to tin the wires and contacts from the headphones - cover the tip of the soldering iron with solder, touch each wire that was initially attached to the rosin with it, and treat the contacts in the same way.
When connecting contacts, do not confuse the position of each wire.
Diagrams for connecting headphones to standard plugs
After soldering, the headphones are connected and their functionality is checked. If everything is in order, then insulate the exposed part with heat shrink or electrical tape. You just need to assemble the new plug, and put the rubber tip from the handle on the old one (you can secure it with glue).
Looking for the cause of the damage
Admit it, how often have you seen a headphone cable break right in the middle? The cause of the breakdown is almost always the plug, which, with regular use, is subjected to mechanical stress much more often than other elements of the headphones. Simply squeeze and tug the wire around the plug.
If the sound appears after this, it means that there really is a problem. We simply cut off the old plug - we won’t need it anymore. Although, if the distance between the break and the flexible part of the plug is about cm, there is a chance to use it if it is not possible to buy a spare plug.
In addition, to more accurately determine the location of the break, you can use the tester in resistance measurement mode (Ohm). Touch one end of the plug to any of the plug contacts (the left or right headphone output is the two outermost contacts), and attach a simple needle to the other probe with electrical tape and carefully insert it into the wire a little further from the intended break point. If the tester shows a value of 0 or slightly more than zero instead of 1 (a value with hundredths or tenths), then there is a break in this wire.
Preparing for work
To repair headphones yourself, we will need:
- non-conductive glue or epoxy resin;
- a special heat-shrinkable tube is an alternative to electrical tape;
- old fountain pen;
- tester (multimeter);
- soldering iron with a thin tip and all accompanying components (tin, rosin);
- side cutters;
- mounting knife;
- lighter.
It's better to use fabric glue if you can't find epoxy resin, which only needs a few drops.
One earphone does not work: various reasons and how to fix the device
In addition to broken contacts on the headphones, other problems may arise, for example, the lack of the necessary drivers, a problem in the socket itself, or clogged contacts.
| Cause | Explanation |
| The plug does not fit tightly into the connector | The contacts on the plug and the audio output for headphones and on the plug are arranged in a circle; accordingly, loose pressing or falling of the connector does not create close contact, so the sound in one of the headphones may not be heard. |
| Lack of drivers | If utilities are not installed correctly on the device or are missing altogether, the headphones will conflict with the operating system of the player or phone. In this case, they need to be installed. |
| Contamination and moisture ingress | Over the course of months of continuous use (meaning at work, during sports, or other activities), the speakers may become contaminated with earwax, dust, or beads of sweat. And these factors will definitely affect the performance of the gadget. |
The malfunction of one earphone may also lie in a damaged membrane. You, of course, can try to bend it into place, however, you must understand that this phenomenon is temporary, and soon the device will completely fail without the possibility of repairing it. Fact! Poor hearing is more common with earbuds with silicone tips.
Advice from professionals
- When buying cheap headphones, expect a year of service life. Almost no one has them for longer.
- If you are repairing an expensive pair, you will need a good soldering iron with a thin tip so as not to fill everything around with solder.
- Copper, silver, gold - all this is clearly better than tin. Good sound requires good materials.
- Reinforcement of headphones greatly extends their service life.
- You can tin your contacts not only with aspirin. There are many ways. If the reader is repairing expensive studio headphones, you can clean them with a knife, since the thickness of the copper will allow this to be done.
How to solder a wire to a headphone speaker
Let us now consider the situation if the wire breaks inside the speaker or not far from it. Carefully disassemble the headphones. After disassembling the headphones, you will see the usual standard set:
- Speaker;
- Wire coming from the second ear;
- Two wires from the microphone;
- The cord coming out of the headphones.
When disassembling the headphones, try not to tug at them too much, otherwise the wires may come off the board. In this case, you will have to find each wire its place.
1. Next, carefully inspect the headphones for dangling wires. Any dangling wires must be soldered back.
If the wire in the cable breaks somewhere at the base of the speakers, then it will be easier for us to cut it and resolder all the contacts again rather than resolder the wire at the break point. After disassembling the headphones, we proceed according to the following scheme.
If the design of the headphone body does not allow you to easily pull out the cable, then cut it off at the base. The rubber piece of the adapter can be left for strength.
2. Then we prepare the wire itself.
- We retreat approximately 2 cm from the end of the adapter and cut the cable.
- Now we take the end of the cord and cut off the top layer of insulation about 7-8 cm from it.
- After the top layer is removed, remove the inner one, being careful not to touch the wires.
- Now we clean and tin the ends of the wires.
Headphone cables
3. Then we insert the wires into the earphone and solder them one by one in place of the old wires (soldering each one in turn and replacing it with a new one).
4. After soldering all the wires, assemble the earphone in the opposite direction.
Turn it on and check it. If everything works, then good. If not, then disassemble the headphones again and look further - perhaps the contact in the cable has broken somewhere else, for example, on the section of the cable running from the right earphone to the left.
If the wire breaks inside the earphone
After disassembling the headphones, we carefully look at the disassembled earphone.