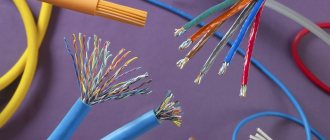
Description and types of SIP
A self-supporting electrical wire consists of several wires isolated from each other (aluminum wire intertwined). When laying new lines in accordance with GOST R 52373-2005, it is necessary to use a self-supporting cable. According to the new PUE rules, these cables are recommended to be used to connect electricity consumers.
Today there are the following types of SIP:
- SIP-1. This is a four-core cable used in three-phase electrical networks with voltages up to 1000 V. Moreover, three of its cores are designed for connecting phases (isolated from each other), and the fourth (zero) is without braid and has a steel core. They also produce SIP-1A cable, in which the neutral core is insulated.
- SIP-2. All cores in this cable are insulated. Its scope of application is the same as that of the cable described above.
- SIP-3. This is a single-core wire with polyethylene insulation. Thanks to the steel core, it is highly durable. It is used in electrical networks up to 35 kV.
- SIP-4. This is a four-core cable with polyethylene insulation, designed for power lines up to 1000 V. It does not have a steel core. It is often used to make branches from the main power line in country houses and in the private sector.
- SIP-5. It includes two or more insulated conductors, all of them without a steel core. This cable is used in electrical networks up to 1000 V.
Knife for stripping insulation from SIP
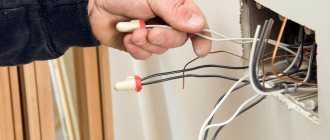
To strip insulation from SIP wires, you can use either an ordinary electrician’s knife or some specialized brands. They easily handle wires with a diameter from 8 to 28mm.
To do this, one circular cut and one longitudinal one are made.
After which the shell easily opens along the longitudinal section.
If the insulation has penetrated tightly between the wires, then, as usual, you will simply have to “shave it off” from the wire. A knife with a heel for SIP is useless, since you simply will not insert it into the space between the conductors and the outer sheath.
Knives for stripping insulation from round cables, type KVT WS-09, can also be used to strip SIPs with minimum cross-sections of 16-25mm2, but not for long. They are not designed for such rigid insulation and the first thing you will break is the fastening of the blades.
There is also such a tool:
- knife DCS BT
Only the price (more than 20,000 rubles) will scare away many who want to buy it.
Moreover, there are both individual knives, and you need to buy them in a set for each section, and an asterisk knife. It is designed for conductors from 16mm2 to 150mm2 inclusive.
Technical characteristics and brands of knives for SIP from Ensto, Niled, KVT:
KWNiledEnsto
KVT
Niled
Ensto
Advantages and disadvantages of using SIP
These wires allow:
- ensure the required electrical safety class;
- increase network reliability during operation;
- reduce the cost of maintaining the electrical network (up to 80%);
- reduce installation time and reduce labor costs;
- place electrical lines on the walls of buildings;
- reduce losses during electricity transmission (due to low resistance);
- connect objects without disconnecting the main supply line;
- lay and connect lines on your own.
Disadvantages of SIP:
- cost 20-25% more than conventional wires without insulation;
- many energy suppliers are not ready to use SIP (outdated equipment and no tools for installation);
- Only overhead power lines can be laid.
Methods of attachment to different surfaces
Walls and ceilings are made from various materials with different structures and densities. Depending on this characteristic, the method of fastening changes:
- Dense - wood in any form, plaster and soft plaster solutions (including gypsum). A nail or self-tapping screw fits perfectly into all these materials. In some - chipboard, OSB and some others - it is better to first drill a hole with a slightly smaller diameter than a self-tapping screw, and then screw it in. Nails are often driven in immediately without pre-drilling. Self-tapping screws are screwed into wood and products made from it. Only for attaching the cable it is better to take them with a flat head
- Solid. This category of materials includes brick, concrete, screeds, and cements. You can’t screw a self-tapping screw into them even with a pre-drilled hole. For such materials, dowel-nails are used (they are also called dowels). This is a fastener consisting of two parts - a plastic dowel cap and a metal (sometimes plastic) screw. In such cases, a hole is drilled in the material with a drill diameter equal to or slightly smaller than the diameter of the dowel. A plastic cap is inserted into the hole. Its top edge should be flush with the surface (if necessary, you can hit it a couple of times with a hammer to level it or cut off the excess with a sharp knife). Then a fastening element (plate, clamp, etc.) is applied, which is attached to the inserted dowel with a screw.
Dowel installation
- Thin or soft. These are plastic, plasterboard, fiberboard, aerated concrete, foam concrete, etc. The usual fasteners do not hold in them; you need a special one, which has an extended “back” part. It has a large support area, due to which the fasteners can be held. Some examples of such fasteners (umbrella, butterfly dowel and dowel with drill) are presented in the photo.
To attach the cable to thin walls, you need special fasteners.
Press and dies
According to the rules, connecting main SIP wires to each other is permitted only with the help of special sleeves. These sleeves can be used to extend SIP even in the middle of the span.
Naturally, for crimping and reliable contact it is necessary to have a hydraulic press (up to 5 tons) and a set of special dies. The connecting sleeves do not have a standard diameter, so the factory dies from the PGR-70-120-150 press will not fit here.
That is, matrices for standard wire cross-sections of 16,25,35,50mm2, etc. here they will not be able to compress the sleeve with the necessary force. You either won’t press it, or the outer insulation of the sleeve will burst, if you choose a cross-section matrix that is less than the calculated one.
To crimp such connectors, three matrix sizes are used:
- 140
- 173
- 210
These numbers mean the distance between the faces of the internal hexagon of the matrices in millimeters - 14mm, 17.3mm, 21mm. The number of the matrix that needs to be pressed is indicated on the wall of the connecting sleeve.
You can read about what rules must be followed, a list of all fittings and materials when connecting SIP wires to each other and to a copper cable:
Press+dies from Ensto, Sicam, Niled, KVT:
KVTSicamNiledEnsto
KVT
Sicam
Niled
Ensto
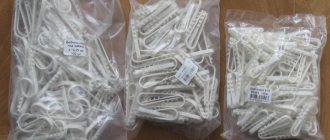
Types of fasteners for SIP
To lay a self-supporting wire, use the following fasteners:
- intermediate support clamps;
- brackets for fastening anchor clamps;
- brackets for fastening intermediate clamps;
- anchor brackets for power consumer wires;
- anchor clamps for insulated load-bearing neutral core;
- anchor clamps for power consumer wires;
- mounting hooks;
- fastening tape (the tape must be made of stainless steel);
- stainless steel clamps;
- stainless steel yokes;
- fastening ties;
- facade fastenings for SIP;
- Spiral knits.
Clamps
Many clamps allow you to attach two self-supporting cables at once. To do this you need to use another clamp. In this case, fastening the SIP will save not only materials, but also free space. Do not use simple cable ties for this purpose. You only need to install clamps for the self-supporting wire - they are wide. In addition, they are made of high-strength plastic, so they are more durable.
Anchor clamps
Using these clamps, SIPs with an insulated load-bearing neutral core are secured. The anchor clamp consists of a body and self-adjusting wedges that allow you to carefully clamp the neutral core. Thanks to the flexible cable, you can install up to three clamps on one bracket.
Facade and pillar brackets
The brackets securely hold the anchor clamps on the facade. They differ in design. When choosing these fasteners, you need to consider the purpose for which the cable is used, because power wires often get very hot (heating of the cores up to 90°C is allowed). Such fittings for fastening SIPs must provide a large gap between the walls and the cable so that it is well cooled.
For installation with tape, use brackets with large limiting projections. During the operation of power lines, a backlash appears in them, which is associated with the stretching of the tape. If these SIP fastening units are on supports with small protrusions, then it can jump off the fastening point.
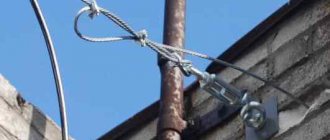
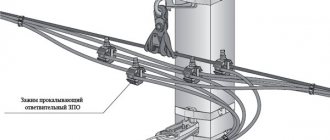
A drawing of an anchor fastening of a self-supporting cable to a reinforced concrete support is shown below.
Buy anchor wedges and intermediate clamps for SIP-2 wire
Anchor and intermediate clamps for SIP-2 wire can be purchased in ours. We sell high quality fittings and equipment for laying power lines. The prices for the products offered are affordable and are among the most attractive on the market. We cooperate with leading manufacturers of goods and equipment for power lines and guarantee the high quality of the products offered.
We offer both domestically produced clamps and those from leading global manufacturers. You can also find anchor and support clamps manufactured by the French company NILED, which meet all advanced quality standards. Our company is the leading official dealer of the plant in the Russian Federation.
All products offered in our store are of high quality and are also covered by a manufacturer's warranty. When making a purchase from us, you can be confident in the safety of using anchor and intermediate clamps for SIP-2 and in their compliance with all regulatory requirements and GOST.
Features of SIP laying
Before installing the SIP wires, prepare the route by clearing the area for installing supports and rolling out the cable. During the preparation process, the old overhead line is removed or a new one is laid next to it, taking into account the dismantling of the old one. Rolling is performed by tightening the wire onto the supports using a special cable. Fastening the SIP to the pole is done using tools and materials for installing the SIP cable.
- unrolling device;
Unrolling device
- bandage tape tensioner;
Band tensioner
- fastening materials;
- line tensioner;
- dynamometer.
Step-by-step installation:
- Install supports.
- Special hooks or brackets are mounted on the supports for mounting SIPs.
- Using equipment, the leader cable is unwound and suspended.
- Stretch the SIP onto the supports and tighten it.
- Attach the cable to supports.
- Arrange linear branches from the main line.
Wire rolling
The installation of SIP begins after installing the VLI supports with clamps attached to them. Anchor clamps are installed on the anchor supports that carry the tension force of the conductors, and supporting clamps are installed on the intermediate supports located between them.
Installation of SIP cable begins with its unrolling. To do this, perform the following steps sequentially:
- Special unrolling rollers are installed on all supports of the anchor span on which the wire is mounted. On the extreme, anchor supports, the rollers are fastened with a belt; on the intermediate supports, the rollers are suspended on a hook in the eyes for supporting clamps;
- A drum with wire is installed behind one of the outer supports of the span. It is located in a vertical position on special stands that allow it to rotate during the rolling process. In order for the wire to enter the roller at a flatter angle, it is recommended to install the drum from the support at a distance not less than its length;
- On the other side of the mounted span there is a drum on which a leader cable is wound, usually a synthetic rope with a diameter of 10–12 mm, depending on the rolling method (manual, mechanized);
- Next, the leader cable is rolled out manually. This operation is performed by sequentially lifting onto each support, threading the cable into the roller and further pulling it;
- After lifting to the last support, the leader cable is connected to the SIP using a special stocking and swivel that prevents the wire from twisting during the rolling process.
Application example and assembly procedure
As an example of the use of nut-type products, a three-phase cable is usually considered, from which wiring with a cross-section of 1.5 mm2 is removed. The correct approach to arranging such a branch involves the following procedure:
- On a cable line with a cross-section of 6 mm2, at the outlet point, the insulation is removed for the length of the connector pressure plate.
- The nut itself is prepared by taking a screwdriver and using it to first pry up and then remove the locking ring on the body.
- The halves of the product are separated.
- You need to unscrew the clamping bolts from the contact plates.
- The protective insulation is also removed from the outlet core with a smaller cross-section to a length corresponding to the size of the pressure plate.
At the final stage of the work, the exposed parts are first tucked into the grooves for the connector dies, and then tightly tightened with screws.
When tightening the screws, do not apply too much force, which could damage the clamp threads. Upon completion of this operation, proceed to assembling the nut body
It is important to distinguish between the two halves, which have four target holes. One of them is simply soldered, the other is intended for outputting the outgoing wire, and two more are for wiring the main cable
Parts of the assembled body are securely fixed with special locking rings.
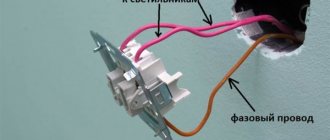
Connection to metering devices
Typically, an electricity meter along with circuit breakers is installed on the outer wall of the house. The connection is made first to the circuit breakers and electricity meter, only then is the cable inserted into the room. To lay SIP from the metering device to the point where the cable enters the house, a solid wire is used. It is fixed on the facade using a mounting hook or other special fasteners.
SIP facade fastenings for brick and wooden houses.
Methods for connecting wires to a support
To connect the SIP wire to current-carrying power lines on a support, several options are used, depending on the power line cable.
For insulated cable lines, special piercing clamps are most often used, which are available in a wide range for various sections and types of insulation. Some clamps can be used without removing the voltage from the line: in their design, the stripping head is made in insulation, which allows you to safely connect the self-supporting insulated insulated insulated wire to the power line. At the same time, the design of the piercing clamps does not allow them to be reused, so everything must be calculated correctly, without any room for error.
But for bare conductors, special clamps are used that have contacts with a smooth surface and do not have piercing elements. When connecting a house to a power line, it is better to coordinate all actions with the energy supply organization. Such organizations may have their own requirements for connections and materials used.
Some “masters” lower the SIP along the pole and lay it underground to the house. But it is important to understand that a self-supporting SIP cable is not intended for such installation, since it does not have special protection from harmful influences and armor from mechanical damage, as a result of which it is intended only for laying in the air.
Separating wedges
A very simple, but very important tool in the construction of SIP lines is insulated wedges for separating individual cores. They are necessary primarily for wires that already have tension on them.
Wedges are used when installing piercing clamps. These devices allow you to safely withdraw and separate the required core by 4-5 centimeters from the common harness. This does not damage the insulation of the remaining conductors.
The use of screwdrivers or open-end wrenches for these purposes is prohibited.
No matter how attentive and careful you are, when installing several dozen piercing clamps in one or several places, damage to the insulation is sure to occur.
Possible installation errors
When installing an input into a house using a SIP cable, difficulties may arise, and in order to avoid mistakes, the most common of them are listed below:
- Weak tension: a dynamometer was not used when tensioning, and installation was carried out “by eye.” This error can lead to increased load on the cable, especially in winter, and its breakage.
- Strong tension: also has a negative effect on the cable, especially its insulation.
- An attempt to reuse piercing clamps: they are disposable, since the head breaks off and re-installation is not possible.
- Damage to insulation during work: It is important to use a solid cable; damage to the insulation may result in a short circuit or electric shock.
- The clamps are not fully secured: the conductors must be correctly and securely fixed in the clamps and not dangle in them. A bad clamp will lead to poor contact, sparking and cable damage.
Methods for connecting aluminum and copper wires
There are many situations in which there is an urgent need to organize such connections. And it is not always possible to quickly and easily replace old aluminum wiring in a house with new copper wiring. If, when trying to connect new electrical equipment, it turns out that the wiring in the house is aluminum, then be sure to use one of the available connectors.
We list the main types of electrical connectors for different conductors:
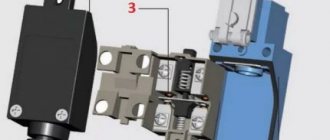
Terminal block (terminal block)
These devices deserve a separate article for consideration, but for now let us draw your attention to the main nuances of their operation. For reliable contact of aluminum and copper conductors in a screw or self-clamping type device, it is necessary to make plates from neutral materials
Alternatively, their surface should be coated with a special paste made exclusively for such actions. This information must be indicated on the label or in the instructions for the product. "Nuts." We wrote about them above. The products got their name due to their structure: the role of the shell is played by a plastic body made of carbolite, the filling is played by clamping plates for good contact. You can use branch clamps without any problems. To begin with, the aluminum conductor line is stripped at the commutation point, after which it is placed in the channel of one of the clamping plates. The copper core of the new equipment is installed in another plate without contact with the external channel. Products with a cross section of 120-150 sq. mm are used mainly by professional electricians, 1.5-4 sq. mm - at home. The piercing clamp is connected directly to the self-supporting insulated wire (SIP) on the main line. It is best to entrust the implementation of such branches to qualified specialists. If you decide to do this yourself, then the device should be connected to the conductors without breaking the insulation (without stripping the cable). Tighten the nut firmly, which will pierce and ensure contact. A homemade connector can be made from one bolt, three brass washers, a nut and electrical tape. To connect aluminum and copper conductors, the area of their direct contact is separated by three washers. This method is considered a temporary connection, but in fact the node will last for several decades.
Security measures
For any electrical installation work, the first and most important thing is to comply with electrical safety rules.
- Do not carry out work in high humidity, fog or during rain, as well as in the dark or at twilight;
- It is necessary to use only certified and reliable tools, cables and fasteners;
- Do not use a damaged cable;
- Do not use fasteners and clamps that are not intended for the type of cable used;
- Work must be carried out strictly using special clothing;
- Live wires are insulated with special overlays;
- Work at height must be carried out by professional installers using machines and mechanisms designed to work near power lines and having the appropriate permit.