Installation of SIP cable from pole to house
It is also important to choose the correct cross-section of the SIP electrical cable. The most common type of self-supporting wire used in residential construction is SIP 4×16.
Securing the wire to the support
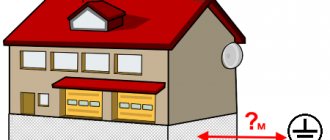
Supply from pole to house
It is important to know that the input cable from the power line to the connection point (electrical panel) should not have breaks or connections, but should be solid.
An important step is also the correct tension of the cable, since excessive sagging negatively affects the durability and reliability of the mounted wire.
SIP wire tension
Methods for connecting wires to a support
To connect the SIP wire to current-carrying power lines on a support, several options are used, depending on the power line cable.
But for bare conductors, special clamps are used that have contacts with a smooth surface and do not have piercing elements.
When connecting a house to a power line, it is better to coordinate all actions with the energy supply organization. Such organizations may have their own requirements for connections and materials used.
Connection to the machine and meter
Sometimes branches from the VVGng copper cable are connected to the SIP cable, using the same piercing clamps, and it is already connected to the switch in the electrical panel or directly to the input circuit breaker (depending on the cross-section of the cable).
What kind of SIP is needed to connect a house?
Which SIP wire should I use? The best option is SIP-4 (4*16) with three-phase input 380V or SIP-4 (2*16) with single-phase 220V.
How SIP-1,2,3,4,5 differ from each other, read in a separate article.
Mistake #2
No suspension cables are required here.
It’s not for nothing that the wire is called self-supporting.
Advantages of SIP
- The conductors are insulated using cross-linked polyethylene, which is weather-resistant.
- The high insulating properties of the wire eliminate accidental electric shock during installation, repair, and operation, and eliminate short circuits due to touching the conductors or breakage.
- Low installation costs due to the ability to run wires along the facades of connected objects, use short supports, organize joint suspension, and the absence of the need to use insulators and traverses.
- Reduced electrical losses due to reduced reactance arising in insulated conductors.
Application of SIP
Completely eliminates the possibility of cable twisting during strong gusts of wind. The wire does not oxidize at the points of fastening and connection. The likelihood of emergency situations is minimal.
During installation, it is necessary to use a wire according to the voltage in the network and the expected load. The SIP is held on the support using a bandage hook. The hook is mounted on the pole using bandage tape. On the wall of the building, another fitting is used, a wall hook with fastening anchor bolts. It is necessary to ensure that the SIP is in good working order. We measure the insulation resistance with an Ohmmeter; we measure the serviceability of the cores and the absence of a short circuit with a multimeter.
In addition, each electrician must have certain uniforms and equipment:
- Canvas or leather mittens
- Dielectric gloves
- Voltage indicator
- Set of tools isolated
- Rope
- Separate wedges
- Montersky belt
- Clamp holder
- Block
- Insulated electrician's knife
How to introduce vultures into the house
The main points of introducing SIP into the house:
- If the cable needs to be led to the entry point into the room along the wall, then to secure it you will need to purchase remote clamps. They allow you to fix the wire on a brick wall or other surfaces at a distance of at least 6 cm from them.
- After introducing SIP-4 into the house, make sure that from the outside it curves down the facade. If it hangs at an angle to the house, then moisture will flow along the surface of the insulation, getting into the protective pipe and into the room. Sealing materials will help prevent water from penetrating inside, but it is better to exclude the possibility of the entry point getting wet.
- Carry out the installation of SIP into the house according to the PUE , and also be sure to coordinate the work with the energy supply company. In addition to the basic rules, they can set their own requirements for the installation of self-supporting insulated insulated wires.
By the way! It will be interesting to know: The main types of clinker tiles for facades, advantages and disadvantages, installation of the installation strip and laying of tiles
Features of SIP laying
Before installing the SIP wires, prepare the route by clearing the area for installing supports and rolling out the cable. During the preparation process, the old overhead line is removed or a new one is laid next to it, taking into account the dismantling of the old one. Rolling is performed by tightening the wire onto the supports using a special cable. Fastening the SIP to the pole is done using tools and materials for installing the SIP cable.
Band tensioner
- Install supports.
- Special hooks or brackets are mounted on the supports for mounting SIPs.
- Using equipment, the leader cable is unwound and suspended.
- Stretch the SIP onto the supports and tighten it.
- Attach the cable to supports.
- Arrange linear branches from the main line.
Preparing to roll out the cable
Special rollers are installed on the supporting and supporting supports. To do this, belts are used on the load-bearing ones, and hooks on the supporting ones. At a distance of at least the length of the support, a drum with wire is placed on the side of the outermost supporting column of the span prepared for rolling out. On the other side of the span, a drum with a cable leader is installed, the diameter of which is selected taking into account the method of rolling out: manual or mechanized, and the wire used.
Pulling SIP wire onto supports
Important. Before installing the poles, you need to secure all the necessary brackets and hooks to eliminate unnecessary work on the pole later.
Pulling the cable leader
A synthetic rope is lifted onto each support. As soon as the leader cable is tucked into the rollers of all supports, it is connected to the SIP cable using a stocking and a swivel. The swivel will not allow the cable to twist while placing the wire on the supports.
Swivel for connecting cable and SIP
Rolling out
By slowly reeling in the leader cable, they begin to lift the SIP onto the supports. As it moves, the wire smoothly rises to the first and subsequent poles, taking the place of the cable on rollers until it stretches over the entire prepared span. During the stretching process, make sure that the cable does not touch the ground or rub against poles and fasteners. You cannot lift SIP from the ground after first rolling it out or rolling it out while moving. But quite often this is what is done.
Attaching to supports
When the cable, together with the cable leader, passes the last support of the span, the SIP is secured in a clamp on the first anchor pole, leaving enough wire for further connection with another span, the supply to the house. Next, the leader cable is disconnected and during installation the wire is secured to all anchor and intermediate supports. The unrolling rollers are removed during the fixation process.
Intermediate clamps for fastening SIP on a pole
Cable termination
Stretch
The tension is carried out using a hand winch. The end of the load-bearing cable core located on the first anchor support in the span is inserted into a special clamp. Using a hand winch, the wire is pulled up, controlling the tension force using a dynamometer. The recommended readings of the measuring device can be found from the SIP installation project or from a special table. It shows the parameters calculated for wires of certain brands, taking into account the length of the anchor span and temperature.
Fastening SIP to the facade of the house
This mount is suitable for all types of facades with a solid base. Including for facades lined with siding or facade panels.
A subscriber branch from the VLI is made from the nearest support of the main line or a linear branch of the VLI, if the support is no more than 25 meters away. If the distance is greater, an additional support is placed at the subscriber's site.
Attaching anchors to the wall of the house and to the pole
Depending on the cross-section, and therefore the weight, of the wires (cable) used for the branch, several options are used for attaching anchors to a wall or support.
Bolt hook. It is screwed into a special dowel, which is driven into a pre-made hole in the wall or support. The hook should be screwed into the main structure of the house, not into the sheathing. Suitable for light branch cables. For wooden structures, a hook with a screw tip is used.
Fastening anchors with through bolted connections to the wall. These are more reliable fastenings of anchors to the wall (see figure A and B).
Fastening anchors to the wall using an opening T-shaped fastening. A hole is drilled in the wall. When closed, the T-bar is a straight bar. After inserting into the hole, the mount opens and is held against the wall by the upper bar of the mount. (See Figure C)
Fastening anchors to the pole with crimping clamps. This is the most reliable way to attach anchors to a support post. The figure clearly shows the girth fastening technology. I will only add that instead of corners and studs, you can use a metal strip with a welded hook for the anchor. (In the figure “Installing anchors on column girths”)
Laying cables along the facade of a building without making a transition
General rules for external installation on the wall of a building:
Minimum distances to elements for horizontal installation:
- above the frames of windows or doors - 30 cm;
- under window frames or balcony platforms (lower plane) - 50 cm;
- above the ground - 275 cm.
Minimum distances to elements for vertical installation:
- to window frames - 50 cm;
- to the edge of balconies or doors - 100 cm.
The minimum distance from the SIP to the wall is 6 cm.
Due to its low fire resistance, this cable should not be attached close to the wall. If the cable catches fire, the fire will not spread to the wall. For installation, special façade fastenings are used.
Important! If, after laying the cable, insulating panels will be mounted on the wall, the distance to the self-supporting insulation insulation is calculated according to the new outer plane, increasing by the thickness of the panels.
What is SIP wire and what are its advantages?
What is SIP wire
SIP stands for “self-supporting insulated wire”. As the name suggests, its main difference from the already familiar wire is the presence of insulation. The material used is light-stabilized cross-linked polyethylene, which, according to manufacturers, is ready to serve for more than 25 years.
At the moment, there are several modifications of this wire on the market. The simplest are SIP1 and SIP 2 wire. They consist of two conductors, one of which, phase, has insulation, and zero is carrier and has no insulation. The only difference between these types of wire is the type of insulation used.
- The SIP 1A and SIP 2A wires have insulated phase and neutral wires. The only difference between them is the type of insulation used.
- SIP 3 wire, which has only one insulated core. It is made using steel-aluminum wire technology, followed by insulation coating.
- But the lowest price is for SIP 4 wire, which does not have load-bearing cores, and all four of its wires are insulated. This was achieved through the use not of aluminum alloys, as in other models, but of pure aluminum. In this case, the SIP 4 wire does not have supporting cores, but is attached to the wire itself.
- Also, SIP 5 wire is made without a supporting core, which is made as a two-core wire. All its veins are insulated.
Advantages of SIP wire
Compared to conventional wire, SIP has many advantages. However, the only disadvantage that can be noted is the higher cost.
In all other respects, it is significantly superior to old aluminum wires.
- Thanks to the presence of insulation, the likelihood of short circuits due to contact of wires during wind or due to the ingress of foreign objects is significantly reduced.
- The presence of special fittings allows you to connect between the SIP wires without removing the voltage. At the same time, the fittings for fastening the wires have breakaway heads that regulate the degree of clamping of the wires.
- The presence of insulation allows you to significantly simplify the process of installing the wire and do it yourself, even for an unprepared person. There is no need to use insulators.
- Another important advantage for energy supply companies is the inability to carry out surges and thus steal electricity. That is why they are increasingly using SIP wire to connect private households.
- An important advantage is the more attractive appearance of the wire. It is this factor that largely becomes decisive when choosing a wire as an input wire for connecting houses.
Laying on the wall
Next, facade fasteners are used. If you purchase factory fittings, the distance is already regulated: at least 6 cm from the cable to the wall.
By the way! It will be interesting to know: Features of paint for concrete facades: which one is better to choose
Then the cable route is marked and holes for fasteners are prepared. The distance between the fastening points is usually at least 70 cm. In bending areas, the frequency of fastening increases to prevent free sagging.
Important! If SIP is used, it is necessary to take into account the requirements for the geometry of the gasket. The bending radius is at least 10 cable diameters.
Then, using standard bolts, all facade fastenings are secured. To prevent corrosion and destruction of fasteners, the metal caps are closed with special plugs.
If house communications are located along the laying route, it is necessary to ensure a safe distance. At least 10 cm to water pipes, at least 40 cm to gas pipes.
Important! It is prohibited to form loose cable loops near metal structures.
Under wind load, the cable can fray the insulation and the wires will short out.
The use of fasteners that are intended for other purposes is not permitted. For example, pipe clamps or cable clips for indoor installation.
Wooden wall
Due to the high degree of flammability of wood, the standards for laying on a wooden wall are much stricter than for brick or concrete. In this case, the following conditions must be strictly met:
- The use of cables with aluminum conductors is strictly prohibited.
- The cable line must be laid in a non-flammable sheath.
- The entrance to the building through the wall must be equipped with a metal sleeve made from a thick-walled pipe.
As a rule, a branch from the power supply network is made with a self-supporting insulated SIP wire with aluminum conductors. The use of aluminum wiring with a flammable sheath for laying on a wooden facade is prohibited, therefore, before attaching the line to a wooden wall, you must connect to a cable with copper conductors using special sealed clamps. When laying a SIP cable, it is prohibited to place it close to the siding; it must be located at a distance of at least 7 cm from the wall, even if the wire is inserted into a corrugated pipe or metal hose.
The wiring can be laid in a metal or plastic cable channel. If there is no threat of mechanical damage, the use of corrugated PVC pipe or metal hose is allowed. When using corrugation, it is very important that the purchased product is equipped with a fire safety certificate. In accordance with the standards, the corrugated pipe fastening step must correspond to the table:
| Corrugated pipe diameter mm | Mounting pitch mm | Corrugated pipe diameter mm | Mounting pitch mm |
| 20 | 1000 | 50 | 1700 |
| 25 | 1100 | 63 | 2000 |
| 32 | 1400 | 75 | 2300 |
| 40 | 1600 | 90 | 2500 |
It is allowed to use a thick-walled pipe as an input bushing, the thickness of the walls of which must correspond to the cross-section of the conductors:
| 4 mm2 | 2.8 mm |
| 6 – 10 mm2 | 3.2 mm |
SIP with carrier neutral up to 1000V
SIP fittings used in the scheme of this network:
Fastening and connection of SIP with cable
Typically used: Cable entry into a transformer substation; cable passages through inaccessible places for pulling high-voltage lines, etc.
It should be taken into account: Type of supports, material of supports (concrete, reinforced concrete, wood); cross section of cable and SIP.
Fastening and connection of SIP with cable
Typically used: Lack of full length of SIP, extension of length
It should be taken into account: Sections of connected SIPs
- MJPT-54 – Zero connecting sleeve
- MJPT-70 – Branch connection sleeve
- CSB – Fastening belt
Intermediate fittings SIP and subscriber branch
Typically used: Branch to subscriber
It should be taken into account: Section of the SIP line, support model
Anchor fittings for SIP subscribers
Typically used: Intermediate suspension in the case of either the length of the line or a change in the direction of pulling SIP
Please note: Vulture section, support model
- LM-50 UZA-L50 – Fastening tape
- A 200 – Clamps
- CA 2000 – Anchor bracket
- PA 25×100 – Anchor clamp
- CSB – Fastening belt
By the way! It will be interesting to know: Installation of facade panels
Fittings for laying SIP on building facades
Typically used: Laying subscriber's SIP along the facade
Please note: Wall material, cable length, fastenings
- CA 2000 – Anchor bracket
- PA 25×100 – Anchor clamp
- BRPF 70-150-1F – Facade mounting bracket
SIP intermediate fittings and re-grounding fittings
Typically used: Suspension of SIP on an intermediate support and connection of the SIP neutral to the grounding descent of the support
It should be taken into account: Section and design of SIP; cross-section of the grounding descent, design (round, flat), material (steel, copper, aluminum); support material (concrete, wood, steel)
- LM-50 UZA-L50 – Fastening tape
- A 200 – Clamps
- ES 1500 – Intermediate kit pendants
- P2X 95 – Hole insulated branch clamp
- CSB – Fastening belt
Intermediate fittings and fittings for the main SIP branch
Typically used: Branching of the main SIP line
It should be taken into account: SIP cross-section, support model
Inserting SIP into a transformer substation
Typically used: Input of SIP into a transformer substation
Please note: Wire cross-section, number of pins
Intermediate SIP fittings for the main line
Typically used: SIP suspension on an intermediate support
It should be taken into account: Section Sip, support model
- LM-50 UZA-L50 – Fastening tape
- A 200 – Clamps
- ES 1500 – Intermediate kit pendants
- CSB – Fastening belt
Intermediate SIP fittings and street lighting connection
Typically used: Suspension of SIP on an intermediate support and connection of street lighting fixtures
It is necessary to take into account: SIP cross-section, lamp wire cross-section, support model
- LM-50 UZA-L50 – Fastening tape
- A 200 – Clamps
- ES 1500 – Intermediate kit pendants
- CSB – Fastening belt
- EP-95-13 – Isolizol branch clamp
Anchor fittings and clamps for connecting SIP to bare wires
Typically used: Connecting a SIP line to a line made with bare wires
It is necessary to take into account: SIP cross-section, bare wire cross-section, support model.
Anchor fittings and clamps for connecting SIP to bare wires
Typically used: Connecting a SIP line to a line made with bare wires
It should be taken into account: SIP cross-section, bare wire cross-section, support model
Intermediate fittings SIP and subscriber branch
Typically used: Subscriber's SIP line branch
It should be taken into account: Section of the SIP supply line, support model
- HEL-5551 – Bolt hook
- PS 495 – Intermediate clamp
- P2X 95 – Insulated branch clamp.
- CSB – Fastening belt
- PA 25×100 – Anchor clamp
Entry into the accounting cabinet
The main question when installing on a facade is where and how to connect SIP? You can, of course, enter the wire directly into the distribution cabinet, but then a headache arises with laying SIP along the facade and, most importantly, with connecting the aluminum conductor to the input circuit breaker.
SIP is a multi-core wire, and according to GOST, such contact connections require the mandatory use of a tip. Without it, in a year you will see a picture like this.
Read how this problem is solved in a separate article.
Spoiler: the simplest and most convenient option in this case is crimping the SIP core with aluminum pin lugs NShA 16-14. Or even better NSHAL (tinned aluminum pin tip).
EKF has these in stock.
Mistake #14
Do not insert SIP aluminum conductors directly into the meter.
In a year or two, the terminals on it will burn out and you will need a new meter.
Moreover, the PUE says that a switching device must be installed in front of the meter.
Many people mount a distribution box high on the facade, in which the wires are actually disconnected and the transition to a copper cable occurs. However, it all looks cumbersome and ugly.
In addition, it is advisable to place a metal box on a wooden base rather than a plastic one. Over the years, plastic dries out and falls apart.
But metal is not a gift at all. Over time, it begins to rust and dirty streaks from it spread across the facade.
Instructions for installing cables on external walls
Firstly, you need to strictly follow the rules of electrical installations, which will affect safety, ease of maintenance and repair work. Secondly, any such actions require a specific project that corresponds to the structure of the future line. The project specifies all the architectural elements of the facade and the route for laying the electrical cable.
Brick and concrete walls
The protection of the cable laid along the facade depends on the quality of the specific section of the wall. Installation can be done using corrugated pipe or steel casings. The wire placed inside such protective elements should not cause the spread of moisture, fire and smoke to different parts of the house.
When installing power and low-current cables together, a number of rules must be observed:
- Use additional protection on all dangerous areas of the wall. Armored cable is required wherever fire is possible.
- Make sure that there is a complete seal at all areas where the cable enters the walls. It is important to maintain sealing of openings, boxes and pipes.
- Use a special sleeve to insert the cable into the wall. It is necessary to seal the space between it and the wire.
- Observe certain standards when making a hole in the wall.
- Protect the electrical network with corrugation.
Corrugated cable on a brick facade
The first step is to decide where the hole will be made in the wall. Its diameter depends on the dimensions of the electrical wire and corrugated pipe. When choosing a sleeve, you should leave a small margin so that the wire in the corrugation passes freely through the pipe. The cable should be pulled along the wall in grooves. For brick and concrete walls, you can use a wall chaser, hammer drill or grinder. Each of the listed tools has its own advantages and disadvantages, but choosing any of them will solve the problem.
Wooden walls
Wooden walls are not a death sentence, and wiring can be laid through them in both open and closed ways. However, qualified craftsmen prefer to use the open option. Its advantages are increased safety and accessibility of any part of the line. The latter will ensure simplicity and efficiency of repair work, maintenance, modernization or replacement of wiring.
Modern cable channels provide everything you need for this: they have a variety of dimensions, shapes and design solutions. Open wiring along the facade of a building using such boxes will look aesthetically pleasing and neat.
Inserting a SIP cable into a wooden house
The first step of installation work is the installation of all elements of the electrical network. These include circuit breakers, lamps, switches, sockets and boxes located inside the room bordering the street. Each element must be connected using a cable channel, and then an electrical wire must be laid in it. For a wooden house, it is important to use a cable with double insulation that does not support combustion and does not emit smoke when exposed to fire.
What you should pay attention to when installing cables on wooden walls:
- Non-combustible insulation is used. Buy a cable of a brand that meets the standards for laying on wooden surfaces.
- Either tubular or metal channels are attached to wooden walls. Installation of armored wire is possible. The installation of corrugated plastic pipes is prohibited.
- To fasten metal cable channels, bolted fasteners are used.
- Metal parts must be grounded.
Laying cables on a wooden wall
Siding panels
Country houses are often assembled from siding panels. The latter are flammable materials, so laying electrical wiring along such walls is accompanied by strict adherence to safety rules and regulations. Ideally, the wiring should be laid on the building frame before the sheathing is completed. In this case, the electrical network will be hidden under the siding and will be considered closed. An alternative option, if the walls have already been rebuilt, is to remove part of the siding to secure the wiring to the frame. This is a labor-intensive and sometimes completely impossible process.
To secure SIP wiring to concrete or brick walls, you need to use a special device SF-10. The dimensions of its ring will allow you to effortlessly fix an electrical wire with a diameter of up to 25 mm. The maximum permissible distance of the ring from the wall surface is 10 cm. In accordance with the rules and regulations, installation of wires close to siding panels is strictly prohibited. The distance between the wire and the wall must be at least 7 mm. Thus, the SF-10 will greatly simplify the task of complying with regulations.
Wiring outside walls under siding
To fasten siding panels to a wooden frame, you need to use special screws in the form of a half ring or hook. They are easy to use and will also allow you to quickly secure the electrical wire without the need to use brackets. Despite the fact that the wiring is carried out from the wall to the distance indicated above, it must be hidden in metal pipes or sleeves. In order not to disturb the architectural style of the house, it is recommended to lay lines parallel to the structures and bends.
Methods and rules for laying HDPE pipes
- It is not recommended to lay cables of different networks in the cavity of one protective channel.
- Do not bend the pipe at an acute angle, as this may lead to the formation of a crease.
- The joints between the pipes must be sealed. Individual products can be connected using compression couplings, press fittings or butt welding.
- The length of the section between the boxes should not exceed 25 meters.
- When laying openly outside the building, black HDPE corrugation, resistant to ultraviolet radiation, should be used.
- To ensure the drainage of condensate formed on external surfaces, the pipelines must have a slope directed towards the duct boxes. Moisture will collect in them.
- When the channel is buried more than 2 meters into the soil, it is necessary to place a protective concrete screed 8–10 cm thick on top.
Laying pipes inside buildings
Installation of cable channels inside buildings is carried out in the following order:
- Cable routing markings.
- Punching grooves in the building envelope (if necessary).
- Connecting individual HDPE pipes into a pipeline and fixing them. To fasten products to walls or ceilings, special holders with a latch are used; to the floor, metal brackets are used.
- Sealing of the structure depending on the location of the channel and its diameter. To seal the walls, use plaster or other finishing materials. Pipelines laid in the floor are poured with concrete.
- Cable pulling. The wire inside the plastic pipeline should be positioned freely, without tension.
Laying outdoors in a trench
The process of laying HDPE pipes for cables in the ground consists of the following steps:
- marking the dimensions of the trench;
- trench excavation and bottom leveling;
- laying out pipes along the trench;
- backfilling the base of the ditch with sand or soft soil 10 cm;
- sequential laying of pipe sections with sealing of joints by resistance welding;
- checking the integrity of the cable sheath and pulling it into the pipe cavity without tension;
- backfilling the finished pipeline with soft soil or sand with a layer thickness of 10–15 cm;
- backfilling the trench with soil.
So that the laid route can be found in the future, signal posts are placed above it. When installing cables underground, fittings cannot be used to connect parts of a polyethylene pipeline. They can break its tightness.
Trenchless method of laying in the ground
In cramped conditions of private courtyards or dachas, where it is not possible to dig a trench, a trenchless cable laying method is used. To do this, special equipment is used that allows you to drill the soil in a horizontal direction. Before starting work, you need to obtain a drilling permit and perform an analysis of the geological composition of the soil.
Expert opinion
Viktor Pavlovich Strebizh, lighting and electrical expert
Any questions ask me, I will help!
After the cable has appeared on the back side of the corrugation, it is fixed, for example, with electrical tape on both sides so that it does not jump into the corrugation again. If there is something you don’t understand, write to me!
Which corrugation to choose
To figure out which corrugated pipe to buy: HDPE or PVC, let’s look at typical applications for different types of corrugation.
- Laying external wiring in a wooden house.
- For connecting electrical wiring of lamps in suspended ceilings and behind plastic and gypsum board panels.
- Electrical installation in the bathhouse, bathroom and other places with high humidity.
- It is the most common and is most often used when installing in an apartment or house.
- For outdoor use, but provided that direct sunlight is minimized.
HDPE or LDPE, including double-layer ones, are suitable for laying cables in the ground (in a trench) and on the street.
Metal hoses are used for laying wires and cables in places with an increased likelihood of mechanical damage. Can be used in explosive areas. There are options with flanges at the ends and a sealing layer - for use in damp places. Therefore, it is impossible to clearly say which is better; each corrugation has its own application.
An important point is the correct choice of the diameter of the corrugation for the cable. To lay a cable in this way, it must fit into a corrugated pipe, and sometimes it is necessary to lay several wires in one pipe. For one wire you need:
What kind of lighting do you prefer?
Built-in Chandelier
The table below shows the outer diameters of popular cable products.
For example, to lay electrical wiring from one VVG 3x4, you need a corrugation with an outer diameter of 20 or 25 mm, and for VBBShV 3x6 - 25-32 mm.
Whereas to lay several wires you need to use the following algorithm:
You need to lay electrical wiring to connect several powerful spotlights, there is a 2x2.5 PVA wire, how many of them will fit in a PVC corrugation with a diameter of 50 mm?
Based on the tables above, we determine the outer diameter of the wire and the inner corrugation:
It follows that up to 6 PVS 2x2.5 wires can be inserted into a 50 mm corrugation.
Now you know how to choose a corrugated cable, as well as what sizes and types of products exist today. Finally, we recommend watching useful videos on the topic:
Branch clamps for SIP - technical characteristics and scope of application
SIP wires (self-supporting insulated wire) are used everywhere. They make it possible to provide electricity to residential buildings, public and industrial enterprises, withstanding even extremely high loads of up to 35 kilowatts. SIP is just a “wire”.
Expert opinion
Viktor Pavlovich Strebizh, lighting and electrical expert
Any questions ask me, I will help!
They make it possible to provide electricity to residential buildings, public and industrial enterprises, withstanding even extremely high loads of up to 35 kilowatts. If there is something you don’t understand, write to me!
Stages of work on connecting SIP
Connecting SIP to the main line
The SIP outlet is connected to the main wires of the VLI using piercing clamps. The design of the clamps is such that there is no need to strip the wire insulation. The wires are inserted into two clamp sockets and tightened with a common bolt.
In the figure you see the connection of the outlet to the house from the intermediate support.
Video: Installation of branch clamps
Note: A panel with a metering meter can be installed on the support. To do this, it will have to be lowered for visual inspection by inspection authorities, and a window must be provided in the shield. The meter can also be installed on the facade of the house, there are no restrictions.
Connecting SIP at home
There are two options for connecting your home:
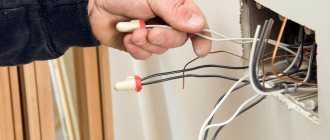
The photo shows the existing electrical connection to the house.
An old rusty gander with two porcelain insulators (the voltage in the house is single-phase 220 Volts), the insulation of the aluminum wires had cracked over time and was exposed in places, the gander itself somehow stayed on the wall of the house, and at that time the wires to the house posed a great danger.
First of all, to replace the old wire with a new 2x16 SIP wire, he went to the “Customer Service Center” of the electrical network company , to whose networks his house is connected; they are the ones who service, connect and repair electrical lines and wires to the house. Contacts and addresses of service centers can be found on their websites of IDGC-Center OJSC (Kursk, Oryol, Belgorod, Bryansk and other regions of the central region).
Moreover, since March 2014, by registering on the website of the electric grid company, you can apply for various services (technological connection, installation and sealing of the electric meter) through your Personal Account, without leaving your home.
Also, each network company must publish on its website the so-called “Service Passport” , which indicates the client’s procedure for receiving the service. For example, this one (may have become outdated since the article was written, so look for what is current at the moment).
Types of fasteners for SIP
To lay a self-supporting wire, use the following fasteners:
- intermediate support clamps;
- brackets for fastening anchor clamps;
- brackets for fastening intermediate clamps;
- anchor brackets for power consumer wires;
- anchor clamps for insulated load-bearing neutral core;
- anchor clamps for power consumer wires;
- mounting hooks;
- fastening tape (the tape must be made of stainless steel);
- stainless steel clamps;
- stainless steel yokes;
- fastening ties;
- facade fastenings for SIP;
- Spiral knits.
Clamps
Many clamps allow you to attach two self-supporting cables at once. To do this you need to use another clamp. In this case, fastening the SIP will save not only materials, but also free space. Do not use simple cable ties for this purpose. You only need to install clamps for the self-supporting wire - they are wide. In addition, they are made of high-strength plastic, so they are more durable.
Anchor clamps
Using these clamps, SIPs with an insulated load-bearing neutral core are secured. The anchor clamp consists of a body and self-adjusting wedges that allow you to carefully clamp the neutral core.
Thanks to the flexible cable, you can install up to three clamps on one bracket.
Facade and pillar brackets
The brackets securely hold the anchor clamps on the facade. They differ in design. When choosing these fasteners, you need to consider the purpose for which the cable is used, because power wires often get very hot (heating of the cores up to 90°C is allowed). Such fittings for fastening SIPs must provide a large gap between the walls and the cable so that it is well cooled.
For installation with tape, use brackets with large limiting projections. During the operation of power lines, a backlash appears in them, which is associated with the stretching of the tape. If these SIP fastening units are on supports with small protrusions, then it can jump off the fastening point.
A drawing of an anchor fastening of a self-supporting cable to a reinforced concrete support is shown below.
Cable laying conditions
- installation is carried out at a temperature not lower than -200C;
- the route is planned and cleared so that the SIP does not touch trees, concrete or metal structures;
- It is not allowed to drag the cable along the ground.
Installation procedure:
When installing branches, connect SIP-4 to the main line using a special piercing clamp. When screwing the bolt, a contact plate with teeth pierces the insulation and is embedded in the material of the conductive core, ensuring reliable contact. The bolt is screwed in until the head comes off.
The piercing clamp is sealed, so it is not threatened by atmospheric moisture.
| voltage 380V (3-phase load) | voltage 220V (1 phase load) | |
| SIP 4x16 | 62 kW | 22 kW |
| SIP 4x25 | 80 kW | 29 kW |
| SIP 4x35 | 99 kW | 35 kW |
| SIP 4x50 | 121 kW | 43 kW |
| SIP 4x70 | 149 kW | 53 kW |
| SIP 4x95 | 186 kW | 66 kW |
| SIP 4x120 | 211 kW | 75 kW |
| SIP 4x150 | 236 kW | 84 kW |
| SIP 4x185 | 270 kW | 96 kW |
| SIP 4x240 | 320 kW | 113 kW |
Standard sizes
The flexibility of the corrugation and its stability depend on the thickness of the walls and the material from which it is made. The conditions under which it can be used depend on the materials used.
Expert opinion
Viktor Pavlovich Strebizh, lighting and electrical expert
Any questions ask me, I will help!
The current-carrying wires in the structure are twisted around a neutral carrier wire; silanol cross-linked polyethylene is used as insulation, which has the property of repelling light and can withstand temperatures up to 90 degrees. If there is something you don’t understand, write to me!