Author: Pavel Gotseyuk
25 June 2016 10:55
Tags: LED lighting Lighting in a quarters sample for an LED home DIY home light DIY LED strip at home
10784
19
How I made LED lighting at home and what was needed for it
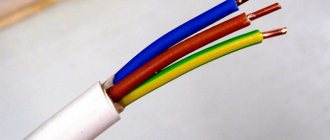
Greetings dear Fishkians. I have been a reader of the site for a long time, but I decided to write for the first time. Whether you kick or not is up to you, but I ask you not to break the post. There will be 19 photos. I didn’t photograph everything, so some photos are from the Internet. So. On the occasion of the renovation, I wanted to install LED lighting in the hall. But not the currently fashionable niche lighting, but rather basic lighting. I figured out what this would require. You will need the following: 1. LED RGB strip. 2. Power supply. 3. Amplifier. 4. Controller. 5. 4-wire wire. 6. Aluminum profile. 7. A pair of hands, or better yet all four.
Arrangement of “starry sky” lighting
To make the interior unusual, use this solution. To implement it, single LEDs of different luminescence intensities will be required. The entire circuit must be connected only through the power supply, as in the case of the tape.
The installation process requires some effort, but the result is worth it. Main stages of work (provided that the ceiling is plasterboard):
- a slab is cut out that follows the dimensions of the ceiling niche, as well as a transparent or translucent plate of appropriate dimensions for installation on the front side;
- wires are connected;
- the finished structure is mounted under the ceiling in a niche.
You can make this solution even more interesting by gluing an image of the sky onto a transparent plate. This will add realism to the “starry” ceiling.
Adviсe
To complete the work of making a lamp successfully, we have collected the most practical tips that will definitely come in handy:
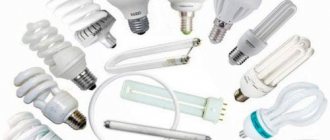
The use of energy-saving lamps is recommended for the product. Why is it undesirable to use conventional ones? They increase the risk of overheating and fire, so if you want to use incandescent lamps, you will have to constantly monitor the condition of the lamp and also buy a fire extinguisher.
You can use old garlands left over from the New Year as decoration. The lighting they create will add coziness to the room.
To create new lighting items, you can modify old lampshades and lamps that everyone probably has lying around.
Lamps can be used to diffuse light and correct the interior, but we strongly recommend avoiding the opposite effect: hiding the light.
Lamps made of textiles and threads
To create a lampshade, you can use old clothes: jeans, knee socks, damaged dresses, etc. The products are decorated with bows, pockets, threads with beads. In almost all cases, the fabric must be placed on some kind of frame. You can also make it yourself. It is better to choose metal, sometimes wood, as a material. The basis for a homemade fabric chandelier can be factory lamps, both new and old. The fabric of a regular old lampshade can be removed and replaced with a modern one with stylish patterns. To create and decorate homemade chandeliers, threads of different thicknesses are used. They wrap various jars and frames, connect parts of the lamp and hang the structure. Lampshades made from hardened threads look interesting. In addition to them, twine or ropes are also used. They go well with different fabrics and papers.
Master class: spherical lamp made of threads
To create this product you will need:
- The base is from a table lamp.
- Glue.
- Thick threads (up to 4 balls).
- Air balloons.
First, the balloons are inflated. It's better to have several, because they can burst. Their shape should be perfectly round. On each of them, a ten-centimeter circle is drawn with a felt-tip pen. A stand with a light bulb will be inserted through a hole of this size. The ball is placed on oilcloth. An adhesive solution is being prepared. You need to wear rubber gloves on your hands to dip the threads into it. When they are saturated with the solution, they are taken out; then the glue clumps are removed. The end of the thread is tied to the knot of the inflatable ball. After this, it is wrapped around the entire ball; this must be done evenly over the entire surface, but chaotically. It is advisable to use several threads of different colors. The ball is then suspended until the structure dries. Then they burst it and cut off the knot. The ball is removed through a large hole, into which you will then need to insert a socket with a light bulb.
DIY fabric lampshade
You will need thick paper, glue, fabric, threads to match the color of the fabric, pins, ruler, pencil, iron. You will need to make a template to calculate the required amount of fabric. If the frame for the lampshade should have a cylindrical shape, then measure the circumference and height and alternately draw the corresponding lines, creating a right angle. The opposite sides of the rectangle are drawn. The desired shape is cut out of paper. It is applied to the fabric. From it you need to get a larger rectangle. It is cut after the desired fragment is selected. Then the material is secured to the template with pins (its edges need to be folded). After this you need to use a sewing machine. The treated fabric is ironed. After this, it is glued to the base. Unprocessed sections are hidden. The seam is made so that the base is covered by the stitched edge.
Advantages of LED lighting
• Energy efficient (with low power consumption it gives maximum output. The efficiency in this case is almost 90%) • They work for a long time (the operating life of LEDs is stated to be approximately 10 years, which is significantly higher than other light sources) • Robust construction (which means they are not at all shocks or constant vibration are scary) • Wide range of colors (LEDs can produce not only white or yellow light, but also many others) • LED lighting can be adjusted by changing the brightness and color • Safe for health (does not contain any harmful substances, and does not produce infrared and ultraviolet rays)
Precautionary measures
When working with electrical products, it is important to follow safety precautions. First of all, you need to carefully consider the choice of power supply. It must have a safety margin for load. It must also meet the operating conditions. The device must not be placed in a damp room or outdoors without a high degree of sealing.
It is also worth noting that for every 5 meters of tape there should be 1 power source.
Do not place mechanical stress on the device. Bends and pressure can lead to rapid failure.
When operating the tape, it is important not to exceed the permissible power supply and temperature conditions. Increased voltage leads to premature failure of the device. High temperatures also negatively affect LED crystals, leading to their degradation.
If you have no experience with installing LED strips, it is better to entrust the installation to a specialist. Incorrect installation may result in equipment failure.
How to make lighting in a house or apartment with your own hands
To create LED lighting, you need to develop a plan for placing light sources. It is necessary to take into account the size of the rooms and work areas. You also need to understand what function the light will perform. After determining the basic requirements, you should purchase the necessary equipment and begin installation.
Required components
First of all, you need to purchase the necessary components. The master will need an LED strip, a power source, a regulator, and a switch. The RGB product will also require a remote control.
LED Strip Light
The tape is usually sold in 5m reels. You first need to determine what length is required, what type is needed - monochrome or multi-color, and the density of the diodes. It is imperative to determine in which room this or that source will be installed. The choice of moisture protection class depends on this - without protection, with a medium and high degree of protection from water.
PWM regulator
PWM controllers are used to control the brightness of the tape. The device must be of high quality, otherwise flickering will be noticeable, which can cause eye fatigue and headaches.
Remote controller
RGB requires a dimmer with a remote control. It allows you to control the backlight shade, intensity, and focus.
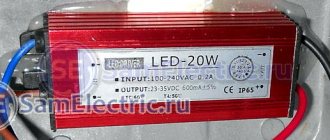
power unit
The power source is the most important element; without it, the tape will not work. It converts the voltage in a 220 Volt outlet into the necessary power for 12 or 24 Volt LEDs. Power supplies can be sealed, semi-sealed or non-sealed - the choice depends on the microclimate in the room.
Installation of LED lighting for a room
After preparing the necessary components, you can proceed to installation. You can make the connection yourself or call a specialist.
Necessary tool
For installation you will need the following tools:
- LED strip with a full set of components;
- soldering iron;
- electrical tape or heat shrink tubing;
- knife or scissors;
- roulette;
- cables;
- Double-sided tape;
- profile.
A drill and staples may also be required.
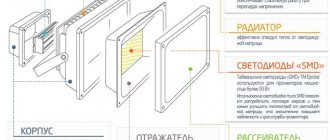
Connection diagram
LED strips are installed in an aluminum profile.
It performs the function of removing heat from light sources. For lighting with low power, which is used for decoration, insulation is not necessary. How to do the installation:
- cut the required length from the tape;
- strip the outer conductors by 1.5 cm;
- solder 2 cables;
- insulate the connection point;
- glue the ICE tape to the profile using double-sided tape;
- install the power supply nearby, connect it to the tape, observing the polarity (especially important for RGB products);
- hide the wires in a plastic box;
- connect the switch.
Next, the functionality of the assembled circuit is checked.
Wi-Fi bridge
Photo of the bridge
In principle, a W-iFi bridge for a lighting system is not necessary, but is a nice addition. With it you can control the light from your phone/tablet/computer/server, etc. Wi-Fi bridge from the same manufacturer as the controller with remote control. Again, no complaints about the quality. A small minus is that the kit does not include a power supply, but there is a cord and any phone charger will be suitable for power. Another unpleasant surprise was the software provided, it is working, universal, but it seemed to me absolutely inconvenient to use. I had to spend a couple of evenings and write my bike play.google.com/store/apps/details?id=com.uncle.george.homelight
Lamps made of metal pipes and tubes in loft style
Non-functioning water pipes with taps can be mounted into a single structure, equipped with light bulbs and thus create a stylish and useful thing. It is better to place it on the wall. This is a very popular finishing element in the loft style. Lamps in the steampunk style are created from large and small pipes. These are complex designs; they cannot be made without special training. However, it is possible to design a small robot with a “head” shaped like a light bulb. Beautiful ceiling chandeliers are made from pipes. In addition, there are various models of lamps made of metal pipes. The material often used is brass. Chandeliers are created in the form of compositions from several tubes. Pipes, as a rule, are made in one piece, but lamps with various patterns and openings are also produced. They are not inferior in popularity to lamps in the loft style.
Chandelier made of brass tubes
You can make a beautiful product in the form of diamond faces. In addition to the pipes themselves, you will need sandpaper, a jigsaw, twine or wire, and gloves. To create an original chandelier you will need 20 pipes: 10 short (6 cm), 5 medium (12 cm) and the same number long (25 cm). You need to find several long pieces, mark them and cut them with a jigsaw. After this, you need to start sanding with sandpaper so that the edges of the tubes are perfectly smooth. Then the fragments are collected onto thick wire or twine. First, horizontal rows are created: the bottom of five short ones and the middle one of the same number of medium tubes. Then they are connected by five more short tubes. The upper part of the structure is made of five long fragments that need to be combined with the already prepared part. Long pipes do not come together completely; the cartridge must be secured in this place.
Lamps made from plumbing pipes
It is necessary to prepare such devices as an electrical cable, electrical tape, adhesive tape, various screwdrivers, two-core wire, cartridges, hinges, fittings that match the parameters of the pipes. One of the tubes should be larger - it will serve as an attachment to the ceiling. The assembly process is quite complex. You need to create a diagram on paper, and only then get down to business. At this stage, the design configuration is determined. The splitters must be connected correctly. All parts of the structure being prepared can be polished and painted. It is better to give preference to white, red, gold and black colors. You need to wait about a day for everything to dry completely. After this, all the pipes are assembled together. Light bulbs are screwed onto them. The last stage is connection. Since the scheme is complex, it is better to invite a specialist.